ISO 1101:1983/Ext 1:1983
(Main)Technical drawings — Geometrical tolerancing — Tolerancing of form, orientation, location and run-out — Generalities, definitions, symbols, indications on drawings — Extract 1: Toleranced characteristics and symbols — Examples of indication and interpretation
Technical drawings — Geometrical tolerancing — Tolerancing of form, orientation, location and run-out — Generalities, definitions, symbols, indications on drawings — Extract 1: Toleranced characteristics and symbols — Examples of indication and interpretation
Dessins techniques — Tolérancement géométrique — Tolérancement de forme, orientation, position et battement — Généralités, définitions, symboles, indications sur les dessins — Extrait 1: géométrique — Caractéristiques à tolérancer et symboles — Exemples d'indication et d'interprétation
General Information
Relations
Standards Content (Sample)
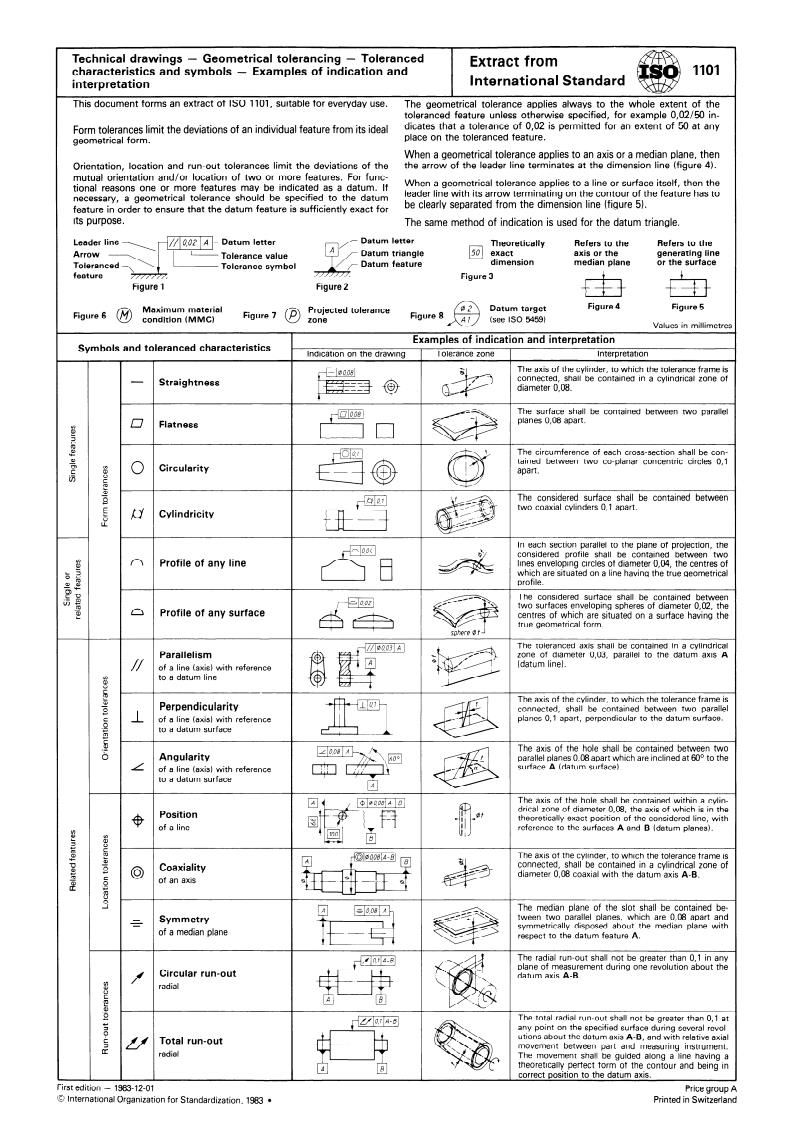
This document forms an extract of ISO 1101, suitable for everyday use.
The geometrical tolerante applies always to the whole extent of the
toleranced feature unless otherwise specified, for example 0,02/50 in-
dicates that a tolerante of 0,02 is permitted for an extent of 50 at any
Form tolerantes limit the deviations of an individual feature from its ideal
place on the toleranced feature.
geometrical form.
When a geometrical tolerante applies to an axis or a median plane, then
the arrow of the leader line terminates at the dimension line (figure 4).
Orientation, location and run-out tolerantes limit the deviations of the
mutual orientation and/or location of two or more features. For func-
When a geometrical tolerante applies to a line or surface itself, then the
tional reasons one or more features may be indicated as a datum. If
leader line with its arrow terminating on the contour of the feature has to
necessary, a geometrical tolerante should be specified to the datum
be clearly separated from the dimension line (figure 5).
feature in Order to ensure that the datum feature is sufficiently exact for
its purpose.
The same method of indication is used for the datum triangle.
Datum letter
Refers to the Refers to the
generating line
axis or the
median plane or the surface
Figure 3
Figure 4
Figure 5
Maximum material
condition (M MC)
Values in millimetres
Examples of indication and interpretation
Symbols and toleranced characteristics
Indication on the drawing Tolerante zone Interpretation
The axis of the cylinder, to which the tolerante frame is
connected shall be contained in a cylindrical zone of
- Straightness
fs* @ & diameter 0108.
The surface shall be contained between two parallel
planes 0,08 apart.
fl Flatness
z
Cl
2
The circumference of each Cross-section shall be con-
tained between two co-planar concentric circles 0,l
two coaxial cylinders 0,l apart.
Profile of any line
Profile of any surface
centres of which are situated on a surface having the
true geometrical form.
The toleranced axis shall be contained in a cylindrical
zone of diameter 0,03, parallel to the datum axis A
of a line (axis) with reference
Perpendicularity
of a line (axis) with reference
to a datum surface
The axis of the hole shall be contained between two
parallel planes 0,08 apart which are inclined at 60° to the
surface A (datum surface).
The axis of the cylinder, to which the tolerante frame is
connected, shall be contained in a cylindrical zone of
diameter 0,08 coaxial with the datum axis A-B.
of the slot shall be contained be-
planes, which are 0,08 apart and
sed about the median plane with
Circular run-out
un-out shall not be greater than 0,l at
specified surface during several revol-
datum axis A-B, and with relative axial
een part and measuring instrument.
along a line having a
ontour and being in
First edition -
...

Questions, Comments and Discussion
Ask us and Technical Secretary will try to provide an answer. You can facilitate discussion about the standard in here.