ASTM D3917-96
(Specification)Standard Specification for Dimensional Tolerance of Thermosetting Glass-Reinforced Plastic Pultruded Shapes
Standard Specification for Dimensional Tolerance of Thermosetting Glass-Reinforced Plastic Pultruded Shapes
SCOPE
1.1 This specification defines tolerances applicable to standard rods, bars, and shapes pultruded from thermosetting glass-reinforced plastics.
1.2 These dimensional tolerances apply to all shapes specified as "standard" by the pultrusion industry.
1.3 Custom shapes and products designed for special applications shall carry specific tolerances that may vary from the standard because a change in type or amount of reinforcement used in a composite directly affects dimensions. The tolerances may be wider or closer than associated with "standard" shapes.
1.4 The following safety hazards caveat pertains only to the test methods portion, Section 4 of this specification: This standard does not purport to address all of the safety concerns, if any, associated with its use. It is the responsibility of the user of this standard to establish appropriate safety and health practices and determine the applicability of regulatory limitations prior to use.
Note—There is no similar or equivalent ISO standard.
General Information
Relations
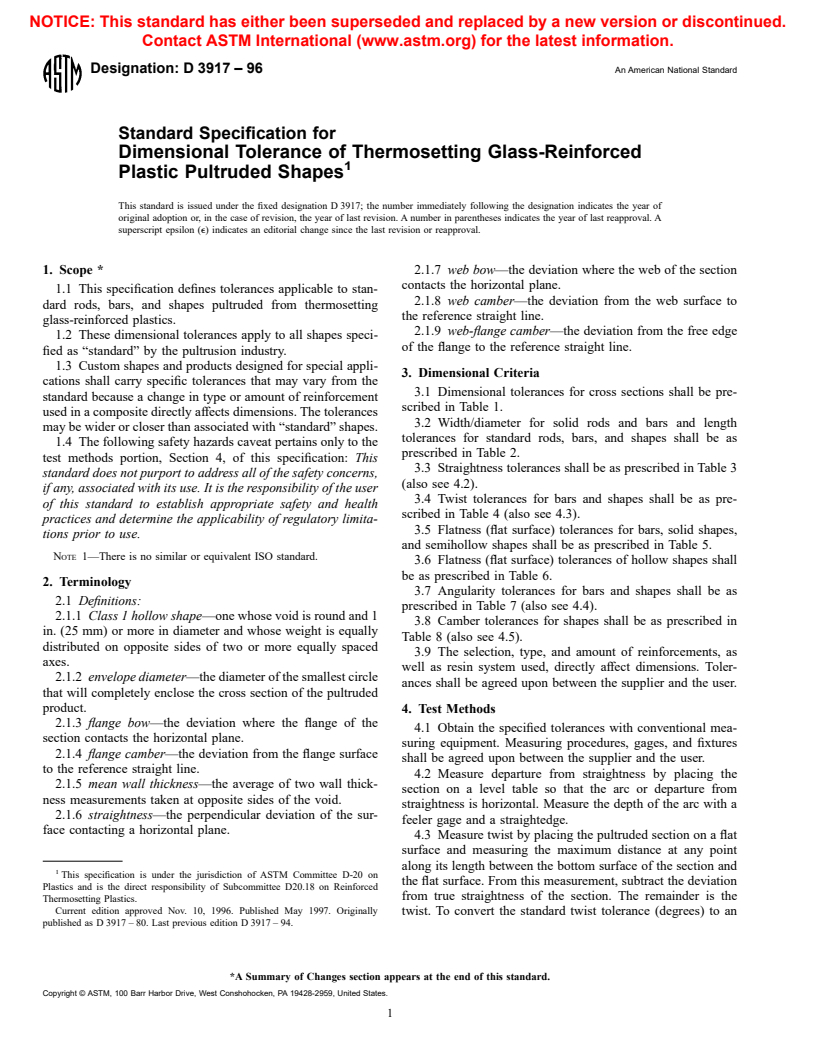
Standards Content (Sample)
NOTICE: This standard has either been superseded and replaced by a new version or discontinued.
Contact ASTM International (www.astm.org) for the latest information.
Designation: D 3917 – 96 An American National Standard
Standard Specification for
Dimensional Tolerance of Thermosetting Glass-Reinforced
Plastic Pultruded Shapes
This standard is issued under the fixed designation D 3917; the number immediately following the designation indicates the year of
original adoption or, in the case of revision, the year of last revision. A number in parentheses indicates the year of last reapproval. A
superscript epsilon (e) indicates an editorial change since the last revision or reapproval.
1. Scope * 2.1.7 web bow—the deviation where the web of the section
contacts the horizontal plane.
1.1 This specification defines tolerances applicable to stan-
2.1.8 web camber—the deviation from the web surface to
dard rods, bars, and shapes pultruded from thermosetting
the reference straight line.
glass-reinforced plastics.
2.1.9 web-flange camber—the deviation from the free edge
1.2 These dimensional tolerances apply to all shapes speci-
of the flange to the reference straight line.
fied as “standard” by the pultrusion industry.
1.3 Custom shapes and products designed for special appli-
3. Dimensional Criteria
cations shall carry specific tolerances that may vary from the
3.1 Dimensional tolerances for cross sections shall be pre-
standard because a change in type or amount of reinforcement
scribed in Table 1.
used in a composite directly affects dimensions. The tolerances
3.2 Width/diameter for solid rods and bars and length
may be wider or closer than associated with “standard” shapes.
tolerances for standard rods, bars, and shapes shall be as
1.4 The following safety hazards caveat pertains only to the
prescribed in Table 2.
test methods portion, Section 4, of this specification: This
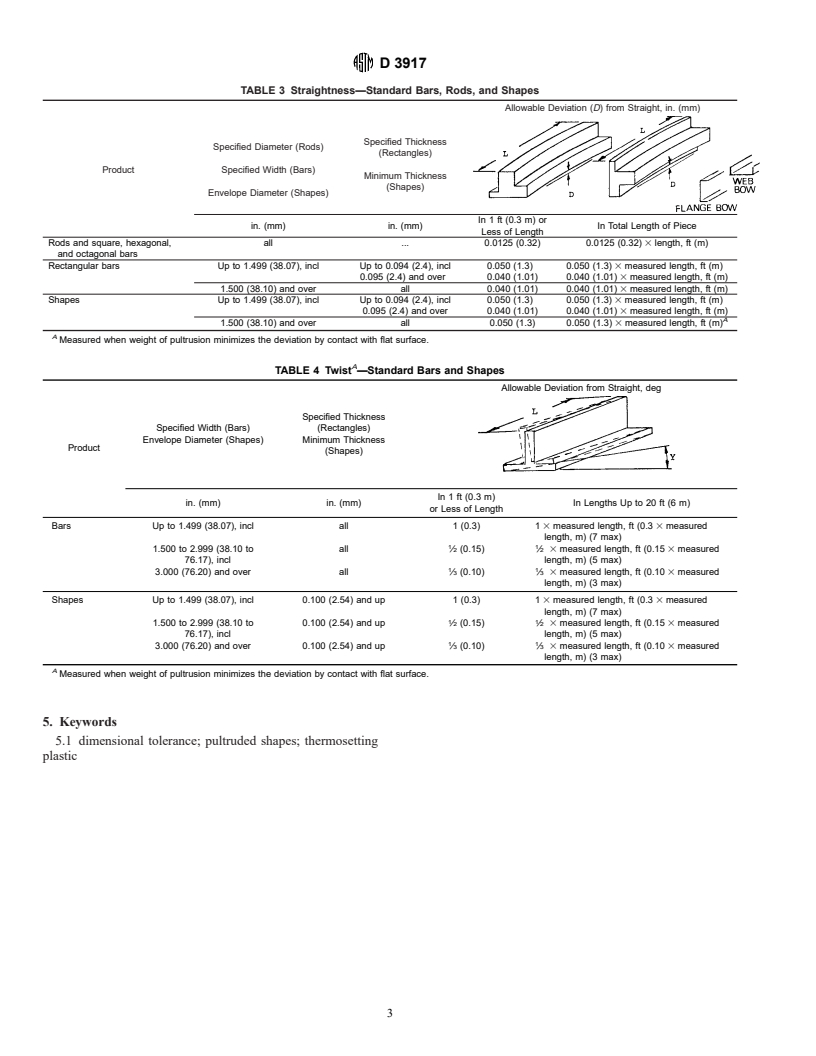
3.3 Straightness tolerances shall be as prescribed in Table 3
standard does not purport to address all of the safety concerns,
(also see 4.2).
if any, associated with its use. It is the responsibility of the user
3.4 Twist tolerances for bars and shapes shall be as pre-
of this standard to establish appropriate safety and health
scribed in Table 4 (also see 4.3).
practices and determine the applicability of regulatory limita-
3.5 Flatness (flat surface) tolerances for bars, solid shapes,
tions prior to use.
and semihollow shapes shall be as prescribed in Table 5.
NOTE 1—There is no similar or equivalent ISO standard.
3.6 Flatness (flat surface) tolerances of hollow shapes shall
be as prescribed in Table 6.
2. Terminology
3.7 Angularity tolerances for bars and shapes shall be as
2.1 Definitions:
prescribed in Table 7 (also see 4.4).
2.1.1 Class 1 hollow shape—one whose void is round and 1
3.8 Camber tolerances for shapes shall be as prescribed in
in. (25 mm) or more in diameter and whose weight is equally
Table 8 (also see 4.5).
distributed on opposite sides of two or more equally spaced
3.9 The selection, type, and amount of reinforcements, as
axes.
well as resin system used, directly affect dimensions. Toler-
2.1.2 envelope diameter—the diameter of the smallest circle
ances shall be agreed upon between the supplier and the user.
that will completely enclose the cross section of the pultruded
product.
4. Test Methods
2.1.3 flange bow—the deviation where the flange of the
4.1 Obtain the specified tolerances with conventional mea-
section contacts the horizontal plane.
suring equipment. Measuring procedures, gages, and fixtures
2.1.4 flange camber—the deviation from the flange surface
shall be agreed upon between the supplier and the user.
to the reference straight line.
4.2 Measure departure from straightness by placing the
2.1.5 mean wall thickness—the average of two wall thick-
section on a level table so that the arc or departure from
ness measurements taken at opposite sides of the void.
straightness is horizontal. Measure the depth of the arc with a
2.1.6 straightness—the perpendicular deviation of the sur-
feeler gage and a straightedge.
face contacting a horizontal plane.
4.3 Measure twist by placing the pultruded section on a flat
surface and measuring the maximum distance at any point
along its length between the bottom surface of the section and
This specification is under the jurisdiction of ASTM Committee D-20 on
the flat surface. From this measurement, subtract the deviation
Plastics and is the direct responsibility of Subcommittee D20.18 on Reinforced
from true straightness of the section. The remainder is the
Thermosetting Plastics.
Current edition approved Nov. 10, 1996. Published May 1997. Originally
twist. To convert the standard twist tolerance (degrees) to an
published as D 3917 – 80. Last previous edition D 3917 – 94.
*A Summary of Changes section appears at the end of this standard.
Copyright © ASTM, 100 Barr Harbor Drive, West Conshohocken, PA 19428-2959, United States.
D 3917
TABLE 1 Cross-Sectional Dimensions—Standard Rods, Bars, and Shapes
Standard Pultruded Section with Envelope Dimension up to 10-in. (254-mm) Diameter
A,B
Solid Dimensions, 6in. (mm)
A B C
Parallel to the Layered Perpendicular to the Wall Thickness Completely
Specified Dimension, in. (mm)
Construction (Perpendicular Layered Construction Enclosing Space 0.11 in.
to Roving in all (Mat and Mat-roving (0.64 cm ) and Over
C,D E,F,G
Products) Products Only) (Eccentricity)
Up to 0.124 (3.15) incl 0.006 (0.15) 0.013 (0.33) 620 % of specified dimension
0.125 to 0.249 (3.18 to 6.32) incl 0.007 (0.18) 0.018 (0.46) but not exceeding either
0.250 to 0.499 (6.35 to 12.67) incl 0.008 (0.20) 0.027 (0.69) 60.100 (2.54) max or
0.500 to 0.749 (12.70 to 19.02) incl 0.009 (0.23) 0.038 (0.97) 60.010 (0.25) min
0.750 to 0.999 (19.05 to 25.37) incl 0.010 (0.25) 0.034 (0.86)
1.000 to 1.499 (25.40 to 38.07) incl 0.012 (0.30) . 620 % of specified dimension
1.500 to 1.999 (38.10 to 50.77) incl 0.014 (0.36) . but not exceeding either
2.000 to 3.999 (50.80 to 101.57) incl 0.024 (0.61) . 60.100 (2.54) max or
4.000 to 5.999 (101.60 to 152.37) incl 0.034 (0.86) . 60.010 (0.25) min
A
The tolerances applicable to a dimension composed of two or more component dimensions is the sum of the tolerances of the component dimensions if all of the
component dimensions are indicated.
B
Allowable deviation from specified dimension where 75 % or more of the dimension is composite.
C
At points less than 0.250 in. (6.35 mm) from base of leg, the tolerances of Dimension A are applicable.
D
When more than 25 % of the specified dimension is space, the tolerances shall be agreed upon between the purchaser and the supplier at the time the contractor
order is entered.
E
For hollow or semihollow shapes, when the nominal thickness of one wall is three times or greater than that of the opposite wall, the wall thickness tolerance shall
be agreed upon between the purchaser and the supplier at the time the contract or order is entered.
F
Where dimensions specified are outside and inside, rather than wall thickness itself, the allowa
...


Questions, Comments and Discussion
Ask us and Technical Secretary will try to provide an answer. You can facilitate discussion about the standard in here.