ASTM E92-82(2003)
(Test Method)Standard Test Method for Vickers Hardness of Metallic Materials
Standard Test Method for Vickers Hardness of Metallic Materials
SCOPE
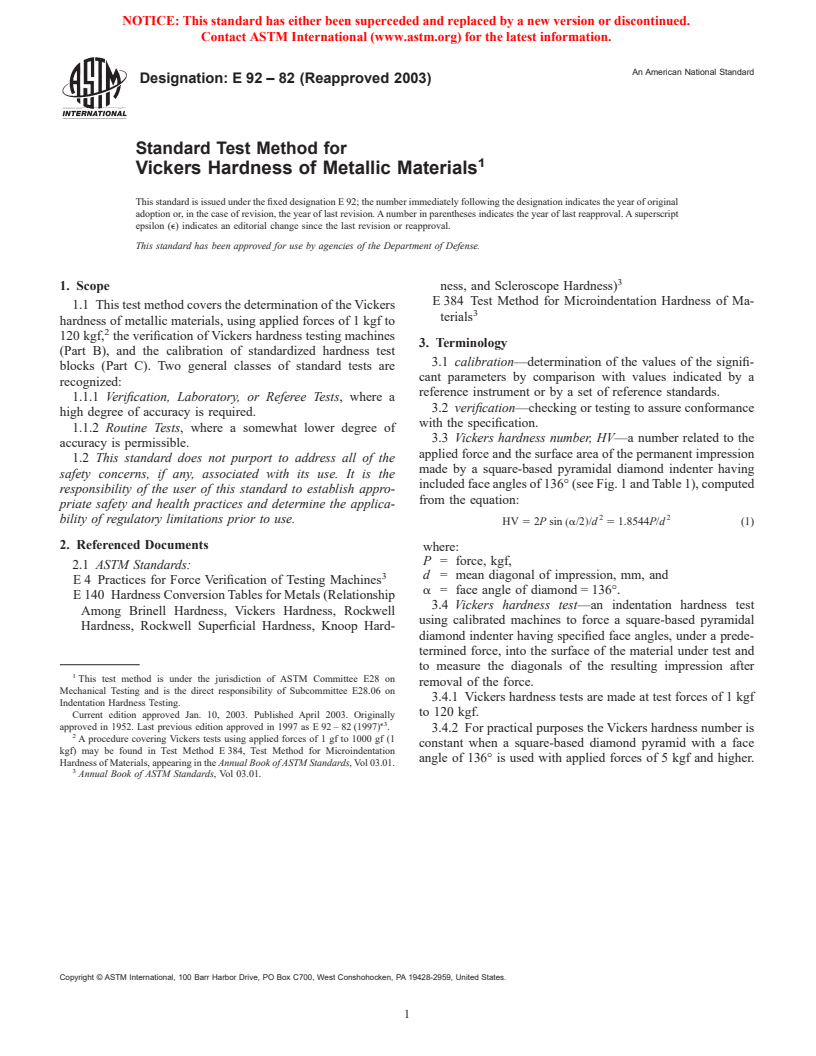
1.1 This test method covers the determination of the Vickers hardness of metallic materials, using applied forces of 1 kgf to 120 kgf, the verification of Vickers hardness testing machines (Part B), and the calibration of standardized hardness test blocks (Part C). Two general classes of standard tests are recognized:
1.1.1 Verification, Laboratory, or Referee Tests, where a high degree of accuracy is required.
1.1.2 Routine Tests where a somewhat lower degree of accuracy is permissible.
1.2 This standard does not purport to address all of the safety concerns, if any, associated with its use. It is the responsibility of the user of this standard to establish appropriate safety and health practices and determine the applicability of regulatory limitations prior to use.
General Information
Relations
Standards Content (Sample)
NOTICE: This standard has either been superceded and replaced by a new version or discontinued.
Contact ASTM International (www.astm.org) for the latest information.
An American National Standard
Designation: E 92 – 82 (Reapproved 2003)
Standard Test Method for
1
Vickers Hardness of Metallic Materials
This standard is issued under the fixed designation E 92; the number immediately following the designation indicates the year of original
adoption or, in the case of revision, the year of last revision. A number in parentheses indicates the year of last reapproval. A superscript
epsilon (e) indicates an editorial change since the last revision or reapproval.
This standard has been approved for use by agencies of the Department of Defense.
3
1. Scope ness, and Scleroscope Hardness)
E 384 Test Method for Microindentation Hardness of Ma-
1.1 This test method covers the determination of the Vickers
3
terials
hardness of metallic materials, using applied forces of 1 kgf to
2
120 kgf, the verification of Vickers hardness testing machines
3. Terminology
(Part B), and the calibration of standardized hardness test
3.1 calibration—determination of the values of the signifi-
blocks (Part C). Two general classes of standard tests are
cant parameters by comparison with values indicated by a
recognized:
reference instrument or by a set of reference standards.
1.1.1 Verification, Laboratory, or Referee Tests, where a
3.2 verification—checking or testing to assure conformance
high degree of accuracy is required.
with the specification.
1.1.2 Routine Tests, where a somewhat lower degree of
3.3 Vickers hardness number, HV—a number related to the
accuracy is permissible.
applied force and the surface area of the permanent impression
1.2 This standard does not purport to address all of the
made by a square-based pyramidal diamond indenter having
safety concerns, if any, associated with its use. It is the
included face angles of 136° (see Fig. 1 and Table 1), computed
responsibility of the user of this standard to establish appro-
from the equation:
priate safety and health practices and determine the applica-
2 2
bility of regulatory limitations prior to use.
HV 5 2P sin a/2 /d 5 1.8544P/d (1)
~ !
2. Referenced Documents where:
P = force, kgf,
2.1 ASTM Standards:
3 d = mean diagonal of impression, mm, and
E 4 Practices for Force Verification of Testing Machines
a = face angle of diamond = 136°.
E 140 Hardness Conversion Tables for Metals (Relationship
3.4 Vickers hardness test—an indentation hardness test
Among Brinell Hardness, Vickers Hardness, Rockwell
using calibrated machines to force a square-based pyramidal
Hardness, Rockwell Superficial Hardness, Knoop Hard-
diamond indenter having specified face angles, under a prede-
termined force, into the surface of the material under test and
to measure the diagonals of the resulting impression after
1
This test method is under the jurisdiction of ASTM Committee E28 on
removal of the force.
Mechanical Testing and is the direct responsibility of Subcommittee E28.06 on
3.4.1 Vickers hardness tests are made at test forces of 1 kgf
Indentation Hardness Testing.
to 120 kgf.
Current edition approved Jan. 10, 2003. Published April 2003. Originally
e3
approved in 1952. Last previous edition approved in 1997 as E 92 – 82 (1997) .
3.4.2 For practical purposes the Vickers hardness number is
2
A procedure covering Vickers tests using applied forces of 1 gf to 1000 gf (1
constant when a square-based diamond pyramid with a face
kgf) may be found in Test Method E 384, Test Method for Microindentation
angle of 136° is used with applied forces of 5 kgf and higher.
Hardness of Materials, appearing in the Annual Book of ASTM Standards, Vol 03.01.
3
Annual Book of ASTM Standards, Vol 03.01.
Copyright © ASTM International, 100 Barr Harbor Drive, PO Box C700, West Conshohocken, PA 19428-2959, United States.
1
---------------------- Page: 1 ----------------------
NOTICE: This standard has either been superceded and replaced by a new version or discontinued.
Contact ASTM International (www.astm.org) for the latest information.
E 92 – 82 (2003)
FIG. 1 Vickers Hardness Test (see Table 1)
TABLE 1 Symbols and Designations Associated with Fig. 1
Number Symbol Designation
1 . Angle at the vertex of the pyramidal in-
denter (136°)
2 P Test force in kilograms-force
1
3 d Arithmetic mean of the two diagonals d
2
and d
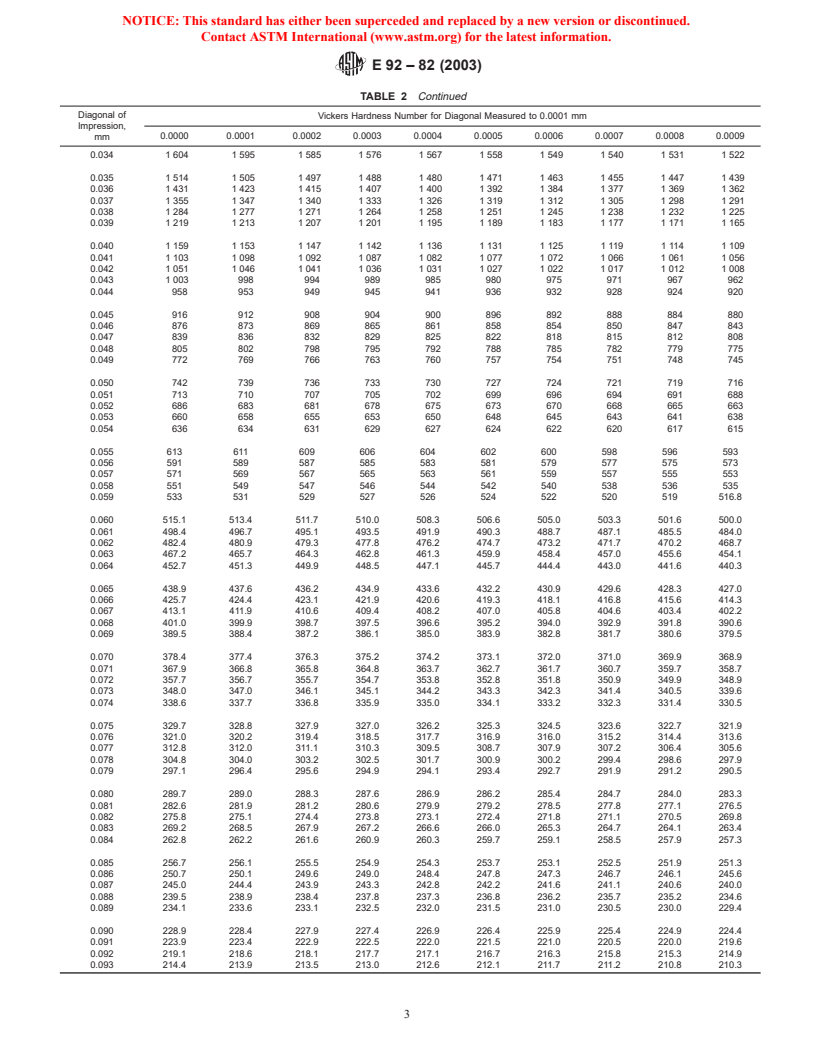
TABLE 2 Vickers Hardness Numbers
(Diamond, 136° Face Angle, force of 1 kgf)
Diagonal of
Vickers Hardness Number for Diagonal Measured to 0.0001 mm
Impression,
0.0000 0.0001 0.0002 0.0003 0.0004 0.0005 0.0006 0.0007 0.0008 0.0009
mm
0.005 74 170 71 290 68 580 66 020 63 590 61 300 59 130 57 080 55 120 53 270
0.006 51 510 49 840 48 240 46 720 45 270 43 890 42 570 41 310 40 100 38 950
0.007 37 840 36 790 35 770 34 800 33 860 32 970 32 100 31 280 30 480 29 710
0.008 28 970 28 260 27 580 26 920 26 280 25 670 25 070 24 500 23 950 23 410
0.009 22 890 22 390 21 910 21 440 20 990 20 550 20 120 19 710 19 310 1
...


Questions, Comments and Discussion
Ask us and Technical Secretary will try to provide an answer. You can facilitate discussion about the standard in here.