ASTM D1623-78(1995)
(Test Method)Standard Test Method for Tensile And Tensile Adhesion Properties Of Rigid Cellular Plastics
Standard Test Method for Tensile And Tensile Adhesion Properties Of Rigid Cellular Plastics
SCOPE
1.1 This test method covers the determination of the tensile and tensile adhesion properties of rigid cellular materials in the form of test specimens of standard shape under defined conditions of temperature, humidity, and testing machine speed.
1.2 Tensile properties may be measured using any of three types of specimens:
1.2.1 Type A may be preferred in those cases where enough sample material exists to form the necessary specimen,
1.2.2 Type B may be used where only smaller specimens are available, as in sandwich panels, etc.
1.2.3 Type C covers the determination of tensile adhesive properties of a cellular plastic to a substrate as in a sandwich panel or the bonding strength of a cellular plastic to a single substrate. Note 1-The values stated in SI units are to be regarded as the standard.
General Information
Relations
Standards Content (Sample)
NOTICE: This standard has either been superceded and replaced by a new version or discontinued.
Contact ASTM International (www.astm.org) for the latest information.
Designation: D 1623 – 78 (Reapproved 1995)
Standard Test Method for
Tensile And Tensile Adhesion Properties Of Rigid
Cellular Plastics
This standard is issued under the fixed designation D 1623; the number immediately following the designation indicates the year of
original adoption or, in the case of revision, the year of last revision. A number in parentheses indicates the year of last reapproval. A
superscript epsilon (e) indicates an editorial change since the last revision or reapproval.
This standard has been approved for use by agencies of the Department of Defense.
1. Scope and movable members in such a way that they will move freely
into alignment as soon as any load is applied, so that the long
1.1 This test method covers the determination of the tensile
axis of the test specimen will coincide with the direction of the
and tensile adhesion properties of rigid cellular materials in the
applied pull through the center line of the grip assembly.
form of test specimens of standard shape under defined
Universal-type joints immediately above and below the speci-
conditions of temperature, humidity, and testing machine
men holdler are recommended. The test specimen shall be held
speed.
in such a way that slippage relative to the grips is prevented,
1.2 Tensile properties may be measured using any of three
insofar as possible. For Type A specimens, use the grips shown
types of specimens:
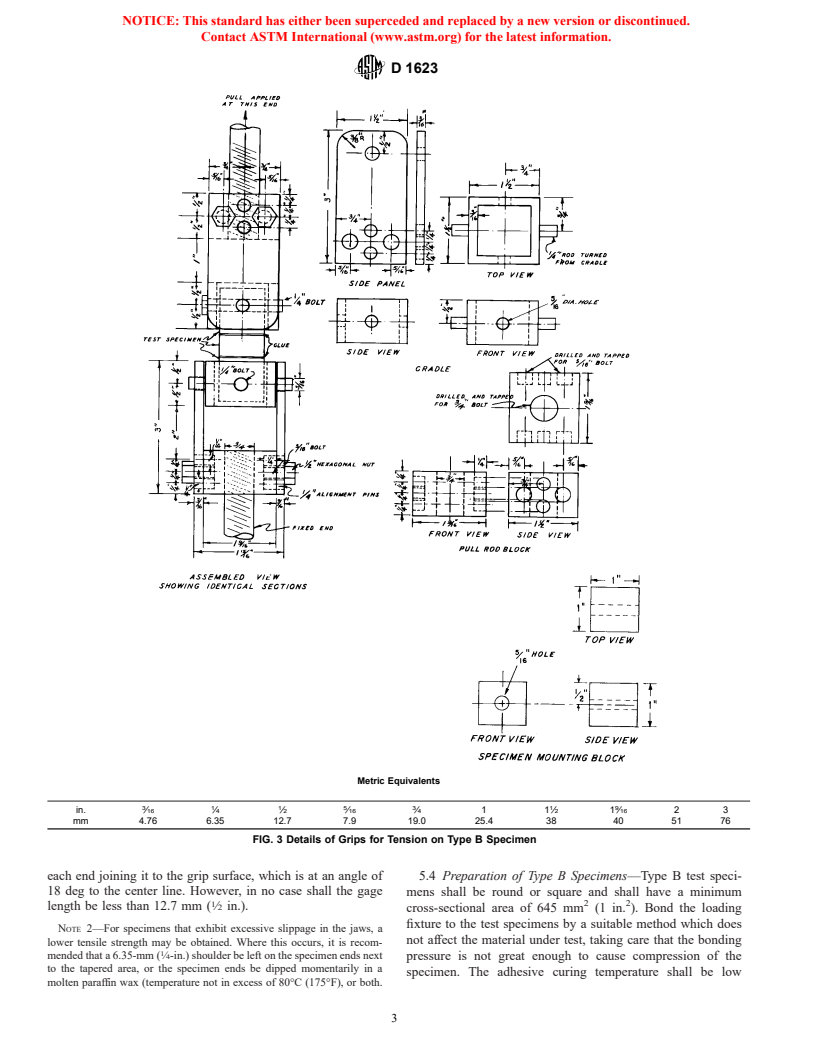
in Fig. 1 and Fig. 2. For Type B specimens, one suitable
1.2.1 Type A may be preferred in those cases where enough
assembly is shown in Fig. 3 and Fig. 4. For Type C specimen,
sample material exists to form the necessary specimen,
a suitable assembly is shown in Fig. 5.
1.2.2 Type B may be used where only smaller specimens
4.1.2 Load Indicator—Use a suitable load-indicating
are available, as in sandwich panels, etc.
mechanism capable of showing the total tensile load carried by
1.2.3 Type C covers the determination of tensile adhesive
the test specimen when held in the grips. Choose an indicator
properties of a cellular plastic to a substrate as in a sandwich
that will permit precision to within 61%.
panel or the bonding strength of a cellular plastic to a single
4.1.3 Extension Indicator—If measurement of the extension
substrate.
is desired, use a suitable instrument for determining the
NOTE 1—The values stated in SI units are to be regarded as the
distance between two fixed points on the test specimen at any
standard.
time during the test.
4.2 Specimen Cutter—For Type A specimens use a suitable
2. Referenced Documents
lathe cutter (see Fig. 6).
2.1 ASTM Standards:
D 618 Practice for Conditioning Plastics and Electrical
5. Test Specimen
Insulating Materials for Testing
5.1 All surfaces of the specimen shall be free of large visible
D 638 Test Method for Tensile Properties of Plastics
flaws or imperfections. If it is necessary to place gage marks on
D 883 Terminology Relating to Plastics
the specimen, do this in such a way as not to affect the surfaces
of the test specimen. Gage marks shall not be scratched,
3. Terminology
punched, or impressed on the specimen.
3.1 Definitions of terms applying to this test method appear
5.2 When testing materials that are suspected to be aniso-
in the Appendix to Test Method D 638.
tropic, prepare duplicate sets of tension test specimens having
their long axes respectively parallel and normal to the sus-
4. Apparatus
pected direction of anisotropy.
4.1 Testing Machine—A testing machine of the constant-
5.3 Preparation of Type A Specimens—The recommended
rate-of-crosshead-movement type comprising essentially the
Type A test specimen shall conform to the dimensions given in
following:
Fig. 7. It may be prepared by normal molding procedures
4.1.1 Grips—Grips for holding the test specimen shall be
wherever possible, but the “skin” effect which results cannot be
the self-aligning type; that is, they must be attached to the fixed
eliminated and will cause a variance in the final result. Another
method of preparation of the specimen, which would not have
This test method is under the jurisdiction of ASTM Committee D-20 on
this objection, is to machine the desired geometry on a small
Plastics, and is the direct responsibility of Subcommittee D 20.22 on Cellular
Plastics. lathe, using the cutter shown in Fig. 6. Insert a 50.8 by 50.8 by
Current edition approved May 26, 1978. Published February 1979. Originally
152-mm (2 by 2 by 6-in.) block of the material to be tested in
published as D 1623 – 59 T. Last previous edition D 1623 – 72.
the four-jaw chuck, previously centered. Prepare the other end
Annual Book of ASTM Standards, Vol 08.01.
Copyright © ASTM International, 100 Barr Harbor Drive, PO Box C700, West Conshohocken, PA 19428-2959, United States.
NOTICE: This standard has either been superceded and replaced by a new version or discontinued.
Contact ASTM International (www.astm.org) for the latest information.
D 1623
FIG. 1 Details of Grips for Tension Test on Type A Specimen
Metric Equivalents
1 1 1 9 11 1 1 1 5
in. ⁄8 ⁄4 ⁄2 ⁄16 ⁄16 1 1.130 1 ⁄2 22 ⁄4 2 ⁄2 33 ⁄16
mm 3.18 6.35 12.7 14.3 17.5 25.4 28.7 38 51 57 64 76 84
FIG. 2 Grip Assembly for Type A Specimen
2 2
of the block to receive the 60-deg tapered end of the tailstock in.) [645 mm (1 in. ) cross section]. Using a band saw, cut off
center. Set the lathe at its highest speed. The appropriate rate of the excess sample end (up to the taper); the specimen is now
entry of the cutter blade will depend on the density of the foam. completed. The lathe assembly and completed specimen are
Advance the cutter until it reaches a stop, at which time the shown in Fig. 8. The recommended gage length shall be 25.4
diameter of the specimen test section shall be 28.7 mm (1.129 mm (1 in.) with a radius of curvature of 11.9 mm ( ⁄32 in.) at
NOTICE: This standard has either been superceded and replaced by a new version or discontinued.
Contact ASTM International (www.astm.org) for the latest information.
D 1623
Metric Equivalents
3 1 1 5 3 1 9
in. ⁄16 ⁄4 ⁄2 ⁄16 ⁄4 11 ⁄2 1 ⁄16 23
mm 4.76 6.35 12.7 7.9 19.0 25.4 38 40 51 76
FIG. 3 Details of Grips for Tension on Type B Specimen
each end joining it to the grip surface, which is at an angle of 5.4 Preparation of Type B Specimens—Type B test speci-
18 deg to the center line. However, in no case shall the gage mens shall be round or square and shall have a minimum
2 2
length be less than 12.7 mm ( ⁄2 in.).
cross-sectional area of 645 mm (1 in. ). Bond the loading
fixture to the test specimens by a suitable method which does
NOTE 2—For specimens that exhibit excessive slippage in the jaws, a
not affect the material under test, taking care that the bonding
lower tensile strength may be obtained. Where this occurs, it is recom-
mended that a 6.35-mm ( ⁄4-in.) shoulder be left on the specimen ends next pre
...


Questions, Comments and Discussion
Ask us and Technical Secretary will try to provide an answer. You can facilitate discussion about the standard in here.