ASTM C770-98(2013)
(Test Method)Standard Test Method for Measurement of Glass Stress—Optical Coefficient
Standard Test Method for<brk type="line"/> Measurement of Glass Stress—Optical Coefficient
SIGNIFICANCE AND USE
3.1 Stress-optical coefficients are used in the determination of stress in glass. They are particularly useful in determining the magnitude of thermal residual stresses for annealing or pre-stressing (tempering) glass. As such, they can be important in specification acceptance.
SCOPE
1.1 This test method covers procedures for determining the stress-optical coefficient of glass, which is used in photoelastic analyses. In Procedure A the optical retardation is determined for a glass fiber subjected to uniaxial tension. In Procedure B the optical retardation is determined for a beam of glass of rectangular cross section when subjected to four-point bending. In Procedure C, the optical retardation is measured for a beam of glass of rectangular cross-section when subjected to uniaxial compression.
1.2 This standard does not purport to address all of the safety concerns, if any, associated with its use. It is the responsibility of the user of this standard to establish appropriate safety and health practices and determine the applicability of regulatory limitations prior to use.
General Information
Relations
Standards Content (Sample)
NOTICE: This standard has either been superseded and replaced by a new version or withdrawn.
Contact ASTM International (www.astm.org) for the latest information
Designation: C770 − 98(Reapproved 2013)
Standard Test Method for
Measurement of Glass Stress—Optical Coefficient
This standard is issued under the fixed designation C770; the number immediately following the designation indicates the year of
original adoption or, in the case of revision, the year of last revision.Anumber in parentheses indicates the year of last reapproval.A
superscript epsilon (´) indicates an editorial change since the last revision or reapproval.
1. Scope 4. Apparatus
1.1 This test method covers procedures for determining the 4.1 Stressing Equipment and Polarimeter:
stress-optical coefficient of glass, which is used in photoelastic 4.1.1 Procedure A—Figs. 1 and 2 illustrate a polarimeter
analyses. In Procedure A the optical retardation is determined employing a quarter-wave plate and rotatable analyzer, de-
for a glass fiber subjected to uniaxial tension. In Procedure B scribed in Test Method E218. The quarter-wave plate shall be
the optical retardation is determined for a beam of glass of designed for the wavelength of the light being used. The
rectangularcrosssectionwhensubjectedtofour-pointbending. polarizing axes of the polarizer and analyzer shall be set at
In Procedure C, the optical retardation is measured for a beam right angles to each other with each being located at an angle
ofglassofrectangularcross-sectionwhensubjectedtouniaxial of 45° with the horizontal and vertical.The analyzer, however,
compression. shallbemountedinarotatablemounthavingascalegraduated
on either side from 0 to 180°. The quarter-wave plate shall be
1.2 This standard does not purport to address all of the
fixed to give maximum extinction when the polarizer and
safety concerns, if any, associated with its use. It is the
analyzer are crossed at right angles; that is, when its polarizing
responsibility of the user of this standard to establish appro-
axes are set at 45° and 135° to the horizontal and vertical. In
priate safety and health practices and determine the applica-
place of the immersion cell E, a means of supporting and
bility of regulatory limitations prior to use.
loading a glass specimen shall be provided, either in air (Fig.
3(a)) or in an immersion liquid (Fig. 3(b)). In this arrangement
2. Referenced Documents
the optical elements of the polarimeter between light source
2.1 ASTM Standards:
andtelescopehavebeenreversedandalargescalegraduatedin
C336Test Method for Annealing Point and Strain Point of
2-nm divisions is employed with the rotatable analyzer I.
Glass by Fiber Elongation
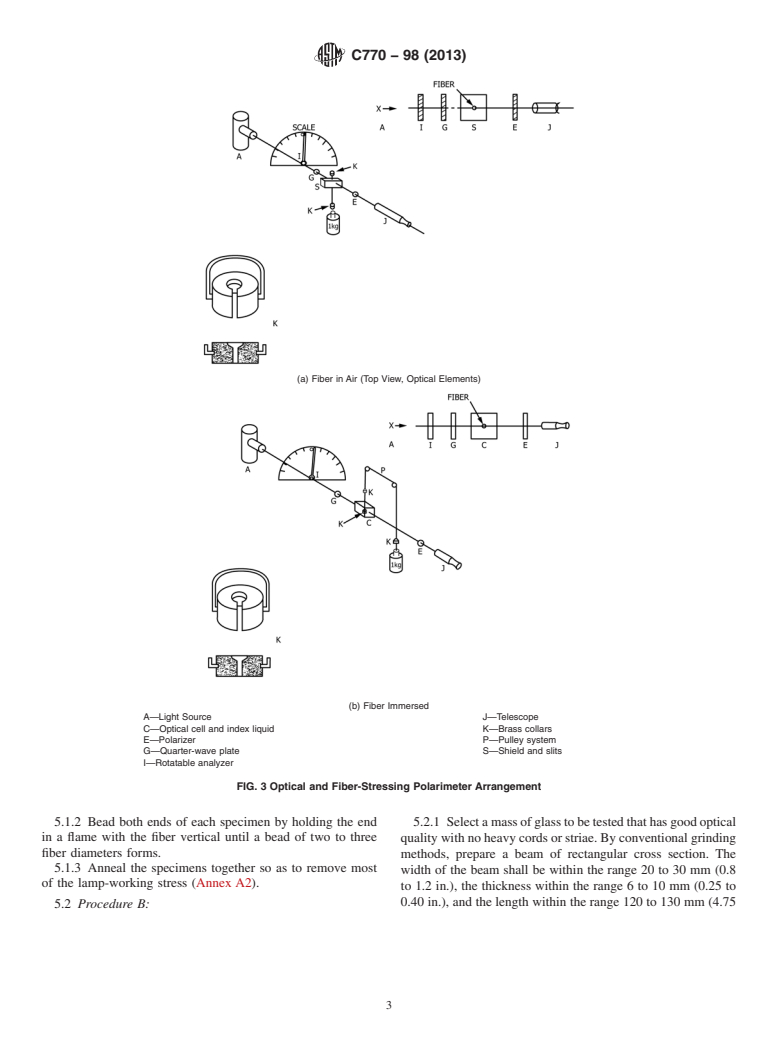
4.1.1.1 Fig. 3 illustrates the fiber-stressing and optical ar-
C598Test Method for Annealing Point and Strain Point of
rangement used in Procedure A. Figure 3(a) shows the fiber
Glass by Beam Bending
mounted vertically, positioned, and supported by two brass
E218Tentative Standard Method for Radiochemical Deter-
collarswithswivelhandlessothatthekilogramweightmaybe
mination of Cesium-137 in Aqueous Solutions (Chlorop-
appliedtoloadthefiber.Alightshieldhavingentranceandexit
latinate Method) (Withdrawn 1968)
slitssurroundsthefiberprovidingadegreeofcollimationtothe
light passing through the fiber and also helping to eliminate
3. Significance and Use
stray light.
3.1 Stress-optical coefficients are used in the determination
4.1.1.2 In Fig. 3(b) the fiber is stressed while immersed in a
of stress in glass. They are particularly useful in determining
liquid which matches the refractive index of the fiber. This
the magnitude of thermal residual stresses for annealing or
arrangement provides more satisfactory viewing of the fiber.
pre-stressing (tempering) glass.As such, they can be important
4.1.2 Procedure B:
in specification acceptance.
4.1.2.1 The apparatus for the beam-bending procedure is
shown in Fig. 4(a). Radiation from a white-light source passes
through the following components and in this sequence: a
This test method is under the jurisdiction of ASTM Committee C14 on Glass
diffusingplate,anadjustableaperture,apolarizerwhoseaxisis
and Glass Products and is the direct responsibility of Subcommittee C14.04 on
Physical and Mechanical Properties.
at 45° to the vertical, the glass specimen, a Babinet
Current edition approved Oct. 1, 2013. Published October 2013. Originally
compensator,apolarizerwhoseaxisisat90°tothatofthefirst
approved in 1973. Last previous edition approved in 2008 as C770–98(2008).
polarizer, and a telescope of modest power.
DOI: 10.1520/C0770-98R13.
For referenced ASTM standards, visit the ASTM website, www.astm.org, or 4.1.2.2 The loading scheme is shown in Fig. 4(b). Metal
contact ASTM Customer Service at service@astm.org. For Annual Book of ASTM
fixtures shall be provided to subject the specimen to four-point
Standards volume information, refer to the standard’s Document Summary page on
the ASTM website.
The last approved version of this historical standard is referenced on Goranson andAdams, “Measurement of Optical Path Differences,” Journal of
www.astm.org. Franklin Institute, Vol 216, 1933, p. 475.
Copyright © ASTM International, 100 Barr Harbor Drive, PO Box C700, West Conshohocken, PA 19428-2959. United States
C770 − 98 (2013)
FIG. 1 Polarimeter
FIG. 2 Orientation of Polarimeter in Standard Position
bending. A support span of 115 mm and a moment arm, a, of 4.1.3.2 Force application frame, shown in Fig. 5 must
45 mm are recommended. Dimensions within 5% of these
include:
values are acceptable. Symmetrical loading is essential, and
a) Astrain-gage load cell and load cell indicator, capable of
requirescarefulcenteringoftheupperloadingblock.Theknife
measuring the force applied within 1% accuracy.
edgesshallbefinishedtoapproximately5-mmradius.Loading
b) Hydraulic or mechanical means of applying constant
canbeaccomplishedthroughayoke,whichrestsinaV-groove
force and maintaining the force during the measuring time.
in the upper loading block, and a weight pan as shown.
c) Swivel-mounted loading blocks, offering at least two
However, any convenient loading scheme at the center of the
degrees of swivel freedom, to avoid the loading on the edge.
upper block may be used.
4.1.2.3 A Babinet compensator is positioned so as to pro-
4.2 Micrometer Caliper, for measuring specimen dimen-
duce vertical fringes (Fig. 4(c)). The neutral fringe must fall
sions to 0.0025 mm (0.0001 in.).
near the center of the support span. Recommended fringe
4.3 Weights that are known to an accuracy of 61%.
spacing is 1000 6 200 nm of retardation per centimeter. In
actual practice the compensator is placed very close to the
specimen inside the loading yoke. 5. Test Specimen
4.1.2.4 Atelescope is mounted in a rotating collar equipped
5.1 Procedure A:
with an angular scale which can be read to 0.1° by a vernier.
5.1.1 Select a mass of the glass to be tested that has good
The cross hairs in the eyepiece are used to measure the tilt
optical quality with no heavy cords or striae. By conventional
angle of the neutral fringe as shown in Fig. 4(c). An 80-mm
lamp-working methods, draw 0.6 to 0.9 m (2 to 3 ft) of fiber
objective lens and 10× eyepiece are adequate components for
from the glass, sufficient to provide five specimens 76 to 102
the telescope.
mm(3to4in.)longwithtaper(variationindiameteralongthe
4.1.2.5 The adjustable aperture is set at the smallest diam-
length) less than 0.025 mm (0.001 in.) and diameters in the
eter that permits suitable viewing.As with the fiber apparatus,
range 0.635 mm (0.025 in.) to 0.760 mm (0.030 in.). The
this provides some collimation and helps to eliminate stray
light. difference in mutually perpendicular diameters at any point
along the specimen length shall be less than 0.0076 mm
4.1.3 Procedure C:
4.1.3.1 Polarimeter as described in Test Method E218. (0.0003 in.).
C770 − 98 (2013)
(a) Fiber in Air (Top View, Optical Elements)
(b) Fiber Immersed
A—Light Source J—Telescope
C—Optical cell and index liquid K—Brass collars
E—Polarizer P—Pulley system
G—Quarter-wave plate S—Shield and slits
I—Rotatable analyzer
FIG. 3 Optical and Fiber-Stressing Polarimeter Arrangement
5.1.2 Bead both ends of each specimen by holding the end 5.2.1 Selectamassofglasstobetestedthathasgoodoptical
in a flame with the fiber vertical until a bead of two to three
qualitywithnoheavycordsorstriae.Byconventionalgrinding
fiber diameters forms.
methods, prepare a beam of rectangular cross section. The
5.1.3 Anneal the specimens together so as to remove most
width of the beam shall be within the range 20 to 30 mm (0.8
of the lamp-working stress (Annex A2).
to 1.2 in.), the thickness within the range 6 to 10 mm (0.25 to
0.40 in.), and the length within the range 120 to 130 mm (4.75
5.2 Procedure B:
C770 − 98 (2013)
(a) Beam Stressing and Polarimeter Arrangement
(b) Beam Loading Scheme (c) View of Babinet Compensator Fringe Pattern Through Stressed Beam
a—Moment arm F—Yoke and weight pan
A—Light Source G—Babinet compensator
B—Adjustable aperature H—Polarizer
C—Polarizer I—Telescope and angular scale
D—Beam L—Load
E—Loading fixtures θ—Tile angle of neutral fringe
FIG. 4 Optical and Mechanical Details for Beam Method
(a) Load Cell
(b) Swivel
(c) Pressure Plate
(d) Specimen
(e) Spherical Washer
(f) Axial Bearing
FIG. 5 Force Application Frame
C770 − 98 (2013)
to 5.10 in.). Use a fine grind for the upper and lower surfaces 6.1.6 Remove the fiber, measure, and record to the nearest
(as the beam sits on the loading fixture) and polish the viewing 0.0025 mm (0.0001 in.) the average diameter,
¯
surfaces. The ends need not be finished and a simple saw cut
d averageofdiame
...


Questions, Comments and Discussion
Ask us and Technical Secretary will try to provide an answer. You can facilitate discussion about the standard in here.