ASTM F218-13(2020)
(Test Method)Standard Test Method for Measuring Optical Retardation and Analyzing Stress in Glass
Standard Test Method for Measuring Optical Retardation and Analyzing Stress in Glass
SIGNIFICANCE AND USE
4.1 The performance of glass products may be affected by presence of residual stresses due to process, differential thermal expansion between fused components, and by inclusions. This test method provides means of quantitative evaluation of stresses.
SCOPE
1.1 This test method covers the analysis of stress in glass by means of a polarimeter based on the principles developed by Jessop and Friedel (1, 2).2 Stress is evaluated as a function of optical retardation, that is expressed as the angle of rotation of an analyzing polarizer that causes extinction in the glass.
1.2 There is no known ISO equivalent to this standard.
1.3 This standard does not purport to address all of the safety concerns, if any, associated with its use. It is the responsibility of the user of this standard to establish appropriate safety, health, and environmental practices and determine the applicability of regulatory limitations prior to use.
1.4 This international standard was developed in accordance with internationally recognized principles on standardization established in the Decision on Principles for the Development of International Standards, Guides and Recommendations issued by the World Trade Organization Technical Barriers to Trade (TBT) Committee.
General Information
- Status
- Published
- Publication Date
- 31-Jul-2020
- Technical Committee
- C14 - Glass and Glass Products
- Drafting Committee
- C14.04 - Physical and Mechanical Properties
Relations
- Effective Date
- 01-Oct-2023
- Effective Date
- 01-Aug-2020
- Refers
ASTM C770-16(2020) - Standard Test Method for Measurement of Glass Stress—Optical Coefficient - Effective Date
- 01-Aug-2020
- Effective Date
- 01-Feb-2019
- Effective Date
- 01-May-2016
- Effective Date
- 01-Nov-2015
- Effective Date
- 01-May-2014
- Effective Date
- 01-May-2014
- Effective Date
- 01-May-2014
- Effective Date
- 01-Oct-2013
- Effective Date
- 01-May-2013
- Effective Date
- 01-May-2013
- Effective Date
- 01-Nov-2011
- Effective Date
- 01-Oct-2010
- Effective Date
- 01-Nov-2009
Overview
ASTM F218-13(2020), "Standard Test Method for Measuring Optical Retardation and Analyzing Stress in Glass," outlines a quantitative methodology for the analysis of stress in glass products. Developed by ASTM International, this standard provides consistent procedures for using a polarimeter to evaluate residual stresses, which can significantly impact the quality and performance of glass. Residual stresses often arise from manufacturing processes, differential thermal expansion, or inclusions within glass materials. Understanding and measuring these internal stresses ensures improved quality control, product durability, and safety.
Key Topics
- Optical Retardation Measurement: The standard defines the use of a polarimeter based on the principles of Jessop and Friedel to assess the retardation in glass. Optical retardation is quantitatively expressed as the degree of analyzer rotation required to achieve extinction of light as it passes through the glass.
- Stress Analysis: Using polariscopic methods, users can determine whether internal stresses are tensile or compressive and their directional orientation. The test method enables both qualitative and quantitative evaluation.
- Setup and Calibration: The document provides guidance on setting up the polarimeter, including detailed descriptions of component arrangement (light source, filters, diffuser, polarizer, immersion cell, full-wave plate, quarter-wave plate, analyzer, and telescope). It refers to appropriate ASTM practices for polarimeter calibration.
- Procedural Guidance: The procedure covers sample preparation, orientation of key optical axes, measurement steps, the interpretation of extinction points, and analysis using color changes or analyzer rotation.
- Precision, Repeatability, and Reproducibility: The standard presents statistical data on repeatability and reproducibility, ensuring users understand the expected accuracy of results across different laboratories.
- Safety and Compliance: Users are responsible for ensuring their practices comply with safety, health, and environmental regulations.
Applications
This ASTM test method is highly relevant in industries where the structural integrity of glass components is critical, such as:
- Glass manufacturing and quality assurance: Manufacturers use this method to detect residual stresses in float glass, container glass, laminated glass, and specialty glass products prior to further processing or delivery.
- Automotive and aerospace sectors: The method is applied to inspect stress in windshields, windows, and other transparent elements subject to mechanical and thermal loads.
- Architectural glass: Ensures safety and longevity of glass panels used in buildings and facades by verifying that stress levels remain within acceptable limits.
- Product development and research laboratories: Facilitates material testing, comparative studies, and optimization of glass processing parameters.
- Forensic analysis: Supports the investigation of glass failures or breakages by providing insight into pre-existing stress distributions.
By enabling accurate measurement of optical retardation and internal stresses, the test method helps minimize failures, optimize processes, and improve product reliability in glass-related applications.
Related Standards
When implementing ASTM F218-13(2020), the following related standards and references are often consulted:
- ASTM C162 - Terminology of Glass and Glass Products
- ASTM C770 - Test Method for Measurement of Glass Stress-Optical Coefficient
- ASTM C978 - Test Method for Photoelastic Determination of Residual Stress in a Transparent Glass Matrix Using a Polarizing Microscope and Optical Retardation Compensation Procedures
- ASTM C1426 - Practices for Verification and Calibration of Polarimeters
- ASTM E177 - Practice for Use of the Terms Precision and Bias in ASTM Test Methods
- ASTM E691 - Practice for Conducting an Interlaboratory Study to Determine the Precision of a Test Method
These standards ensure proper terminology, equipment calibration, and methodological consistency when measuring optical retardation and analyzing stress in glass.
Keywords: ASTM F218, optical retardation, glass stress analysis, polarimeter, residual stress, glass quality, test method, glass manufacturing, stress measurement, polariscopic method.
Buy Documents
ASTM F218-13(2020) - Standard Test Method for Measuring Optical Retardation and Analyzing Stress in Glass
Frequently Asked Questions
ASTM F218-13(2020) is a standard published by ASTM International. Its full title is "Standard Test Method for Measuring Optical Retardation and Analyzing Stress in Glass". This standard covers: SIGNIFICANCE AND USE 4.1 The performance of glass products may be affected by presence of residual stresses due to process, differential thermal expansion between fused components, and by inclusions. This test method provides means of quantitative evaluation of stresses. SCOPE 1.1 This test method covers the analysis of stress in glass by means of a polarimeter based on the principles developed by Jessop and Friedel (1, 2).2 Stress is evaluated as a function of optical retardation, that is expressed as the angle of rotation of an analyzing polarizer that causes extinction in the glass. 1.2 There is no known ISO equivalent to this standard. 1.3 This standard does not purport to address all of the safety concerns, if any, associated with its use. It is the responsibility of the user of this standard to establish appropriate safety, health, and environmental practices and determine the applicability of regulatory limitations prior to use. 1.4 This international standard was developed in accordance with internationally recognized principles on standardization established in the Decision on Principles for the Development of International Standards, Guides and Recommendations issued by the World Trade Organization Technical Barriers to Trade (TBT) Committee.
SIGNIFICANCE AND USE 4.1 The performance of glass products may be affected by presence of residual stresses due to process, differential thermal expansion between fused components, and by inclusions. This test method provides means of quantitative evaluation of stresses. SCOPE 1.1 This test method covers the analysis of stress in glass by means of a polarimeter based on the principles developed by Jessop and Friedel (1, 2).2 Stress is evaluated as a function of optical retardation, that is expressed as the angle of rotation of an analyzing polarizer that causes extinction in the glass. 1.2 There is no known ISO equivalent to this standard. 1.3 This standard does not purport to address all of the safety concerns, if any, associated with its use. It is the responsibility of the user of this standard to establish appropriate safety, health, and environmental practices and determine the applicability of regulatory limitations prior to use. 1.4 This international standard was developed in accordance with internationally recognized principles on standardization established in the Decision on Principles for the Development of International Standards, Guides and Recommendations issued by the World Trade Organization Technical Barriers to Trade (TBT) Committee.
ASTM F218-13(2020) is classified under the following ICS (International Classification for Standards) categories: 81.040.01 - Glass in general. The ICS classification helps identify the subject area and facilitates finding related standards.
ASTM F218-13(2020) has the following relationships with other standards: It is inter standard links to ASTM C162-23, ASTM C1426-14(2020), ASTM C770-16(2020), ASTM C978-04(2019), ASTM C770-16, ASTM C162-05(2015), ASTM C978-04(2014), ASTM C1426-14, ASTM E177-14, ASTM C770-98(2013), ASTM E177-13, ASTM E691-13, ASTM E691-11, ASTM E177-10, ASTM C1426-09. Understanding these relationships helps ensure you are using the most current and applicable version of the standard.
ASTM F218-13(2020) is available in PDF format for immediate download after purchase. The document can be added to your cart and obtained through the secure checkout process. Digital delivery ensures instant access to the complete standard document.
Standards Content (Sample)
This international standard was developed in accordance with internationally recognized principles on standardization established in the Decision on Principles for the
Development of International Standards, Guides and Recommendations issued by the World Trade Organization Technical Barriers to Trade (TBT) Committee.
Designation: F218 − 13 (Reapproved 2020)
Standard Test Method for
Measuring Optical Retardation and Analyzing Stress in
Glass
ThisstandardisissuedunderthefixeddesignationF218;thenumberimmediatelyfollowingthedesignationindicatestheyearoforiginal
adoptionor,inthecaseofrevision,theyearoflastrevision.Anumberinparenthesesindicatestheyearoflastreapproval.Asuperscript
epsilon (´) indicates an editorial change since the last revision or reapproval.
1. Scope E177Practice for Use of the Terms Precision and Bias in
ASTM Test Methods
1.1 Thistestmethodcoverstheanalysisofstressinglassby
E691Practice for Conducting an Interlaboratory Study to
means of a polarimeter based on the principles developed by
2 Determine the Precision of a Test Method
Jessop and Friedel (1, 2). Stress is evaluated as a function of
optical retardation, that is expressed as the angle of rotation of
3. Terminology
an analyzing polarizer that causes extinction in the glass.
3.1 Definitions:
1.2 There is no known ISO equivalent to this standard.
3.1.1 For definitions of terms used in this test method, refer
1.3 This standard does not purport to address all of the
to Terminology C162.
safety concerns, if any, associated with its use. It is the
4. Significance and Use
responsibility of the user of this standard to establish appro-
priate safety, health, and environmental practices and deter-
4.1 The performance of glass products may be affected by
mine the applicability of regulatory limitations prior to use.
presence of residual stresses due to process, differential ther-
1.4 This international standard was developed in accor-
mal expansion between fused components, and by inclusions.
dance with internationally recognized principles on standard-
This test method provides means of quantitative evaluation of
ization established in the Decision on Principles for the
stresses.
Development of International Standards, Guides and Recom-
mendations issued by the World Trade Organization Technical 5. Calibration and Standardization
Barriers to Trade (TBT) Committee.
5.1 Whenever calibration of the polarimeter is required by
product specification, Practices C1426 for verification and
2. Referenced Documents
calibration should be used.
2.1 ASTM Standards:
6. Polarimeter
C162Terminology of Glass and Glass Products
C770Test Method for Measurement of Glass Stress—
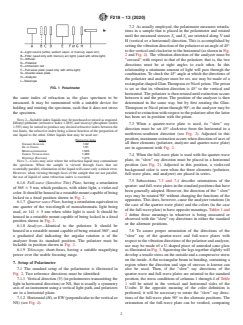
6.1 The polarimeter shall consist of an arrangement similar
Optical Coefficient
to that shown in Fig. 1. A description of each component
C978Test Method for Photoelastic Determination of Re-
follows:
sidual Stress in a Transparent Glass Matrix Using a
6.1.1 Source of Light—Either a white light or a monochro-
Polarizing Microscope and Optical Retardation Compen-
matic source such as sodium light (λ 589 nm) or a white light
sation Procedures
covered with a narrow-band interferential filter B (see Fig. 1)
C1426Practices forVerification and Calibration of Polarim-
transmitting the desired monochromatic wavelength.
eters
NOTE 1—The white light should provide a source of illumination with
solar temperature of at least that of Illuminant A.
6.1.2 Filter—The filter should be placed between the light
This test method is under the jurisdiction of ASTM Committee C14 on Glass
source and the polarizer, or between the analyzer and the
and Glass Products and is the direct responsibility of Subcommittee C14.04 on
Physical and Mechanical Properties.
viewer (see Fig. 1).
Current edition approved Aug. 1, 2020. Published September 2020. Originally
6.1.3 Diffuser—A piece of opal glass or a ground glass of
approved in 1950. Last previous edition approved in 2013 as F218 – 13. DOI:
photographic quality.
10.1520/F0218-13R20.
6.1.4 Polarizer—Apolarizing element housed in a rotatable
Theboldfacenumbersinparenthesesrefertothelistofreferencesattheendof
this test method.
mount capable of being locked in a fixed position shown in
For referenced ASTM standards, visit the ASTM website, www.astm.org, or
Fig. 2 and Fig. 4.
contact ASTM Customer Service at service@astm.org. For Annual Book of ASTM
6.1.5 Immersion Cell—Rectangular glass jar with strain-
Standards volume information, refer to the standard’s Document Summary page on
the ASTM website. free, retardation-free viewing sides filled with a liquid having
Copyright © ASTM International, 100 Barr Harbor Drive, PO Box C700, West Conshohocken, PA 19428-2959. United States
F218 − 13 (2020)
7.2 As usually employed, the polarimeter measures retarda-
tions in a sample that is placed in the polarimeter and rotated
until the measured stresses S and S are oriented along V and
x y
H (vertical or a horizontal) direction. This is accomplished by
settingthevibrationdirectionofthepolarizeratanangleof45°
totheverticalandclockwisetothehorizontal(asshowninFig.
A—Light source (white, sodium vapor, or mercury vapor arc)
2 and Fig. 4). The vibration direction of the analyzer must be
B—Filter (used only with mercury arc light) (used with white light)
C—Diffuser
“crossed” with respect to that of the polarizer; that is, the two
D—Polarizer
directions must be at right angles to each other. In this
E—Immersion cell
F—Full-wave plate (used only with white light) relationship a minimum amount of light will pass through the
G—Quarter-wave plate
combination.To check the 45° angle at which the directions of
H—Analyzer
the polarizer and analyzer must be set, use may be made of a
I—Telescope
rectangular-shaped Glan-Thompson or Nicol prism. The prism
FIG. 1 Polarimeter
is set so that its vibration direction is 45° to the vertical and
horizontal.The polarizer is then rotated until extinction occurs
between it and the prism. The position of the analyzer is then
the same index of refraction as the glass specimen to be
measured. It may be surmounted with a suitable device for determined in the same way, but by first rotating the Glan-
holding and rotating the specimen, such that it does not stress Thompson or Nicol prism through 90°; or the analyzer may be
the specimen. rotatedtoextinctionwithrespecttothepolarizerafterthelatter
has been set in position with the prism.
NOTE2—Suitableindexliquidsmaybepurchasedormixedasrequired.
Dibutyl phthalate (refractive index 1.489), and tricresyl phosphate (index
7.3 When a quarter-wave plate is used, its “slow” ray
1.555) may be mixed to produce any desired refractive index between the
direction must be set 45° clockwise from the horizontal in a
twolimits,therefractiveindexbeingalinearfunctionoftheproportionof
northwest-southeast direction (see Fig. 2). Adjusted in this
one liquid to the other. Other liquids that may be used are:
position,maximumextinctionoccurswhendirectionofaxesof
LIQUID REFRACTIVE INDEX
CINNAMIC ALDEHYDE 1.62 all three elements (polarizer, analyzer and quarter-wave plate)
OIL OF CASSIA 1.61
are in agreement with Fig. 2.
MONOCHLOROBENZENE 1.525
CARBON TETRACHLORIDE 1.463
7.4 When the full-wave plate is used with the quarter-wave
DIPENTENE (EASTMAN) 1.473
plate, its “slow” ray direction must be placed in a horizontal
NOTE 3—Cases may arise where the refraction liquid may contaminate
position (see Fig. 2). Adjusted in this position, a violet-red
the specimen. When the sample is viewed through faces that are
essentiallyparallel,eliminationoftheliquidwillcauseonlyaminorerror.
background color is seen when the three elements (polarizer,
However, when viewing through faces of the sample that are not parallel,
full-wave plate, and analyzer) are placed in series.
the use of liquid of same refraction index is essential.
7.5 Subsections 7.3 and 7.4 describe orientations of the
6.1.6 Full-wave (Sensitive Tint) Plate, having a retardation
quarter-andfull-waveplatesinthestandardpositionsthathave
of 565 6 5 nm, which produces, with white light, a violet-red
been generally adopted. However, the direction of the “ slow”
color.Itshouldbehousedinarotatablemountcapableofbeing
rays may be rotated 90° without changing the functions of the
locked in a fixed position shown in Fig. 2.
apparatus.This does, however, cause the analyzer rotations (in
6.1.7 Quarter-wavePlate,havingaretardationequivalentto
the case of the quarter-wave plate) and the colors (in the case
one quarter of the wavelength of monochromatic light being
ofthefull-waveplate)tohaveoppositemeanings.Tables1and
used, or 141 6 5 nm when white light is used. It should be
2 define these meanings in whatever is being measured or
housed in a rotatable mount capable of being locked in a fixed
observed with the “slow” ray directions in either the standard
position shown in Fig. 2.
or the alternate positions.
6.1.8 Analyzer—Identical to the polarizer. It should be
housed in a rotatable mount capable of being rotated 360°, and
7.6 To assure proper orientation of the directions of the
a graduated dial indicating the angular rotation α of the “slow” ray of the quarter-wave and full-wave plates with
analyzer from its standard position. The polarizer must be
respecttothevibrationdirectionsofthepolarizerandanalyzer,
lockable in position shown in Fig. 2. use may be made of a U-shaped piece of annealed cane glass
6.1.9 Telescope, short-focus, having a suitable magnifying
asillustratedinFig.3.Squeezingthelegstogetherslightlywill
power over the usable focusing range. developatensilestressontheoutsideandacompressivestress
on the inside.Aflat rectangular beam in bending, containing a
7. Setup of Polarimeter
region where the direction and sign of stresses is known can
7.1 The standard setup of the polarimeter is illustrated in also be used. Then, if the “slow” ray directions of the
Fig. 2. Two reference directions must be identified: quarter-wave and full-wave plates are oriented in the standard
7.1.1 Vertical direction (V) (in polarimeters transmitting the position, the stress conditions of columns 1 through 4 of Table
light in horizontal direction) or NS, that is usually a symmetry 1 will be noted in the vertical and horizontal sides of the
axis of an instrument using a vertical light path, and polarizers U-tube. If the opposite meaning of the color definition is
are in a horizontal plane. preferred, it will be necessary to rotate the “slow” ray direc-
7.1.2 Horizontal(H),orEW(perpendiculartotheverticalor tions of the full-wave plate 90° to the alternate positions. The
NS) (see Fig. 4). orientation of the full-wave plate can be verified, comparing
F218 − 13 (2020)
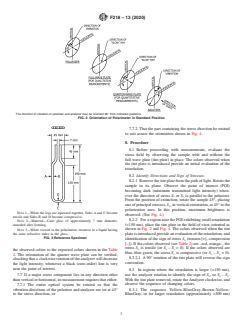
The direction of vibration of polarizer and analyzer may be oriented 90° from indicated positions.
FIG. 2 Orientation of Polarimeter in Standard Position
7.7.2 That the part containing the stress direction be rotated
to suit assure the orientation shown in Fig. 4.
8. Procedure
8.1 Before proceeding with measurements, evaluate the
stress field by observing the sample with and without the
full-wave plate (tint plate) in place. The colors observed when
the tint plate is introduced provide an initial evaluation of the
retardation.
8.2 Identify Directions and Sign of Stresses:
8.2.1 Removethetintplatefromthepathoflight.Rotatethe
sample in its plane. Observe the point of interest (POI)
becoming dark (minimum transmitted light intensity) when-
ever the direction of stress S or S is parallel to the polarizer.
x y
From the position of extinction, rotate the sample 45°, placing
oneofprincipalstresses,S ,inverticalorientation,at45°tothe
x
polarization axes. In this position, maximum brightness is
NOTE 1—When the legs are squeezed together, SidesAand C become
observed. (See Fig. 4.)
tensile and Sides B and D become compressive.
8.2.2 ForaregionnearthePOIexhibitingsmallretardation
NOTE 2—Material—Cane glass of approximately 7 mm diameter,
(<150 nm), place the tint plate in the field of view, oriented as
annealed after forming.
NOTE 3—When viewed in the polarimeter, immerse in a liquid having shown in Fig. 2 and Fig. 4. The colors observed when the tint
the same refractive index as the glass.
plateisintroducedprovideanevaluationoftheretardation,and
FIG. 3 Reference Specimen
identification of the sign of stress S (tension [+], compression
x
[–]). If the colors observed (see Table 2) are .red, orange., the
stress S is tensile (or S – S > 0). If the colors observed are
x x y
the observed colors to the expected colors shown in the Table
blue.blue green, the stress S is compressive (or S – S < 0).
x x y
2. The orientation of the quarter wave plate can be verified,
8.2.2.1 A 90° rotation of the tint plate will reverse the sign
checkingthataclockwiserotationoftheanalyzerwilldecrease
convention.
the light intensity, whenever a black (zero-order) line is very
near the point of interest.
8.3 In regions where the retardation is larger (>150 nm),
use the analyzer rotation to identify the sign of S,or S – S .
7.7 If a major stress component lies in any direction other
x x y
Withthetintplateremoved,rotatetheAnalyzerclockwise,and
thanverticalorhorizontal,itsmeasurementrequiresthateither:
observe the sequence of changing colors.
7.7.1 The entire optical system be rotated so that the
vibration directions of the polarizer and analyzer are set at 45° 8.3.1 The sequence Yellow-BlueGray-Brown-Yellow-
to the stress direction, or BlueGray, or for larger retardation (approximately >300 nm)
F218 − 13 (2020)
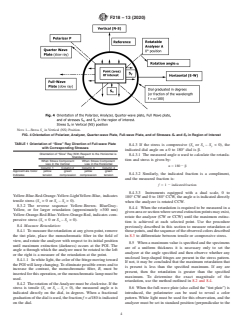
NOTE 1—Stress S in Vertical (NS) Position.
x
FIG. 4 Orientation of Polarizer, Analyzer, Quarter-wave Plate, Full-wave Plate, and of Stresses S and S in Region of Interest
x y
TABLE 1 Orientation of “Slow” Ray Direction of Full-wave Plate
8.4.3 If the stress is compressive (S or S – S < 0), the
x x y
with Corresponding Stresses
indicated dial angle ona0to 180° dial is β.
Orientation of “Slow” Ray With Respect to the Horizontal is
8.4.3.1 The measured angle α used to calculate the retarda-
Standard
tion and stress is given by:
When Stress Component When Stress Component
Lies in the Vertical Lies in the Horizontal
α 5 180 2 β
Column 1 Column 2 Column 3 Column 4
Approximate Color yellow green yellow green
8.4.3.2 Similarly, the indicated fraction is a compliment,
Indicates tension compression compression tension
and the measured fraction is:
f 5 1 2 indicatedfraction
8.4.3.3 Instruments equipped with a dual scale, 0 to
Yellow-Blue-Red-Orange-Yellow-LightYellow-Blue, indicates
180° CW and 0 to 180° CCW, the angle α is indicated directly
tensile stress (S >0or S – S > 0).
x x y
when the analyzer is rotated CCW.
8.3.2 The reverse sequence Yellow-Brown- BlueGray-
8.4.4 When the retardation is required to be measured in a
Yellow, or for larger retardation (approximately >300 nm)
givenareaorsectionwhereseveralextinctionpointsmayexist,
Yellow-Orange-Red-Blue-Yellow-Orange-Red, indicates com-
rotate the analyzer (CW or CCW) until the maximum extinc-
pressive stress (S <0or S – S > 0).
x x y
tion is achieved at each selected point. Use the procedure
8.4 Measure Retardation:
previously described in this section to measure retardation at
8.4.1 To measure the retardation at any given point, remove thosepoints,andthesequenceoftheobservedcolorsdescribed
the tint plate, place the monochromatic filter in the field of
in 8.3 to differentiate between tensile or compressive stress.
view, and rotate the analyzer with respect to its initial position
8.5 When a maximum value is specified and the specimens
until maximum extinction (darkness) occurs at the POI. The
are of a uniform thickness it is necessary only to set the
angle α through which the analyzer must be rotated to the left
analyzer at the angle specified and then observe whether any
or the right is a measure of the retardation at the point.
unclosed loop-shaped fringes are present in the stress pattern.
8.4.1.1 Inwhitelight,thecolorofthefringemovingtoward
If not, it may be concluded that the maximum retardation that
thePOIwillkeepchanging.Toeliminatepossibleerrorsandto
is present is less than the specified maximum. If any are
increase the contrast, the monochroma
...


Questions, Comments and Discussion
Ask us and Technical Secretary will try to provide an answer. You can facilitate discussion about the standard in here.
Loading comments...