ASTM D6617-05
(Practice)Standard Practice for Laboratory Bias Detection Using Single Test Result from Standard Material
Standard Practice for Laboratory Bias Detection Using Single Test Result from Standard Material
SIGNIFICANCE AND USE
Laboratories performing petroleum test methods can use this practice to set an acceptable tolerance zone for infrequent testing of CS or CCS material, based on ε, and a desired Type I error, for the purpose of ascertaining if the test method is being performed without bias.
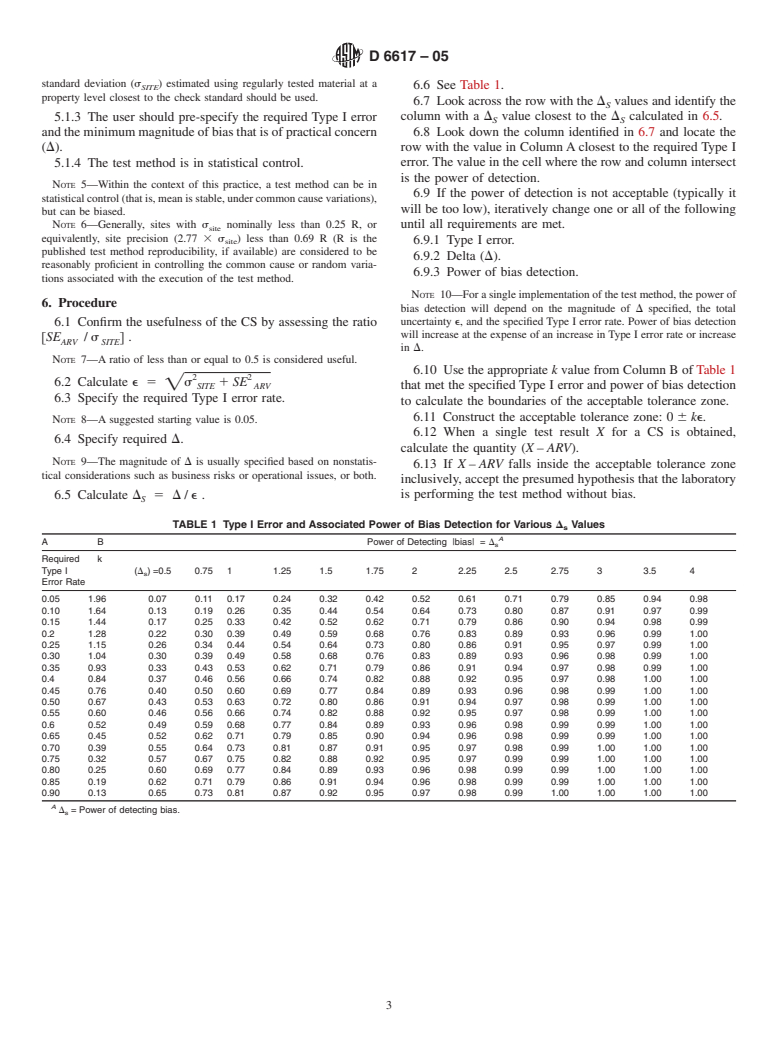
This practice can be used to estimate the power of correctly detecting bias of different magnitudes, using the acceptable tolerance zone set in 4.1, and hence, gain insight into the limitation of the true bias detection capability associated with this acceptable tolerance zone. With this insight, trade-offs can be made between desired Type I error versus desired bias detection capability to suit specific business needs.
The CS testing activities described in this practice are intended to augment and not replace the regular statistical monitoring of test method performance as described in Practice D 6299.
SCOPE
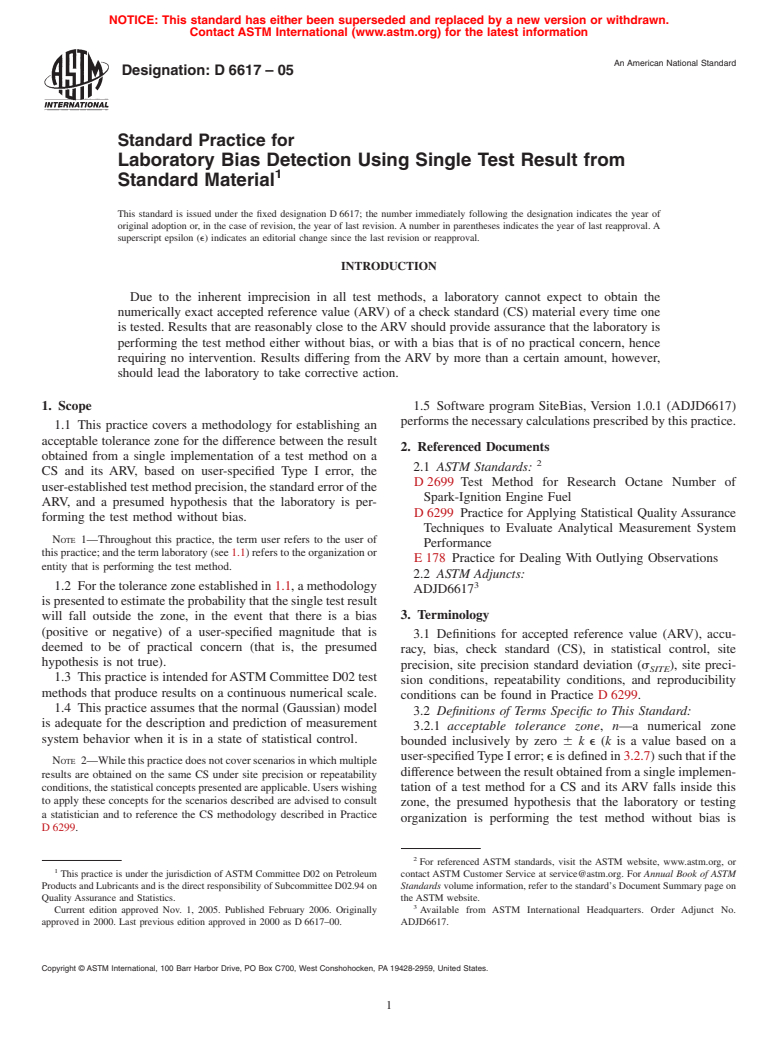
1.1 This practice covers a methodology for establishing an acceptable tolerance zone for the difference between the result obtained from a single implementation of a test method on a CS and its ARV, based on user-specified Type I error, the user-established test method precision, the standard error of the ARV, and a presumed hypothesis that the laboratory is performing the test method without bias.Note 1
Throughout this practice, the term user refers to the user of this practice; and the term laboratory (see ) refers to the organization or entity that is performing the test method.
1.2 For the tolerance zone established in , a methodology is presented to estimate the probability that the single test result will fall outside the zone, in the event that there is a bias (positive or negative) of a user-specified magnitude that is deemed to be of practical concern (that is, the presumed hypothesis is not true).
1.3 This practice is intended for ASTM Committee D02 test methods that produce results on a continuous numerical scale.
1.4 This practice assumes that the normal (Gaussian) model is adequate for the description and prediction of measurement system behavior when it is in a state of statistical control.Note 2
While this practice does not cover scenarios in which multiple results are obtained on the same CS under site precision or repeatability conditions, the statistical concepts presented are applicable. Users wishing to apply these concepts for the scenarios described are advised to consult a statistician and to reference the CS methodology described in Practice D 6299.
1.5 Software program SiteBias, Version 1.0.1 (ADJD6617) performs the necessary calculations prescribed by this practice.
General Information
Relations
Standards Content (Sample)
NOTICE: This standard has either been superseded and replaced by a new version or withdrawn.
Contact ASTM International (www.astm.org) for the latest information
An American National Standard
Designation:D6617–05
Standard Practice for
Laboratory Bias Detection Using Single Test Result from
1
Standard Material
This standard is issued under the fixed designation D 6617; the number immediately following the designation indicates the year of
original adoption or, in the case of revision, the year of last revision. A number in parentheses indicates the year of last reapproval. A
superscript epsilon (e) indicates an editorial change since the last revision or reapproval.
INTRODUCTION
Due to the inherent imprecision in all test methods, a laboratory cannot expect to obtain the
numerically exact accepted reference value (ARV) of a check standard (CS) material every time one
is tested. Results that are reasonably close to theARV should provide assurance that the laboratory is
performing the test method either without bias, or with a bias that is of no practical concern, hence
requiring no intervention. Results differing from the ARV by more than a certain amount, however,
should lead the laboratory to take corrective action.
1. Scope 1.5 Software program SiteBias, Version 1.0.1 (ADJD6617)
performs the necessary calculations prescribed by this practice.
1.1 This practice covers a methodology for establishing an
acceptable tolerance zone for the difference between the result
2. Referenced Documents
obtained from a single implementation of a test method on a
2
2.1 ASTM Standards:
CS and its ARV, based on user-specified Type I error, the
D2699 Test Method for Research Octane Number of
user-establishedtestmethodprecision,thestandarderrorofthe
Spark-Ignition Engine Fuel
ARV, and a presumed hypothesis that the laboratory is per-
D 6299 Practice for Applying Statistical Quality Assurance
forming the test method without bias.
Techniques to Evaluate Analytical Measurement System
NOTE 1—Throughout this practice, the term user refers to the user of
Performance
this practice; and the term laboratory (see 1.1) refers to the organization or
E 178 Practice for Dealing With Outlying Observations
entity that is performing the test method.
2.2 ASTM Adjuncts:
3
1.2 Forthetolerancezoneestablishedin1.1,amethodology
ADJD6617
ispresentedtoestimatetheprobabilitythatthesingletestresult
3. Terminology
will fall outside the zone, in the event that there is a bias
(positive or negative) of a user-specified magnitude that is
3.1 Definitions for accepted reference value (ARV), accu-
deemed to be of practical concern (that is, the presumed
racy, bias, check standard (CS), in statistical control, site
hypothesis is not true).
precision, site precision standard deviation (s ), site preci-
SITE
1.3 This practice is intended forASTM Committee D02 test
sion conditions, repeatability conditions, and reproducibility
methods that produce results on a continuous numerical scale.
conditions can be found in Practice D 6299.
1.4 This practice assumes that the normal (Gaussian) model
3.2 Definitions of Terms Specific to This Standard:
is adequate for the description and prediction of measurement
3.2.1 acceptable tolerance zone, n—a numerical zone
system behavior when it is in a state of statistical control.
bounded inclusively by zero 6 k e (k is a value based on a
user-specifiedTypeIerror; eisdefinedin3.2.7)suchthatifthe
NOTE 2—Whilethispracticedoesnotcoverscenariosinwhichmultiple
differencebetweentheresultobtainedfromasingleimplemen-
results are obtained on the same CS under site precision or repeatability
conditions,thestatisticalconceptspresentedareapplicable.Userswishing tation of a test method for a CS and its ARV falls inside this
to apply these concepts for the scenarios described are advised to consult
zone, the presumed hypothesis that the laboratory or testing
a statistician and to reference the CS methodology described in Practice
organization is performing the test method without bias is
D 6299.
2
For referenced ASTM standards, visit the ASTM website, www.astm.org, or
1
This practice is under the jurisdiction ofASTM Committee D02 on Petroleum contact ASTM Customer Service at service@astm.org. For Annual Book of ASTM
Products and Lubricants and is the direct responsibility of Subcommittee D02.94 on Standards volume information, refer to the standard’s Document Summary page on
Quality Assurance and Statistics. the ASTM website.
3
Current edition approved Nov. 1, 2005. Published February 2006. Originally Available from ASTM International Headquarters. Order Adjunct No.
approved in 2000. Last previous edition approved in 2000 as D 6617–00. ADJD6617.
Copyright © ASTM International, 100 Barr Harbor Drive, PO Box C700, West Conshohocken, PA 19428-2959, United States.
1
---------------------- Page: 1 ----------------------
D6617–05
accepted, and the difference is attributed to normal random 3.2.8.1 Discussion—Type I error, commonly known as
variation of the
...


Questions, Comments and Discussion
Ask us and Technical Secretary will try to provide an answer. You can facilitate discussion about the standard in here.