ASTM E448-82(1997)e2
(Practice)Standard Practice for Scleroscope Hardness Testing of Metallic Materials
Standard Practice for Scleroscope Hardness Testing of Metallic Materials
SCOPE
1.1 This practice covers the determination of the Scleroscope hardness of metallic materials (Part A), the verification of Scleroscope hardness instruments (Part B), and the calibration of standardized hardness test blocks (Part C).
1.2 The values stated in SI units are to be regarded as the standard. The values given in parentheses are for information only.
1.3 This standard does not purport to address all of the safety problems, if any, associated with its use. It is the responsibility of the user of this standard to establish appropriate safety and health practices and determine the applicability of regulatory limitations prior to use.
General Information
Relations
Standards Content (Sample)
NOTICE: This standard has either been superseded and replaced by a new version or discontinued.
Contact ASTM International (www.astm.org) for the latest information.
e2
Designation: E 448 – 82 (Reapproved 1997)
Standard Practice for
Scleroscope Hardness Testing of Metallic Materials
This standard is issued under the fixed designation E 448; the number immediately following the designation indicates the year of
original adoption or, in the case of revision, the year of last revision. A number in parentheses indicates the year of last reapproval. A
superscript epsilon (e) indicates an editorial change since the last revision or reapproval.
e NOTE—Section 20 was added editorially in October 1997.
e NOTE—Note 1 was editorially revised in December 2001.
1. Scope average rebound of a hammer from a forged steel roll of
accepted maximum hardness.
1.1 This practice covers the determination of the Sclero-
scope hardness of metallic materials (Part A), the verification
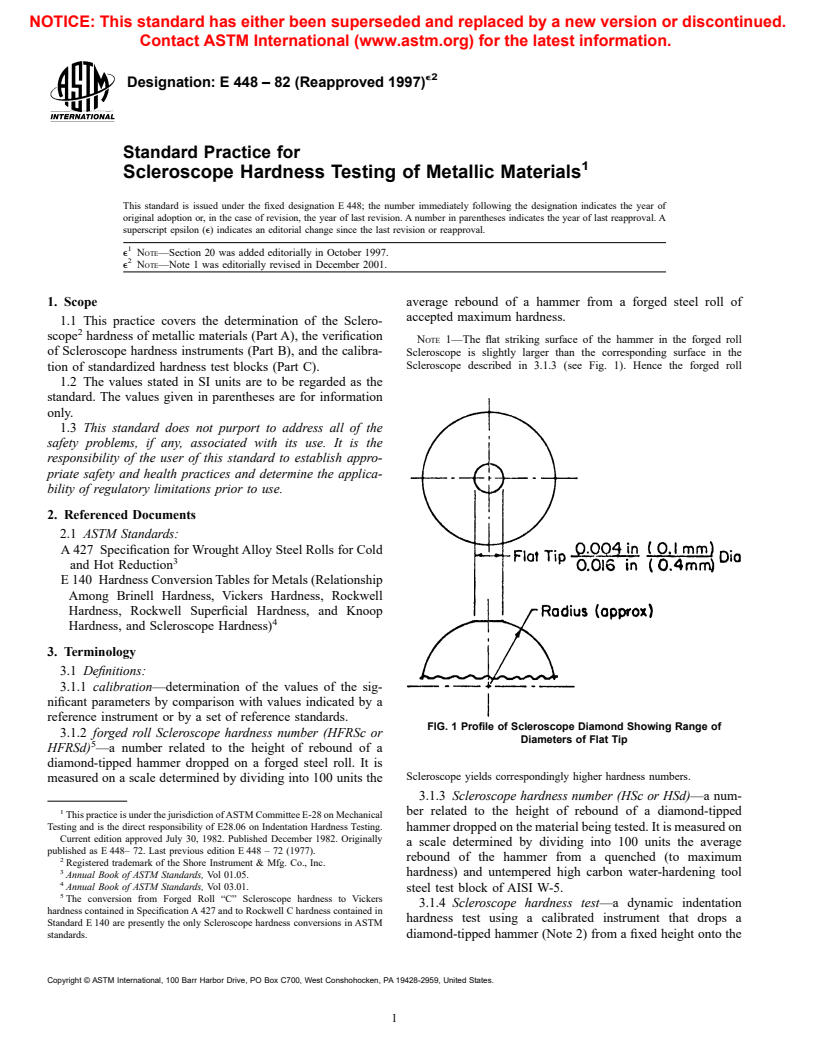
NOTE 1—The flat striking surface of the hammer in the forged roll
of Scleroscope hardness instruments (Part B), and the calibra-
Scleroscope is slightly larger than the corresponding surface in the
Scleroscope described in 3.1.3 (see Fig. 1). Hence the forged roll
tion of standardized hardness test blocks (Part C).
1.2 The values stated in SI units are to be regarded as the
standard. The values given in parentheses are for information
only.
1.3 This standard does not purport to address all of the
safety problems, if any, associated with its use. It is the
responsibility of the user of this standard to establish appro-
priate safety and health practices and determine the applica-
bility of regulatory limitations prior to use.
2. Referenced Documents
2.1 ASTM Standards:
A 427 Specification for Wrought Alloy Steel Rolls for Cold
and Hot Reduction
E 140 Hardness Conversion Tables for Metals (Relationship
Among Brinell Hardness, Vickers Hardness, Rockwell
Hardness, Rockwell Superficial Hardness, and Knoop
Hardness, and Scleroscope Hardness)
3. Terminology
3.1 Definitions:
3.1.1 calibration—determination of the values of the sig-
nificant parameters by comparison with values indicated by a
reference instrument or by a set of reference standards.
FIG. 1 Profile of Scleroscope Diamond Showing Range of
3.1.2 forged roll Scleroscope hardness number (HFRSc or
Diameters of Flat Tip
HFRSd) —a number related to the height of rebound of a
diamond-tipped hammer dropped on a forged steel roll. It is
Scleroscope yields correspondingly higher hardness numbers.
measured on a scale determined by dividing into 100 units the
3.1.3 Scleroscope hardness number (HSc or HSd)—a num-
ber related to the height of rebound of a diamond-tipped
This practice is under the jurisdiction of ASTM Committee E-28 on Mechanical
Testing and is the direct responsibility of E28.06 on Indentation Hardness Testing. hammer dropped on the material being tested. It is measured on
Current edition approved July 30, 1982. Published December 1982. Originally
a scale determined by dividing into 100 units the average
published as E 448– 72. Last previous edition E 448 – 72 (1977).
rebound of the hammer from a quenched (to maximum
Registered trademark of the Shore Instrument & Mfg. Co., Inc.
hardness) and untempered high carbon water-hardening tool
Annual Book of ASTM Standards, Vol 01.05.
Annual Book of ASTM Standards, Vol 03.01.
steel test block of AISI W-5.
The conversion from Forged Roll “C” Scleroscope hardness to Vickers
3.1.4 Scleroscope hardness test—a dynamic indentation
hardness contained in Specification A 427 and to Rockwell C hardness contained in
hardness test using a calibrated instrument that drops a
Standard E 140 are presently the only Scleroscope hardness conversions in ASTM
standards. diamond-tipped hammer (Note 2) from a fixed height onto the
Copyright © ASTM International, 100 Barr Harbor Drive, PO Box C700, West Conshohocken, PA 19428-2959, United States.
NOTICE: This standard has either been superseded and replaced by a new version or discontinued.
Contact ASTM International (www.astm.org) for the latest information.
E 448
surface of the material under test. The height of rebound of the 3.1.5 verification—checking or testing the instrument to
hammer is a measure of the hardness of the material.
assure conformance with the specification.
NOTE 2—An all-steel “Magnifier Hammer” that yielded a greater
spread in hardness readings on soft nonferrous metals has been available.
This hammer has become obsolete and, hence, is not considered in this
practice.
GENERAL DESCRIPTION OF INSTRUMENTS AND TEST PROCEDURE FOR SCLEROSCOPE
HARDNESS TEST
4. Apparatus significant effect on the readings of a rebound-type hardness
instrument. Consequently, the geometry of the diamond must
4.1 The instrument used for determining Scleroscope hard-
be shaped to produce a correct reading on reference bars of
ness numbers is supplied in two models designated Model C
known hardness. In the forged roll Scleroscope the diamond tip
and Model D.
is specifically dimensioned to produce a correct reading on a
4.2 Scleroscope Model C—This model consists of a verti-
forged-steel roll of known hardness. In profile, the diamond is
cally disposed barrel containing a precision bore glass tube. A
convex, having an approximate radius terminated by a flat
scale, graduated from 0 to 140, is set behind and is visible
striking surface, as shown in Fig. 1. The flat striking surface is
through the glass tube. A pneumatic actuating head, affixed to
approximately circular and from 0.004 to 0.016 in. (0.1 to 0.4
the top of the barrel, is manually operated by a rubber bulb and
mm) in diameter, depending on the type of instrument and the
tube. A hammer drops from a specified height and rebounds
hardness and other physical characteristics of the diamond.
within the glass tube.
4.3 Scleroscope Model D—This model is known as the Dial 4.5 Supporting Devices—The three supporting devices used
Recording Scleroscope. It consists of a vertically disposed most frequently with the Scleroscope are (a) the clamping
barrel containing a clutch to arrest the hammer at maximum stand, (b) the swing arm and post, and (c) the roll-testing stand.
height of rebound. This is made possible by using a hammer
which is longer and heavier than the hammer in the Model C 5. Test Specimens
Scleroscope, and which develops the same striking energy in
5.1 Form—Specimens used in Scleroscope testing vary
dropping through a shorter distance. A number of supporting
greatly with respect to size and shape. Smaller specimens may
devices are available with this instrument and it is recom-
be tested in the clamping stand which has a jaw capacity of 3
mended that one of these be used (see section 4.5).
in. (76 mm) high by 2 ⁄2 in. (64 mm) deep. Large specimens,
4.4 Diamond-Tipped Hammers:
beyond the jaw capacity of the clamping stand, may be tested
4.4.1 There are two sizes of diamond-tipped hammers
with the instrument mounted on the swing arm and post or the
commonly used in the Scleroscope hardness instruments.
roll-testing stand. The swing arm and post has a height and
These are the small hammer used in the Model C instrument
reach capacity of 9 in. (230 mm) and 14 in. (360 mm),
and the larger hammer used in the Model D instrument.
respectively. The roll-testing stand may be used for mounting
4.4.2 The following dimensions are applicable to the
the instrument on cylindrical specimens with a diameter of 2 ⁄2
diamond-tipped hammers:
in. (64 mm) and upward without limit. The roll-testing stand
Model C
may also be used for mounting the instrument on flat, horizon-
Diameter 0.234 in. (5.94 mm)
tal surfaces with a minimum perimetric dimension of 3 by 5 in.
Mass 2.300 6 0.500 g
Over-all length 0.815 to 0.840 in. (20.7 to 21.3 mm)
(76 by 130 mm). The Model C Scleroscope may be used free
Distance hammer 9.890 + 0.005, −0.015 in. (251.2 + 0.1,
hand for testing specimens with a minimum mass of 5 lb (2.3
falls −0.4 mm)
kg). It is not recommended that the Model D Scleroscope be
Model D
used free hand.
Diameter 0.3125 in. (7.94 mm)
5.2 Thickness—Thin strips or sheets may be tested, with
Mass 36.0 6 2.0 g
Over-all length 3.990 to 4.010 in. (101.33 to 104.10 mm)
some limitations, but only when the Scleroscope is mounted in
Distance hammer 0.704 + 0.017, −0.021 in. (17.9 + 0.4, −0.5
the clamping stand. Ideally, the sheet should be flat and without
falls mm)
undulation. If the sheet material is bowed, the concave side
4.4.3 The geometry of the diamond tip is of significance
should be up to preclude any possibility of erroneous readings
only at its ultimate extremity because of the limited penetration
due to spring effect. The minimum thicknesses of sheet in
of the diamond into the material being tested. Such penetration
various categories that may be tested are as follows:
is about 0.001 in. (0.025 mm) on mild steel and about 0.0005
Thickness
in. (0.013 mm) on hardened tool steel. Further, the variation in
Material in. mm
Hard steel 0.005 to 0.006 0.13 to 0.15
hardness of commercially available industrial diamonds has a
Half-hard brass strip 0.010 0.25
Cold-rolled steel 0.010 0.25
Annealed-brass sheet 0.015 0.38
Model C and D Scleroscopes are manufactured by the Shore Instrument and
Manufacturing Co., Inc., Jamaica, NY. 5.3 Finish—The degree of test-surface finish is important.
NOTICE: This standard has either been superseded and replaced by a new version or discontinued.
Contact ASTM International (www.astm.org) for the latest information.
E 448
An excessively coarse finish will yield low and erratic read- 7.3 Spacing of Indentations—An error may result if the
ings. Hence, when necessary, the surface shall be filed, indentations are spaced too closely together. Space indenta-
machined, ground, or polished to permit accurate, consistent tions at least 0.020 in. (0.51 mm) apart and make only once at
readings to be obtained. Care should be taken to avoid the same spot. Flat specimens with parallel surfaces may be
overheating or excessively cold working the surface. The tested within ⁄4 in. (6 mm) of the edge when properly clamped.
surface fi
...


Questions, Comments and Discussion
Ask us and Technical Secretary will try to provide an answer. You can facilitate discussion about the standard in here.