ASTM F1503-02(2012)
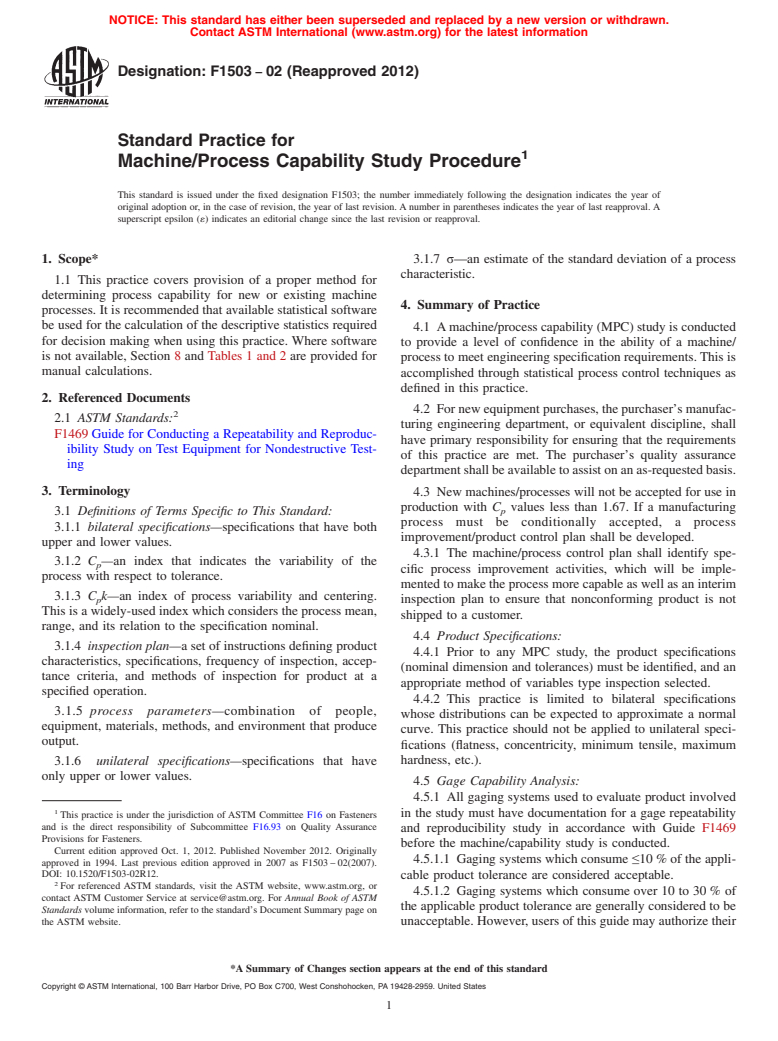
(Practice)Standard Practice for Machine/Process Capability Study Procedure (Withdrawn 2018)
Standard Practice for Machine/Process Capability Study Procedure (Withdrawn 2018)
SIGNIFICANCE AND USE
5.1 This practice is designed to evaluate a machine or process isolated from its normal operating environment. In its normal operating environment, there would be many sources of variation that may not exist at a machine/process builder's facility; or put another way, this study is usually conducted under ideal conditions. Therefore, it should be recognized that the results of this practice are usually a “best case” analysis, and allowances need to be made for sources of variations that may exist at the purchaser's facility.
SCOPE
1.1 This practice covers provision of a proper method for determining process capability for new or existing machine processes. It is recommended that available statistical software be used for the calculation of the descriptive statistics required for decision making when using this practice. Where software is not available, Section 8 and Tables 1 and 2 are provided for manual calculations.TABLE 1 Machine/Process Average and Range
Calculate the average Range (R) and the Process Average X For the study period, calculate:
where: k = the number of subgroups, R1 = the range and average of the first subgroup, X1 = the range and average of the first subgroup, R2 = from the second subgroup, and X2 = from the second subgroup, etc.
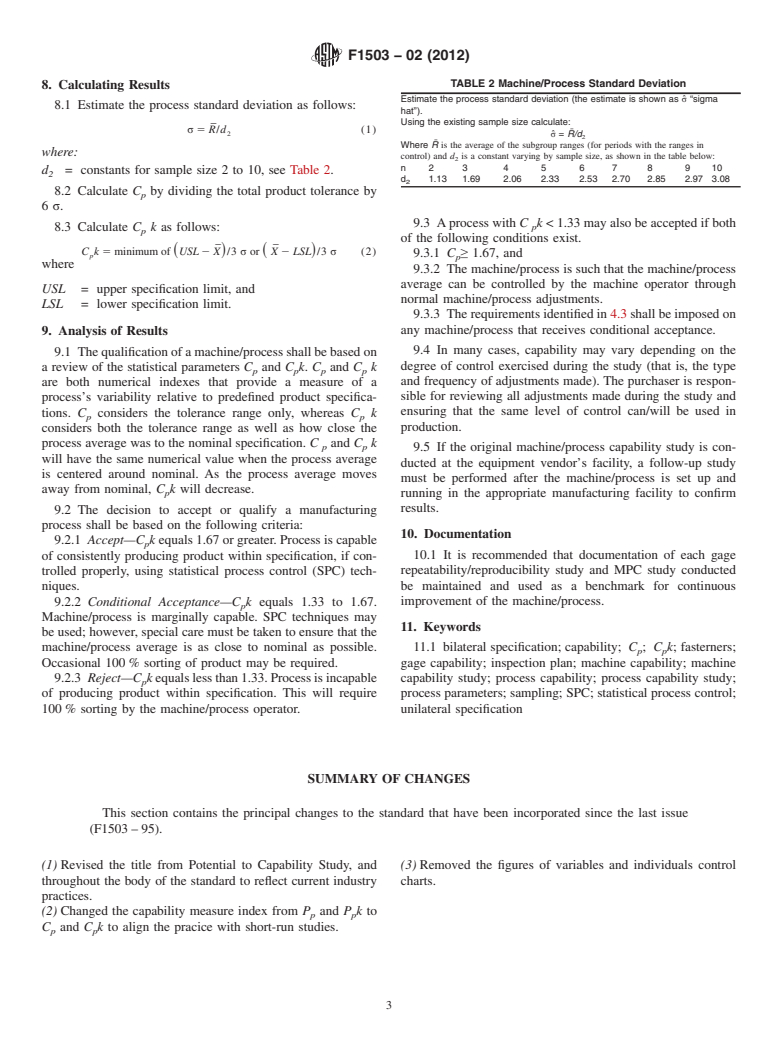
TABLE 2 Machine/Process Standard Deviation
Estimate the process standard deviation (the estimate is shown as σ^ “sigma hat”).
Using the existing sample size calculate:
σ^ = R/d2
Where R is the average of the subgroup ranges (for periods with the ranges in control) and d 2 is a constant varying by sample size, as shown in the table below:
n
2
3
4
5
6
7
8
9
10
d2
1.13
1.69
2.06
2.33
2.53
2.70
2.85
2.97
3.08
WITHDRAWN RATIONALE
This practice covers provision of a proper method for determining process capability for new or existing machine processes. It is recommended that available statistical software be used for the calculation of the descriptive statistics required for decision making when using this practice.
Formerly under the jurisdiction of Committee F16 on Fasteners, this practice was withdrawn in June 2018. This standard is being withdrawn without replacement due to its limited use by industry.
General Information
Relations
Standards Content (Sample)
NOTICE: This standard has either been superseded and replaced by a new version or withdrawn.
Contact ASTM International (www.astm.org) for the latest information
Designation: F1503 − 02 (Reapproved 2012)
Standard Practice for
Machine/Process Capability Study Procedure
This standard is issued under the fixed designation F1503; the number immediately following the designation indicates the year of
original adoption or, in the case of revision, the year of last revision. A number in parentheses indicates the year of last reapproval. A
superscript epsilon (´) indicates an editorial change since the last revision or reapproval.
1. Scope* 3.1.7 σ—an estimate of the standard deviation of a process
characteristic.
1.1 This practice covers provision of a proper method for
determining process capability for new or existing machine
4. Summary of Practice
processes. It is recommended that available statistical software
be used for the calculation of the descriptive statistics required
4.1 Amachine/process capability (MPC) study is conducted
for decision making when using this practice. Where software
to provide a level of confidence in the ability of a machine/
is not available, Section 8 and Tables 1 and 2 are provided for
process to meet engineering specification requirements. This is
manual calculations.
accomplished through statistical process control techniques as
defined in this practice.
2. Referenced Documents
4.2 For new equipment purchases, the purchaser’s manufac-
2.1 ASTM Standards:
turing engineering department, or equivalent discipline, shall
F1469 Guide for Conducting a Repeatability and Reproduc-
have primary responsibility for ensuring that the requirements
ibility Study on Test Equipment for Nondestructive Test-
of this practice are met. The purchaser’s quality assurance
ing
department shall be available toassist on an as-requested basis.
3. Terminology
4.3 New machines/processes will not be accepted for use in
production with C values less than 1.67. If a manufacturing
p
3.1 Definitions of Terms Specific to This Standard:
process must be conditionally accepted, a process
3.1.1 bilateral specifications—specifications that have both
improvement/product control plan shall be developed.
upper and lower values.
4.3.1 The machine/process control plan shall identify spe-
3.1.2 C —an index that indicates the variability of the
p
cific process improvement activities, which will be imple-
process with respect to tolerance.
mented to make the process more capable as well as an interim
3.1.3 C k—an index of process variability and centering.
p
inspection plan to ensure that nonconforming product is not
This is a widely-used index which considers the process mean,
shipped to a customer.
range, and its relation to the specification nominal.
4.4 Product Specifications:
3.1.4 inspection plan—a set of instructions defining product
4.4.1 Prior to any MPC study, the product specifications
characteristics, specifications, frequency of inspection, accep-
(nominal dimension and tolerances) must be identified, and an
tance criteria, and methods of inspection for product at a
appropriate method of variables type inspection selected.
specified operation.
4.4.2 This practice is limited to bilateral specifications
3.1.5 process parameters—combination of people,
whose distributions can be expected to approximate a normal
equipment, materials, methods, and environment that produce
curve. This practice should not be applied to unilateral speci-
output.
fications (flatness, concentricity, minimum tensile, maximum
hardness, etc.).
3.1.6 unilateral specifications—specifications that have
only upper or lower values.
4.5 Gage Capability Analysis:
4.5.1 All gaging systems used to evaluate product involved
This practice is under the jurisdiction of ASTM Committee F16 on Fasteners in the study must have documentation for a gage repeatability
and is the direct responsibility of Subcommittee F16.93 on Quality Assurance
and reproducibility study in accordance with Guide F1469
Provisions for Fasteners.
before the machine/capability study is conducted.
Current edition approved Oct. 1, 2012. Published November 2012. Originally
4.5.1.1 Gaging systems which consume≤10 % of the appli-
approved in 1994. Last previous edition approved in 2007 as F1503 – 02(2007).
DOI: 10.1520/F1503-02R12.
cable product tolerance are considered acceptable.
For referenced ASTM standards, visit the ASTM website, www.astm.org, or
4.5.1.2 Gaging systems which consume over 10 to 30 % of
contact ASTM Customer Service at service@astm.org. For Annual Book of ASTM
the applicable product tolerance are generally considered to be
Standards volume information, refer to the standard’s Document Summary page on
the ASTM website. unacceptable. However, users of this guide may authorize their
*A Summary of Changes section appears at the end of this standard
Copyright © ASTM International, 100 Barr Harbor Drive, PO Box C700, West Conshohocken, PA 19428-2959. United States
F1503 − 02 (2012)
TABLE 1 Machine/Process Average and Range
6. Material Selection
¯ ¯
Calculate the average Range (R) and the Process Average X For the study period,
6.1 Material (for example, steel slugs, bar, wire, prefinished
calculate:
parts, etc.) used for MPC studies shall be selected at random.
The variability of material used for MPC studies should be
R 1R 1.1R
1 2 k
¯
R 5
consistent with the variability of material the machine is likely
k
¯ ¯ ¯
to see in production. However, all selected samples shall
X 1X 1.1X
1 2 k
¯
X 5
k conform to their applicable product engineering standards.
where:
6.2 Presorting of material is not permissible for machine/
k = the number of subgroups, process qualification purposes.
R = the range and average of the first subgroup,
¯ 6.3 In some cases, machine/process capability results may
X = the range and average of the first subgroup,
R = from the second subgroup, and
2 be influenced by the specific product specifications selected for
¯
X = from the second subgroup, etc.
the study. The specific product selected for qualifying a new
machine/process should be based on that which will yield the
most conservative results. If the relationship between specific
product specifications and machine/process capability is
use depending on factors such as the criticality of the specifi-
unknown, two or more distinct studies should be performed
cation in question, the cost of alternative gaging systems, and
with different products to qualify and accept the new machine/
so forth.
process.
4.5.1.3 Gaging systems which consume more than 30 % of
the product tolerance are unacceptable and must not be used.
7. Procedure-Machine/Process Capability Study
4.5.2 All gaging systems must be certified as accurate using
standards traceable to NIST, other recognized standards
7.1 Operate the machine/process for a sufficient period of
organizations, or the equivalent manufacturer’s standard.
time to ensure that the machine/process is stable and all initial
setup adjustments are complete.
4.6 Process Parameter Selection :
4.6.1 For studies conducted at the equipment vendor’s
7.2 Control charting techniques should be utilized to deter-
facility, all machine/process parameters (for example, infeed
mine the stability and capability of the machine/process.
rates, coolant, dies, pressures, fixtures, etc.) must be estab-
¯
7.2.1 When possible, a standard X,R chart should be used
lished and documented prior to the MPC study so the require-
with subgroup size n equals 2 through 5.
ments of 9.5 can be met.
7.2.1.1 Sampling frequencies shall be established to ensure
4.6.1.1 Machine/process parameters may not be changed
that all likely sources of variability occur.
once an MPC study has begun.
7.2.1.2 A minimum of 25 subgroups are required to estab-
4.6.1.2 All machine/process adjustments made during the
lish control.
MPCstudymustbedocumentedandincludedwithinformation
7.2.2 When the quantity of sample measurements cannot be
required in Section 10.1 of this practice.
practically obtained, it is permissible to utilize a chart for
individuals and moving ranges.
NOTE1—Machine/processadjustmentsaredefinedasthoseadjustments
made due t
...


Questions, Comments and Discussion
Ask us and Technical Secretary will try to provide an answer. You can facilitate discussion about the standard in here.