ASTM C599-91(1995)e1
(Specification)Standard Specification for Conical Process Glass Pipe and Fittings (Withdrawn 2002)
Standard Specification for Conical Process Glass Pipe and Fittings (Withdrawn 2002)
SCOPE
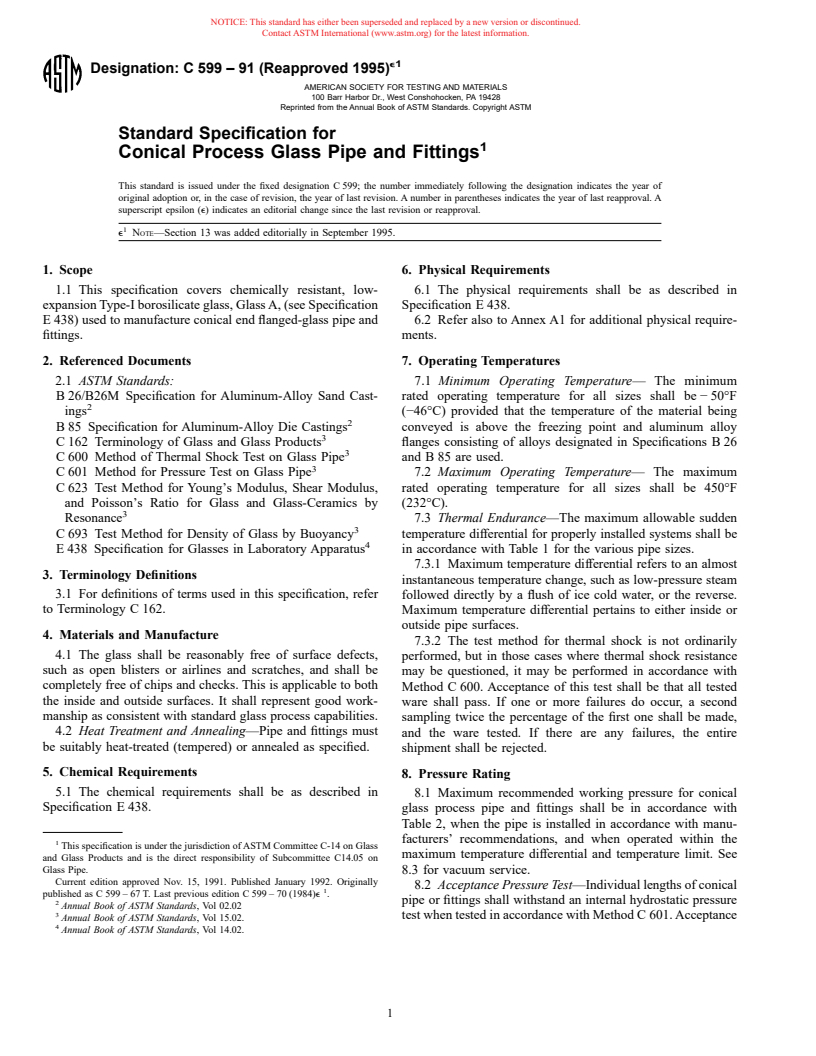
1.1 This specification covers chemically resistant, low-expansion Type-I borosilicate glass, Glass A, (see Specification E438) used to manufacture conical end flanged-glass pipe and fittings.
General Information
Standards Content (Sample)
e1
Designation: C 599 – 91 (Reapproved 1995)
AMERICAN SOCIETY FOR TESTING AND MATERIALS
100 Barr Harbor Dr., West Conshohocken, PA 19428
Reprinted from the Annual Book of ASTM Standards. Copyright ASTM
Standard Specification for
Conical Process Glass Pipe and Fittings
This standard is issued under the fixed designation C 599; the number immediately following the designation indicates the year of
original adoption or, in the case of revision, the year of last revision. A number in parentheses indicates the year of last reapproval. A
superscript epsilon (e) indicates an editorial change since the last revision or reapproval.
e NOTE—Section 13 was added editorially in September 1995.
1. Scope 6. Physical Requirements
1.1 This specification covers chemically resistant, low- 6.1 The physical requirements shall be as described in
expansion Type-I borosilicate glass, Glass A, (see Specification Specification E 438.
E 438) used to manufacture conical end flanged-glass pipe and 6.2 Refer also to Annex A1 for additional physical require-
fittings. ments.
2. Referenced Documents 7. Operating Temperatures
2.1 ASTM Standards: 7.1 Minimum Operating Temperature— The minimum
B 26/B26M Specification for Aluminum-Alloy Sand Cast- rated operating temperature for all sizes shall be − 50°F
ings (−46°C) provided that the temperature of the material being
B 85 Specification for Aluminum-Alloy Die Castings conveyed is above the freezing point and aluminum alloy
C 162 Terminology of Glass and Glass Products flanges consisting of alloys designated in Specifications B 26
C 600 Method of Thermal Shock Test on Glass Pipe and B 85 are used.
C 601 Method for Pressure Test on Glass Pipe 7.2 Maximum Operating Temperature— The maximum
C 623 Test Method for Young’s Modulus, Shear Modulus, rated operating temperature for all sizes shall be 450°F
and Poisson’s Ratio for Glass and Glass-Ceramics by (232°C).
Resonance 7.3 Thermal Endurance—The maximum allowable sudden
C 693 Test Method for Density of Glass by Buoyancy temperature differential for properly installed systems shall be
E 438 Specification for Glasses in Laboratory Apparatus in accordance with Table 1 for the various pipe sizes.
7.3.1 Maximum temperature differential refers to an almost
3. Terminology Definitions
instantaneous temperature change, such as low-pressure steam
3.1 For definitions of terms used in this specification, refer
followed directly by a flush of ice cold water, or the reverse.
to Terminology C 162. Maximum temperature differential pertains to either inside or
outside pipe surfaces.
4. Materials and Manufacture
7.3.2 The test method for thermal shock is not ordinarily
4.1 The glass shall be reasonably free of surface defects,
performed, but in those cases where thermal shock resistance
such as open blisters or airlines and scratches, and shall be
may be questioned, it may be performed in accordance with
completely free of chips and checks. This is applicable to both
Method C 600. Acceptance of this test shall be that all tested
the inside and outside surfaces. It shall represent good work-
ware shall pass. If one or more failures do occur, a second
manship as consistent with standard glass process capabilities.
sampling twice the percentage of the first one shall be made,
4.2 Heat Treatment and Annealing—Pipe and fittings must
and the ware tested. If there are any failures, the entire
be suitably heat-treated (tempered) or annealed as specified.
shipment shall be rejected.
5. Chemical Requirements
8. Pressure Rating
5.1 The chemical requirements shall be as described in
8.1 Maximum recommended working pressure for conical
Specification E 438.
glass process pipe and fittings shall be in accordance with
Table 2, when the pipe is installed in accordance with manu-
facturers’ recommendations, and when operated within the
This specification is under the jurisdiction of ASTM Committee C-14 on Glass
maximum temperature differential and temperature limit. See
and Glass Products and is the direct responsibility of Subcommittee C14.05 on
Glass Pipe. 8.3 for vacuum service.
Current edition approved Nov. 15, 1991. Published January 1992. Originally
8.2 Acceptance Pressure Test—Individual lengths of conical
published as C 599 – 67 T. Last previous edition C 599 – 70 (1984)e .
2 pipe or fittings shall withstand an internal hydrostatic pressure
Annual Book of ASTM Standards, Vol 02.02
test when tested in accordance with Method C 601. Acceptance
Annual Book of ASTM Standards, Vol 15.02.
Annual Book of ASTM Standards, Vol 14.02.
C 599
TABLE 1 Maximum Temperature for Thermal Endurance
9.1.3 Flange Out-Of-Round—Out-of-round of the flanges
Sudden Temperature shall be measured on the conical portion of the flange at the
Nominal Pipe Size, in.
Difference, max °F (°C)
distance from the plane of the flange face indicated in Table 4,
1 to 2 200 (93)
3 140 (78)
TABLE 4 Out-of-Round of Flanges
4 122 (68)
Measurement
6 180 (82)
Point (Distance
Nominal Size, Out-of-Round,
from Plane of
in. max, in. (mm)
Flange Face),
TABLE 2 Maximum Working Pressure for Glass Process Pipe
in. (mm)
and Fittings
1to3 ⁄2(12.7) 0.020 (0.51)
4to6 ⁄2(12.7) 0.030 (0.76)
Recommended Working
Nominal Pipe Size, in.
Pressure, max, psi (kPa)
1 to 2 50 (345)
and shall be within the requirements prescribed in Table 4.
3 40 (276)
9.2 Bow:
4 35 (241)
6 20 (138)
9.2.1 Bow for Pipe Diameters 1 in. and Up—Bow shall be
measured at the midpoint of the pipe on a flat supporting
surface so as to permit no bending due to mass. Bow shall not
of this test shall be that all tested ware shall pass. If one or
exceed 0.0015 times the length of the pipe. The representative
more failures do occur, a second sampling twice the percentage
maximum bow tolerances in Table 5 indicate the range.
of the first one shall be made and the ware tested. If there are
10. Dimensions of All Pipe and Fittings
any failures in the second sampling, the entire sampling shall
be rejected.
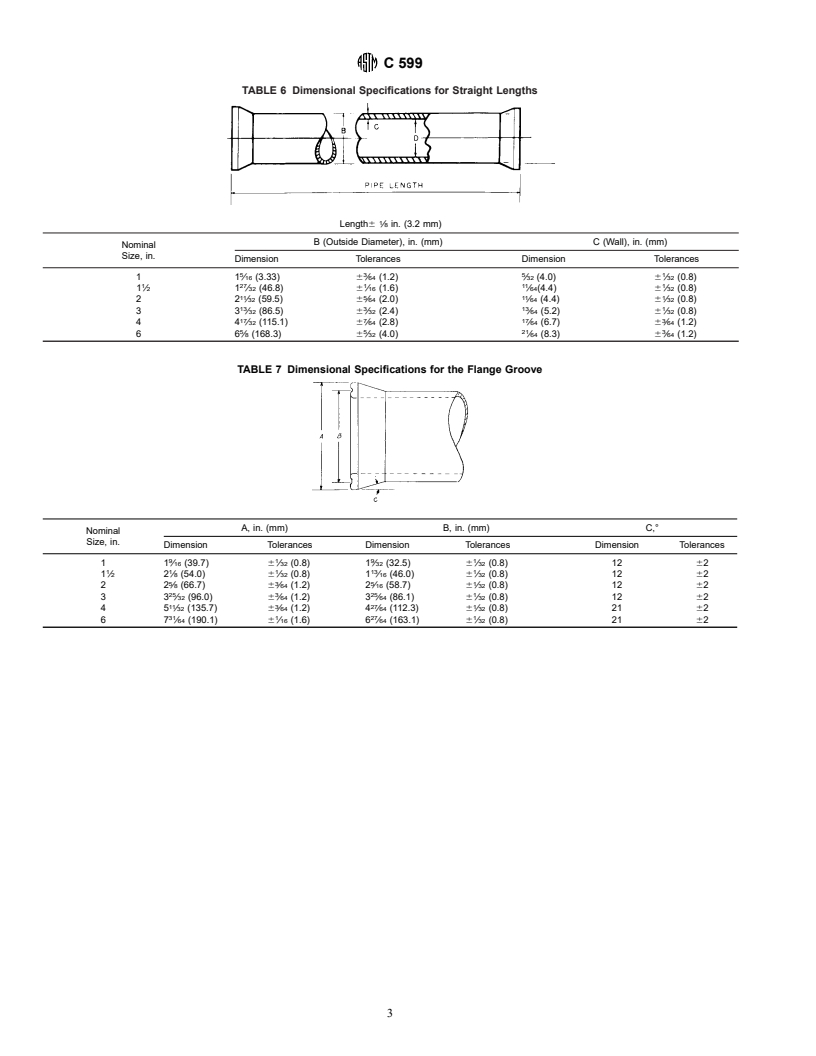
10.1 Straight Pipe (Dimensions)—Dimensional specifica-
8.3 All pipe sizes are suitable for vacuum applications.
tions for straight lengths shall be in accordance with Table 6.
10.2 Dimensions of Flange Groove—Dimensional specifi-
9. Dimensions and Permissible Variations
cations for the flange groove shall be in accordance with Table
9.1 Flanges:
7.
9.1.1 Flange Face Flatness—Maximum permissible devia-
10.3 Spacers (Standard)—Dimensional specifications for
tion from a flat plane across the face of the flange on all sizes
spacers (standard) shall be in accordance with Table 8.
shall be ⁄64 in. (0.4 mm).
10.4 Spacer (Beveled)—Dimensional specifications of spac-
9.1.2 Flange Face Squareness—Flange faces of both pipe
ers (beveled) shall be in accordance with Table 9.
and fittings shall be square to the pipe centerline within the
10.5 Fittings (Dimensions)—Dimensional specifications for
limits prescribed in Table 3.
common fittings shall be in accordance with Tables 10-20.
11. Inspection
TABLE 3 Flange Face Squareness
11.1 Inspection of the material shall be made at the point of
Squareness Measurement,
Nominal Pipe Size, in.
delivery, unless otherwise agreed upon between the purchaser
max, in. (mm)
and the seller.
1to2 ⁄32 (0.8)
3 ⁄64 (1.19)
12. Packaging
4 ⁄16 (1.59)
6 ⁄32 (2.38)
12.1 Pipe, fittings, and hardware shall be so packaged as to
prevent injury to them during transportation and handling.
Those items packed in containers conforming to all construc-
9.1.2.1 Squareness of straight pipe lengths shall be mea-
tion requirements of Consolidated Freight Classification as to
sured by placing the pipe on rollers, located approximately 2
bursting tests, size limit, and gross mass shall be considered as
in. (51 mm) from each end, and butting one end against a flat
being properly packed.
plate perpendicular to the axis of the rollers. The pipe shall be
12.2 All hardware items shall be packed in boxes separate
rotated and the length variation at the sealing surface shall be
from the pipe and fittings.
read with a suitable mechanism, such as a dial indicator. The
maximum reading shall not exceed that shown in 9.1.1 for the
13. Keywords
respective pipe size.
13.1 borosilicate; glass; pipe
9.1.2.2 Pipe fittings shall be measured for flange squareness
TABLE 5 Bow for Pipe Diameters 1 in. and Up
by a gage having flat plates constructed at the angle required by
that fitting. One flange shall be firmly placed on one plate and Length, ft (m) Bow, max, in. (mm)
the difference between the remaining flange face and the other 1
⁄2 (0.75) 0.045 (1.14)
5 (1.5) 0.090 (2.29)
surface plate shall not exceed the amount shown in 9.1.1 for the
10 (3) 0.180 (4.57)
respective fitting size.
C 599
TABLE 6 Dimensional Specifications for Straight Lengths
Length6 ⁄8 in. (3.2 mm)
B (Outside Diameter), in. (mm) C (Wall), in. (mm)
Nominal
Size, in.
Dimension Tolerances Dimension Tolerances
5 3 5 1
11 ⁄16 (3.33) 6 ⁄64 (1.2) ⁄32 (4.0) 6 ⁄32 (0.8)
1 27 1 11 1
1 ⁄2 1 ⁄32 (46.8) 6 ⁄16 (1.6) ⁄64(4.4) 6 ⁄32 (0.8)
11 5 11 1
22 ⁄32 (59.5) 6 ⁄64 (2.0) ⁄64 (4.4) 6 ⁄32 (0.8)
13 3 13 1
33 ⁄32 (86.5) 6 ⁄32 (2.4) ⁄64 (5.2) 6 ⁄32 (0.8)
17 7 17 3
44 ⁄32 (115.1) 6 ⁄64 (2.8) ⁄64 (6.7) 6 ⁄64 (1.2)
5 5 21 3
66 ⁄8 (168.3) 6 ⁄32 (4.0) ⁄64 (8.3) 6 ⁄64 (1.2)
TABLE 7 Dimensional Specifications for the Flange Groove
A, in. (mm) B, in. (mm) C,°
Nominal
Size, in.
Dimension Tolerances Dimension Toleranc
...


Questions, Comments and Discussion
Ask us and Technical Secretary will try to provide an answer. You can facilitate discussion about the standard in here.