ASTM C770-16(2020)
(Test Method)Standard Test Method for Measurement of Glass Stress—Optical Coefficient
Standard Test Method for Measurement of Glass Stress—Optical Coefficient
SIGNIFICANCE AND USE
3.1 Stress-optical coefficients are used in the determination of stress in glass. They are particularly useful in determining the magnitude of thermal residual stresses for annealing or pre-stressing (tempering) glass. As such, they can be important in specification acceptance.
SCOPE
1.1 This test method covers procedures for determining the stress-optical coefficient of glass, which is used in photoelastic analyses. In Procedure A the optical retardation is determined for a glass fiber subjected to uniaxial tension. In Procedure B the optical retardation is determined for a beam of glass of rectangular cross section when subjected to four-point bending. In Procedure C, the optical retardation is measured for a beam of glass of rectangular cross-section when subjected to uniaxial compression.
1.2 This standard does not purport to address all of the safety concerns, if any, associated with its use. It is the responsibility of the user of this standard to establish appropriate safety, health, and environmental practices and determine the applicability of regulatory limitations prior to use.
1.3 This international standard was developed in accordance with internationally recognized principles on standardization established in the Decision on Principles for the Development of International Standards, Guides and Recommendations issued by the World Trade Organization Technical Barriers to Trade (TBT) Committee.
General Information
- Status
- Published
- Publication Date
- 31-Jul-2020
- Technical Committee
- C14 - Glass and Glass Products
- Drafting Committee
- C14.04 - Physical and Mechanical Properties
Relations
- Replaces
ASTM C770-16 - Standard Test Method for Measurement of Glass Stress—Optical Coefficient - Effective Date
- 01-Aug-2020
- Effective Date
- 01-Aug-2020
- Effective Date
- 01-Aug-2020
- Effective Date
- 01-Aug-2019
- Effective Date
- 01-May-2015
- Effective Date
- 01-May-2014
- Effective Date
- 01-Oct-2013
- Refers
ASTM F218-12 - Standard Test Method for Measuring Optical Retardation and Analyzing Stress in Glass - Effective Date
- 01-Mar-2012
- Effective Date
- 01-Apr-2010
- Effective Date
- 01-Nov-2009
- Effective Date
- 01-Apr-2008
- Effective Date
- 15-Sep-2005
- Effective Date
- 01-Sep-2005
- Effective Date
- 01-Oct-2004
- Effective Date
- 10-Apr-2003
Overview
ASTM C770-16(2020), "Standard Test Method for Measurement of Glass Stress-Optical Coefficient," provides standardized test procedures for determining the stress-optical coefficient of glass. This coefficient is critical for quantifying stress in glass materials through photoelastic analysis, enabling the detection and measurement of both residual and induced stresses during processes like annealing or tempering. Developed by ASTM International, this standard is widely recognized for ensuring repeatable and consistent results in glass stress analysis, supporting quality control, specification acceptance, and research applications.
Key Topics
- Stress-Optical Coefficient Determination: The heart of ASTM C770-16(2020) is its detailed guidance on three procedures to measure stress-optical coefficients:
- Procedure A: Determines optical retardation in a glass fiber under uniaxial tension.
- Procedure B: Measures optical retardation in a rectangular glass beam subjected to four-point bending.
- Procedure C: Assesses retardation in a beam or disc of glass subjected to uniaxial compression.
- Photoelastic Analysis: Utilizes polarimeters and precise mechanical loading (tension, bending, compression) to induce and measure birefringence caused by internal or externally applied stress.
- Significance of Stress-Optical Data: The stress-optical coefficient is essential for evaluating:
- Residual stresses from manufacturing
- Effectiveness of annealing or tempering
- Compliance with material specifications
- Test Apparatus: Guidance on the setup and calibration of polarimetry equipment, stressing devices, and measurement tools ensures accurate and reproducible data.
- Safety and Best Practices: Safety, health, and regulatory considerations are noted as essential user responsibilities.
Applications
ASTM C770-16(2020) is practically applied across several domains:
- Quality Control in Glass Manufacturing: Determining stress levels helps ensure that glass products meet required mechanical performance standards, reducing the risk of breakage or failure in use.
- Annealing and Tempering Evaluation: The test method provides objective data on the efficiency of stress-relieving processes, crucial for architectural, automotive, and container glass.
- Research and Development: Supports materials scientists and engineers in developing new glass compositions, studying the effects of processing parameters, and benchmarking material performance.
- Failure Analysis: Aids in fracture and defect studies by linking observed birefringence patterns to stress distributions within the glass.
- Specification Acceptance: Validates product compliance with customer or industry requirements, underpinning procurement and certification processes.
Related Standards
Users of ASTM C770-16(2020) often reference complementary standards to support comprehensive glass testing and analysis, including:
- ASTM C336 – Test Method for Annealing Point and Strain Point of Glass by Fiber Elongation
- ASTM C598 – Test Method for Annealing Point and Strain Point of Glass by Beam Bending
- ASTM C1426 – Practices for Verification and Calibration of Polarimeters
- ASTM F218 – Test Method for Measuring Optical Retardation and Analyzing Stress in Glass
- NIST Recommended Practice Guide: "Fractography of Ceramics and Glasses"
These related standards provide expanded methods for thermal property measurement, calibration of optical devices, and supplemental analysis for glass and ceramic stress testing.
By utilizing ASTM C770-16(2020), manufacturers, laboratories, and researchers can reliably measure and interpret glass stress, ensuring product integrity and supporting innovation in glass technology. This standard is an essential component of any glass testing or quality assurance program.
Buy Documents
ASTM C770-16(2020) - Standard Test Method for Measurement of Glass Stress—Optical Coefficient
Frequently Asked Questions
ASTM C770-16(2020) is a standard published by ASTM International. Its full title is "Standard Test Method for Measurement of Glass Stress—Optical Coefficient". This standard covers: SIGNIFICANCE AND USE 3.1 Stress-optical coefficients are used in the determination of stress in glass. They are particularly useful in determining the magnitude of thermal residual stresses for annealing or pre-stressing (tempering) glass. As such, they can be important in specification acceptance. SCOPE 1.1 This test method covers procedures for determining the stress-optical coefficient of glass, which is used in photoelastic analyses. In Procedure A the optical retardation is determined for a glass fiber subjected to uniaxial tension. In Procedure B the optical retardation is determined for a beam of glass of rectangular cross section when subjected to four-point bending. In Procedure C, the optical retardation is measured for a beam of glass of rectangular cross-section when subjected to uniaxial compression. 1.2 This standard does not purport to address all of the safety concerns, if any, associated with its use. It is the responsibility of the user of this standard to establish appropriate safety, health, and environmental practices and determine the applicability of regulatory limitations prior to use. 1.3 This international standard was developed in accordance with internationally recognized principles on standardization established in the Decision on Principles for the Development of International Standards, Guides and Recommendations issued by the World Trade Organization Technical Barriers to Trade (TBT) Committee.
SIGNIFICANCE AND USE 3.1 Stress-optical coefficients are used in the determination of stress in glass. They are particularly useful in determining the magnitude of thermal residual stresses for annealing or pre-stressing (tempering) glass. As such, they can be important in specification acceptance. SCOPE 1.1 This test method covers procedures for determining the stress-optical coefficient of glass, which is used in photoelastic analyses. In Procedure A the optical retardation is determined for a glass fiber subjected to uniaxial tension. In Procedure B the optical retardation is determined for a beam of glass of rectangular cross section when subjected to four-point bending. In Procedure C, the optical retardation is measured for a beam of glass of rectangular cross-section when subjected to uniaxial compression. 1.2 This standard does not purport to address all of the safety concerns, if any, associated with its use. It is the responsibility of the user of this standard to establish appropriate safety, health, and environmental practices and determine the applicability of regulatory limitations prior to use. 1.3 This international standard was developed in accordance with internationally recognized principles on standardization established in the Decision on Principles for the Development of International Standards, Guides and Recommendations issued by the World Trade Organization Technical Barriers to Trade (TBT) Committee.
ASTM C770-16(2020) is classified under the following ICS (International Classification for Standards) categories: 81.040.10 - Raw materials and raw glass. The ICS classification helps identify the subject area and facilitates finding related standards.
ASTM C770-16(2020) has the following relationships with other standards: It is inter standard links to ASTM C770-16, ASTM C1426-14(2020), ASTM C336-71(2020), ASTM C598-93(2019), ASTM C336-71(2015), ASTM C1426-14, ASTM C598-93(2013), ASTM F218-12, ASTM C336-71(2010), ASTM C1426-09, ASTM C598-93(2008), ASTM F218-05, ASTM C336-71(2005), ASTM C1426-99(2004), ASTM C598-93(2003). Understanding these relationships helps ensure you are using the most current and applicable version of the standard.
ASTM C770-16(2020) is available in PDF format for immediate download after purchase. The document can be added to your cart and obtained through the secure checkout process. Digital delivery ensures instant access to the complete standard document.
Standards Content (Sample)
This international standard was developed in accordance with internationally recognized principles on standardization established in the Decision on Principles for the
Development of International Standards, Guides and Recommendations issued by the World Trade Organization Technical Barriers to Trade (TBT) Committee.
Designation: C770 − 16 (Reapproved 2020)
Standard Test Method for
Measurement of Glass Stress—Optical Coefficient
This standard is issued under the fixed designation C770; the number immediately following the designation indicates the year of
original adoption or, in the case of revision, the year of last revision.Anumber in parentheses indicates the year of last reapproval.A
superscript epsilon (´) indicates an editorial change since the last revision or reapproval.
1. Scope 2.2 NIST Standard:
NIST Recommended Practice Guide“Fractography of Ce-
1.1 This test method covers procedures for determining the
ramics and Glasses” (Subsection 4.6.2—Flexural
stress-optical coefficient of glass, which is used in photoelastic
Strength)
analyses. In Procedure A the optical retardation is determined
for a glass fiber subjected to uniaxial tension. In Procedure B
3. Significance and Use
the optical retardation is determined for a beam of glass of
3.1 Stress-optical coefficients are used in the determination
rectangularcrosssectionwhensubjectedtofour-pointbending.
of stress in glass. They are particularly useful in determining
In Procedure C, the optical retardation is measured for a beam
the magnitude of thermal residual stresses for annealing or
ofglassofrectangularcross-sectionwhensubjectedtouniaxial
pre-stressing(tempering)glass.Assuch,theycanbeimportant
compression.
in specification acceptance.
1.2 This standard does not purport to address all of the
4. Apparatus
safety concerns, if any, associated with its use. It is the
4.1 Stressing Equipment and Polarimeter:
responsibility of the user of this standard to establish appro-
4.1.1 Procedure A—Figs. 1 and 2 illustrate a polarimeter
priate safety, health, and environmental practices and deter-
employing a quarter-wave plate and rotatable analyzer, de-
mine the applicability of regulatory limitations prior to use.
scribed in Test Method F218. The quarter-wave plate shall be
1.3 This international standard was developed in accor-
designed for the wavelength of the light being used. The
dance with internationally recognized principles on standard-
polarizing axes of the polarizer and analyzer shall be set at
ization established in the Decision on Principles for the
right angles to each other with each being located at an angle
Development of International Standards, Guides and Recom-
of 45° with the horizontal and vertical.The analyzer, however,
mendations issued by the World Trade Organization Technical
shallbemountedinarotatablemounthavingascalegraduated
Barriers to Trade (TBT) Committee.
on either side from 0 to 180°. The quarter-wave plate shall be
fixed to give maximum extinction when the polarizer and
2. Referenced Documents
analyzerarecrossedatrightangles;thatis,whenitspolarizing
axes are set at 45° and 135° to the horizontal and vertical. In
2.1 ASTM Standards:
C336Test Method for Annealing Point and Strain Point of place of the immersion cell E, a means of supporting and
loading a glass specimen shall be provided, either in air (Fig.
Glass by Fiber Elongation
C598Test Method for Annealing Point and Strain Point of 3(a)) or in an immersion liquid (Fig. 3(b)). In this arrangement
the optical elements of the polarimeter between light source
Glass by Beam Bending
C1426Practices forVerification and Calibration of Polarim- andtelescopehavebeenreversedandalargescalegraduatedin
2 nm divisions is employed with the rotatable analyzer I.
eters
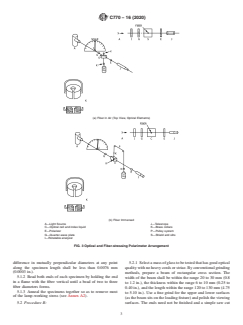
F218Test Method for Measuring Optical Retardation and 4.1.1.1 Fig. 3 illustrates the fiber-stressing and optical ar-
rangement used in Procedure A. Fig. 3(a) shows the fiber
Analyzing Stress in Glass
mounted vertically, positioned, and supported by two brass
collarswithswivelhandlessothatthekilogramweightmaybe
appliedtoloadthefiber.Alightshieldhavingentranceandexit
This test method is under the jurisdiction of ASTM Committee C14 on Glass
slitssurroundsthefiberprovidingadegreeofcollimationtothe
and Glass Products and is the direct responsibility of Subcommittee C14.04 on
Physical and Mechanical Properties.
light passing through the fiber and also helping to eliminate
Current edition approved Aug. 1, 2020. Published September 2020. Originally
stray light.
approved in 1973. Last previous edition approved in 2016 as C770–16. DOI:
10.1520/C0770-16R20.
2 3
For referenced ASTM standards, visit the ASTM website, www.astm.org, or Available from National Institute of Standards and Technology (NIST), 100
contact ASTM Customer Service at service@astm.org. For Annual Book of ASTM Bureau Dr., Stop 1070, Gaithersburg, MD 20899-1070, http://www.nist.gov.
Standards volume information, refer to the standard’s Document Summary page on Goranson andAdams, “Measurement of Optical Path Differences,” Journal of
the ASTM website. Franklin Institute, Vol 216, 1933, p. 475.
Copyright © ASTM International, 100 Barr Harbor Drive, PO Box C700, West Conshohocken, PA 19428-2959. United States
C770 − 16 (2020)
FIG. 1 Polarimeter
FIG. 2 Orientation of Polarimeter in Standard Position
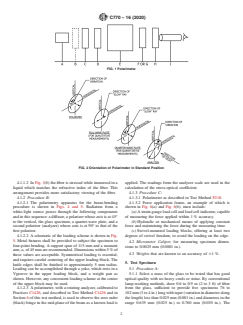
4.1.1.2 In Fig. 3(b) the fiber is stressed while immersed in a applied. The readings from the analyzer scale are used in the
liquid which matches the refractive index of the fiber. This calculation of the stress-optical coefficient.
arrangement provides more satisfactory viewing of the fiber. 4.1.3 Procedure C:
4.1.2 Procedure B: 4.1.3.1 Polarimeter as described in Test Method F218.
4.1.2.1 The polarimetry apparatus for the beam-bending 4.1.3.2 Force application frame, an example of which is
procedure is shown in Figs. 4 and 5. Radiation from a shown in Fig. 6(a) and Fig. 6(b), must include:
white-light source passes through the following components (a)Astrain-gaugeloadcellandloadcellindicator,capable
andinthissequence:adiffuser,apolarizerwhoseaxisisat45° of measuring the force applied within 1% accuracy.
to the vertical, the glass specimen, a quarter-wave plate, and a (b)Hydraulic or mechanical means of applying constant
second polarizer (analyzer) whose axis is at 90° to that of the force and maintaining the force during the measuring time.
first polarizer. (c)Swivel-mounted loading blocks, offering at least two
4.1.2.2 Aschematic of the loading scheme is shown in Fig. degrees of swivel freedom, to avoid the loading on the edge.
5. Metal fixtures shall be provided to subject the specimen to
4.2 Micrometer Caliper, for measuring specimen dimen-
four-point bending. A support span of 115 mm and a moment
sions to 0.0025 mm (0.0001 in.).
arm,a,of45mmarerecommended.Dimensionswithin5%of
4.3 Weights that are known to an accuracy of 61%.
these values are acceptable. Symmetrical loading is essential,
and requires careful centering of the upper loading block. The
5. Test Specimen
knife edges shall be finished to approximately 5 mm radius.
Loading can be accomplished through a yoke, which rests in a 5.1 Procedure A:
Vgroove in the upper loading block, and a weight pan as 5.1.1 Select a mass of the glass to be tested that has good
shown. However, any convenient loading scheme at the center optical quality with no heavy cords or striae. By conventional
of the upper block may be used. lamp-working methods, draw 0.6 to 0.9 m (2 to 3 ft) of fiber
4.1.2.3 Apolarimeter, with a rotating analyzer, calibrated to from the glass, sufficient to provide five specimens 76 to
Practices C1426, and described in Test Method C1426 and in 102mm(3to4in.)longwithtaper(variationindiameteralong
Section 6 of this test method, is used to observe the zero order the length) less than 0.025 mm (0.001 in.) and diameters in the
(black) fringe in the mid-plane of the beam as a known load is range 0.635 mm (0.025 in.) to 0.760 mm (0.030 in.). The
C770 − 16 (2020)
(a) Fiber in Air (Top View, Optical Elements)
(b) Fiber Immersed
A—Light Source J—Telescope
C—Optical cell and index liquid K—Brass collars
E—Polarizer P—Pulley system
G—Quarter-wave plate S—Shield and slits
I—Rotatable analyzer
FIG. 3 Optical and Fiber-stressing Polarimeter Arrangement
difference in mutually perpendicular diameters at any point 5.2.1 Selectamassofglasstobetestedthathasgoodoptical
along the specimen length shall be less than 0.0076 mm qualitywithnoheavycordsorstriae.Byconventionalgrinding
(0.0003 in.).
methods, prepare a beam of rectangular cross section. The
5.1.2 Bead both ends of each specimen by holding the end
width of the beam shall be within the range 20 to 30 mm (0.8
in a flame with the fiber vertical until a bead of two to three
to 1.2 in.), the thickness within the range 6 to 10 mm (0.25 to
fiber diameters forms.
0.40 in.), and the length within the range 120 to 130 mm (4.75
5.1.3 Anneal the specimens together so as to remove most
to 5.10 in.). Use a fine grind for the upper and lower surfaces
of the lamp-working stress (see Annex A2).
(asthebeamsitsontheloadingfixture)andpolishtheviewing
5.2 Procedure B: surfaces. The ends need not be finished and a simple saw cut
C770 − 16 (2020)
Repeatfivetimestoobtainanaverage“zero”scalereading, r¯ .
Normally, this will be near the scale zero for a relatively
unstressed fiber and may be in the direction of rotation which
indicates vertical tension. Since 180° of rotation covers a
retardation of one full wavelength each angular degree corre-
sponds to 3.03 nm, if light of a wavelength of 546 nm is used.
6.1.5 Add a 10 N (2.25 lb) weight to the fiber loading
suspensionofthetestfixture.Rotatetheanalyzerinthetension
direction (see Annex A1) until extinction again occurs and
record the retardation indicated. Repeat this rotation about five
times and obtain an average scale reading, r¯.
6.1.6 Remove the fiber, measure, and record to the nearest
¯
0.0025 mm (0.0001 in.) the average diameter, d (acerage of
diameters parallel and perpendicular to light path) at the
position where retardation was measured.
6.1.7 Repeat this procedure with the other fiber specimens.
6.2 Procedure B:
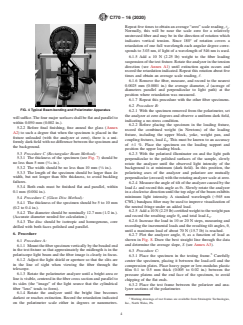
FIG. 4 Typical Beam-bending and Polarimeter Apparatus
6.2.1 With the specimen removed from the polarimeter, set
the analyzer at zero degrees and observe a uniform dark field,
willsuffice.Thefourmajorsurfacesshallbeflatandparallelto
indicating a no-stress condition.
within 0.050 mm (0.002 in.).
6.2.2 Before placing the specimen in the loading fixture,
5.2.2 Before final finishing, fine anneal the glass (Annex
record the combined weight (in Newtons) of the loading
A2) to such a degree that when the specimen is placed in the
fixture, including the upper block, yoke, weight pan, and
fixture unloaded (with the analyzer at zero), there is a uni-
coupling fixtures, load L . This must be known to an accuracy
formly dark field with no difference between the specimen and
of 61 %. Place the specimen on the loading support and
the background.
position the
...


Questions, Comments and Discussion
Ask us and Technical Secretary will try to provide an answer. You can facilitate discussion about the standard in here.
Loading comments...