ASTM D3702-94(2004)
(Test Method)Standard Test Method for Wear Rate and Coefficient of Friction of Materials in Self-Lubricated Rubbing Contact Using a Thrust Washer Testing Machine
Standard Test Method for Wear Rate and Coefficient of Friction of Materials in Self-Lubricated Rubbing Contact Using a Thrust Washer Testing Machine
SCOPE
1.1 This test method covers the determination of wear rate and coefficient of friction for self-lubricated materials in rubbing contact by a testing machine² that utilizes a thrust washer specimen configuration.
Note 1—This machine may also be used to measure coefficient of friction.
1.2 The values in SI units are to be regarded as the standard. In cases where materials, products, or equipment are available only in inch-pound units, SI values in parentheses are for information only.
1.3 This standard does not purport to address all of the safety concerns, if any, associated with its use. It is the responsibility of the user of this standard to establish appropriate safety and health practices and determine the applicability of regulatory limitations prior to use.
General Information
Relations
Standards Content (Sample)
NOTICE: This standard has either been superseded and replaced by a new version or withdrawn.
Contact ASTM International (www.astm.org) for the latest information
Designation:D3702–94 (Reapproved 2004)
Standard Test Method for
Wear Rate and Coefficient of Friction of Materials in Self-
Lubricated Rubbing Contact Using a Thrust Washer Testing
Machine
This standard is issued under the fixed designation D3702; the number immediately following the designation indicates the year of
original adoption or, in the case of revision, the year of last revision. A number in parentheses indicates the year of last reapproval. A
superscript epsilon (´) indicates an editorial change since the last revision or reapproval.
1. Scope 2.1.3 wear rate—the rate of material removal or dimen-
sional change due to wear per unit of exposure parameter; for
1.1 This test method covers the determination of wear rate
example, quantity of material removed (mass, volume, thick-
and coefficient of friction for self-lubricated materials in
2 ness) in unit distance of sliding or unit time.
rubbing contact by a testing machine that utilizes a thrust
2.2 Definitions of Terms Specific to This Standard:
washer specimen configuration.
2.2.1 torque—reaction of a tendency to turn due to friction
NOTE 1—This machine may also be used to measure coefficient of
forces between specimens traveling in a circular path. It is the
friction.
product of a restraining force and the radius at which it acts to
1.2 The values in SI units are to be regarded as the standard.
balance the frictional torque.
In cases where materials, products, or equipment are available
3. Summary of Test Method
only in inch-pound units, SI values in parentheses are for
information only.
3.1 The test machine is operated with a test specimen
1.3 This standard does not purport to address all of the
rotating under load against a stationary steel washer. Each test
safety concerns, if any, associated with its use. It is the
consists of break-in for 40 h followed by a selected test
responsibility of the user of this standard to establish appro-
duration, each at the same selected normal load and speed.
priate safety and health practices and determine the applica-
Load is obtained by application of dead weights to the 10:1
2 2
bility of regulatory limitations prior to use.
lever arm. The contact area is 1.29 cm (0.20 in. ). The mean
rubbing velocity is related to spindle rotational speed: 1
2. Terminology
rpm = 0.0848 m/min (0.278 ft/min).
2.1 Definitions:
3.2 The thickness change of the test specimen and torque
2.1.1 coeffıcient of friction, µ or f—in tribology—thedimen-
during test are measured for each test.
sionlessratioofthefrictionforce(F)betweentwobodiestothe
3.3 Wear rate in centimetres per hour (inches per hour) and
normal force (N) pressing these bodies together.
coefficient of friction is reported.
µ or f 5 ~F/N! (1)
4. Significance and Use
2.1.1.1 Discussion—A distinction is often made between
4.1 This test method is used to determine the equilibrium
static coefficient of friction and kinetic coefficient of friction.
rate of wear and coefficient of friction of materials in rubbing
2.1.2 wear—damage to a solid surface, generally involving
contactunderusefuloperatingconditions,thatis,combinations
progressive loss of material, due to relative motion between
of pressure and velocity that fall below the PV
that surface and a contacting substance or substances.
(pressure 3 velocity) limit of the test material. The user of this
test method should determine to his own satisfaction whether
This test method is under the jurisdiction of ASTM Committee D02 on the results of this test procedure correlate with field perfor-
Petroleum Products and Lubricants and is the direct responsibility of Subcommittee
mance or other bench test machines. If the test conditions are
D02.L0.05 on Solid Lubricants.
changed, the wear rates may change and the relative value of
Current edition approved Nov. 1, 2004. Published November 2004. Originally
one material with respect to another may also change.
approved in 1978. Last previous edition approved in 1999 as D3702 – 94 (1999).
DOI: 10.1520/D3702-94R04.
4.2 Test conditions may be selected from Table 1.
An example known to the committee at this time is the Falex Multispecimen
4.3 The precision of wear measurement is relatively inde-
Test Machine, available from Falex Corp., 1020 Airpark Drive, Sugar Grove, IL
pendent of test duration or amount of wear, but the precision of
60554. This manufacturer recommends a maximum test load of 808 lb (367 kg). If
wear rate (calculation) improves with test duration and amount
you are aware of alternative suppliers, please provide this information to ASTM
International Headquarters. Your comments will receive careful consideration at a
of wear. It is generally believed that useful wear rate precision
meeting of the responsible technical committee , which you may attend.
Copyright © ASTM International, 100 Barr Harbor Drive, PO Box C700, West Conshohocken, PA 19428-2959, United States.
D3702–94 (2004)
A
TABLE 1 Test Conditions
Rotational Rubbing Velocity, Load, lb (kg), to Obtain PV, psi 3 ft/min (kg/cm 3 m/min) at Selected Speeds
speed, rpm ft/min (m/min) PV 1250 (26.8) PV 2500 (53.6) PV 5000 (107.1) PV 10 000 (214.3)
1 2 3 4
36 10 (3.05) 25.0 (11.3) 50.0 (22.7) 100 (45.4) 200 (90.7)
180 50 (15.2) 5.0 (2.3) 10.0 (4.5) 20.0 (9.1) 40.0 (18.1)
900 250 (76.2) 1.0 (0.5) 2.0 (0.9) 4.0 (1.8) 8.0 (3.6)
A −5 −7
For many applications a wear rate exceeding 1.0 3 10 in./h (2.5 3 10 m/h) is considered excessive. Typical wear rates for some commonly used materials at
different PV levels are:
−6 −5 −7 −7
Acetal homopolymer at PV:5 3 10 to 1 3 10 in./h (1.3 3 10 to 2.5 3 10 m/h)
−5 −5 −7 −7
Acetal homopolymer at PV:1 3 10 to 3 3 10 in./h (2.5 3 10 to 7.5 3 10 m/h)
−6 −6 −8 −7
22 % PTFE-filled acetal homopolymer at PV:3 3 10 to 6 3 10 in./h (7.5 3 10 to 1.5 3 10 m/h)
−5 −5 −7 −6
Polyamide (Type 6-6) at PV:1 3 10 to 5 3 10 in./h (2.5 3 10 to 1.3 3 10 m/h)
−5 −5 −7 −7
15 % graphite filled polyimide restin at PV:1 3 10 to 2 3 10 in./h (2.5 3 10 to 5 3 10 m/h)
requirestheselectionofatestdurationsufficienttoproduce0.1 7.2 Before each test, thoroughly clean the steel washer and
mm (0.004 in.) of wear. Test durations will often be in the 50 both specimen holders using the solvent per 5.1.
to 4000-h range.
NOTE 3—Remove all solvents from the washer before testing.
5. Apparatus
7.3 Clean the test specimen as recommended by the manu-
5.1 Falex Multispecimen Test Machine, Fig. 1, shown sche-
facturer of the test material.
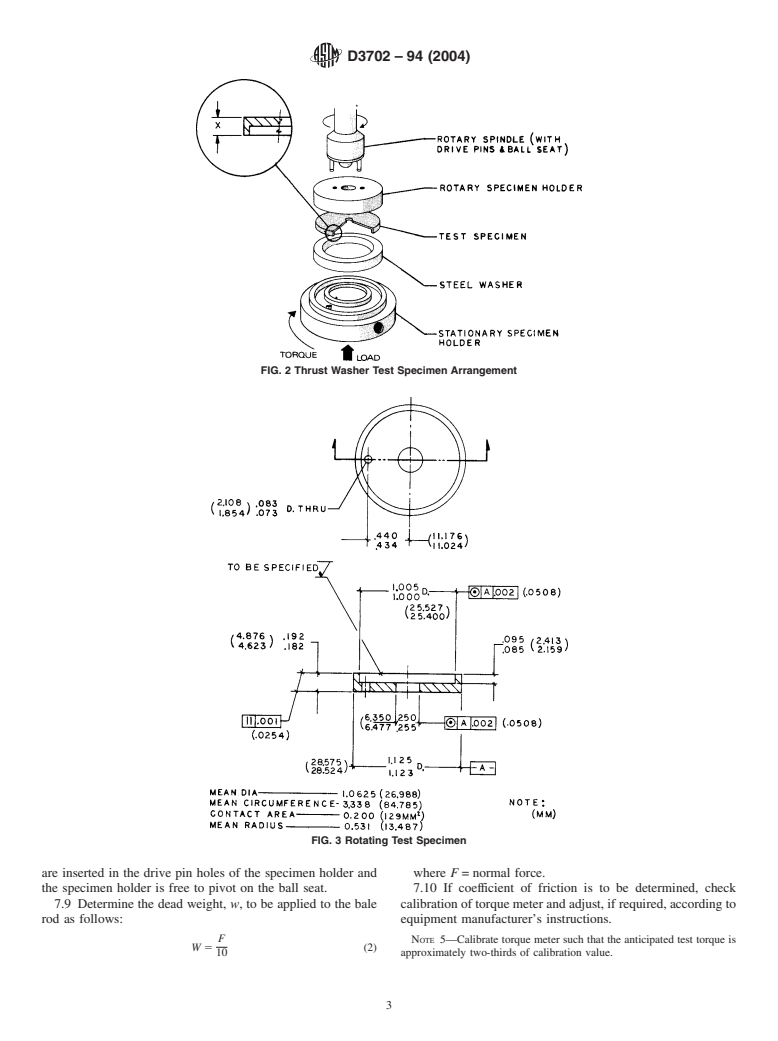
matically in Fig. 2 and described in Annex A1.
7.3.1 Store cleaned test specimens prior to testing in a glass
5.2 Test Specimen or Rotating Wafer, shown in Fig. 3.
jar.
5.3 Stationary Washer, AISI C-1018 steel, shown in Fig. 4.
7.3.2 Following the cleaning, do not handle the test speci-
The surface finish should be 16 6 2 µin. AA, the hardness Rc
mens with bare hands. It is recommended that clean cotton
20 6 5.
gloves or clean tweezers or tongs be used.
5.4 Micrometer (Note 4), capable of measuring to the
nearest 0.003 mm (0.0001 in.).
NOTE 4—Check compatibility of the test specimen cleaning procedure
and reagents with the specific material to be tested.
6. Reagents and Materials
7.4 Preset the speed control to provide the desired speed as
6.1 Solvent, safe, non-film forming, nonchlorinated.
measured in revolutions per minute using the built-in tachom-
NOTE 2—Petroleum distillates, formerly used as solvents, have been
eter. Refer to Table 1 to convert the specified velocity to
eliminated due to possible toxic effects. Each user should select a solvent
revolutions per minute.
that can meet applicable safety requirements and thoroughly clean
7.5 Install the test specimen in the upper specimen holder
machine parts.
with the bolt and washer provided. Torque the bolt to
6.2 Appropriate reagents for cleaning the test specimen as
2.8 6 0.6 J (25 6 5 in.·lbf).
recommended by the manufacturer of
...


Questions, Comments and Discussion
Ask us and Technical Secretary will try to provide an answer. You can facilitate discussion about the standard in here.