ASTM D5656-10(2017)
(Test Method)Standard Test Method for Thick-Adherend Metal Lap-Shear Joints for Determination of the Stress-Strain Behavior of Adhesives in Shear by Tension Loading
Standard Test Method for Thick-Adherend Metal Lap-Shear Joints for Determination of the Stress-Strain Behavior of Adhesives in Shear by Tension Loading
SIGNIFICANCE AND USE
5.1 This test method can be used to determine the stress-strain properties of an adhesive in shear and to establish the proportional-limit of the stress-stain relationship. This data may be useful for the design and analysis of adhesively bonded joints.
5.2 This test method is not intended to determine adhesion characteristics of an adhesive to a particular substrate; rather this test method is intended to characterize the adhesive shear stress-strain properties that may be relevant for design considerations.
5.3 This test method has been developed and applied using bonded aluminum adherends. At this time no assumptions regarding the validity of this test method with non-aluminum adherends can be made.
SCOPE
1.1 This test method covers the preparation and testing of thick-adherend lap-shear samples for the determination of the stress-strain behavior of adhesives.
1.2 This test method covers data reduction and analysis of stress-strain curves obtained using thick-adherend lap-shear samples.
1.3 The values stated in SI units are to be regarded as the standard. The inch-pound units in parentheses are for information only.
1.4 This standard does not purport to address all of the safety concerns, if any, associated with its use. It is the responsibility of the user of this standard to establish appropriate safety, health, and environmental practices and determine the applicability of regulatory limitations prior to use. Specific precautionary statements are given in 7.3.
1.5 This international standard was developed in accordance with internationally recognized principles on standardization established in the Decision on Principles for the Development of International Standards, Guides and Recommendations issued by the World Trade Organization Technical Barriers to Trade (TBT) Committee.
General Information
- Status
- Published
- Publication Date
- 14-Nov-2017
- Technical Committee
- D14 - Adhesives
- Drafting Committee
- D14.80 - Metal Bonding Adhesives
Relations
- Effective Date
- 15-Nov-2017
- Effective Date
- 01-May-2016
- Effective Date
- 01-May-2016
- Effective Date
- 01-Jun-2014
- Effective Date
- 01-Jul-2012
- Effective Date
- 01-May-2012
- Effective Date
- 01-Dec-2011
- Effective Date
- 01-Jan-2011
- Effective Date
- 01-Jun-2010
- Effective Date
- 01-Nov-2009
- Effective Date
- 01-Apr-2009
- Effective Date
- 01-Dec-2008
- Effective Date
- 01-Oct-2008
- Effective Date
- 15-Aug-2008
- Effective Date
- 01-Apr-2008
Overview
ASTM D5656-10(2017): Standard Test Method for Thick-Adherend Metal Lap-Shear Joints for Determining the Stress-Strain Behavior of Adhesives in Shear by Tension Loading is a key ASTM method utilized to characterize the shear performance of structural adhesives. The standard specifies procedures for sample preparation, testing, and data analysis of thick-adherend lap-shear joints, particularly focusing on determining the shear stress-strain relationship of an adhesive. This information is essential for engineers, designers, and materials scientists involved in the design and analysis of adhesively bonded joints.
Key Topics
- Shear Stress-Strain Properties of Adhesives: Provides a method to generate accurate stress-strain curves in shear through tension loading of bonded metal lap-shear specimens.
- Sample Preparation and Testing: Details the preparation of thick-adherend aluminum lap-shear panels, adhesive application, curing, and machining to precise dimensions for testing.
- Data Analysis: Guides users through reduction and interpretation of stress-strain data, determination of proportional limit, shear modulus, and other relevant parameters.
- Focus on Aluminum Adherends: The method is validated using aluminum substrates; its applicability to other materials is not covered by this standard.
- Standardized Test Apparatus: Specifies requirements for testing machines, extensometers, and alignment to ensure accurate measurements.
- Test Limitations: Not intended for evaluating adhesive bond strength to a specific substrate or for use with non-aluminum adherends.
Applications
ASTM D5656-10(2017) is widely used in the aerospace, automotive, and construction industries where understanding the mechanical performance of adhesive joints is critical. Practical applications include:
- Design and Engineering Analysis: Stress-strain data from this standard support predictive modeling and safety assessments during the development of adhesively bonded structures.
- Adhesive Product Development: Enables manufacturers to evaluate the mechanical properties of new adhesive formulations under controlled shear conditions.
- Quality Control: Provides a consistent method for quality assurance and performance comparison of adhesives used in structural bonding applications.
- Material Specification and Certification: Offers a data-driven basis for specifying adhesives in technical documentation or supplier agreements, ensuring compliance with engineering requirements.
Note: The test method is intended for characterization of adhesive properties, not for substrate-specific adhesion evaluation. Results are particularly valid for aluminum-to-aluminum joints.
Related Standards
Several ASTM standards are commonly referenced or used in conjunction with ASTM D5656-10(2017):
- ASTM D907: Terminology of Adhesives - Defines key terms and concepts relevant to adhesive testing.
- ASTM D2651: Guide for Preparation of Metal Surfaces for Adhesive Bonding - Covers surface pre-treatment techniques for optimal bonding.
- ASTM E4: Practices for Force Verification of Testing Machines - Ensures proper calibration of mechanical testing equipment.
- ASTM D4896: Guide for Use of Adhesive-Bonded Single Lap-Joint Specimen Test Results - Discusses limitations and interpretation of single lap-joint tests.
Practical Value
Adopting ASTM D5656-10(2017) assures that data used for design and specification of structural adhesives are consistent, reliable, and comparable across organizations. By focusing on the shear stress-strain response, the standard enables engineers to:
- Accurately assess adhesives’ performance in critical load-bearing applications
- Incorporate robust mechanical property data into advanced simulation and modeling
- Mitigate the risk of joint failure and improve long-term structural reliability
Keywords: ASTM D5656, adhesive testing, thick-adherend lap-shear, shear stress-strain, structural adhesive, aluminum adherends, mechanical properties, standard test method
Buy Documents
ASTM D5656-10(2017) - Standard Test Method for Thick-Adherend Metal Lap-Shear Joints for Determination of the Stress-Strain Behavior of Adhesives in Shear by Tension Loading
Get Certified
Connect with accredited certification bodies for this standard

Smithers Quality Assessments
US management systems and product certification.

DIN CERTCO
DIN Group product certification.
Sponsored listings
Frequently Asked Questions
ASTM D5656-10(2017) is a standard published by ASTM International. Its full title is "Standard Test Method for Thick-Adherend Metal Lap-Shear Joints for Determination of the Stress-Strain Behavior of Adhesives in Shear by Tension Loading". This standard covers: SIGNIFICANCE AND USE 5.1 This test method can be used to determine the stress-strain properties of an adhesive in shear and to establish the proportional-limit of the stress-stain relationship. This data may be useful for the design and analysis of adhesively bonded joints. 5.2 This test method is not intended to determine adhesion characteristics of an adhesive to a particular substrate; rather this test method is intended to characterize the adhesive shear stress-strain properties that may be relevant for design considerations. 5.3 This test method has been developed and applied using bonded aluminum adherends. At this time no assumptions regarding the validity of this test method with non-aluminum adherends can be made. SCOPE 1.1 This test method covers the preparation and testing of thick-adherend lap-shear samples for the determination of the stress-strain behavior of adhesives. 1.2 This test method covers data reduction and analysis of stress-strain curves obtained using thick-adherend lap-shear samples. 1.3 The values stated in SI units are to be regarded as the standard. The inch-pound units in parentheses are for information only. 1.4 This standard does not purport to address all of the safety concerns, if any, associated with its use. It is the responsibility of the user of this standard to establish appropriate safety, health, and environmental practices and determine the applicability of regulatory limitations prior to use. Specific precautionary statements are given in 7.3. 1.5 This international standard was developed in accordance with internationally recognized principles on standardization established in the Decision on Principles for the Development of International Standards, Guides and Recommendations issued by the World Trade Organization Technical Barriers to Trade (TBT) Committee.
SIGNIFICANCE AND USE 5.1 This test method can be used to determine the stress-strain properties of an adhesive in shear and to establish the proportional-limit of the stress-stain relationship. This data may be useful for the design and analysis of adhesively bonded joints. 5.2 This test method is not intended to determine adhesion characteristics of an adhesive to a particular substrate; rather this test method is intended to characterize the adhesive shear stress-strain properties that may be relevant for design considerations. 5.3 This test method has been developed and applied using bonded aluminum adherends. At this time no assumptions regarding the validity of this test method with non-aluminum adherends can be made. SCOPE 1.1 This test method covers the preparation and testing of thick-adherend lap-shear samples for the determination of the stress-strain behavior of adhesives. 1.2 This test method covers data reduction and analysis of stress-strain curves obtained using thick-adherend lap-shear samples. 1.3 The values stated in SI units are to be regarded as the standard. The inch-pound units in parentheses are for information only. 1.4 This standard does not purport to address all of the safety concerns, if any, associated with its use. It is the responsibility of the user of this standard to establish appropriate safety, health, and environmental practices and determine the applicability of regulatory limitations prior to use. Specific precautionary statements are given in 7.3. 1.5 This international standard was developed in accordance with internationally recognized principles on standardization established in the Decision on Principles for the Development of International Standards, Guides and Recommendations issued by the World Trade Organization Technical Barriers to Trade (TBT) Committee.
ASTM D5656-10(2017) is classified under the following ICS (International Classification for Standards) categories: 83.180 - Adhesives. The ICS classification helps identify the subject area and facilitates finding related standards.
ASTM D5656-10(2017) has the following relationships with other standards: It is inter standard links to ASTM D5656-10, ASTM D4896-01(2016), ASTM D2651-01(2016), ASTM E4-14, ASTM D907-12a, ASTM D907-12, ASTM D907-11a, ASTM D907-11, ASTM E4-10, ASTM E4-09a, ASTM E4-09, ASTM E4-08, ASTM D907-08b, ASTM D907-08a, ASTM D4896-01(2008)e1. Understanding these relationships helps ensure you are using the most current and applicable version of the standard.
ASTM D5656-10(2017) is available in PDF format for immediate download after purchase. The document can be added to your cart and obtained through the secure checkout process. Digital delivery ensures instant access to the complete standard document.
Standards Content (Sample)
This international standard was developed in accordance with internationally recognized principles on standardization established in the Decision on Principles for the
Development of International Standards, Guides and Recommendations issued by the World Trade Organization Technical Barriers to Trade (TBT) Committee.
Designation: D5656 − 10 (Reapproved 2017)
Standard Test Method for
Thick-Adherend Metal Lap-Shear Joints for Determination of
the Stress-Strain Behavior of Adhesives in Shear by
Tension Loading
This standard is issued under the fixed designation D5656; the number immediately following the designation indicates the year of
original adoption or, in the case of revision, the year of last revision. A number in parentheses indicates the year of last reapproval. A
superscript epsilon (´) indicates an editorial change since the last revision or reapproval.
1. Scope E4 Practices for Force Verification of Testing Machines
1.1 This test method covers the preparation and testing of
3. Terminology
thick-adherend lap-shear samples for the determination of the
3.1 Definitions:
stress-strain behavior of adhesives.
3.1.1 Many terms in this test method are defined in Termi-
1.2 This test method covers data reduction and analysis of
nology D907.
stress-strain curves obtained using thick-adherend lap-shear
3.2 Definitions of Terms Specific to This Standard:
samples.
3.2.1 knee, n—inflection point on a load-deflection curve;
1.3 The values stated in SI units are to be regarded as the
the point at which plastic yielding of the adhesive begins to
standard. The inch-pound units in parentheses are for informa-
dominate the deformation response of the load-deflection
tion only.
curve.
1.4 This standard does not purport to address all of the
3.2.2 panel, n—two plates of a rigid material having the
safety concerns, if any, associated with its use. It is the
same dimensions that are adhesively bonded together on one
responsibility of the user of this standard to establish appro-
face such that the thickness of the panel is approximately twice
priate safety, health, and environmental practices and deter-
the thickness of each individual plate.
mine the applicability of regulatory limitations prior to use.
Specific precautionary statements are given in 7.3. 4. Summary of Test Method
1.5 This international standard was developed in accor-
4.1 This test method consists of testing thick-adherend
dance with internationally recognized principles on standard-
lap-shear samples whereby a tensile load is applied to the
ization established in the Decision on Principles for the
sample but the adhesive is placed in shear. Unlike Guide
Development of International Standards, Guides and Recom-
D4896, the adherends used in this standard test method are
mendations issued by the World Trade Organization Technical
thick and rigid, peel forces are minimized and the shear
Barriers to Trade (TBT) Committee.
stress-strain properties of the adhesive are obtained. Refer-
enced data presents a finite element analysis of the thick-
2. Referenced Documents
adherent metal lap shear specimen and calculates the effect of
2.1 ASTM Standards:
varying the adherent and adhesive stiffness. User of this
D907 Terminology of Adhesives
standard is cautioned that since the stress is not totally uniform
D2651 GuideforPreparationofMetalSurfacesforAdhesive
across the over-lap of the specimen, factors such as adhesive
Bonding
stiffness, adherent stiffness and location of shear strain mea-
D4896 Guide for Use ofAdhesive-Bonded Single Lap-Joint
surement along the length of the bond can affect the experi-
3,4
Specimen Test Results
mentally obtained load-displacement curve.
NOTE 1—The peel forces generated during testing are a function of the
bending deformation in the adherends. Greater adherend stiffness results
This test method is under the jurisdiction of ASTM Committee D14 on
in less bending and smaller peel forces.
Adhesives and is the direct responsibility of Subcommittee D14.80 on Metal
Bonding Adhesives.
Current edition approved Nov. 15, 2017. Published November 2017. Originally
approved in 1995. Last previous edition approved in 2010 as D5656 – 10. DOI: Kassapoglou, C. and Adelmann, John C., “KGR-1 Thick Adherend Specimen
rd
10.1520/D5656-10R17. Evaluation for the Determination of Adhesive Mechanical Properties,” 23 Inter-
For referenced ASTM standards, visit the ASTM website, www.astm.org, or national SAMPE Conference, Oct. 21–24, 1991.
contact ASTM Customer Service at service@astm.org. For Annual Book of ASTM Krieger, R. B., Jr., “Stiffness Characteristics of StructuralAdhesives for Stress
Standards volume information, refer to the standard’s Document Summary page on Analysis in Hostile Environment,” American Cyanamid Co., Havre de Grace, MD,
the ASTM website. 1975.
Copyright © ASTM International, 100 Barr Harbor Drive, PO Box C700, West Conshohocken, PA 19428-2959. United States
D5656 − 10 (2017)
5. Significance and Use
5.1 This test method can be used to determine the stress-
strain properties of an adhesive in shear and to establish the
proportional-limit of the stress-stain relationship. This data
maybeusefulforthedesignandanalysisofadhesivelybonded
joints.
5.2 This test method is not intended to determine adhesion
characteristics of an adhesive to a particular substrate; rather
this test method is intended to characterize the adhesive shear
stress-strain properties that may be relevant for design consid-
erations.
5.3 This test method has been developed and applied using
bonded aluminum adherends. At this time no assumptions
regarding the validity of this test method with non-aluminum
adherends can be made.
6. Apparatus
6.1 Testing machine conforming to the requirements of
Practices E4. Select the testing machine so that the breaking
load of the specimens falls between 15 and 85 % of the FIG. 1 Bonded Adherend Plates
full-scale capacity. Ensure that the machine is capable of
maintaining a rate of loading of 2455 N (550 lbf)/min, or, if the
the plates are in contact with the shims if they are being used.
rate is dependent on cross-head motion, set the machine to
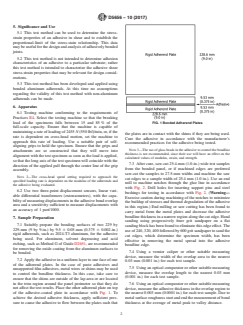
Cure the adhesive in accordance with the manufacturer’s
approach this rate of loading. Use a suitable pair of self-
recommended practices for the adhesive being tested.
aligning grips to hold the specimen. Ensure that the grips and
NOTE 3—The use of glass beads in the adhesive to control the bondline
attachments are so constructed that they will move into
thickness is not recommended, since their use will have an effect on the
alignment with the test specimen as soon as the load is applied,
calculated values of modulus, strain, and strength.
so that the long axis of the test specimen will coincide with the
7.3 After cure, saw-cut 25.4-mm (1.0-in.) wide test samples
direction of the applied pull through the center line of the grip
from the bonded panel, or if machined edges are preferred
assembly.
saw-cut the samples to 27.5-mm widths and machine the saw
NOTE 2—The cross-head speed setting required to approach the
cut edges to a sample width of 25.4 mm (1.0 in.). Use an end
specified loading rate is dependent on the modulus of the adherends and
mill to machine notches through the glue line in accordance
the adhesive being evaluated.
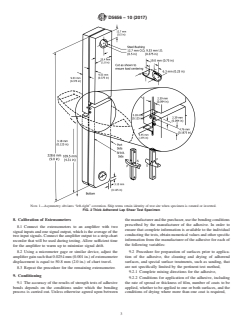
with Fig. 2. Drill holes for inserting support pins and steel
6.2 Use two three-point displacement sensors, linear vari-
bushings for testing in accordance with Fig. 2.(Warning—
able differential transformers (extensometers), with the capa-
Exercise caution during machining of the notches to minimize
bility of measuring displacements in the adhesive bond overlap
the buildup of stresses and thermal degradation of the adhesive
area and a sensitivity sufficient to measure displacements with
in this region.) End milling or saw cutting has been found to
an accuracy of 1 part/1000.
carry metal from the metal plates and decrease the adhesive
bondline thickness in a narrow region along the cut edge. Hand
7. Sample Preparation
sanding using progressively finer grit sandpaper on a flat
7.1 Suitably prepare the bonding surfaces of two 229 by
sanding block has been found to eliminate this edge effect.The
229-mm (9 by 9-in.) by 9.5 6 0.05-mm (0.375 6 0.002-in.)
useof240,320,400followedby600gritsandpapertosandthe
rigid adherends, such as 2024-T3 aluminum, for the adhesive
cut edges, which determine the specimen width, has been
being used. For aluminum, solvent degreasing and acid
effective in removing the metal spread into the adhesive
etching, such as Method G of Guide D2651, are recommended
bondline edge.
for removing the oxide coating from the aluminum surfaces to
7.4 Using a vernier caliper or other suitable measuring
be bonded.
device, measure the width of the overlap area to the nearest
7.2 Apply the adhesive in a uniform layer to one face of one
0.03 mm (0.001 in.) for each test sample.
of the adherend plates. In the case of paste adhesives and
7.5 Using an optical comparator or other suitable measuring
unsupported film adhesives, metal wires or shims may be used
device, measure the overlap length to the nearest 0.03 mm
to control the bondline thickness. In this case, take care to
(0.001 in.) for each test sample.
ensure that the shims are outside of the lap area or are located
in the trim region around the panel perimeter so that they do 7.6 Using an optical comparator or other suitable measuring
not affect the test results. Place the other adherend plate on top device, measure the adhesive thickness in the overlap region to
of the adhesive-coated plate in accordance with Fig. 1.To the nearest 0.003 mm (0.0001 in.) for each test sample. Due to
achieve the desired adhesive thickness, apply sufficient pres- metalsurfaceroughnessstartandendthemeasurementofbond
sure to cause the adhesive to flow between the plates such that thickness at the average of metal peak to valley distance.
D5656 − 10 (2017)
NOTE 1—Asymmetry obviates “left-right” covention. Ship terms retain identity of test site when specimen is rotated or inverted.
FIG. 2 Thick Adherend Lap Shear Test Specimen
8. Calibration of Extensometers themanufacturerandthepurchaser,usethebondingconditions
prescribed by the manufacturer of the adhesive. In order to
8.1 Connect the extensometers to an amplifier with two
ensure that complete information is available to the individual
signal inputs and one signal output, which is the average of the
conductingthetests,obtainnumericalvaluesandotherspecific
two input signals. Connect the amplifier output to a strip-chart
information from the manufacturer of the adhesive for each of
recorder that will be used during testing.Allow sufficient time
the following variables:
for the amplifier to warm up to minimize signal drift.
9.2 Procedure for preparation of surfaces prior to applica-
8.2 Using a micrometer gage or similar device, adjust the
amplifiergainsuchthat0.0254mm(0.001in.)ofextensometer tion of the adhesive, the cleaning and drying of adherend
surfaces, and special surface treatments, such as sanding, that
displacement is equal to 50.8 mm (2.0 in.) of chart travel.
are not specifically limited by the pertinent test method,
8.3 Repeat the procedure for the remaining extensometer.
9.2.1 Complete mixing directions for the adhesive,
9. Conditioning
9.2.2 Conditions for application of the adhesive, including
9.1 The accuracy of the results of strength tests of adhesive the rate of spread or thickness of film, number of coats to be
applied, whether to be applied to one or both surfaces, and the
bonds depends on the conditions under which the bonding
process is carried out. Unless otherwise agreed upon between conditions of drying where more than one coat is required,
D5656 − 10 (2017)
9.2.3 Assembly conditions before application of pressure, attach one of the extensometers to each edge of the bar, in
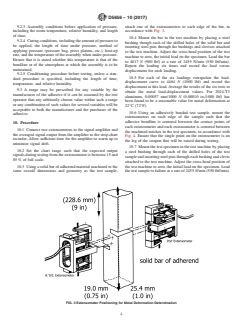
including the room temperature, relative humidity, and length accordance with Fig. 3.
of time,
10.4 Mount the bar in the test machine by placing a steel
9.2.4 Curingconditions,includingtheamountofpressureto
bushing though each of the drilled holes of the solid bar and
be applied, the length of time under pressure, method of
inserting steel pins through the bushings and clevises attached
applying pressure (pressure bag, press platens, etc.), heat-up
to the test machine. Adjust the cross-head position of the test
rate, and the temperature of the assembly when under pressure.
machine to zero, the initial load on the specimen. Load the bar
Ensure that it is state
...


Questions, Comments and Discussion
Ask us and Technical Secretary will try to provide an answer. You can facilitate discussion about the standard in here.
Loading comments...