ASTM D5656-01
(Test Method)Standard Test Method for Thick-Adherend Metal Lap-Shear Joints for Determination of the Stress-Strain Behavior of Adhesives in Shear by Tension Loading
Standard Test Method for Thick-Adherend Metal Lap-Shear Joints for Determination of the Stress-Strain Behavior of Adhesives in Shear by Tension Loading
SCOPE
1.1 This test method covers the preparation and testing of thick-adherend lap-shear samples for the determination of the stress-strain behavior of adhesives.
1.2 This test method covers data reduction and analysis of stress-strain curves obtained using thick-adherend lap-shear samples.
1.3 The values stated in SI units are to be regarded as the standard. The inch-pound units in parentheses are for information only.
1.4 This standard does not purport to address all of the safety concerns, if any, associated with its use. It is the responsibility of the user of this standard to establish appropriate safety and health practices and determine the applicability of regulatory limitations prior to use. Specific precautionary statements are given in 7.3.
General Information
Relations
Standards Content (Sample)
NOTICE: This standard has either been superseded and replaced by a new version or withdrawn.
Contact ASTM International (www.astm.org) for the latest information
Designation: D 5656 – 01
Standard Test Method for
Thick-Adherend Metal Lap-Shear Joints for Determination of
the Stress-Strain Behavior of Adhesives in Shear by
1
Tension Loading
This standard is issued under the fixed designation D 5656; the number immediately following the designation indicates the year of
original adoption or, in the case of revision, the year of last revision. A number in parentheses indicates the year of last reapproval. A
superscript epsilon (e) indicates an editorial change since the last revision or reapproval.
1. Scope 3.2.2 panel—two plates of a rigid material having the same
dimensions that are adhesively bonded together on one face
1.1 This test method covers the preparation and testing of
such that the thickness of the panel is approximately twice the
thick-adherend lap-shear samples for the determination of the
thickness of each individual plate.
stress-strain behavior of adhesives.
1.2 This test method covers data reduction and analysis of
4. Summary of Test Method
stress-strain curves obtained using thick-adherend lap-shear
4.1 This test method consists of testing thick-adherend
samples.
lap-shear samples whereby a tensile load is applied to the
1.3 The values stated in SI units are to be regarded as the
sample but the adhesive is placed in shear. Since the adherends
standard. The inch-pound units in parentheses are for informa-
used are thick and rigid, peel forces are minimized and the
tion only.
shear stress-strain properties of the adhesive are obtained.
1.4 This standard does not purport to address all of the
safety concerns, if any, associated with its use. It is the
NOTE 1—The peel forces generated during testing are a function of the
responsibility of the user of this standard to establish appro- bending deformation in the adherends. Greater adherend stiffness results
in less bending and smaller peel forces.
priate safety and health practices and determine the applica-
bility of regulatory limitations prior to use. Specific precau-
5. Significance and Use
tionary statements are given in 7.3.
5.1 This test method can be used to determine the stress-
2. Referenced Documents
strain properties of an adhesive in shear and to establish the
proportional-limit of the stress-stain relationship. This data
2.1 ASTM Standards:
2
may be useful for the design and analysis of adhesively bonded
D 907 Terminology of Adhesives
joints.
D 2651 Guide for Preparation of Metal Surfaces for Adhe-
2
5.2 This test method is not intended to determine adhesion
sive Bonding
3
characteristics of an adhesive to a particular substrate; rather
E 4 Practices for Force Verification of Testing Machines
this test method is intended to characterize the adhesive
3. Terminology
properties that may be relevant for design considerations.
5.3 This test method has been developed and applied using
3.1 Definitions:
bonded aluminum adherends. At this time no assumptions
3.1.1 Many terms in this test method are defined in Termi-
regarding the validity of this test method with non-aluminum
nology D 907.
adherends can be made.
3.2 Definitions of Terms Specific to This Standard:
3.2.1 knee—inflection point on a load-deflection curve; the
6. Apparatus
point at which plastic yielding of the adhesive begins to
6.1 Testing machine conforming to the requirements of
dominate the deformation response of the load-deflection
Practices E 4. Select the testing machine so that the breaking
curve.
load of the specimens falls between 15 and 85 % of the
full-scale capacity. Ensure that the machine is capable of
1 maintaining a rate of loading of 2455 N (550 lbf)/min, or, if the
This test method is under the jurisdiction of ASTM Committee D14 on
rate is dependent on cross-head motion, set the machine to
Adhesives and is the direct responsibility of Subcommittee D14.80 on Metal
Bonding Adhesives.
approach this rate of loading. Use a suitable pair of self-
Current edition approved Oct. 10, 2001. Published December 2001. Originally
aligning grips to hold the specimen. Ensure that the grips and
published as D 5656 - 95. Last previous edition D 5656 - 95(2000).
2 attachments are so constructed that they will move into
Annual Book of ASTM Standards, Vol 15.06.
3
Annual Book of ASTM Standards, Vol 03.01. alignment with the test specimen as soon as the load is applied,
Copyright © ASTM International, 100 Barr Harbor Drive, PO Box C700, West Conshohocken, PA 19428-2959, United States.
1
---------------------- Page: 1 ----------------------
D5656–01
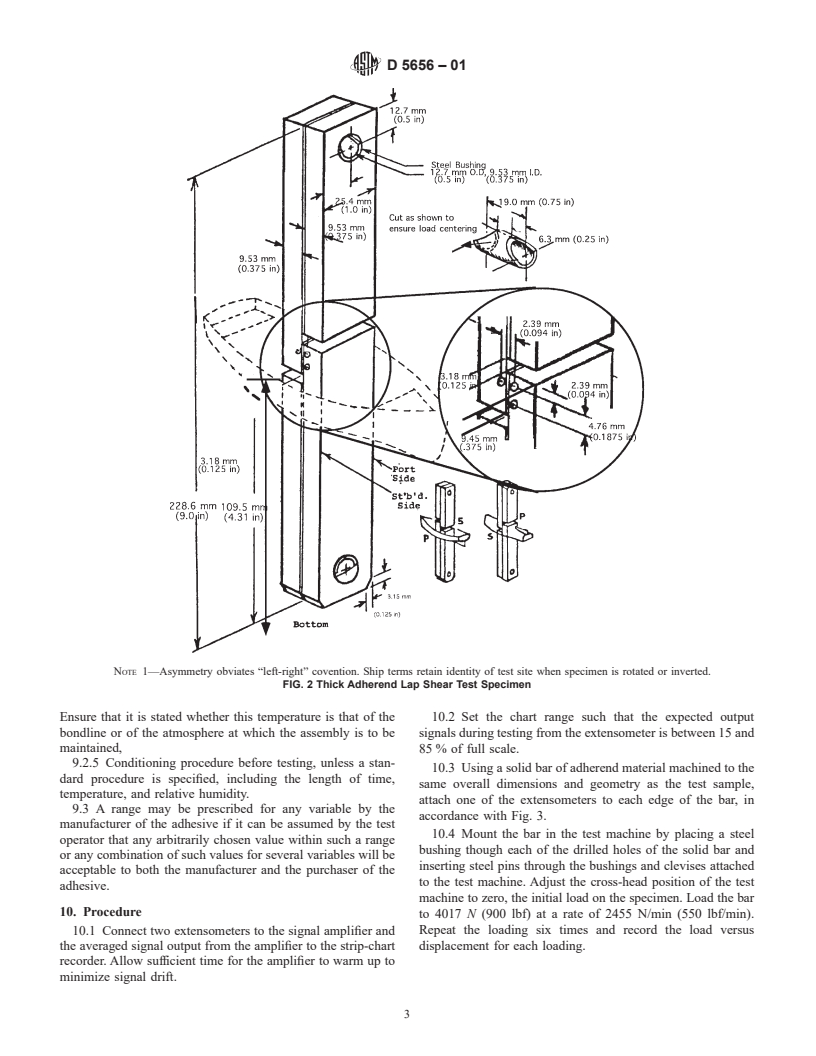
so that the long axis of the test specimen will coincide with the 7.3 After cure, saw-cut 25.4-mm (1.0-in.) wide test samples
direction of the applied pull through the center line of the grip from the bonded panel, or if machined edges are preferred
assembly. saw-cut the samples to 27.5-mm widths and machine the saw
cut edges to a sample width
...


Questions, Comments and Discussion
Ask us and Technical Secretary will try to provide an answer. You can facilitate discussion about the standard in here.