ASTM D5656-95(2000)
(Test Method)Standard Test Method for Thick-Adherend Metal Lap-Shear Joints for Determination of the Stress-Strain Behavior of Adhesives in Shear by Tension Loading
Standard Test Method for Thick-Adherend Metal Lap-Shear Joints for Determination of the Stress-Strain Behavior of Adhesives in Shear by Tension Loading
SCOPE
1.1 This test method covers the preparation and testing of thick-adherend lap-shear samples for the determination of the stress-strain behavior of adhesives.
1.2 This test method covers data reduction and analysis of stress-strain curves obtained using thick-adherend lap-shear samples.
1.3 The values stated in SI units are to be regarded as the standard. The inch-pound units in parentheses are for information only.
1.4 This standard does not purport to address all of the safety concerns, if any, associated with its use. It is the responsibility of the user of this standard to establish appropriate safety and health practices and determine the applicability of regulatory limitations prior to use. Specific precautionary statements are given in 7.3.
General Information
Relations
Standards Content (Sample)
NOTICE: This standard has either been superseded and replaced by a new version or discontinued.
Contact ASTM International (www.astm.org) for the latest information.
Designation: D 5656 – 95 (Reapproved 2000)
Standard Test Method for
Thick-Adherend Metal Lap-Shear Joints for Determination of
the Stress-Strain Behavior of Adhesives in Shear by
Tension Loading
This standard is issued under the fixed designation D 5656; the number immediately following the designation indicates the year of
original adoption or, in the case of revision, the year of last revision. A number in parentheses indicates the year of last reapproval. A
superscript epsilon (e) indicates an editorial change since the last revision or reapproval.
1. Scope 4. Summary of Test Method
1.1 This test method covers the preparation and testing of 4.1 This test method consists of testing thick-adherend
thick-adherend lap-shear samples for the determination of the lap-shear samples whereby a tensile load is applied to the
stress-strain behavior of adhesives. sample but the adhesive is placed in shear. Since the adherends
1.2 This test method covers data reduction and analysis of used are thick and rigid, peel forces are minimized and the
stress-strain curves obtained using thick-adherend lap-shear shear stress-strain properties of the adhesive are obtained.
samples.
NOTE 1—The peel forces generated during testing are a function of the
1.3 The values stated in SI units are to be regarded as the
bending deformation in the adherends. Greater adherend stiffness results
standard. The inch-pound units in parentheses are for informa-
in less bending and smaller peel forces.
tion only.
5. Significance and Use
1.4 This standard does not purport to address all of the
safety concerns, if any, associated with its use. It is the
5.1 This test method can be used to determine the
responsibility of the user of this standard to establish appro-
stressstrain properties of an adhesive in shear and to establish
priate safety and health practices and determine the applica-
the proportional-limit of the stress-stain relationship. This data
bility of regulatory limitations prior to use. Specific precau-
may be useful for the design and analysis of adhesively bonded
tionary statements are given in Note 4.
joints.
5.2 This test method is not intended to determine adhesion
2. Referenced Documents
characteristics of an adhesive to a particular substrate; rather
2.1 ASTM Standards:
this test method is intended to characterize the adhesive
D 907 Terminology of Adhesives
properties that may be relevant for design considerations.
D 2651 Guide for Preparation of Metal Surfaces for Adhe-
5.3 This test method has been developed and applied using
sive Bonding
bonded aluminum adherends. At this time no assumptions
E 4 Practices for Force Verification of Testing Machines
regarding the validity of this test method with non-aluminum
adherends can be made.
3. Terminology
6. Apparatus
3.1 Definitions:
3.1.1 Many terms in this test method are defined in Termi-
6.1 The testing machine shall conform to the requirements
nology D 907.
of Practice E 4. The testing machine shall be so selected that
3.2 Definitions of Terms Specific to This Standard:
the breaking load of the specimens falls between 15 and 85 %
3.2.1 knee—inflection point on a load-deflection curve; the
of the full-scale capacity. The machine shall be capable of
point at which plastic yielding of the adhesive begins to
maintaining a rate of loading of 2455 N (550 lbf)/min, or, if the
dominate the deformation response of the load-deflection
rate is dependent on cross-head motion, the machine should be
curve.
set to approach this rate of loading. It shall be provided with a
3.2.2 panel—two plates of a rigid material having the same
suitable pair of self-aligning grips to hold the specimen. The
dimensions that are adhesively bonded together on one face
grips and attachments shall be so constructed that they will
such that the thickness of the panel is approximately twice the
move into alignment with the test specimen as soon as the load
thickness of each individual plate.
is applied, so that the long axis of the test specimen will
coincide with the direction of the applied pull through the
center line of the grip assembly.
This test method is under the jurisdiction of ASTM Committee D14 on
Adhesives and is the direct responsibility of Subcommittee D14.80 on Metal
NOTE 2—The cross-head speed setting required to approach the speci-
Bonding Adhesives.
fied loading rate is dependent on the modulus of the adherends and the
Current edition approved Jan. 15, 1995. Published March 1995.
Annual Book of ASTM Standards, Vol 15.06. adhesive being evaluated.
Annual Book of ASTM Standards, Vol 03.01.
Copyright © ASTM, 100 Barr Harbor Drive, West Conshohocken, PA 19428-2959, United States.
D 5656
NOTE 4—Caution: Caution should be exercised during machining of
6.2 Two three-point displacement sensors/(linear variable
the notches to minimize the buildup of stresses and thermal degradation of
differential transformers) extensometers with the capability of
the adhesive in this region.
measuring displacements in the adhesive bond overlap area,
and a sensitivity sufficient to measure displacements with an 7.4 Using a vernier caliper or other suitable measuring
device, measure the width of the overlap area to the nearest
accuracy of 1 part/1000 shall be used.
0.003 mm (0.001 in.) for each test sample.
7. Sample Preparation
7.5 Using an optical comparator or other suitable measuring
7.1 Suitably prepare the bonding surfaces of two 229 by
device, measure the overlap length to the nearest 0.003 mm
229-mm (9 by 9-in.) by 9.5 6 0.05-mm (0.375 6 0.002-in.)
(0.001 in.) for each test sample.
rigid adherends which do not deflect during testing, such as
7.6 Using an optical comparator or other suitable measuring
2024-T3 aluminum, for the adhesive being used. For alumi-
device, measure the adhesive thickness in the overlap region to
num, solvent degreasing and acid etching, such as Method G of
the nearest 0.0003 mm (0.0001 in.) for each test sample.
Guide D 2651, are recommended for removing the oxide
8. Calibration of Extensometers
coating from the aluminum surfaces to be bonded.
7.2 Apply the adhesive in a uniform layer to one face of one
8.1 Connect the extensometers to an amplifier with two
of the adherend plates. In the case of paste adhesives and
signal inputs and one signal output which is the average of the
unsupported film adhesives, metal wires or shims may be used
two input signals. Connect the amplifier output to a strip-chart
to control the bondline thickness. In this case, take care to
recorder that will be used during testing. Allow sufficient time
ensure that the shims are outside of the lap area or are located
for the amplifier to warm up to minimize signal drift.
in the trim region around the panel perimeter so that they do
8.2 Using a micrometer gage or similar device, adjust the
not affect the test results. Place the other adherend plate on top
amplifier gain such that 0.0254 mm (0.001 in.) of extensometer
of the adhesive-coated plate in accordance with Fig. 1. To
displacement is equal to 50.8 mm (2.0 in.) of chart travel.
achieve the desired adhesive thickness, apply sufficient pres-
8.3 Repeat the procedure for the remaining extensometer.
sure to cause the adhesive to flow between the plates such that
9. Conditioning
the plates are in contact with the shims if they are being used.
Cure the adhesive in accordance with the manufacturer’s
9.1 The accuracy of the results of strength tests of adhesive
recommended practices for the adhesive being tested.
bonds will depend on the conditions under which the bonding
process is carried out. Unless otherwise agreed upon between
NOTE 3—The use of glass beads in the adhesive to control the bondline
the manufacturer and the purchaser, the bonding conditions
thickness is not recommended, since their use will have an effect on the
shall be prescribed by the manufacturer of the adhesive. In
calculated values of modulus, strain, and strength.
order to ensure that complete information is available to the
7.3 After cure, saw-cut 25.4-mm (1.0-in.) wide test samples
individual conducting the tests, the manufacturer of the adhe-
from the bonded panel, or if machined edges are preferred
sive shall furnish numerical values and other specific informa-
saw-cut the samples to 27.5-mm widths and machine the saw
tion for each of the following variables:
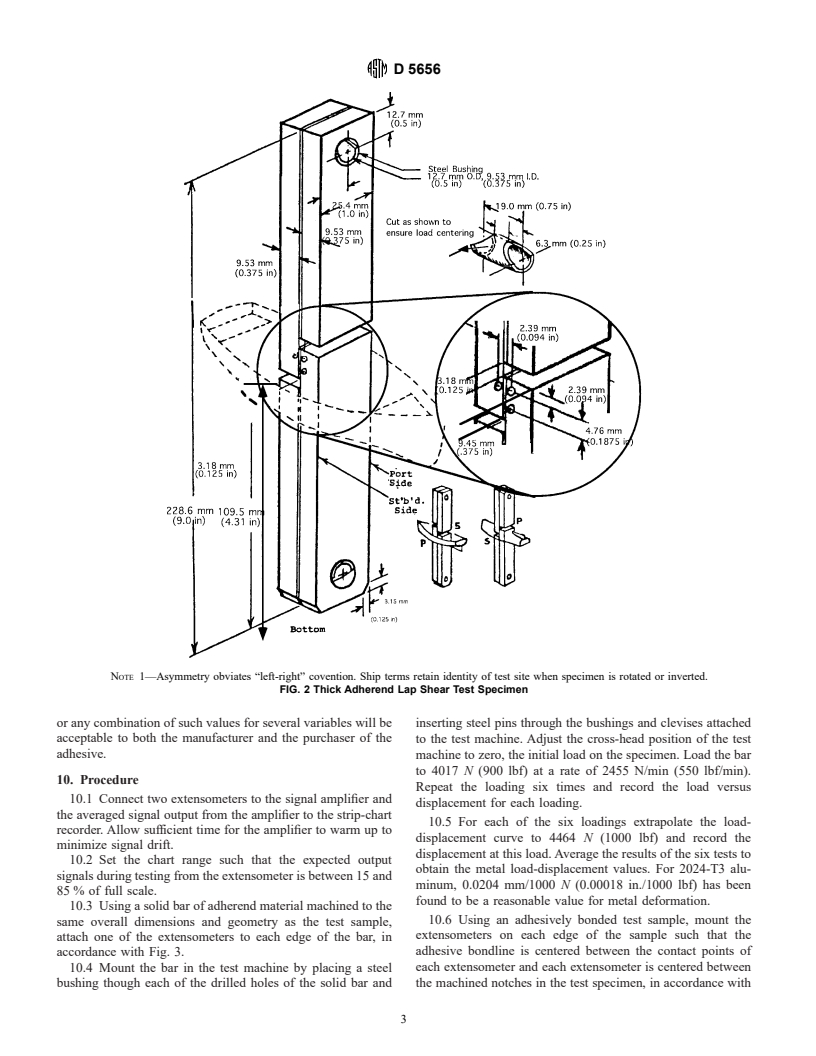
cut edges to a sample width of 25.4 mm (1.0 in.). Use an end
9.2 Procedure for preparation of surfaces prior to applica-
mill to machine notches through the glue line in accordance
tion of the adhesive, the cleaning and drying of adherend
with Fig. 2. Drill holes for inserting support pins and steel
surfaces, and special surface treatments, such as sanding, that
bushings for testing in accordance with Fig. 2.
are not specifically limited by the pertinent test method,
9.2.1 Complete mixing directions for the adhesive,
9.2.2 Conditions for application of the adhesive, including
the rate of spread or thickness of film, number of coats to be
applied, whether to be applied to one or both surfaces, and the
conditions of drying where more than one coat is required,
9.2.3 Assembly conditions before application of pressure,
including the room temperature, relative humidity, and length
of time,
9.2.4 Curing conditions, including the amount of pressure to
be applied, the length of time under pressure, method of
applying pressure (pressure bag, press platens, etc.), heat-up
rate, and the temperature of the assembly when under pressure.
It should be state
...


Questions, Comments and Discussion
Ask us and Technical Secretary will try to provide an answer. You can facilitate discussion about the standard in here.