ASTM G98-17(2022)
(Test Method)Standard Test Method for Galling Resistance of Materials
Standard Test Method for Galling Resistance of Materials
SIGNIFICANCE AND USE
5.1 This test method is designed to rank material couples in their resistance to the failure mode caused by galling and not merely to classify the surface appearance of sliding surfaces.
5.2 This test method should be considered when damaged (galled) surfaces render components non-serviceable. Experience has shown that galling is most prevalent in sliding systems that are slow moving and operate intermittently. The galling and seizure of threaded components is a classic example which this test method most closely simulates.
5.3 Other galling-prone examples include: sealing surfaces of value trim which may leak excessively due to galling; and pump wear rings that may function ineffectively due to galling.
5.4 If the equipment continues to operate satisfactorily and loses dimension gradually, then mechanical wear should be evaluated by a different test such as the crossed cylinder Test Method (see Test Method G83). Chain belt pins and bushings are examples of this type of problem.
5.5 This test method should not be used for quantitative or final design purposes since many environmental factors influence the galling performance of materials in service. Lubrication, alignment, stiffness and geometry are only some of the factors that can affect how materials perform. This test method has proven valuable in screening materials for prototypical testing that more closely simulates actual service conditions.
SCOPE
1.1 This test method covers a laboratory test which ranks the galling resistance of material couples. Most galling studies have been conducted on bare metals and alloys; however, non-metallics, coatings, and surface modified alloys may also be evaluated by this test method.
1.2 This test method is not designed for evaluating the galling resistance of material couples sliding under lubricated conditions because galling usually will not occur under lubricated sliding conditions using this test method.
1.3 This standard does not purport to address all of the safety concerns, if any, associated with its use. It is the responsibility of the user of this standard to establish appropriate safety, health, and environmental practices and determine the applicability of regulatory limitations prior to use.
1.4 This international standard was developed in accordance with internationally recognized principles on standardization established in the Decision on Principles for the Development of International Standards, Guides and Recommendations issued by the World Trade Organization Technical Barriers to Trade (TBT) Committee.
General Information
Relations
Buy Standard
Standards Content (Sample)
This international standard was developed in accordance with internationally recognized principles on standardization established in the Decision on Principles for the
Development of International Standards, Guides and Recommendations issued by the World Trade Organization Technical Barriers to Trade (TBT) Committee.
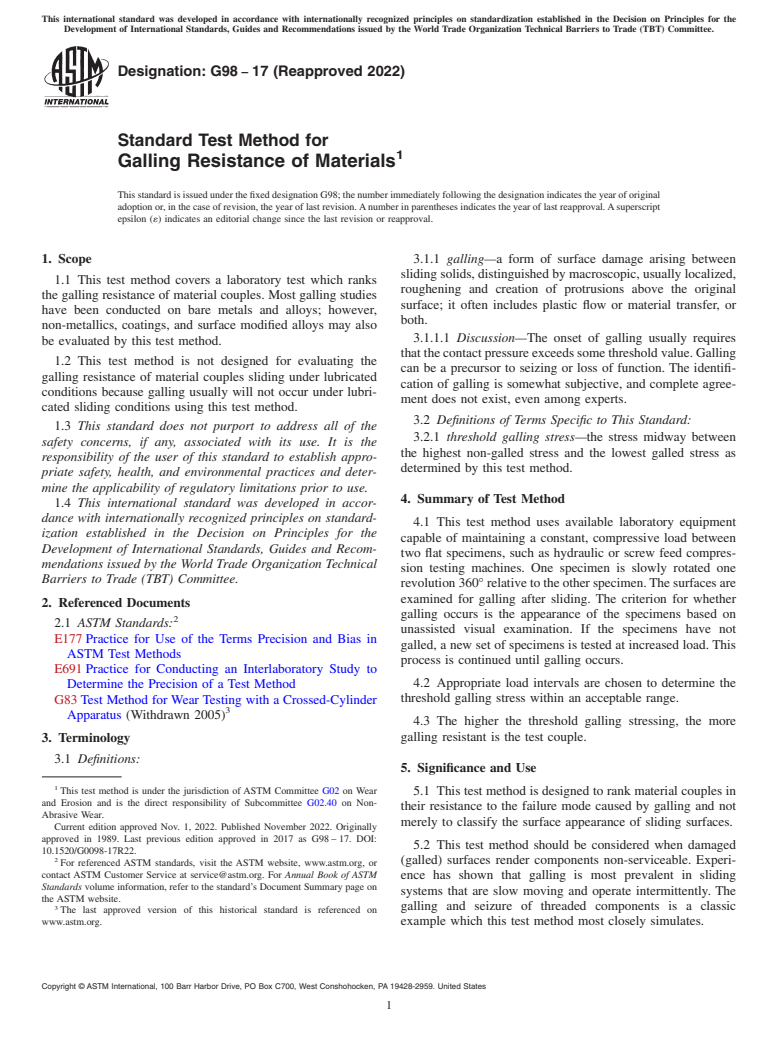
Designation: G98 − 17 (Reapproved 2022)
Standard Test Method for
Galling Resistance of Materials
This standard is issued under the fixed designation G98; the number immediately following the designation indicates the year of original
adoption or, in the case of revision, the year of last revision.Anumber in parentheses indicates the year of last reapproval.Asuperscript
epsilon (´) indicates an editorial change since the last revision or reapproval.
1. Scope 3.1.1 galling—a form of surface damage arising between
sliding solids, distinguished by macroscopic, usually localized,
1.1 This test method covers a laboratory test which ranks
roughening and creation of protrusions above the original
the galling resistance of material couples. Most galling studies
surface; it often includes plastic flow or material transfer, or
have been conducted on bare metals and alloys; however,
both.
non-metallics, coatings, and surface modified alloys may also
3.1.1.1 Discussion—The onset of galling usually requires
be evaluated by this test method.
thatthecontactpressureexceedssomethresholdvalue.Galling
1.2 This test method is not designed for evaluating the
can be a precursor to seizing or loss of function. The identifi-
galling resistance of material couples sliding under lubricated
cation of galling is somewhat subjective, and complete agree-
conditions because galling usually will not occur under lubri-
ment does not exist, even among experts.
cated sliding conditions using this test method.
3.2 Definitions of Terms Specific to This Standard:
1.3 This standard does not purport to address all of the
3.2.1 threshold galling stress—the stress midway between
safety concerns, if any, associated with its use. It is the
the highest non-galled stress and the lowest galled stress as
responsibility of the user of this standard to establish appro-
determined by this test method.
priate safety, health, and environmental practices and deter-
mine the applicability of regulatory limitations prior to use.
4. Summary of Test Method
1.4 This international standard was developed in accor-
dance with internationally recognized principles on standard-
4.1 This test method uses available laboratory equipment
ization established in the Decision on Principles for the
capable of maintaining a constant, compressive load between
Development of International Standards, Guides and Recom-
two flat specimens, such as hydraulic or screw feed compres-
mendations issued by the World Trade Organization Technical
sion testing machines. One specimen is slowly rotated one
Barriers to Trade (TBT) Committee.
revolution360°relativetotheotherspecimen.Thesurfacesare
examined for galling after sliding. The criterion for whether
2. Referenced Documents
galling occurs is the appearance of the specimens based on
2.1 ASTM Standards:
unassisted visual examination. If the specimens have not
E177 Practice for Use of the Terms Precision and Bias in
galled, a new set of specimens is tested at increased load. This
ASTM Test Methods
process is continued until galling occurs.
E691 Practice for Conducting an Interlaboratory Study to
4.2 Appropriate load intervals are chosen to determine the
Determine the Precision of a Test Method
threshold galling stress within an acceptable range.
G83 Test Method for Wear Testing with a Crossed-Cylinder
Apparatus (Withdrawn 2005)
4.3 The higher the threshold galling stressing, the more
galling resistant is the test couple.
3. Terminology
3.1 Definitions:
5. Significance and Use
This test method is under the jurisdiction of ASTM Committee G02 on Wear 5.1 This test method is designed to rank material couples in
and Erosion and is the direct responsibility of Subcommittee G02.40 on Non-
their resistance to the failure mode caused by galling and not
Abrasive Wear.
merely to classify the surface appearance of sliding surfaces.
Current edition approved Nov. 1, 2022. Published November 2022. Originally
approved in 1989. Last previous edition approved in 2017 as G98 – 17. DOI:
5.2 This test method should be considered when damaged
10.1520/G0098-17R22.
(galled) surfaces render components non-serviceable. Experi-
For referenced ASTM standards, visit the ASTM website, www.astm.org, or
contact ASTM Customer Service at service@astm.org. For Annual Book of ASTM
ence has shown that galling is most prevalent in sliding
Standards volume information, refer to the standard’s Document Summary page on
systems that are slow moving and operate intermittently. The
the ASTM website.
3 galling and seizure of threaded components is a classic
The last approved version of this historical standard is referenced on
www.astm.org. example which this test method most closely simulates.
Copyright © ASTM International, 100 Barr Harbor Drive, PO Box C700, West Conshohocken, PA 19428-2959. United States
G98 − 17 (2022)
5.3 Other galling-prone examples include: sealing surfaces Thickness is not critical. Tests have been successfully run on
of value trim which may leak excessively due to galling; and blocks with thicknesses from 1.5 mm (0.06 in.) to 25.4 mm
pump wear rings that may function ineffectively due to galling. (1 in.).
5.4 If the equipment continues to operate satisfactorily and 7.5 Maintain block flatness at 0.33 mm/m (0.004 in./ft).
loses dimension gradually, then mechanical wear should be
7.6 The arithmetic average surface finish of both test sur-
evaluated by a different test such as the crossed cylinder Test
faces should be between 0.25 µm and 1.1 µm (10 µin. and
Method (see Test Method G83). Chain belt pins and bushings
45 µin.). Leave specimens as-ground or polished with abrasive
are examples of this type of problem.
paper to achieve the finish.
5.5 This test method should not be used for quantitative or
8. Procedure
final design purposes since many environmental factors influ-
ence the galling performance of materials in service.
8.1 An overall view of the galling test set-up is shown in
Lubrication, alignment, stiffness and geometry are only some
Fig. 2.
of the factors that can affect how materials perform. This test
8.2 Cleaning—Immediately prior to testing, clean the test
method has proven valuable in screening materials for proto-
surfaces of the specimens using a procedure that will remove
typical testing that more closely simulates actual service
any scale, oil film, or foreign matter. The following cleaning
conditions.
technique is suggested for metallic specimens: clean the button
and block in trichloroethane, ultrasonically, if possible; a
6. Apparatus
methanol rinse may be used to remove any traces of trichlo-
6.1 Commonly available laboratory equipment has been
roethane residue (see Note 1). Materials with open grains
used to conduct galling tests. Both Brinell hardness testers and
(some powder metals) must be dried to remove all traces of the
servo-hydraulic testing machines have proven to be satisfac-
cleaning solvent which may be entrapped in the material.
tory as loading devices. Any apparatus that can apply and
Demagnetize steel specimens having residual magnetism.
maintain a constant compressive load should be acceptable.
NOTE 1—This cleaning procedure is not appropriate for polymers. If a
polymer is being tested, a cleaning procedure that does not alter the
7. Test Specimens
chemistry or surface should be determined.
7.1 This test method uses a cylindrical flat-on-flat geometry.
8.3 Mount specimens in the loading device and degrease
One specimen is called the button (or pin) and is generally (but
again if possible. Lightly load the specimens. Twist the button
not necessarily) rotated about its axis on the flat specimen
by hand to make sure it is seated flat on the block.
called the block.
8.4 Apply the selected load. If there is no estimate of the
7.2 Some typical button geometries are shown in Fig. 1.
galling resistance of the test couple, it is advisable to start with
7.3 The only critical dimension is diameter “B’’ of the
890 N (200 lb) and increase the stress in subsequent tests as
contact area. The 6.4 mm (0.25 in.) diameter hole accommo-
desired. This will minimize damage to the specimens so that
dates a ball bearing for alignment purposes during the test.All
they may be remachined and used for further testing.
other dimensions may be varied to the user’s convenience.
8.5 Immediately rotate one specimen (usually the button,
7.4 The block specimen m
...
NOTICE: This standard has either been superseded and replaced by a new version or withdrawn.
Contact ASTM International (www.astm.org) for the latest information
Designation: G98 − 17 (Reapproved 2022)
Standard Test Method for
Galling Resistance of Materials
This standard is issued under the fixed designation G98; the number immediately following the designation indicates the year of original
adoption or, in the case of revision, the year of last revision. A number in parentheses indicates the year of last reapproval. A superscript
epsilon (´) indicates an editorial change since the last revision or reapproval.
1. Scope 3.1.1 galling—a form of surface damage arising between
sliding solids, distinguished by macroscopic, usually localized,
1.1 This test method covers a laboratory test which ranks
roughening and creation of protrusions above the original
the galling resistance of material couples. Most galling studies
surface; it often includes plastic flow or material transfer, or
have been conducted on bare metals and alloys; however,
both.
non-metallics, coatings, and surface modified alloys may also
3.1.1.1 Discussion—The onset of galling usually requires
be evaluated by this test method.
that the contact pressure exceeds some threshold value. Galling
1.2 This test method is not designed for evaluating the
can be a precursor to seizing or loss of function. The identifi-
galling resistance of material couples sliding under lubricated
cation of galling is somewhat subjective, and complete agree-
conditions because galling usually will not occur under lubri-
ment does not exist, even among experts.
cated sliding conditions using this test method.
3.2 Definitions of Terms Specific to This Standard:
1.3 This standard does not purport to address all of the
3.2.1 threshold galling stress—the stress midway between
safety concerns, if any, associated with its use. It is the
the highest non-galled stress and the lowest galled stress as
responsibility of the user of this standard to establish appro-
determined by this test method.
priate safety, health, and environmental practices and deter-
mine the applicability of regulatory limitations prior to use.
4. Summary of Test Method
1.4 This international standard was developed in accor-
dance with internationally recognized principles on standard-
4.1 This test method uses available laboratory equipment
ization established in the Decision on Principles for the
capable of maintaining a constant, compressive load between
Development of International Standards, Guides and Recom-
two flat specimens, such as hydraulic or screw feed compres-
mendations issued by the World Trade Organization Technical
sion testing machines. One specimen is slowly rotated one
Barriers to Trade (TBT) Committee.
revolution 360° relative to the other specimen. The surfaces are
examined for galling after sliding. The criterion for whether
2. Referenced Documents
galling occurs is the appearance of the specimens based on
2.1 ASTM Standards:
unassisted visual examination. If the specimens have not
E177 Practice for Use of the Terms Precision and Bias in
galled, a new set of specimens is tested at increased load. This
ASTM Test Methods
process is continued until galling occurs.
E691 Practice for Conducting an Interlaboratory Study to
4.2 Appropriate load intervals are chosen to determine the
Determine the Precision of a Test Method
threshold galling stress within an acceptable range.
G83 Test Method for Wear Testing with a Crossed-Cylinder
Apparatus (Withdrawn 2005)
4.3 The higher the threshold galling stressing, the more
galling resistant is the test couple.
3. Terminology
3.1 Definitions:
5. Significance and Use
This test method is under the jurisdiction of ASTM Committee G02 on Wear
5.1 This test method is designed to rank material couples in
and Erosion and is the direct responsibility of Subcommittee G02.40 on Non-
their resistance to the failure mode caused by galling and not
Abrasive Wear.
merely to classify the surface appearance of sliding surfaces.
Current edition approved Nov. 1, 2022. Published November 2022. Originally
approved in 1989. Last previous edition approved in 2017 as G98 – 17. DOI:
5.2 This test method should be considered when damaged
10.1520/G0098-17R22.
(galled) surfaces render components non-serviceable. Experi-
For referenced ASTM standards, visit the ASTM website, www.astm.org, or
contact ASTM Customer Service at service@astm.org. For Annual Book of ASTM
ence has shown that galling is most prevalent in sliding
Standards volume information, refer to the standard’s Document Summary page on
systems that are slow moving and operate intermittently. The
the ASTM website.
3 galling and seizure of threaded components is a classic
The last approved version of this historical standard is referenced on
www.astm.org. example which this test method most closely simulates.
Copyright © ASTM International, 100 Barr Harbor Drive, PO Box C700, West Conshohocken, PA 19428-2959. United States
G98 − 17 (2022)
5.3 Other galling-prone examples include: sealing surfaces Thickness is not critical. Tests have been successfully run on
of value trim which may leak excessively due to galling; and blocks with thicknesses from 1.5 mm (0.06 in.) to 25.4 mm
pump wear rings that may function ineffectively due to galling. (1 in.).
5.4 If the equipment continues to operate satisfactorily and 7.5 Maintain block flatness at 0.33 mm/m (0.004 in./ft).
loses dimension gradually, then mechanical wear should be
7.6 The arithmetic average surface finish of both test sur-
evaluated by a different test such as the crossed cylinder Test
faces should be between 0.25 µm and 1.1 µm (10 µin. and
Method (see Test Method G83). Chain belt pins and bushings
45 µin.). Leave specimens as-ground or polished with abrasive
are examples of this type of problem.
paper to achieve the finish.
5.5 This test method should not be used for quantitative or
8. Procedure
final design purposes since many environmental factors influ-
ence the galling performance of materials in service.
8.1 An overall view of the galling test set-up is shown in
Lubrication, alignment, stiffness and geometry are only some
Fig. 2.
of the factors that can affect how materials perform. This test
8.2 Cleaning—Immediately prior to testing, clean the test
method has proven valuable in screening materials for proto-
surfaces of the specimens using a procedure that will remove
typical testing that more closely simulates actual service
any scale, oil film, or foreign matter. The following cleaning
conditions.
technique is suggested for metallic specimens: clean the button
and block in trichloroethane, ultrasonically, if possible; a
6. Apparatus
methanol rinse may be used to remove any traces of trichlo-
6.1 Commonly available laboratory equipment has been
roethane residue (see Note 1). Materials with open grains
used to conduct galling tests. Both Brinell hardness testers and
(some powder metals) must be dried to remove all traces of the
servo-hydraulic testing machines have proven to be satisfac-
cleaning solvent which may be entrapped in the material.
tory as loading devices. Any apparatus that can apply and
Demagnetize steel specimens having residual magnetism.
maintain a constant compressive load should be acceptable.
NOTE 1—This cleaning procedure is not appropriate for polymers. If a
7. Test Specimens polymer is being tested, a cleaning procedure that does not alter the
chemistry or surface should be determined.
7.1 This test method uses a cylindrical flat-on-flat geometry.
8.3 Mount specimens in the loading device and degrease
One specimen is called the button (or pin) and is generally (but
again if possible. Lightly load the specimens. Twist the button
not necessarily) rotated about its axis on the flat specimen
by hand to make sure it is seated flat on the block.
called the block.
8.4 Apply the selected load. If there is no estimate of the
7.2 Some typical button geometries are shown in Fig. 1.
galling resistance of the test couple, it is advisable to start with
7.3 The only critical dimension is diameter “B’’ of the
890 N (200 lb) and increase the stress in subsequent tests as
contact area. The 6.4 mm (0.25 in.) diameter hole accommo-
desired. This will minimize damage to the specimens so that
dates a ball bearing for alignment purposes during the test. All
they may be remachined and used for further testing.
other dimensions may be varied to the user’s convenience.
8.5 Immediately rotate one specimen (usually the button,
7.4 The block specimen must have sufficient area to accom-
but not necessarily) one revolution. Use an
...
This document is not an ASTM standard and is intended only to provide the user of an ASTM standard an indication of what changes have been made to the previous version. Because
it may not be technically possible to adequately depict all changes accurately, ASTM recommends that users consult prior editions as appropriate. In all cases only the current version
of the standard as published by ASTM is to be considered the official document.
Designation: G98 − 17 G98 − 17 (Reapproved 2022)
Standard Test Method for
Galling Resistance of Materials
This standard is issued under the fixed designation G98; the number immediately following the designation indicates the year of original
adoption or, in the case of revision, the year of last revision. A number in parentheses indicates the year of last reapproval. A superscript
epsilon (´) indicates an editorial change since the last revision or reapproval.
1. Scope
1.1 This test method covers a laboratory test which ranks the galling resistance of material couples. Most galling studies have been
conducted on bare metals and alloys; however, non-metallics, coatings, and surface modified alloys may also be evaluated by this
test method.
1.2 This test method is not designed for evaluating the galling resistance of material couples sliding under lubricated conditions
because galling usually will not occur under lubricated sliding conditions using this test method.
1.3 This standard does not purport to address all of the safety concerns, if any, associated with its use. It is the responsibility
of the user of this standard to establish appropriate safety, health, and environmental practices and determine the applicability of
regulatory limitations prior to use.
1.4 This international standard was developed in accordance with internationally recognized principles on standardization
established in the Decision on Principles for the Development of International Standards, Guides and Recommendations issued
by the World Trade Organization Technical Barriers to Trade (TBT) Committee.
2. Referenced Documents
2.1 ASTM Standards:
E177 Practice for Use of the Terms Precision and Bias in ASTM Test Methods
E691 Practice for Conducting an Interlaboratory Study to Determine the Precision of a Test Method
G83 Test Method for Wear Testing with a Crossed-Cylinder Apparatus (Withdrawn 2005)
3. Terminology
3.1 Definitions:
3.1.1 galling—a form of surface damage arising between sliding solids, distinguished by macroscopic, usually localized,
roughening and creation of protrusions above the original surface; it often includes plastic flow or material transfer, or both.
3.1.1.1 Discussion—
The onset of galling usually requires that the contact pressure exceeds some threshold value. Galling can be a precursor to seizing
or loss of function. The identification of galling is somewhat subjective, and complete agreement does not exist, even among
experts.
3.2 Definitions of Terms Specific to This Standard:
This test method is under the jurisdiction of ASTM Committee G02 on Wear and Erosion and is the direct responsibility of Subcommittee G02.40 on Non-Abrasive Wear.
Current edition approved July 15, 2017Nov. 1, 2022. Published August 2017November 2022. Originally approved in 1989. Last previous edition approved in 20092017
as G98 – 02 (2009).G98 – 17. DOI: 10.1520/G0098-17.10.1520/G0098-17R22.
For referenced ASTM standards, visit the ASTM website, www.astm.org, or contact ASTM Customer Service at service@astm.org. For Annual Book of ASTM Standards
volume information, refer to the standard’sstandard’s Document Summary page on the ASTM website.
The last approved version of this historical standard is referenced on www.astm.org.
Copyright © ASTM International, 100 Barr Harbor Drive, PO Box C700, West Conshohocken, PA 19428-2959. United States
G98 − 17 (2022)
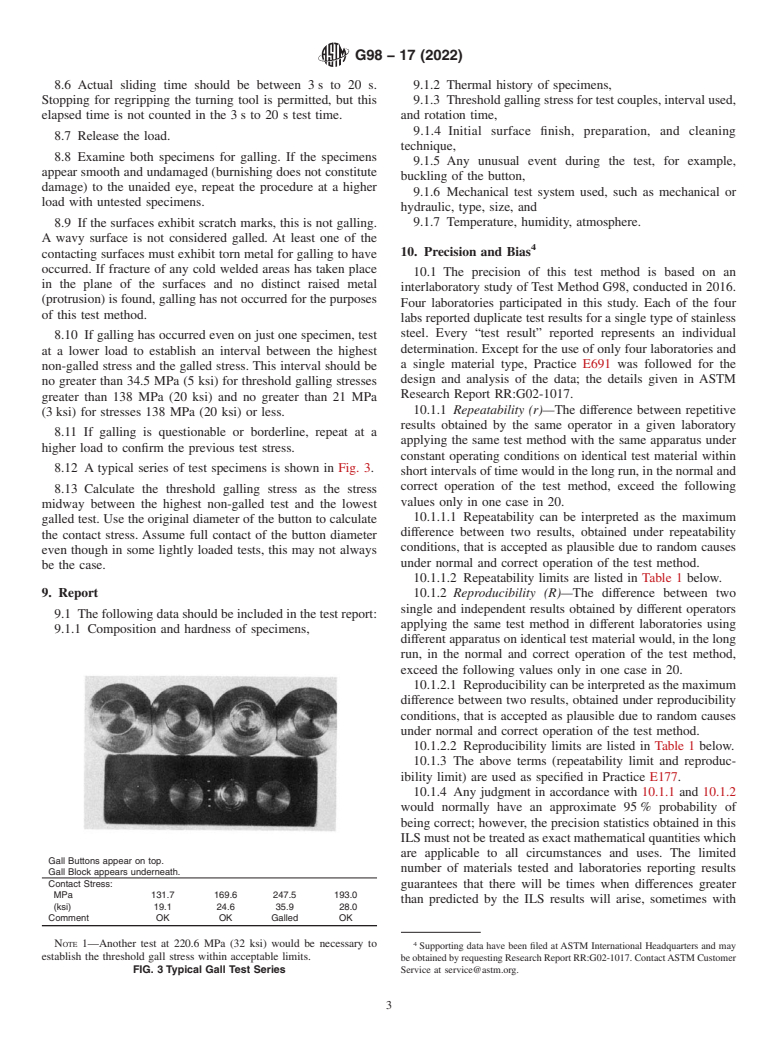
3.2.1 threshold galling stress—the stress midway between the highest non-galled stress and the lowest galled stress as determined
by this test method.
4. Summary of Test Method
4.1 This test method uses available laboratory equipment capable of maintaining a constant, compressive load between two flat
specimens, such as hydraulic or screw feed compression testing machines. One specimen is slowly rotated one revolution 360°
relative to the other specimen. The surfaces are examined for galling after sliding. The criterion for whether galling occurs is the
appearance of the specimens based on unassisted visual examination. If the specimens have not galled, a new set of specimens is
tested at increased load. This process is continued until galling occurs.
4.2 Appropriate load intervals are chosen to determine the threshold galling stress within an acceptable range.
4.3 The higher the threshold galling stressing, the more galling resistant is the test couple.
5. Significance and Use
5.1 This test method is designed to rank material couples in their resistance to the failure mode caused by galling and not merely
to classify the surface appearance of sliding surfaces.
5.2 This test method should be considered when damaged (galled) surfaces render components non-serviceable. Experience has
shown that galling is most prevalent in sliding systems that are slow moving and operate intermittently. The galling and seizure
of threaded components is a classic example which this test method most closely simulates.
5.3 Other galling-prone examples include: sealing surfaces of value trim which may leak excessively due to galling; and pump
wear rings that may function ineffectively due to galling.
5.4 If the equipment continues to operate satisfactorily and loses dimension gradually, then mechanical wear should be evaluated
by a different test such as the crossed cylinder Test Method (see Test Method G83). Chain belt pins and bushings are examples
of this type of problem.
5.5 This test method should not be used for quantitative or final design purposes since many environmental factors influence the
galling performance of materials in service. Lubrication, alignment, stiffness and geometry are only some of the factors that can
affect how materials perform. This test method has proven valuable in screening materials for prototypical testing that more closely
simulates actual service conditions.
6. Apparatus
6.1 Commonly available laboratory equipment has been used to conduct galling tests. Both Brinell hardness testers and
servo-hydraulic testing machines have proven to be satisfactory as loading devices. Any apparatus that can apply and maintain a
constant compressive load should be acceptable.
7. Test Specimens
7.1 This test method uses a cylindrical flat-on-flat geometry. One specimen is called the button (or pin) and is generally (but not
necessarily) rotated about its axis on the flat specimen called the block.
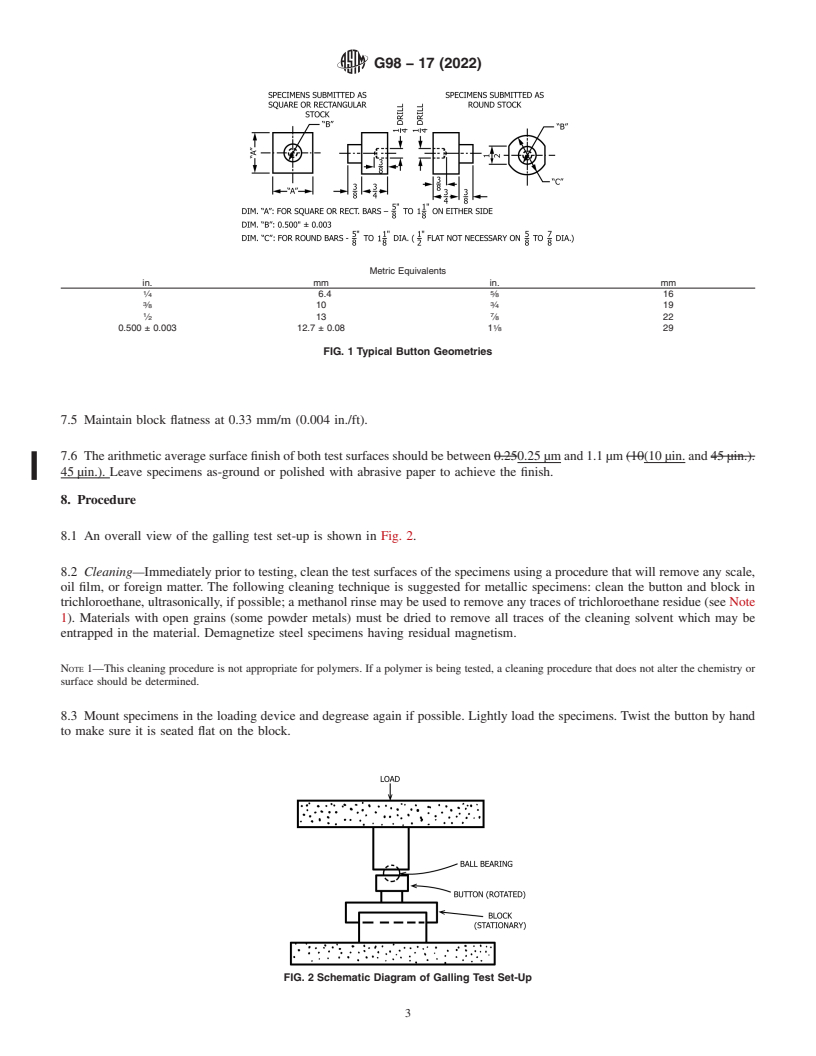
7.2 Some typical button geometries are shown in Fig. 1.
7.3 The only critical dimension is diameter “B’’ of the contact area. The 6.4-mm (0.25-in.)6.4 mm (0.25 in.) diameter hole
accommodates a ball bearing for alignment purposes during the test. All other dimensions may be varied to the user’s convenience.
7.4 The block specimen must have sufficient area to accommodate at least one test; however, most users have found that blocks
of length 76 mm (3 in.) to 152 mm (6 in.) are ideal for multiple tests. A reasonable width is 19 mm (0.75 in.). Thickness is not
critical. Tests have been successfully run on blocks with thicknesses from 1.5 mm (0.06 in.) to 25.4 mm (1 in.).(1 in.).
G98 − 17 (2022)
Metric Equivalents
in. mm in. mm
1 5
⁄4 6.4 ⁄8 16
3 3
⁄8 10 ⁄4 19
1 7
⁄2 13 ⁄8 22
0.500 ± 0.003 12.7 ± 0.08 1 ⁄8 29
FIG. 1 Typical Button Geometries
7.5 Maintain block flatness at 0.33 mm/m (0.004 in./ft).
7.6 The arithmetic average surface finish of both test surfaces should be between 0.250.25 μm and 1.1 μm (10(10 μin. and 45 μin.).
45 μin.). Leave specimens as-ground or polished with abrasive paper to achieve the finish.
8. Procedure
8.1 An overall view of the galling test set-up is shown in Fig. 2.
8.2 Cleaning—Immediately prior to testing, clean the test surfaces of the specimens using a procedure that will remove any scale,
oil film, or foreign matter. The following cleaning technique is suggested for metallic specimens: clean the button and block in
trichloroethane, ultrasonically, if possible; a methanol rinse may be used to remove any traces of trichloroethane residue (see Note
1). Materials with open grains (some powder metals) must be dried to remove all traces of the cleaning solvent which may be
entrapped in the material. Demagnetize steel specimens having residual magnetism.
NOTE 1—This cleaning procedure is not appropriate for polymers. If a polymer is being tested, a cleaning procedure that does not alter the chemistry or
surface should be determined.
8.3 Mount specimens in the loading device and degrease again if possible. Lightly
...



Questions, Comments and Discussion
Ask us and Technical Secretary will try to provide an answer. You can facilitate discussion about the standard in here.