ASTM F788-13
(Specification)Standard Specification for Surface Discontinuities of Bolts, Screws, and Studs, Inch and Metric Series
Standard Specification for Surface Discontinuities of Bolts, Screws, and Studs, Inch and Metric Series
ABSTRACT
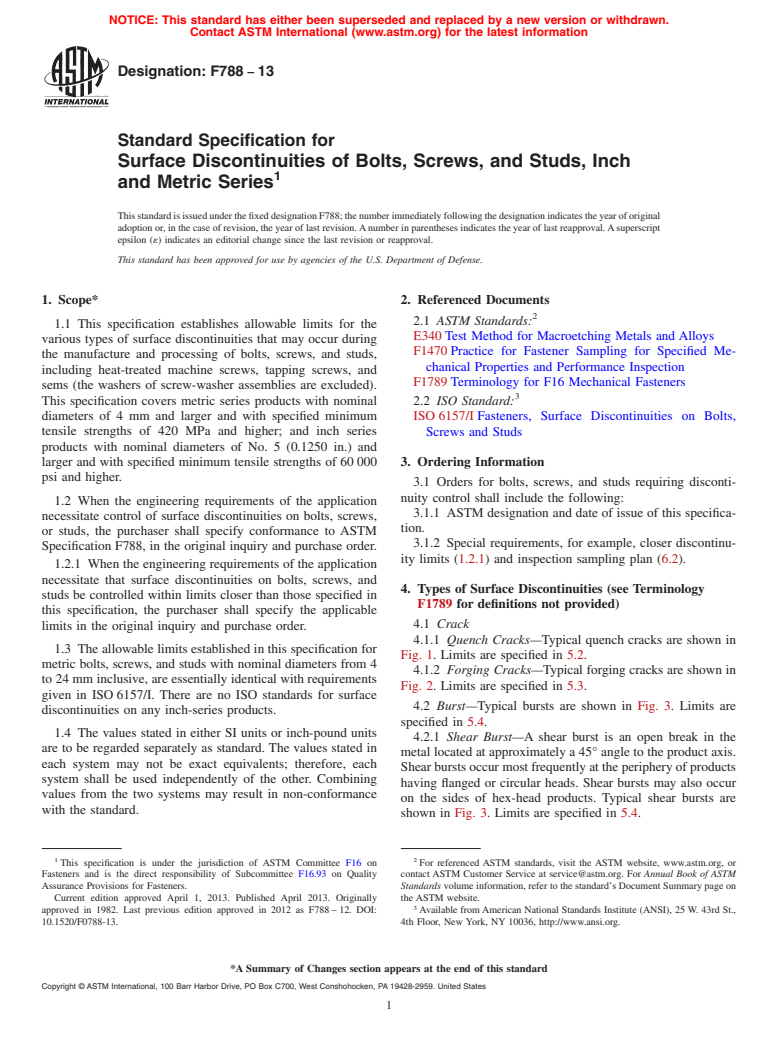
This specification establishes allowable limits for the various types of surface discontinuities that may occur during the manufacture and processing of bolts, screws, and studs, including heat-treated machine screws, tapping screws, and sems. Types of surface discontinuities are: crack; burst; seam; fold; thread lap; void; tool marks; and gouge and nick. These surface discontinuities shall be inspected in accordance with the specified requirements.
SCOPE
1.1 This specification establishes allowable limits for the various types of surface discontinuities that may occur during the manufacture and processing of bolts, screws, and studs, including heat-treated machine screws, tapping screws, and sems (the washers of screw-washer assemblies are excluded). This specification covers metric series products with nominal diameters of 4 mm and larger and with specified minimum tensile strengths of 420 MPa and higher; and inch series products with nominal diameters of No. 5 (0.1250 in.) and larger and with specified minimum tensile strengths of 60 000 psi and higher.
1.2 When the engineering requirements of the application necessitate control of surface discontinuities on bolts, screws, or studs, the purchaser shall specify conformance to ASTM Specification F788, in the original inquiry and purchase order.
1.2.1 When the engineering requirements of the application necessitate that surface discontinuities on bolts, screws, and studs be controlled within limits closer than those specified in this specification, the purchaser shall specify the applicable limits in the original inquiry and purchase order.
1.3 The allowable limits established in this specification for metric bolts, screws, and studs with nominal diameters from 4 to 24 mm inclusive, are essentially identical with requirements given in ISO 6157/I. There are no ISO standards for surface discontinuities on any inch-series products.
1.4 The values stated in either SI units or inch-pound units are to be regarded separately as standard. The values stated in each system may not be exact equivalents; therefore, each system shall be used independently of the other. Combining values from the two systems may result in non-conformance with the standard.
General Information
Relations
Buy Standard
Standards Content (Sample)
NOTICE: This standard has either been superseded and replaced by a new version or withdrawn.
Contact ASTM International (www.astm.org) for the latest information
Designation:F788 −13
Standard Specification for
Surface Discontinuities of Bolts, Screws, and Studs, Inch
1
and Metric Series
ThisstandardisissuedunderthefixeddesignationF788;thenumberimmediatelyfollowingthedesignationindicatestheyearoforiginal
adoptionor,inthecaseofrevision,theyearoflastrevision.Anumberinparenthesesindicatestheyearoflastreapproval.Asuperscript
epsilon (´) indicates an editorial change since the last revision or reapproval.
This standard has been approved for use by agencies of the U.S. Department of Defense.
1. Scope* 2. Referenced Documents
2
2.1 ASTM Standards:
1.1 This specification establishes allowable limits for the
E340Test Method for Macroetching Metals and Alloys
various types of surface discontinuities that may occur during
F1470Practice for Fastener Sampling for Specified Me-
the manufacture and processing of bolts, screws, and studs,
chanical Properties and Performance Inspection
including heat-treated machine screws, tapping screws, and
F1789Terminology for F16 Mechanical Fasteners
sems (the washers of screw-washer assemblies are excluded).
3
This specification covers metric series products with nominal
2.2 ISO Standard:
diameters of 4 mm and larger and with specified minimum ISO6157/IFasteners, Surface Discontinuities on Bolts,
tensile strengths of 420 MPa and higher; and inch series Screws and Studs
products with nominal diameters of No. 5 (0.1250 in.) and
larger and with specified minimum tensile strengths of 60000 3. Ordering Information
psi and higher.
3.1 Orders for bolts, screws, and studs requiring disconti-
nuity control shall include the following:
1.2 When the engineering requirements of the application
3.1.1 ASTM designation and date of issue of this specifica-
necessitate control of surface discontinuities on bolts, screws,
tion.
or studs, the purchaser shall specify conformance to ASTM
3.1.2 Special requirements, for example, closer discontinu-
Specification F788, in the original inquiry and purchase order.
ity limits (1.2.1) and inspection sampling plan (6.2).
1.2.1 When the engineering requirements of the application
necessitate that surface discontinuities on bolts, screws, and
4. Types of Surface Discontinuities (see Terminology
studs be controlled within limits closer than those specified in
F1789 for definitions not provided)
this specification, the purchaser shall specify the applicable
4.1 Crack
limits in the original inquiry and purchase order.
4.1.1 Quench Cracks—Typical quench cracks are shown in
1.3 The allowable limits established in this specification for
Fig. 1. Limits are specified in 5.2.
metric bolts, screws, and studs with nominal diameters from 4
4.1.2 Forging Cracks—Typical forging cracks are shown in
to 24 mm inclusive, are essentially identical with requirements
Fig. 2. Limits are specified in 5.3.
given in ISO6157/I. There are no ISO standards for surface
4.2 Burst—Typical bursts are shown in Fig. 3. Limits are
discontinuities on any inch-series products.
specified in 5.4.
1.4 The values stated in either SI units or inch-pound units
4.2.1 Shear Burst—A shear burst is an open break in the
are to be regarded separately as standard. The values stated in
metal located at approximately a 45° angle to the product axis.
each system may not be exact equivalents; therefore, each
Shearburstsoccurmostfrequentlyattheperipheryofproducts
system shall be used independently of the other. Combining
having flanged or circular heads. Shear bursts may also occur
values from the two systems may result in non-conformance
on the sides of hex-head products. Typical shear bursts are
with the standard.
shown in Fig. 3. Limits are specified in 5.4.
1 2
This specification is under the jurisdiction of ASTM Committee F16 on For referenced ASTM standards, visit the ASTM website, www.astm.org, or
Fasteners and is the direct responsibility of Subcommittee F16.93 on Quality contact ASTM Customer Service at service@astm.org. For Annual Book of ASTM
Assurance Provisions for Fasteners. Standards volume information, refer to the standard’s Document Summary page on
Current edition approved April 1, 2013. Published April 2013. Originally the ASTM website.
3
approved in 1982. Last previous edition approved in 2012 as F788–12. DOI: Available fromAmerican National Standards Institute (ANSI), 25 W. 43rd St.,
10.1520/F0788-13. 4th Floor, New York, NY 10036, http://www.ansi.org.
*A Summary of Changes section appears at the end of this standard
Copyright © ASTM International, 100 Barr Harbor Drive, PO Box C700, West Conshohocken, PA 19428-2959. United States
1
---------------------- Page: 1 ----------------------
F788−13
FIG. 1 Typical Quench Cracks
shoulder diameter; and Dc designates flange diameter (speci-
fied maximum) or head diameter (specified maximum) of
circular head products. For metric series products, D and Dc
are in millimetres; f
...
This document is not an ASTM standard and is intended only to provide the user of an ASTM standard an indication of what changes have been made to the previous version. Because
it may not be technically possible to adequately depict all changes accurately, ASTM recommends that users consult prior editions as appropriate. In all cases only the current version
of the standard as published by ASTM is to be considered the official document.
Designation: F788 − 12 F788 − 13
Standard Specification for
Surface Discontinuities of Bolts, Screws, and Studs, Inch
1
and Metric Series
This standard is issued under the fixed designation F788; the number immediately following the designation indicates the year of original
adoption or, in the case of revision, the year of last revision. A number in parentheses indicates the year of last reapproval. A superscript
epsilon (´) indicates an editorial change since the last revision or reapproval.
This standard has been approved for use by agencies of the Department of Defense.
1. Scope*
1.1 This specification establishes allowable limits for the various types of surface discontinuities that may occur during the
manufacture and processing of bolts, screws, and studs, including heat-treated machine screws, tapping screws, and sems (the
washers of screw-washer assemblies are excluded). This specification covers metric series products with nominal diameters of 4
mm and larger and with specified minimum tensile strengths of 420 MPa and higher; and inch series products with nominal
diameters of No. 5 (0.1250 in.) and larger and with specified minimum tensile strengths of 60 000 psi and higher.
1.2 When the engineering requirements of the application necessitate control of surface discontinuities on bolts, screws, or
studs, the purchaser shall specify conformance to ASTM Specification F788, in the original inquiry and purchase order.
1.2.1 When the engineering requirements of the application necessitate that surface discontinuities on bolts, screws, and studs
be controlled within limits closer than those specified in this specification, the purchaser shall specify the applicable limits in the
original inquiry and purchase order.
1.3 The allowable limits established in this specification for metric bolts, screws, and studs with nominal diameters from 4 to
24 mm inclusive, are essentially identical with requirements given in ISO 6157/I. There are no ISO standards for surface
discontinuities on any inch-series products.
1.4 The values stated in either SI units or inch-pound units are to be regarded separately as standard. The values stated in each
system may not be exact equivalents; therefore, each system shall be used independently of the other. Combining values from the
two systems may result in non-conformance with the standard.
2. Referenced Documents
2
2.1 ASTM Standards:
E340 Test Method for Macroetching Metals and Alloys
F1470 Practice for Fastener Sampling for Specified Mechanical Properties and Performance Inspection
F1789 Terminology for F16 Mechanical Fasteners
3
2.2 ISO Standard:
ISO 6157/I Fasteners, Surface Discontinuities on Bolts, Screws and Studs
3. Ordering Information
3.1 Orders for bolts, screws, and studs requiring discontinuity control shall include the following:
3.1.1 ASTM designation and date of issue of this specification.
3.1.2 Special requirements, for example, closer discontinuity limits (1.2.1) and inspection sampling plan (6.2).
4. Types of Surface Discontinuities (see Terminology F1789 for definitions not provided)
4.1 Crack
4.1.1 Quench Cracks—Typical quench cracks are shown in Fig. 1. Limits are specified in 5.2.
1
This specification is under the jurisdiction of ASTM Committee F16 on Fasteners and is the direct responsibility of Subcommittee F16.93 on Quality Assurance
Provisions for Fasteners.
Current edition approved Oct. 1, 2012April 1, 2013. Published November 2012April 2013. Originally approved in 1982. Last previous edition approved in 20082012 as
F788/F788M – 08.F788 – 12. DOI: 10.1520/F0788-12.10.1520/F0788-13.
2
For referenced ASTM standards, visit the ASTM website, www.astm.org, or contact ASTM Customer Service at service@astm.org. For Annual Book of ASTM Standards
volume information, refer to the standard’s Document Summary page on the ASTM website.
3
Available from American National Standards Institute (ANSI), 25 W. 43rd St., 4th Floor, New York, NY 10036, http://www.ansi.org.
*A Summary of Changes section appears at the end of this standard
Copyright © ASTM International, 100 Barr Harbor Drive, PO Box C700, West Conshohocken, PA 19428-2959. United States
1
---------------------- Page: 1 ----------------------
F788 − 13
FIG. 1 Typical Quench Cracks
4.1.2 Forging Cracks—Typical forging cracks are shown in Fig. 2. Limits are specified in 5.3.
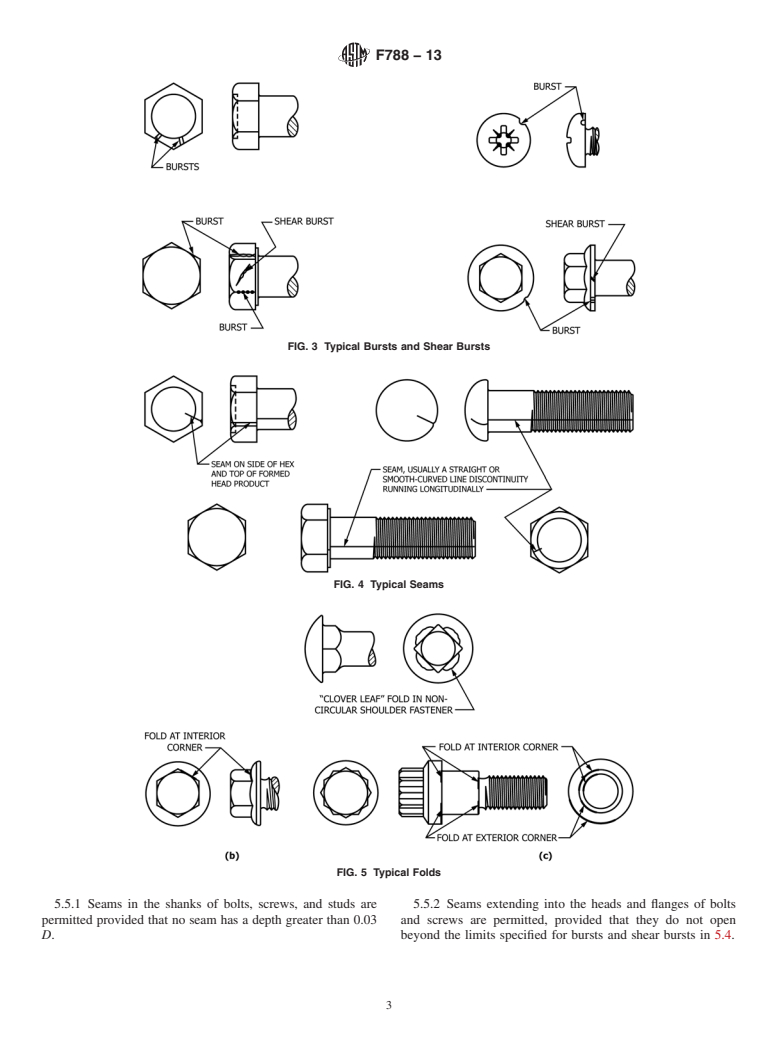
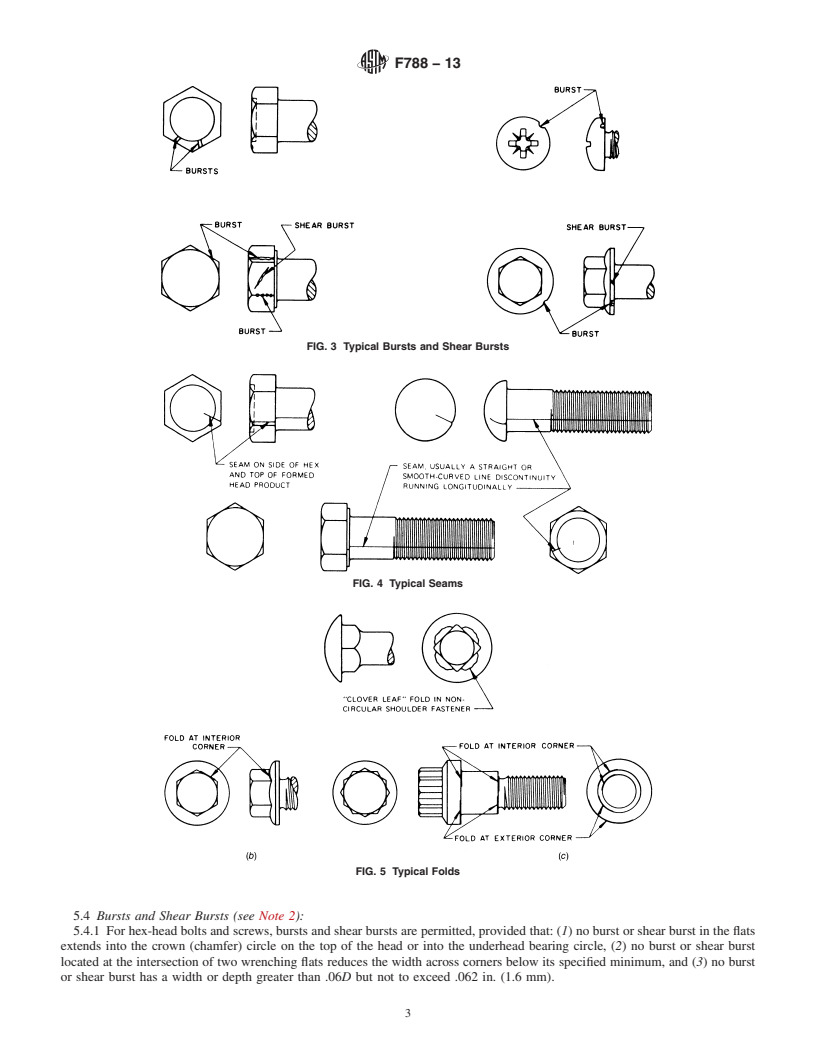
4.2 Burst—Typical bursts are shown in Fig. 3. Limits are specified in 5.4.
4.2.1 Shear Burst—A shear burst is an open break in the metal located at approximately a 45° angle to the product axis. Shear
bursts occur mo
...


Questions, Comments and Discussion
Ask us and Technical Secretary will try to provide an answer. You can facilitate discussion about the standard in here.