ASTM E252-84(1999)
(Test Method)Standard Test Method for Thickness of Thin Foil and Film by Weighing
Standard Test Method for Thickness of Thin Foil and Film by Weighing
SCOPE
1.1 This test method covers the determination of the thickness of metallic foils 0.002 in. (0.05 mm) and less in thickness by weighing a specimen of known area and density. The method is applicable to other foils and films as indicated in Annex A3. Note-The values stated in inch-pound units are to be regarded as the standard.
1.2 This standard may involve hazardous materials, operations, and equipment. This standard does not purport to address all of the safety problems associated with its use. It is the responsibility of whoever uses this standard to consult and establish appropriate safety and health practices and determine the applicability of regulatory limitations prior to use.
General Information
Relations
Standards Content (Sample)
NOTICE: This standard has either been superseded and replaced by a new version or withdrawn.
Contact ASTM International (www.astm.org) for the latest information
Designation: E 252 – 84 (Reapproved 1999)
Standard Test Method for
Thickness of Thin Foil and Film by Weighing
This standard is issued under the fixed designation E 252; the number immediately following the designation indicates the year of
original adoption or, in the case of revision, the year of last revision. A number in parentheses indicates the year of last reapproval. A
superscript epsilon (e) indicates an editorial change since the last revision or reapproval.
This standard has been approved for use by agencies of the Department of Defense.
1. Scope 3.2 Balance—capable of measuring to the nearest 0.1 mg of
2 2
thickness for the 8.000-in. (51.613-cm ) circle.
1.1 This test method covers the determination of the thick-
ness of metallic foils 0.002 in. (0.05 mm) and less in thickness
4. Procedure
by weighing a specimen of known area and density. The test
2 2
4.1 Blank an 8.000 6 0.008-in. (51.613 6 0.051-cm )
method is applicable to other foils and films as indicated in
circle representative of the foil swab with acetone or other
Annex A3.
suitable solvent to ensure a surface free of soil, and weigh the
1.2 The values stated in inch-pound units are to be regarded
clean, dry specimen to the nearest 0.1 mg. Use a suitable
as the standard.
solvent to remove any coating known to exceed 0.005 mg/ft
1.3 This standard does not purport to address all of the
(4.645 mg/cm ) of surface area.
safety concerns, if any, associated with its use. It is the
responsibility of the user of this standard to establish appro-
5. Calculation
priate safety and health practices and determine the applica-
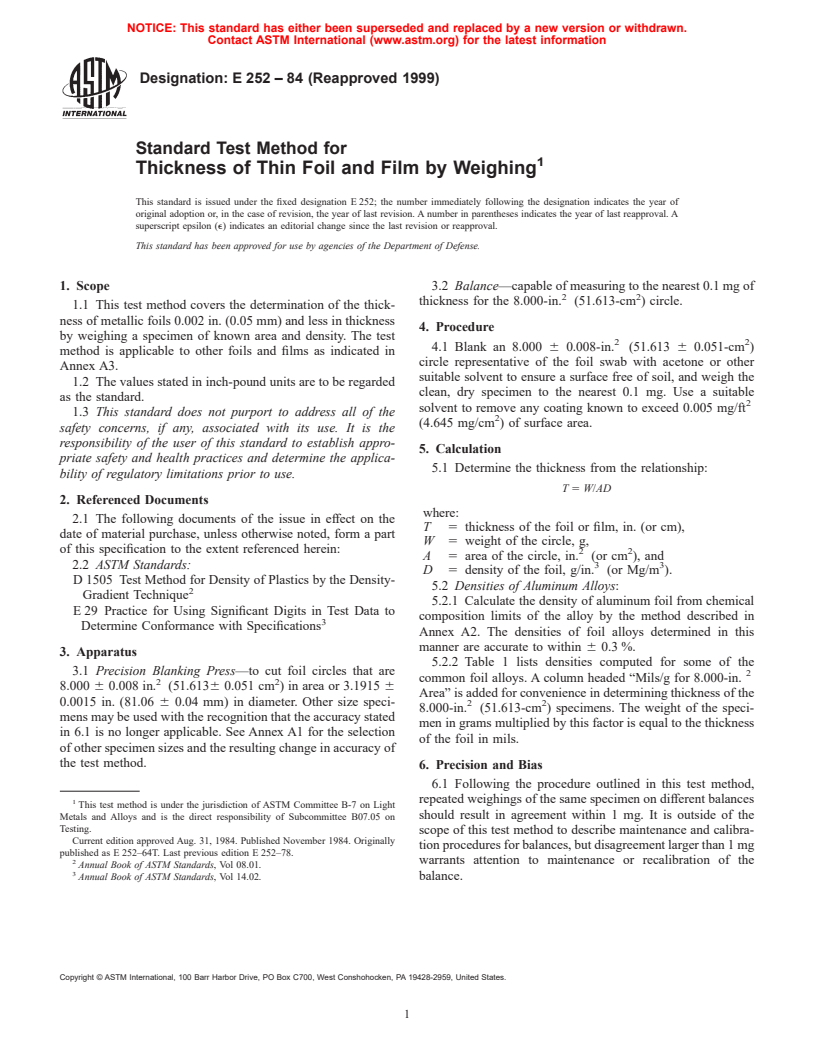
5.1 Determine the thickness from the relationship:
bility of regulatory limitations prior to use.
T 5 W/AD
2. Referenced Documents
where:
2.1 The following documents of the issue in effect on the
T 5 thickness of the foil or film, in. (or cm),
date of material purchase, unless otherwise noted, form a part
W 5 weight of the circle, g,
of this specification to the extent referenced herein: 2 2
A 5 area of the circle, in. (or cm ), and
2.2 ASTM Standards: 3 3
D 5 density of the foil, g/in. (or Mg/m ).
D 1505 Test Method for Density of Plastics by the Density-
5.2 Densities of Aluminum Alloys:
Gradient Technique
5.2.1 Calculate the density of aluminum foil from chemical
E 29 Practice for Using Significant Digits in Test Data to
composition limits of the alloy by the method described in
Determine Conformance with Specifications
Annex A2. The densities of foil alloys determined in this
manner are accurate to within 6 0.3 %.
3. Apparatus
5.2.2 Table 1 lists densities computed for some of the
3.1 Precision Blanking Press—to cut foil circles that are 2
common foil alloys. A column headed “Mils/g for 8.000-in.
2 2
8.000 6 0.008 in. (51.6136 0.051 cm ) in area or 3.1915 6
Area” is added for convenience in determining thickness of the
0.0015 in. (81.06 6 0.04 mm) in diameter. Other size speci- 2 2
8.000-in. (51.613-cm ) specimens. The weight of the speci-
mens may be used with the recognition that the accuracy stated
men in grams multiplied by this factor is equal to the thickness
in 6.1 is no longer applicable. See Annex A1 for the selection
of the foil in mils.
of other specimen sizes and the resulting change in accuracy of
the test method.
6. Precision and Bias
6.1 Following the procedure outlined in this test method,
repeated weighings of the same specimen on different balances
This test method is under the jurisdiction of ASTM Committee B-7 on Light
should result in agreement within 1 mg. It is outside of the
Metals and Alloys and is the direct responsibility of Subcommittee B07.05 on
Testing.
scope of this test method to describe maintenance and calibra-
Current edition approved Aug. 31, 1984. Published November 1984. Originally
tion procedures for balances, but disagreement larger than 1 mg
published as E 252–64T. Last previous edition E 252–78.
2 warrants attention to maintenance or recalibration of the
Annual Book of ASTM Standards, Vol 08.01.
balance.
Annual Book of ASTM Standards, Vol 14.02.
Copyright © ASTM International, 100 Barr Harbor Drive, PO Box C700, West Conshohocken, PA 19428-2959, United States.
E 252
TABLE 1 Densities of Aluminum Foil Alloys Applicable to the
Determination of Foil Thickness by the Weight Method
Density 2
mils/g for 8.000-in.
Alloy
3 3A Area
g/in. Mg/m
1100 44.41 2.71 2.815
1145 44.24 2.700 2.826
1188 44.24 2.700 2.826
1199 44.24 2.700 2.826
1235 44.33 2.705 2.820
3003 44.74 2.73 2.794
5052 43.92 2.68 2.846
5056 43.26 2.64 2.890
8079 44.57 2.72 2.805
8111 44.41 2.71 2.815
A
Registration Record of Aluminum Association Designations and Chemical
Composition Limits for Wrought Aluminum and Wrought Aluminum Alloys, Alumi-
num Assoc., Washington, DC.
ANNEXES
(Mandatory Information)
A1. SPECIMEN SIZE AND SHAPE AND ITS EFFECT ON ACCURACY
A1.1 General is the specific diameter required to provide the area used in the
thickness computation, then the error in area resulting from a
A1.1.1 Specimens of sizes and shapes other than the 8.000-
2 2
small error, Dd, in the diameter is 200 Dd/d %. It follows then
in. (51.613-cm ) circle maybe used provided consideration is
that to maintain an area accurate to 60.1 %, the tolerance on
given to controllable factors affecting the accuracy of the
method. Specifically, the area of the specimen shall be known the diameter of the blanked circle shall be 60.0005 times the
circle diameter. The fact that the tolerance on diameter loosens
and controlled to an accuracy of 60.1 % and the minimum
weight of specimen shall be 70 mg. Specimens ranging in size in direct proportion to the diameter is a factor to consider in
2 2
from8to32in. (52 to 206 cm ) are convenient to handle and selecting the specimen size to use in the method. Compliance
can be prepared to meet the aforementioned requirements.
with this tolerance limits the area error to E 560.1 % of the
A
thickness determined.
A1.2 Source of Error
A1.2.1 Inherent errors in determining thickness by the
A1.5 Error from Weighing the Specimen (E )
W
weight method result from the limits on the accuracy of the
A1.5.1 The accuracy of weighing a foil specimen has been
density value assigned to the alloy, the accuracy with which a
specimen can be cut and its area determined, and the accuracy found to be 0.7 mg. This imposes a maximum error on the
of weighing. Much time could be devoted to a discussion of
method of 6 0.07/TAD% of the thickness determined. Since D,
refinement of errors but it shall suffice here to draw on
density of the foil, is fixed, it is seen that the magnitude of the
experience as a guide for determining the accuracy of the
weighing error is a function of the thickness, T, of the foil and
method.
the area, A, of the specimen. The area, A, is a controllable
factor in the method, and the importance of selecting a large
A1.3 Error from Uncertainty of the Densities of the
area to minimize the overall percentage error in the method for
Specimen (E )
D
thin foil is apparent from a few simple calculations. The
A1.3.1 The density of aluminum foil alloys shall be those
product TAD is the weight of the specimen in grams, so to
listed in Table 1 or shall be determined by the method
prevent the weighing error from introducing errors in excess of
described in Annex A2. Values so obtained are accurate to
61.0 %, it is necessary that the weight of the minimum
60.3 % of the true density. The error imposed by uncertainty
thickness specimen be larger than 70 mg. The maximum error
of the density then is E 560.3 % of the thickness deter-
D
in the method due to weighing then is E 56 0.07/TAD%of
mined. W
the thickness determined.
A1.4 Error from Control of the Area of the Specimen
(E )
A
A1.4.1 A precision blanking press can cut a specimen whos
...


Questions, Comments and Discussion
Ask us and Technical Secretary will try to provide an answer. You can facilitate discussion about the standard in here.