ASTM B871-96
(Test Method)Standard Test Method for Tear Testing of Aluminum Alloy Products
Standard Test Method for Tear Testing of Aluminum Alloy Products
SCOPE
1.1 This test method covers the static tear test of aluminum alloy products using specimens that are 0.040 in. (1 mm) to 0.250 in. (6.35 mm) thick.
1.2 This test method is applicable to aluminum alloy products having a minimum thickness of 0.040 in. (1 mm).
1.3 This test method provides a measure of both notch toughness and resistance to crack propagation with the primary use as a screening or merit rank test.
1.4 The reliability of the tear test has been established in various research programs by reasonably good correlations between data from the tear tests and fracture toughness tests.
Note 1—Direct measurement of fracture toughness may be made in accordance with Practices B 645, B 646 and Test Method E 399.
1.5 The values stated in inch-pound units are to be regarded as the standard. The values given in parentheses are for information only.
1.6 This standard does not purport to address all of the safety concerns, if any, associated with its use. It is the responsibility of the user of this standard to establish appropriate safety and health practices and determine the applicability of regulatory limitations prior to use.
General Information
Relations
Standards Content (Sample)
NOTICE: This standard has either been superseded and replaced by a new version or discontinued.
Contact ASTM International (www.astm.org) for the latest information.
Designation: B 871 – 96
Standard Test Method for
Tear Testing of Aluminum Alloy Products
This standard is issued under the fixed designation B 871; the number immediately following the designation indicates the year of
original adoption or, in the case of revision, the year of last revision. A number in parentheses indicates the year of last reapproval. A
superscript epsilon (e) indicates an editorial change since the last revision or reapproval.
1. Scope E 399 Test Method for Plane-Strain Fracture Toughness
Testing Metallic Materials
1.1 This test method covers the static tear test of aluminum
alloy products using specimens that are 0.040 in. (1 mm) to
3. Terminology
0.250 in. (6.35 mm) thick.
3.1 Definitions of Terms Specific to This Standard:
1.2 This test method is applicable to aluminum alloy prod-
3.1.1 initiation energy, IE (FL)—the amount of energy
ucts having a minimum thickness of 0.040 in. (1 mm).
required to initiate a crack in a tear specimen. Initiation energy
1.3 This test method provides a measure of both notch
is determined by integrating the area under the load-
toughness and resistance to crack propagation with the primary
displacement curve from the beginning of the test to the point
use as a screening or merit rank test.
of maximum load.
1.4 The reliability of the tear test has been established in
3.1.2 propagation energy, PE (FL)—the amount of energy
various research programs by reasonably good correlations
,
2 3 required to propagate a crack in a tear specimen. Propagation
between data from the tear tests and fracture toughness tests.
energy is determined by integrating the area under the load-
NOTE 1—Direct measurement of fracture toughness may be made in
displacement curve from the point of maximum load to the
accordance with Practices B 645, B 646 and Test Method E 399.
point of complete fracture.
1.5 The values stated in inch-pound units are to be regarded
3.1.3 tear resistance—a general term describing the resis-
as the standard. The values given in parentheses are for
tance of a material to crack propagation under static loading,
information only.
either in an elastic or plastic stress field.
−2
1.6 This standard does not purport to address all of the
3.1.4 tear strength, TS (FL )—the maximum nominal di-
safety concerns, if any, associated with its use. It is the
rect and bending stress that the tear specimen is capable of
responsibility of the user of this standard to establish appro-
sustaining.
priate safety and health practices and determine the applica-
3.1.5 tear strength to tensile yield strength ratio (TYR)—the
bility of regulatory limitations prior to use.
ratio of the tear strength to tensile yield strength of the material
determined in accordance with Test Methods B 557.
2. Referenced Documents −1
3.1.6 unit propagation energy, UPE (FL )—the amount of
2.1 ASTM Standards:
energy required to propagate a crack across a tear specimen
B 557 Test Methods for Tension Testing Wrought and Cast
divided by the original net area of the specimen.
Aluminum- and Magnesium-Alloy Products
4. Summary of Test Method
B 645 Practice for Plane Strain Fracture Toughness Testing
of Aluminum Alloys
4.1 The tear test involves a single edge notched specimen
B 646 Practice for Fracture Toughness Testing of Alumi-
that is statically loaded through pin loading holes. The load and
num Alloys
displacement required to fracture the specimen are recorded for
E 4 Practices for Force Verification of Testing Machines
analysis.
E 83 Practice for Verification and Classification of Exten-
4.2 Tear test specimens should be fractured using any
someters
mechanical test machine capable of quasi-static loading at a
E 338 Test Method for Sharp-Notch Testing of High-
crosshead speed of 0.05 in./min (1.3 mm/min) or less.
Strength Sheet Materials
5. Significance and Use
This test method is under the jurisdiction of ASTM Committee B-7 on Light 5.1 The significance of the tear test is similar to that of the
Metals and Alloys and is the direct responsibility of Subcommittee B07.05 on
notch-tensile test, and its primary usefulness is as an indicator
Testing.
of toughness or as a ranking test as described in Test Method
Current edition approved April 10, 1996. Published June 1996.
E 338 and Practice B 646.
Kaufman, J. G., and Holt, Marshall, “Fracture Characteristics of Aluminum
Alloys,” Alcoa Research Laboratories Technical Paper No. 18.
5.1.1 This test method provides a comparative measure of
Kaufman, J. G., and Knoll, A. H., “Kahn-Type Tear Tests and Crack Toughness
resistance of aluminum alloys and products to unstable fracture
of Aluminum Sheet,” Metals Research and Standards, April 1964, pp. 151–155.
originating from the presence of crack-like stress concentra-
Annual Book of ASTM Standards, Vol 02.02.
Annual Book of ASTM Standards, Vol 03.01. tors. This test method is not intended to provide an absolute
Copyright © ASTM, 100 Barr Harbor Drive, West Conshohocken, PA 19428-2959, United States.
B 871
measure of resistance to crack propagation that might be used smaller than that of the holes. Spacing washers of the necessary
in the design of a structure. thickness shall be used to center the specimen in the clevises.
5.2 Values of the energies required to initiate and propagate A typical arrangement is shown in Fig. 1.
cracks in tear specimens are determined by measuring or 6.3 Displacement at the notch tip is measured by displace-
integrating the appropriate areas under the test curve developed ment gages or similar devices that are mounted on the
during the test. specimen or the clevis at a point corresponding to the load axis
5.3 The unit propagation energy (UPE) is the primary result of the specimen. The devices shall be calibrated in accordance
of the tear test. This value provides a measure of the combi- with Practice E 83. For ductile materials, it is recommended
nation of strength and ductility that permits a material to resist that the displacement gages have a travel capability of at least
crack growth under either elastic or plastic stresses. The UPE 0.5 in.
value normally will exhibit greater scatter than conventional 6.4 The use of crosshead displacement is not recommended
tensile or yield strength values. In order to establish a reason- because of the fact that all deformation in the test fixtures and
able estimate of average properties, it is recommended that specimen clevis is then included in the displacement measure-
replicate specimens be tested for each metal condition being ment and contributes to the apparent initiation and propagation
evaluated. The UPE value has significance as a relative index energies measured. If crosshead displacement is used, the data
of fracture toughness. cannot be compared directly with data measured in accordance
5.4 The ratio of the tear strength to the tensile yield strength with 6.2 unless a calibration comparison with a number of
is a measure of notch toughness comparable to the notch-yield standard materials is conducted.
ratio from notch-tensile tests carried out in accordance with 6.5 Because testing machine stiffness can influence the data
Test Method E 338. It is of value in relative ranking of recording in the tear test, the use of a relatively stiff machine is
2,3
materials with regard to their toughness. recommended. Further, it is recommended that for consistency
5.5 The numerical results of the test are dependent upon the of data, the same testing machine or machines be used for all
specimen size and geometry, although specimen thicknesses tests that are intended for direct comparison and relative rating
over the range of 0.063 in. (1.6 mm) to 0.100 in. (2.5 mm) have of a group of materials. If comparisons are to be made between
not shown a significant effect on the resultant test data; that is, different machines in one location or among several locations/
tear strength and tear energies (IE, PE, and UPE). These organizations, it is recommended that a series of calibration
values may exhibit a dependency to thickness when the tests be run on a group of materials with a range of toughness
specimen thickness is outside of this stated range and care shall levels.
be taken when using this data. 6.5.1 If rapid fracture of tear specimens is regularly ob-
5.6 The tear test can serve the following purposes: served, as described in 9.6.1, this is an indication that a stiffer
5.6.1 In the research and development of materials, to study testing machine and related apparatus is required to minimize
the effects of variables of composition, processing, heat treat- extraneous energy release and deformation during the tear test.
ment, etc.
5.6.2 In service evaluation, to compare the relative crack
propagation resistance of a number of aluminum alloys or
products that are otherwise equally suitable for an application.
5.6.3 For specifications of material acceptance and manu-
facturing quality control when there is a sound basis for
establishing a minimum acceptable tear test property, that is,
UPE.
5.7 The reliability of the tear test has been well established
2,3
by developing reasonably good correlations between tear test
data and fracture toughness test data of aluminum alloys and
products, as determined in accordance with Practices B 645,
B 646 and Test Method E 399. Limited data suggest that the
test may be sensitive to crosshead rates above 0.5 in./min.
6. Apparatus
6.1 The test shall be conducted with a tension testing
machine conforming to the requirements of Practices E 4.
6.2 The device for transmitting load to the specimen shall be
such that load axis coincides with the root of the edge notch. A
satisfactory arrangement for load application incorporates
clevises having hardened pins which pass through the holes in
the specimen. The diameter of the hardened pins is slightly
Kaufman, J. G., and Reedy, J. F., “Description and Procedure for Making
Kahn-Type Tear Tests,” Alcoa Research Laboratory Report 9-M 681, Feb. 10, 1966. FIG. 1 Tear Test Specimen Clevis Arrangement
B 871
7. Test Specimens on the specimen orientation and the direction in which the load
is applied relative to the grain flow of the specimen. The
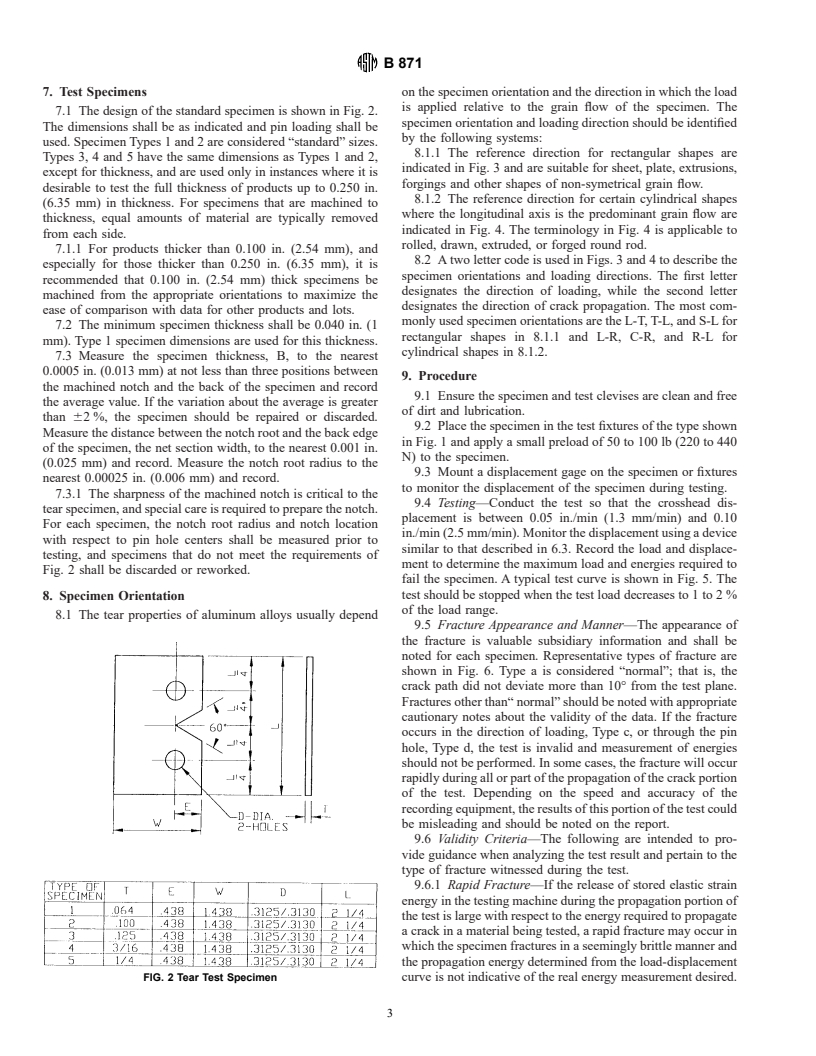
7.1 The design of the standard specimen is shown in Fig. 2.
specimen orientation and loading direction should be identified
The dimensions shall be as indicated and pin loading shall be
by the following systems:
used. Specimen Types 1 and 2 are considered “standard” sizes.
8.1.1 The reference direction for rectangular shapes are
Types 3, 4 and 5 have the same dimensions as Types 1 and 2,
indicated in Fig. 3 and are suitable f
...


Questions, Comments and Discussion
Ask us and Technical Secretary will try to provide an answer. You can facilitate discussion about the standard in here.