ASTM E2402-19
(Test Method)Standard Test Method for Mass Loss, Residue, and Temperature Measurement Validation of Thermogravimetric Analyzers
Standard Test Method for Mass Loss, Residue, and Temperature Measurement Validation of Thermogravimetric Analyzers
SIGNIFICANCE AND USE
5.1 This test method may be used to validate the performance of a specific thermogravimetric analyzer.
5.2 This test method may be used to validate the performance of a specific method based upon a thermogravimetry mass loss or residue measurement.
5.3 This test method may be used to determine the repeatability of a specific apparatus, operator, or laboratory.
5.4 This test method may be used for specification and regulatory compliance purposes.
SCOPE
1.1 This test method provides procedures for validating mass loss, residue, and temperature measurements by thermogravimetric analyzers (TGAs) and analytical methods based upon the measurement of mass loss or residue content or temperature. Performance parameters determined include mass loss, residue, and temperature repeatability (precision), detection limit, quantitation limit, linearity, and bias.
1.2 Validation of apparatus performance and analytical methods is requested or required for quality initiatives or where results may be used for legal purposes.
1.3 The values stated in SI units are to be regarded as standard. No other units of measurement are included in this standard.
1.4 This standard does not purport to address all of the safety concerns, if any, associated with its use. It is the responsibility of the user of this standard to establish appropriate safety, health, and environmental practices and determine the applicability of regulatory limitations prior to use.
1.5 This international standard was developed in accordance with internationally recognized principles on standardization established in the Decision on Principles for the Development of International Standards, Guides and Recommendations issued by the World Trade Organization Technical Barriers to Trade (TBT) Committee.
General Information
- Status
- Published
- Publication Date
- 31-Aug-2019
- Technical Committee
- E37 - Thermal Measurements
- Drafting Committee
- E37.10 - Fundamental, Statistical and Mechanical Properties
Relations
- Effective Date
- 01-Sep-2019
- Effective Date
- 01-Oct-2023
- Effective Date
- 01-Oct-2023
- Refers
ASTM E2040-19 - Standard Test Method for Mass Scale Calibration of Thermogravimetric Analyzers - Effective Date
- 01-Dec-2019
- Effective Date
- 01-Sep-2015
- Effective Date
- 01-May-2015
- Effective Date
- 15-Aug-2014
- Effective Date
- 15-Aug-2014
- Effective Date
- 01-May-2014
- Effective Date
- 01-Apr-2014
- Refers
ASTM E2040-08(2014) - Standard Test Method for Mass Scale Calibration of Thermogravimetric Analyzers - Effective Date
- 15-Mar-2014
- Effective Date
- 15-Feb-2014
- Effective Date
- 01-May-2013
- Effective Date
- 01-Mar-2013
- Effective Date
- 01-Sep-2012
Overview
ASTM E2402-19: Standard Test Method for Mass Loss, Residue, and Temperature Measurement Validation of Thermogravimetric Analyzers provides precise procedures for validating thermogravimetric analyzers (TGAs). This standard focuses on validating mass loss, residue, and temperature measurements, ensuring accurate and reliable analytical results. The method is widely used for quality control, regulatory compliance, and method validation in thermal analysis.
Key Topics
- Thermogravimetric Analysis Validation
ASTM E2402-19 outlines methods to confirm the performance of TGAs, including their measurement accuracy and repeatability for mass loss, residue, and temperature. - Performance Parameters
The standard includes guidance for determining:- Mass loss
- Residue
- Temperature repeatability (precision)
- Detection limit
- Quantitation limit
- Linearity
- Measurement bias
- Apparatus and Materials
Requirements for TGA equipment, calibration materials, purge gases, and reference materials are specified, emphasizing the need for properly calibrated and controlled systems. - Calculation and Reporting
Equations and guidelines for calculating mass loss, residue, detection and quantitation limits, linearity, and bias are provided to ensure consistent reporting. - Quality and Regulatory Compliance
Validation of apparatus and methods supports compliance with regulatory standards and internal quality initiatives.
Applications
ASTM E2402-19 has practical applications across various scientific and industrial domains:
- Instrument Performance Validation
Laboratories use this method to confirm that their thermogravimetric analyzers yield accurate and reproducible results, which is crucial for maintaining laboratory accreditation and quality assurance. - Method Validation
The standard is applicable for validating analytical procedures based on thermogravimetry, ensuring methods can accurately determine mass loss or residue content in test specimens. - Repeatability Assessment
ASTM E2402-19 helps to establish and document the repeatability of measurements performed by specific apparatus, operators, or laboratories. - Regulatory and Specification Compliance
Industries subject to regulations or needing to meet internal specifications can use this standard to demonstrate compliance and analytical reliability. - Materials Characterization
Accurate validation of mass loss and residue is essential in fields such as polymers, pharmaceuticals, chemicals, and materials science where thermal analysis is an integral part of material characterization.
Related Standards
For comprehensive thermogravimetric analysis and method validation, the following ASTM standards are referenced in conjunction with ASTM E2402-19:
- ASTM E177 – Practice for Use of the Terms Precision and Bias in ASTM Test Methods
- ASTM E473 – Terminology Relating to Thermal Analysis and Rheology
- ASTM E1142 – Terminology Relating to Thermophysical Properties
- ASTM E1582 – Test Method for Temperature Calibration of Thermogravimetric Analyzers
- ASTM E1970 – Practice for Statistical Treatment of Thermoanalytical Data
- ASTM E2040 – Test Method for Mass Scale Calibration of Thermogravimetric Analyzers
- ASTM E2161 – Terminology Relating to Performance Validation in Thermal Analysis and Rheology
- U.S. FDA Q2B – Validation of Analytical Procedures: Methodology
Practical Value
Adopting ASTM E2402-19 enables laboratories and industries to:
- Assure the reliability and accuracy of thermal analysis data
- Meet internal and external quality standards
- Support robust method development for mass loss and residue determination
- Maintain regulatory compliance for analytical measurements
This standard plays a key role in upholding scientific integrity and enabling comparability of thermogravimetric measurement results across organizations worldwide.
Buy Documents
ASTM E2402-19 - Standard Test Method for Mass Loss, Residue, and Temperature Measurement Validation of Thermogravimetric Analyzers
REDLINE ASTM E2402-19 - Standard Test Method for Mass Loss, Residue, and Temperature Measurement Validation of Thermogravimetric Analyzers
Get Certified
Connect with accredited certification bodies for this standard

ECOCERT
Organic and sustainability certification.

Eurofins Food Testing Global
Global leader in food, environment, and pharmaceutical product testing.

IMP NDT d.o.o.
Non-destructive testing services. Radiography, ultrasonic, magnetic particle, penetrant, visual inspection.
Sponsored listings
Frequently Asked Questions
ASTM E2402-19 is a standard published by ASTM International. Its full title is "Standard Test Method for Mass Loss, Residue, and Temperature Measurement Validation of Thermogravimetric Analyzers". This standard covers: SIGNIFICANCE AND USE 5.1 This test method may be used to validate the performance of a specific thermogravimetric analyzer. 5.2 This test method may be used to validate the performance of a specific method based upon a thermogravimetry mass loss or residue measurement. 5.3 This test method may be used to determine the repeatability of a specific apparatus, operator, or laboratory. 5.4 This test method may be used for specification and regulatory compliance purposes. SCOPE 1.1 This test method provides procedures for validating mass loss, residue, and temperature measurements by thermogravimetric analyzers (TGAs) and analytical methods based upon the measurement of mass loss or residue content or temperature. Performance parameters determined include mass loss, residue, and temperature repeatability (precision), detection limit, quantitation limit, linearity, and bias. 1.2 Validation of apparatus performance and analytical methods is requested or required for quality initiatives or where results may be used for legal purposes. 1.3 The values stated in SI units are to be regarded as standard. No other units of measurement are included in this standard. 1.4 This standard does not purport to address all of the safety concerns, if any, associated with its use. It is the responsibility of the user of this standard to establish appropriate safety, health, and environmental practices and determine the applicability of regulatory limitations prior to use. 1.5 This international standard was developed in accordance with internationally recognized principles on standardization established in the Decision on Principles for the Development of International Standards, Guides and Recommendations issued by the World Trade Organization Technical Barriers to Trade (TBT) Committee.
SIGNIFICANCE AND USE 5.1 This test method may be used to validate the performance of a specific thermogravimetric analyzer. 5.2 This test method may be used to validate the performance of a specific method based upon a thermogravimetry mass loss or residue measurement. 5.3 This test method may be used to determine the repeatability of a specific apparatus, operator, or laboratory. 5.4 This test method may be used for specification and regulatory compliance purposes. SCOPE 1.1 This test method provides procedures for validating mass loss, residue, and temperature measurements by thermogravimetric analyzers (TGAs) and analytical methods based upon the measurement of mass loss or residue content or temperature. Performance parameters determined include mass loss, residue, and temperature repeatability (precision), detection limit, quantitation limit, linearity, and bias. 1.2 Validation of apparatus performance and analytical methods is requested or required for quality initiatives or where results may be used for legal purposes. 1.3 The values stated in SI units are to be regarded as standard. No other units of measurement are included in this standard. 1.4 This standard does not purport to address all of the safety concerns, if any, associated with its use. It is the responsibility of the user of this standard to establish appropriate safety, health, and environmental practices and determine the applicability of regulatory limitations prior to use. 1.5 This international standard was developed in accordance with internationally recognized principles on standardization established in the Decision on Principles for the Development of International Standards, Guides and Recommendations issued by the World Trade Organization Technical Barriers to Trade (TBT) Committee.
ASTM E2402-19 is classified under the following ICS (International Classification for Standards) categories: 19.020 - Test conditions and procedures in general; 71.040.10 - Chemical laboratories. Laboratory equipment. The ICS classification helps identify the subject area and facilitates finding related standards.
ASTM E2402-19 has the following relationships with other standards: It is inter standard links to ASTM E2402-11(2017), ASTM E1142-23b, ASTM E473-23b, ASTM E2040-19, ASTM E2161-15, ASTM E1142-15, ASTM E1142-14b, ASTM E473-14, ASTM E177-14, ASTM E1142-14a, ASTM E2040-08(2014), ASTM E1142-14, ASTM E177-13, ASTM E2161-13, ASTM E1142-12. Understanding these relationships helps ensure you are using the most current and applicable version of the standard.
ASTM E2402-19 is available in PDF format for immediate download after purchase. The document can be added to your cart and obtained through the secure checkout process. Digital delivery ensures instant access to the complete standard document.
Standards Content (Sample)
This international standard was developed in accordance with internationally recognized principles on standardization established in the Decision on Principles for the
Development of International Standards, Guides and Recommendations issued by the World Trade Organization Technical Barriers to Trade (TBT) Committee.
Designation: E2402 − 19
Standard Test Method for
Mass Loss, Residue, and Temperature Measurement
Validation of Thermogravimetric Analyzers
This standard is issued under the fixed designation E2402; the number immediately following the designation indicates the year of
original adoption or, in the case of revision, the year of last revision. A number in parentheses indicates the year of last reapproval. A
superscript epsilon (´) indicates an editorial change since the last revision or reapproval.
1. Scope* E1142 Terminology Relating to Thermophysical Properties
E1582 Test Method for Temperature Calibration of Thermo-
1.1 This test method provides procedures for validating
gravimetric Analyzers
mass loss, residue, and temperature measurements by thermo-
E1970 PracticeforStatisticalTreatmentofThermoanalytical
gravimetric analyzers (TGAs) and analytical methods based
Data
upon the measurement of mass loss or residue content or
E2040 Test Method for Mass Scale Calibration of Thermo-
temperature. Performance parameters determined include mass
gravimetric Analyzers
loss, residue, and temperature repeatability (precision), detec-
E2161 Terminology Relating to Performance Validation in
tion limit, quantitation limit, linearity, and bias.
Thermal Analysis and Rheology
1.2 Validation of apparatus performance and analytical
methodsisrequestedorrequiredforqualityinitiativesorwhere
3. Terminology
results may be used for legal purposes.
3.1 Technical terms used in this standard are defined in
1.3 The values stated in SI units are to be regarded as
Practice E177 and in Terminologies E473, E1142, and E2161
standard. No other units of measurement are included in this
including analyte, bow, calibration, Celsius, certification, cer-
standard.
tified reference material, Curie temperature, derivative, detec-
1.4 This standard does not purport to address all of the
tion limit, extrapolated onset value, linearity, magnetic
safety concerns, if any, associated with its use. It is the
transformation, onset point, plateau, precision, quantification
responsibility of the user of this standard to establish appro-
limit, reference material, repeatability, slope, standard
priate safety, health, and environmental practices and deter-
deviation, thermogravimetry, thermogravimetric analysis,
mine the applicability of regulatory limitations prior to use.
temperature, and validation.
1.5 This international standard was developed in accor-
3.2 Definitions of Terms Specific to This Standard:
dance with internationally recognized principles on standard-
3.2.1 highly volatile matter, n—materials (such as moisture,
ization established in the Decision on Principles for the
plasticizer, residual solvent, etc.) that boil at temperatures
Development of International Standards, Guides and Recom-
below 200 °C.
mendations issued by the World Trade Organization Technical
Barriers to Trade (TBT) Committee. 3.2.2 mass loss plateau, n—a region of a thermogravimetric
curve with a relatively constant mass (that is, accompanied by
2. Referenced Documents
a minima in the first derivative of mass with respect to time).
2.1 ASTM Standards:
3.2.3 medium volatile matter, n—materials (such as oil and
E177 Practice for Use of the Terms Precision and Bias in
polymer degradation products) that boil in the temperature
ASTM Test Methods
range between 200 °C and 400 °C.
E473 Terminology Relating to Thermal Analysis and Rhe-
3.2.4 residue, n—material remaining (such as metal
ology
components, filler content or inert reinforcing materials) after
more volatile components are vaporized.
ThistestmethodisunderthejurisdictionofASTMCommitteeE37onThermal
Measurements and is the direct responsibility of Subcommittee E37.10 on
4. Summary of Test Method
Fundamental, Statistical and Mechanical Properties.
Current edition approved Sept. 1, 2019. Published September 2019. Originally
4.1 Mass is the primary dependent parameter and tempera-
approved in 2005. Last previous edition approved in 2017 as E2402 – 11 (2017).
ture is the primary independent parameter measured by ther-
DOI: 10.1520/E2402-19.
mogravimetric analysis.
For referenced ASTM standards, visit the ASTM website, www.astm.org, or
contact ASTM Customer Service at service@astm.org. For Annual Book of ASTM
4.2 Mass loss and residue measurements are validated by
Standards volume information, refer to the standard’s Document Summary page on
the ASTM website. their direct measurement using thermogravimetric apparatus
*A Summary of Changes section appears at the end of this standard
Copyright © ASTM International, 100 Barr Harbor Drive, PO Box C700, West Conshohocken, PA 19428-2959. United States
E2402 − 19
over a specified temperature range using reference materials of 7.1.1.1 Afurnace to provide uniform controlled heating of a
known volatiles content as an analyte. specimen to a constant temperature of at least 400 °C and at a
constant rate between 5 °C/min and 25 °C/min.
4.3 Alternatively, validation of a thermogravimetic method
7.1.1.2 Atemperature sensor to provide an indication of the
based upon mass loss and residue measurements may be
specimen/furnace temperature readable to 60.1 °C.
performed using a specific test specimen as the analyte.
7.1.1.3 A continuous recording balance (thermobalance)
4.4 The mass loss of three or more specimens (nominally
with a minimum capacity of 100 mg and a sensitivity of 610
representing the maximum, midpoint, and minimum of the
µg to measure the specimen mass.
range of this test method) is measured at least in triplicate. A
7.1.1.4 A means of maintaining the specimen/container
fourth blank specimen, containing no analyte, is also measured
under a controlled atmosphere using an inert gas of 99.9+ %
at least in triplicate.
purity at a purge rate of 50 mL/min to 100 mL/min 6 5
mL/min.
NOTE1—Repeatabilityisdeterminedbyperformingasufficientnumber
of determinations to calculate statistically valid estimates of the standard
NOTE 2—Excessive purge rates should be avoided as they may
deviation or relative standard deviation of the measurements.
introduce interferences due to turbulence effects and temperature gradi-
4.4.1 Mass loss and residue linearity and bias are deter- ents.
mined from the linear regressions (best-fit straight line) corre-
7.1.2 A temperature controller capable of executing a spe-
lation of the results from measurements of the three or more
cific temperature program by operating the furnace between
specimens.
selected temperature limits at a rate of temperature change of
4.4.2 Mass loss and residue detection limit, quantitation
5 °C/min to 25 °C/min to within 6 0.5 °C/min.
limit, and repeatability are determined from the standard
7.1.3 A data collection device, to provide a means of
deviation of the blank specimen measurements.
acquiring, storing, and displaying measured or calculated
4.4.3 Mass loss and residue repeatability are determined
signals, or both. The minimum output signals required for
from the repeatability measurements of the three or more
thermogravimetry are mass, temperature, and time.
analyte-containing specimens.
7.1.4 Containers (pans, crucibles, etc.) that are inert to the
specimen and that will remain gravimetrically stable up to 450
4.5 Temperature measurement is validated using three or
°C.
more temperature calibration materials (nominally represent-
ing the minimum, midpoint, and maximum of the range of the
7.2 Graduated micropipettes with a capacity of 20 µL to 40
test method) that are measured at least in triplicate.
µL measurable to within 61 µL.
4.5.1 Temperature linearity, bias, detection limit, quantita-
tion limit, and repeatability are determined from the standard 8. Reagents and Materials
deviation of these measurements.
8.1 Mass Loss Reference Materials, preferably certified for
mass loss covering a range of nominally 2 %, 50 %, and 98
5. Significance and Use
mass loss % over the temperature range of 25 °C to 200 °C.
5.1 This test method may be used to validate the perfor-
NOTE 3—Materials with other mass loss values may be used but shall
mance of a specific thermogravimetric analyzer.
be reported.
5.2 This test method may be used to validate the perfor-
8.2 Temperature Calibration Materials, preferably certified
mance of a specific method based upon a thermogravimetry
for transition temperature, representing the minimum, mid-
mass loss or residue measurement.
point and maximum of the applicable temperature range of the
thermogravimetric analyzer (see Test Method E1582).
5.3 This test method may be used to determine the repeat-
ability of a specific apparatus, operator, or laboratory.
8.3 Nitrogen (or other inert purge gas) of 99.9+ % purity.
5.4 This test method may be used for specification and
9. Hazards
regulatory compliance purposes.
9.1 During the course of these experiments, organic vapors
are evolved from the specimen and will exhaust from the
6. Interferences
instrument.Aventilationsystemshallbeusedtoensurethatthe
6.1 This test method depends upon distinctive thermal
operator is not exposed to these vapors.
stability ranges of the measured components as a principle of
9.2 Review the Safety Data Sheets (SDS) for the compo-
the test. For this reason, impurities or other materials that have
nents of the mass loss reference materials and the temperature
no well-defined thermally stable range, or the thermal stability
reference materials for additional safety information.
of which are the same as other components, may create
interferences.
10. Calibration and Standardization
7. Apparatus 10.1 After turning the power on, allow the instrument to
equilibrate for at least one hour prior to any measurement.
7.1 Thermogravimetric Analyzer (TGA)—The essential in-
strumentation required to provide minimum thermogravimetry 10.2 Perform any cleaning and calibration procedures de-
capability for this test method includes:
scribed by the manufacturer in the apparatus operator’s
7.1.1 A thermobalance composed of: manual.
E2402 − 19
10.3 If not previously established, perform temperature and chamber with dry nitrogen (or other inert gas) at a flow rate of
masscalibrationsaccordingtoTestMethodsE1582andE2040, 50 mL/min to 100 mL/min 6 10 % throughout the experiment.
respectively, using the same purge gas, purge flow rate, and
NOTE 6—Other specimen volumes may be used but shall be reported.
heating rate (here 10 °C/min) to be used for validation
11.5 Heat the test specimen at 10 °C/min from 25 °C to 400
experiments.
°C and record the thermal curve.
NOTE 7—Other heating rates may be used but shall be reported. Higher
11. Procedure for Determining Mass Loss and Residue
rates, however, may reduce the resolution between high volatility and
Measurement Repeatability, Detection Limit,
medium volatility component leading to poorer detection and quantitation
Quantitation Limit, Linearity, and Bias limits.
11.1 This process involves characterizing, in triplicate,
11.6 Cool the test specimen to 25 °C. The thermal curve
specimens with no mass loss and at least three or more test need not be recorded.
specimens taken to represent the low, medium, and high
11.7 Select a point on the mass loss thermal curve from11.5
extremes of the range over which performance is to be
before and another on the mass loss plateau immediately after
validated.
thefirstmassloss.Thesetemperaturepointsareidentifiedat T
NOTE 4—The details of this procedure are written using mass loss
and T , respectively. Record the masses at these two points as
reference materials as an analyte, and with a generic set of experimental 2
M (1) and M (1) (see Fig. 1).
conditions.Forvalidationofaspecificmasslossmethod,specimensofthe
1 2
analyte should be prepared to represent the range of the intended test
NOTE 8—The valley of the first derivative curve may be useful in
method, and steps 11.2 to 11.20 replaced with the specific mass loss
identifying T the point of maximum resolution between the lower (high
procedure (that is, sample size, heating rate, purge gas, purge flow rate,
volatility) and higher temperature (medium volatility) mass loss regions.
etc.).
NOTE9—ItiscommontoselectT tobeambienttemperatureandM (1)
1 1
to be M (1)
11.2 Prepare at least 150-mg quantities of each of the o
reference specimens covering the mass loss range of the test.
11.8 Determine the mass loss between M (1) and M (1) as
1 2
Nominal mas
...
This document is not an ASTM standard and is intended only to provide the user of an ASTM standard an indication of what changes have been made to the previous version. Because
it may not be technically possible to adequately depict all changes accurately, ASTM recommends that users consult prior editions as appropriate. In all cases only the current version
of the standard as published by ASTM is to be considered the official document.
Designation: E2402 − 11 (Reapproved 2017) E2402 − 19
Standard Test Method for
Mass Loss Loss, Residue, and ResidueTemperature
Measurement Validation of Thermogravimetric Analyzers
This standard is issued under the fixed designation E2402; the number immediately following the designation indicates the year of
original adoption or, in the case of revision, the year of last revision. A number in parentheses indicates the year of last reapproval. A
superscript epsilon (´) indicates an editorial change since the last revision or reapproval.
1. Scope Scope*
1.1 This test method provides procedures for validating mass loss loss, residue, and residuetemperature measurements by
thermogravimetric analyzers (TGA)(TGAs) and analytical methods based upon the measurement of mass loss or residue content.
content or temperature. Performance parameters determined include mass loss loss, residue, and residuetemperature repeatability
(precision), detection limit, quantitation limit, linearity, and bias.
1.2 Validation of apparatus performance and analytical methods is requested or required for quality initiatives or where results
may be used for legal purposes.
1.3 The values stated in SI units are to be regarded as standard. No other units of measurement are included in this standard.
1.4 There is no ISO standard equivalent to this test method.
1.4 This standard does not purport to address all of the safety concerns, if any, associated with its use. It is the responsibility
of the user of this standard to establish appropriate safety, health, and environmental practices and determine the applicability of
regulatory limitations prior to use.
1.5 This international standard was developed in accordance with internationally recognized principles on standardization
established in the Decision on Principles for the Development of International Standards, Guides and Recommendations issued
by the World Trade Organization Technical Barriers to Trade (TBT) Committee.
2. Referenced Documents
2.1 ASTM Standards:
E177 Practice for Use of the Terms Precision and Bias in ASTM Test Methods
E473 Terminology Relating to Thermal Analysis and Rheology
E1142 Terminology Relating to Thermophysical Properties
E1582 Test Method for Temperature Calibration of Thermogravimetric Analyzers
E1970 Practice for Statistical Treatment of Thermoanalytical Data
E2040 Test Method for Mass Scale Calibration of Thermogravimetric Analyzers
E2161 Terminology Relating to Performance Validation in Thermal Analysis and Rheology
2.2 Other Standard:
U.S. FDA Q2B Validation of Analytical Procedures: Methodology, 62 FR 27464, May 19, 1997
3. Terminology
3.1 Technical terms used in this standard are defined in Practice E177 and in Terminologies E473, E1142, and E2161. including
analyte, bow, calibration, Celsius, certification, certified reference material, Curie temperature, derivative, detection limit,
extrapolated onset value, linearity, magnetic transformation, onset point, plateau, precision, quantification limit, reference
material, repeatability, slope, standard deviation, thermogravimetry, thermogravimetric analysis, temperature, and validation.
3.2 Definitions of Terms Specific to This Standard:
This test method is under the jurisdiction of ASTM Committee E37 on Thermal Measurements and is the direct responsibility of Subcommittee E37.10 on Fundamental,
Statistical and Mechanical Properties.
Current edition approved Dec. 15, 2017Sept. 1, 2019. Published December 2017September 2019. Originally approved in 2005. Last previous edition approved in 20112017
as E2402 – 11.E2402 – 11 (2017). DOI: 10.1520/E2402-11R17.10.1520/E2402-19.
For referenced ASTM standards, visit the ASTM website, www.astm.org, or contact ASTM Customer Service at service@astm.org. For Annual Book of ASTM Standards
volume information, refer to the standard’s Document Summary page on the ASTM website.
*A Summary of Changes section appears at the end of this standard
Copyright © ASTM International, 100 Barr Harbor Drive, PO Box C700, West Conshohocken, PA 19428-2959. United States
E2402 − 19
3.2.1 highly volatile matter—matter, n—materials (such as moisture, plasticizer, residual solvent, etc.) that boil at temperatures
below 200°C.200 °C.
3.2.2 mass loss plateau, n—a region of a thermogravimetric curve with a relatively constant mass (that is, accompanied by a
minima in the first derivative of mass with respect to time).
3.2.3 medium volatile matter—matter, n—materials (such as oil and polymer degradation products) that boil in the temperature
range between 200 °C and 400°C.400 °C.
3.2.4 residue—residue, n—material remaining (such as metal components, filler content or inert reinforcing materials) after
more volatile components are vaporized.
3.2.4 mass loss plateau—a region of a thermogravimetric curve with a relatively constant mass (that is, accompanied by a
minima in the first derivative of mass with respect to time).
4. Summary of Test Method
4.1 Mass is the primary dependent parameter and temperature is the primary independent parameter measured by
TGA.thermogravimetric analysis.
4.2 Mass loss and residue measurements are validated by their direct measurement using thermogravimetric apparatus over a
specified temperature range using reference materials of known volatiles content as an analyte.
4.3 Alternatively, validation of a TGAthermogravimetic method based upon mass loss and residue measurements may be
performed using a specific test specimen as the analyte.
4.4 The mass loss of three or more specimens (nominally representing the maximum, midpoint, and minimum of the range of
this test method) is measured at least in triplicate. A fourth blank specimen, containing no analyte, is also measured at least in
triplicate.
NOTE 1—Repeatability is determined by performing a sufficient number of determinations to calculate statistically valid estimates of the standard
deviation or relative standard deviation of the measurements.
4.4.1 Mass loss and residue linearity and bias are determined from the best-fit straight-line linear regressions (best-fit straight
line) correlation of the results from measurements of the three or more specimens.
4.4.2 Mass loss and residue detection limit and quantitation limit limit, quantitation limit, and repeatability are determined from
the standard deviation of the blank specimen measurements.
4.4.3 Mass loss and residue repeatability are determined from the repeatability measurements of the three or more
analyte-containing specimens.
4.5 Temperature measurement is validated using three or more temperature calibration materials (nominally representing the
minimum, midpoint, and maximum of the range of the test method) that are measured at least in triplicate.
4.5.1 Temperature linearity, bias, detection limit, quantitation limit, and repeatability are determined from the standard deviation
of these measurements.
5. Significance and Use
5.1 This test method may be used to validate the performance of a specific TGA apparatus.thermogravimetric analyzer.
5.2 This test method may be used to validate the performance of a specific method based upon a TGAthermogravimetry mass
loss or residue measurement.
5.3 This test method may be used to determine the repeatability of a specific apparatus, operator, or laboratory.
5.4 This test method may be used for specification and regulatory compliance purposes.
6. Interferences
6.1 This test method depends upon distinctive thermal stability ranges of the measured components as a principle of the test.
For this reason, impurities or other materials that have no well-defined thermally stable range, or the thermal stability of which
are the same as other components, may create interferences.
7. Apparatus
7.1 Thermogravimetric Analyzer (TGA)—The essential instrumentation required to provide minimum thermogravimetry
capability for this test method includes:
7.1.1 A thermobalance composed of:
7.1.1.1 A furnace to provide uniform controlled heating of a specimen to a constant temperature of 400°C at least 400 °C and
at a constant rate between 5 °C/min and 25°C/min.25 °C/min.
7.1.1.2 A temperature sensor to provide an indication of the specimen/furnace temperature readable to 60.1°C.60.1 °C.
7.1.1.3 A continuous recording balance (thermobalance) with a minimum capacity of 100 mg and a sensitivity of 610 μg to
measure the specimen mass.
E2402 − 19
7.1.1.4 A means of maintaining the specimen/container under a controlled atmosphere using an inert gas of 99.9+ % purity at
a purge rate of 50 mL/min to 100 mL/min 6 5 mL/min.
NOTE 2—Excessive purge rates should be avoided as they may introduce interferences due to turbulence effects and temperature gradients.
7.1.2 A temperature controller capable of executing a specific temperature program by operating the furnace between selected
temperature limits at a rate of temperature change of 5 °C/min to 25°C/min 25 °C/min to within 6 0.5°C/min.0.5 °C/min.
7.1.3 A data collection device, to provide a means of acquiring, storing, and displaying measured or calculated signals, or both.
The minimum output signals required for thermogravimetry are mass, temperature, and time.
7.1.4 Containers (pans, crucibles, etc.) that are inert to the specimen and that will remain gravimetrically stable up to 450°C.450
°C.
7.2 Graduated micropipettes with a capacity of 20 μL to 40 μL measurable to within 61 μL.
8. Reagents and Materials
8.1 Mass Loss Reference Materials, preferably certified for mass loss covering a range of 2, 50, and 98 % mass loss nominally
2 %, 50 %, and 98 mass loss % over the temperature range of 25 °C to 200°C.200 °C.
NOTE 3—Materials with other mass loss values may be used but shall be reported.
8.2 Temperature Calibration Materials, preferably certified for transition temperature, representing the minimum, midpoint and
maximum of the applicable temperature range of the thermogravimetric analyzer (see Test Method E1582).
8.3 Nitrogen (or other inert purge gas) of 99.9+ % purity.
9. Hazards
9.1 During the course of these experiments, organic vapors are evolved from the specimen and will exhaust from the instrument.
A ventilation system shall be used to ensure that the operator is not exposed to these vapors.
9.2 Review the Material Safety Data Sheets (MSDS)(SDS) for the components of the mass loss reference materials and the
temperature reference materials for additional safety information.
10. Calibration and Standardization
10.1 After turning the power on, allow the instrument to equilibrate for at least one hour prior to any measurement.
10.2 Perform any cleaning and calibration procedures described by the manufacturer in the apparatus operator’s manual.
10.3 If not previously established, perform temperature and mass calibrations according to Test Methods E1582 and E2040,
respectively, using the same purge gas, purge flow rate, and heating rate (here 10°C/min) 10 °C/min) to be used for validation
experiments.
11. Procedure for Determining Mass Loss and Residue Measurement Repeatability, Detection Limit, Quantitation
Limit, Linearity, and Bias
11.1 This process involves characterizing, in triplicate, specimens with no mass loss and at least three or more test specimens
taken to represent the low, medium, and high extremes of the range over which performance is to be validated.
NOTE 4—The details of this procedure are written using mass loss reference materials as an analyte, and with a generic set of experimental conditions.
For validation of a specific mass loss method, specimens of the analyte should be prepared to represent the range of the intended test method, and steps
11.2 to 11.20 replaced with the specific mass loss procedure (that is, sample size, heating rate, purge gas, purge flow rate, etc.).
11.2 Prepare at least 150 mg 150-mg quantities of each of the reference specimens covering the mass loss range of the test.
Nominal mass values might be 2, 50, 2 %, 50 %, and 98 mass loss %.loss %.
NOTE 5—Most thermoanalytical methods cover 1.5 to 2 decades of range. The mass values selected should approximate the anticipated range. Other
masses losses and mass ranges may be used but shall be reported.
11.3 Tare the empty sample pan.
11.4 Using a micropipette, load 20 μL to 40 μL 6 1 μL of the largest mass loss specimen (for example, the 98 mass loss % loss
% reference material) onto the sample container. Close the apparatus in preparation for conducting the experiment. Weigh and
record the test specimen mass as M (1). Purge the sample chamber with dry nitrogen (or other inert gas) at a flow rate of 50 mL/min
o
to 100 mL/min 6 10 % throughout the experiment.
NOTE 6—Other specimen volumes may be used but shall be reported.
11.5 Heat the test specimen at 10°C/min 10 °C/min from 25 °C to 400°C 400 °C and record the thermal curve.
NOTE 7—Other heating rates may be used but shall be reported. Higher rates, however, may reduce the resolution between high volatility and medium
volatility component leading to poorer detection and quantitation limits.
11.6 Cool the test specimen to 25°C. 25 °C. The thermal curve need not be recorded.
E2402 − 19
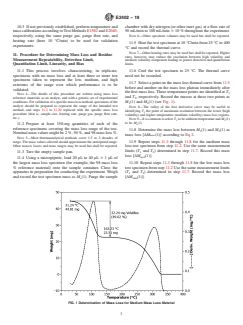
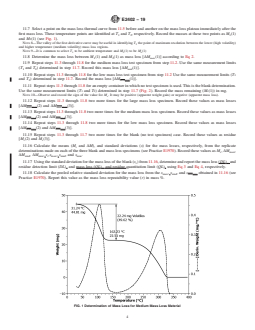
11.7 Select a point on the mass loss thermal curve from 11.5 before and another on the mass loss plateau immediately after the
first mass loss. These temperature points are identified at T and T , respectively. Record the masses at these two points as M (1)
1 2 1
and M (1) (see Fig. 1).
NOTE
...
Questions, Comments and Discussion
Ask us and Technical Secretary will try to provide an answer. You can facilitate discussion about the standard in here.
Loading comments...