ASTM E3142-18a(2023)
(Test Method)Standard Test Method for Thermal Lag of Thermal Analysis Apparatus
Standard Test Method for Thermal Lag of Thermal Analysis Apparatus
SIGNIFICANCE AND USE
5.1 Differing temperature rates-of-change may be required for different measurements (for example, Test Method E698). Temperature calibration changes as a function of temperature rate-of-change. The use of the known thermal lag of an apparatus may be used to adjust the temperature calibration of the apparatus obtained at one temperature rate-of-change with that at another required for a given applications. This adjustment procedure for temperature calibration is described in 8.1.
5.2 This test method may be used in research, quality assurance, and specification acceptance.
SCOPE
1.1 This test method addresses the dependence of temperature calibration on the temperature rate-of-change. This test method describes the determination of the thermal lag of thermal analysis apparatus and its application to the modification of the temperature calibration for that apparatus obtained at alternative linear temperature rates-of-change.
1.2 This test method is applicable, but not limited to, the temperature calibration of differential thermal analyzers (DTAs), differential scanning calorimeters (DSCs), thermogravimetric analyzers (TGAs), thermomechanical analyzers (TMAs), and dynamic mechanical analyzers (DMAs).
1.3 This test method is applicable only to apparatus demonstrating a linear relationship between indicated temperature and temperature rate-of-change.
1.4 The values stated in SI units are to be regarded as the standard. No other units of measurement are included in this standard.
1.5 This standard does not purport to address all of the safety concerns, if any, associated with its use. It is the responsibility of the user of this standard to establish appropriate safety, health, and environmental practices and determine the applicability of regulatory limitations prior to use.
1.6 This international standard was developed in accordance with internationally recognized principles on standardization established in the Decision on Principles for the Development of International Standards, Guides and Recommendations issued by the World Trade Organization Technical Barriers to Trade (TBT) Committee.
General Information
Relations
Standards Content (Sample)
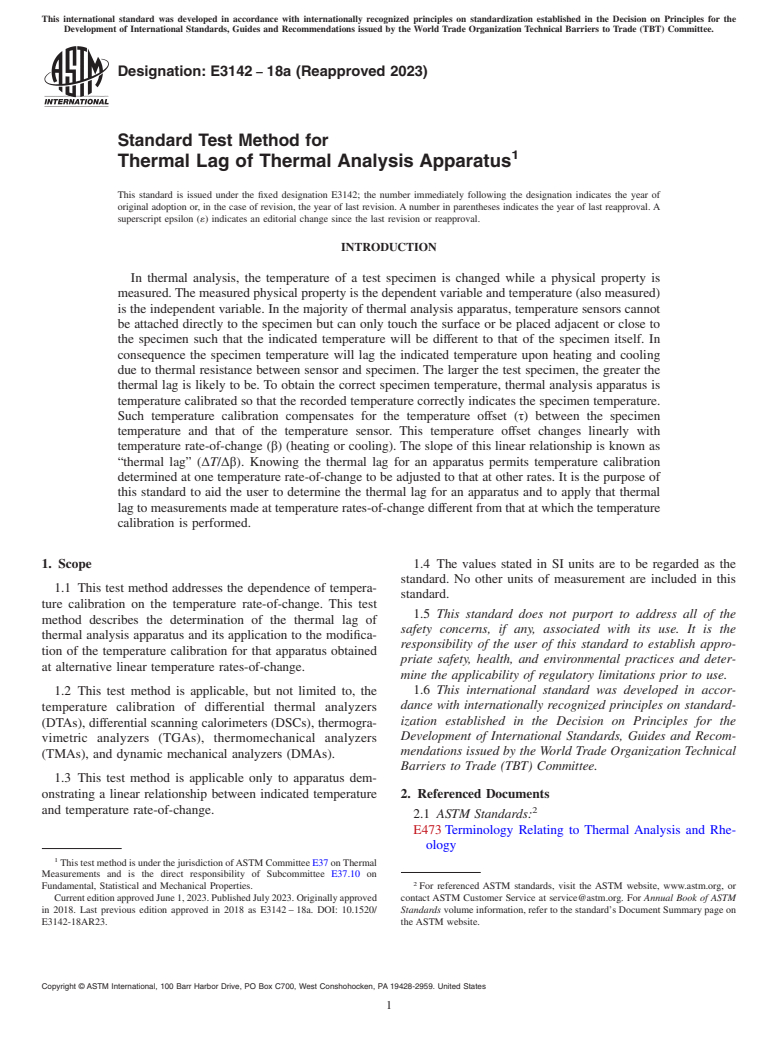
This international standard was developed in accordance with internationally recognized principles on standardization established in the Decision on Principles for the
Development of International Standards, Guides and Recommendations issued by the World Trade Organization Technical Barriers to Trade (TBT) Committee.
Designation: E3142 − 18a (Reapproved 2023)
Standard Test Method for
Thermal Lag of Thermal Analysis Apparatus
This standard is issued under the fixed designation E3142; the number immediately following the designation indicates the year of
original adoption or, in the case of revision, the year of last revision. A number in parentheses indicates the year of last reapproval. A
superscript epsilon (´) indicates an editorial change since the last revision or reapproval.
INTRODUCTION
In thermal analysis, the temperature of a test specimen is changed while a physical property is
measured. The measured physical property is the dependent variable and temperature (also measured)
is the independent variable. In the majority of thermal analysis apparatus, temperature sensors cannot
be attached directly to the specimen but can only touch the surface or be placed adjacent or close to
the specimen such that the indicated temperature will be different to that of the specimen itself. In
consequence the specimen temperature will lag the indicated temperature upon heating and cooling
due to thermal resistance between sensor and specimen. The larger the test specimen, the greater the
thermal lag is likely to be. To obtain the correct specimen temperature, thermal analysis apparatus is
temperature calibrated so that the recorded temperature correctly indicates the specimen temperature.
Such temperature calibration compensates for the temperature offset (τ) between the specimen
temperature and that of the temperature sensor. This temperature offset changes linearly with
temperature rate-of-change (β) (heating or cooling). The slope of this linear relationship is known as
“thermal lag” (∆T/∆β). Knowing the thermal lag for an apparatus permits temperature calibration
determined at one temperature rate-of-change to be adjusted to that at other rates. It is the purpose of
this standard to aid the user to determine the thermal lag for an apparatus and to apply that thermal
lag to measurements made at temperature rates-of-change different from that at which the temperature
calibration is performed.
1. Scope 1.4 The values stated in SI units are to be regarded as the
standard. No other units of measurement are included in this
1.1 This test method addresses the dependence of tempera-
standard.
ture calibration on the temperature rate-of-change. This test
1.5 This standard does not purport to address all of the
method describes the determination of the thermal lag of
safety concerns, if any, associated with its use. It is the
thermal analysis apparatus and its application to the modifica-
responsibility of the user of this standard to establish appro-
tion of the temperature calibration for that apparatus obtained
priate safety, health, and environmental practices and deter-
at alternative linear temperature rates-of-change.
mine the applicability of regulatory limitations prior to use.
1.2 This test method is applicable, but not limited to, the 1.6 This international standard was developed in accor-
dance with internationally recognized principles on standard-
temperature calibration of differential thermal analyzers
ization established in the Decision on Principles for the
(DTAs), differential scanning calorimeters (DSCs), thermogra-
Development of International Standards, Guides and Recom-
vimetric analyzers (TGAs), thermomechanical analyzers
mendations issued by the World Trade Organization Technical
(TMAs), and dynamic mechanical analyzers (DMAs).
Barriers to Trade (TBT) Committee.
1.3 This test method is applicable only to apparatus dem-
onstrating a linear relationship between indicated temperature 2. Referenced Documents
and temperature rate-of-change. 2
2.1 ASTM Standards:
E473 Terminology Relating to Thermal Analysis and Rhe-
ology
This test method is under the jurisdiction of ASTM Committee E37 on Thermal
Measurements and is the direct responsibility of Subcommittee E37.10 on
Fundamental, Statistical and Mechanical Properties. For referenced ASTM standards, visit the ASTM website, www.astm.org, or
Current edition approved June 1, 2023. Published July 2023. Originally approved contact ASTM Customer Service at service@astm.org. For Annual Book of ASTM
in 2018. Last previous edition approved in 2018 as E3142 – 18a. DOI: 10.1520/ Standards volume information, refer to the standard’s Document Summary page on
E3142-18AR23. the ASTM website.
Copyright © ASTM International, 100 Barr Harbor Drive, PO Box C700, West Conshohocken, PA 19428-2959. United States
E3142 − 18a (2023)
E698 Test Method for Kinetic Parameters for Thermally 5. Significance and Use
Unstable Materials Using Differential Scanning Calorim-
5.1 Differing temperature rates-of-change may be required
etry and the Flynn/Wall/Ozawa Method
for different measurements (for example, Test Method E698).
E967 Test Method for Temperature Calibration of Differen-
Temperature calibration changes as a function of temperature
tial Scanning Calorimeters and Differential Thermal Ana-
rate-of-change. The use of the known thermal lag of an
lyzers
apparatus may be used to adjust the temperature calibration of
E1142 Terminology Relating to Thermophysical Properties
the apparatus obtained at one temperature rate-of-change with
E1363 Test Method for Temperature Calibration of Thermo-
that at another required for a given applications. This adjust-
mechanical Analyzers
ment procedure for temperature calibration is described in 8.1.
E1582 Test Method for Temperature Calibration of Thermo-
5.2 This test method may be used in research, quality
gravimetric Analyzers
assurance, and specification acceptance.
E1867 Test Methods for Temperature Calibration of Dy-
namic Mechanical Analyzers
6. Interferences
E1970 Practice for Statistical Treatment of Thermoanalytical
Data
6.1 Thermal lag on heating may differ from that on cooling.
E2069 Test Method for Temperature Calibration on Cooling
6.2 Where thermal lag is examined upon cooling, the
of Differential Scanning Calorimeters
reference material shall be selected to show no supercooling.
Liquid crystal materials and adamantane are examples of
3. Terminology
materials without supercooling (see Test Method E2069).
3.1 Definitions:
3.1.1 Terms applicable to this test method and can be found 7. Procedure
in Terminologies E473 and E1142 and include the terms
7.1 Select the appropriate ASTM standard for temperature
calorimeter, differential, differential scanning calorimeter, dif-
calibration of the apparatus (Test Method E967 for differential
ferential thermal analysis, dynamic mechanical analysis,
scanning calorimeters or differential thermal analyzers, Test
temperature, thermal analysis, thermogravimetric analysis,
Method E1582 for thermogravimetric analyzers, Test Method
and thermomechanical analysis.
E1363 for thermomechanical analyzers, or Test Methods
3.2 Definitions of Terms Specific to This Standard:
E1867 for dynamic mechanical analyzers).
3.2.1 temperature offset, n—the difference between the ac-
7.2 Perform the procedure described in the calibration
tual specimen temperature and that reported by a temperature
standard and record the determined temperature as T and the
sensor.
observed temperature rate-of-change as β .
3.2.2 thermal lag, n—the change in indicated temperature
NOTE 1—The temperature rate-of-change shall be measured. Use of the
offset with temperature rate-of-change.
programmed temperature rate-of-change is not satisfactory.
7.3 Perform the procedure described in the calibration
4. Summary of Test Method
standard at two additional heating rates other than β repre-
4.1 Following apparatus temperature calibration with a senting the low, medium, and high heating rate capability of the
reference material at an identified temperature rate-of-change,
apparatus. Record these additional data pair values as T and
the temperature offs
...


Questions, Comments and Discussion
Ask us and Technical Secretary will try to provide an answer. You can facilitate discussion about the standard in here.