ASTM E2208-02(2018)e1
(Guide)Standard Guide for Evaluating Non-Contacting Optical Strain Measurement Systems
Standard Guide for Evaluating Non-Contacting Optical Strain Measurement Systems
ABSTRACT
This guide assists potential users in understanding the issues related to the accuracy of non-contacting strain measurement systems and to provide a common framework for quantitative comparison of optical systems. The output from a non-contacting optical strain and deformation measurement system is generally divided into optical data and image analysis data. Each non-contacting optical strain measurement system must be evaluated to determine reliable estimates for the accuracy of the resulting Derived Data.
SCOPE
1.1 The purpose of this document is to assist potential users in understanding the issues related to the accuracy of non-contacting strain measurement systems and to provide a common framework for quantitative comparison of optical systems. The output from a non-contacting optical strain and deformation measurement system is generally divided into optical data and image analysis data. Optical data contains information related to specimen strains and the image analysis process converts the encoded optical information into strain data. The enclosed document describes potential sources of error in the strain data and describes general methods for quantifying the error and estimating the accuracy of the measurements when applying non-contacting methods to the study of events for which the optical integration time is much smaller than the inverse of the maximum temporal frequency in the encoded data (that is, events that can be regarded as static during the integration time). A brief application of the approach, along with specific examples defining the various terms, is given in the Appendix.
1.2 This international standard was developed in accordance with internationally recognized principles on standardization established in the Decision on Principles for the Development of International Standards, Guides and Recommendations issued by the World Trade Organization Technical Barriers to Trade (TBT) Committee.
General Information
- Status
- Published
- Publication Date
- 30-Apr-2018
- Technical Committee
- E08 - Fatigue and Fracture
- Drafting Committee
- E08.03 - Advanced Apparatus and Techniques
Relations
- Effective Date
- 01-May-2018
- Effective Date
- 15-Feb-2024
- Effective Date
- 01-Feb-2024
- Effective Date
- 01-Jun-2020
- Effective Date
- 01-May-2020
- Effective Date
- 01-Feb-2020
- Effective Date
- 15-Apr-2014
- Effective Date
- 15-Dec-2012
- Effective Date
- 15-Nov-2012
- Effective Date
- 15-Nov-2012
- Effective Date
- 15-Nov-2012
- Effective Date
- 15-Nov-2012
- Effective Date
- 15-Nov-2012
- Effective Date
- 01-Sep-2012
- Effective Date
- 01-Aug-2012
Overview
ASTM E2208-02(2018)e1: Standard Guide for Evaluating Non-Contacting Optical Strain Measurement Systems provides essential guidance for assessing the accuracy and reliability of optical, non-contacting systems used for measuring strain and deformation. Developed by ASTM International, this guide establishes a common framework for quantitative comparison and evaluation, addressing critical factors influencing measurement performance. The document is particularly relevant for engineers, researchers, and quality professionals seeking reliable, non-contact methods for measuring strain in materials and components.
Non-contacting optical strain measurement systems offer significant advantages over traditional methods by enabling precise, full-field strain and displacement assessments without physically attaching sensors to specimens. The standard focuses on understanding accuracy issues, identifying errors, and establishing best evaluation practices for these advanced systems.
Key Topics
This guide covers several key areas to ensure comprehensive evaluation of non-contacting optical strain measurement systems:
- Accuracy Assessment: Explains how to determine and quantify the accuracy of derived strain data from optical measurements.
- Data Flow and Classification: Differentiates between optical data (encoded information captured by imaging) and image analysis data (strain calculations from processed images).
- Sources of Error: Identifies common sources of measurement error, including:
- Recording media limitations (e.g., camera resolution, quantization level)
- Environmental factors (vibrations, lighting variations)
- Systematic and random errors from hardware, software, and the test environment
- Image processing challenges and extraction methods
- Evaluation Process: Recommends direct comparison with established measurement methods (such as extensometers and strain gages) and outlines simulation techniques to assess performance under varied conditions.
Applications
Non-contacting optical strain measurement systems are widely used in numerous high-precision applications where traditional contact methods are impractical or could influence the specimen. Key applications include:
- Material Testing: High-resolution strain measurements in metals, composites, and polymers during tensile, fatigue, and fracture testing.
- Component and Structural Analysis: Real-time monitoring of strain and deformation in complex assemblies or in-situ structures, especially in aerospace, automotive, and civil engineering contexts.
- Fracture Mechanics: Measurement near crack tips or bi-material interfaces where high strain gradients occur.
- Extreme Environments: Testing under conditions such as high temperature, vacuum, or environments where physical sensors would be compromised.
- Full-field Analysis: Research and development tasks requiring spatially resolved strain mapping for validating computational models or investigating material behavior.
By following ASTM E2208, users can reliably assess the performance of their optical systems and ensure that measurement results meet the required accuracy for informed decision-making.
Related Standards
For best practices and comprehensive testing, ASTM E2208-02(2018)e1 references and integrates with several related ASTM standards, including:
- ASTM E8: Test Methods for Tension Testing of Metallic Materials
- ASTM E251: Test Methods for Performance Characteristics of Metallic Bonded Resistance Strain Gages
- ASTM E399: Test Method for Linear-Elastic Plane-Strain Fracture Toughness of Metallic Materials
- ASTM E83: Practice for Verification and Classification of Extensometer Systems
- ASTM E1823: Terminology Relating to Fatigue and Fracture Testing
These documents provide foundational procedures and terminology, establishing a complete framework for mechanical testing and strain measurement using both conventional and advanced optical methods.
By following the guidance presented in ASTM E2208-02(2018)e1, organizations can ensure that their non-contacting optical strain measurement systems deliver precise, reliable, and traceable results, enhancing the quality and integrity of material and structural testing.
Keywords: non-contacting strain measurement, optical strain measurement systems, ASTM E2208, strain accuracy, quantitative comparison, measurement errors, image analysis, materials testing, standards for strain measurement, optical deformation analysis.
Buy Documents
ASTM E2208-02(2018)e1 - Standard Guide for Evaluating Non-Contacting Optical Strain Measurement Systems
Get Certified
Connect with accredited certification bodies for this standard

BSMI (Bureau of Standards, Metrology and Inspection)
Taiwan's standards and inspection authority.
Sponsored listings
Frequently Asked Questions
ASTM E2208-02(2018)e1 is a guide published by ASTM International. Its full title is "Standard Guide for Evaluating Non-Contacting Optical Strain Measurement Systems". This standard covers: ABSTRACT This guide assists potential users in understanding the issues related to the accuracy of non-contacting strain measurement systems and to provide a common framework for quantitative comparison of optical systems. The output from a non-contacting optical strain and deformation measurement system is generally divided into optical data and image analysis data. Each non-contacting optical strain measurement system must be evaluated to determine reliable estimates for the accuracy of the resulting Derived Data. SCOPE 1.1 The purpose of this document is to assist potential users in understanding the issues related to the accuracy of non-contacting strain measurement systems and to provide a common framework for quantitative comparison of optical systems. The output from a non-contacting optical strain and deformation measurement system is generally divided into optical data and image analysis data. Optical data contains information related to specimen strains and the image analysis process converts the encoded optical information into strain data. The enclosed document describes potential sources of error in the strain data and describes general methods for quantifying the error and estimating the accuracy of the measurements when applying non-contacting methods to the study of events for which the optical integration time is much smaller than the inverse of the maximum temporal frequency in the encoded data (that is, events that can be regarded as static during the integration time). A brief application of the approach, along with specific examples defining the various terms, is given in the Appendix. 1.2 This international standard was developed in accordance with internationally recognized principles on standardization established in the Decision on Principles for the Development of International Standards, Guides and Recommendations issued by the World Trade Organization Technical Barriers to Trade (TBT) Committee.
ABSTRACT This guide assists potential users in understanding the issues related to the accuracy of non-contacting strain measurement systems and to provide a common framework for quantitative comparison of optical systems. The output from a non-contacting optical strain and deformation measurement system is generally divided into optical data and image analysis data. Each non-contacting optical strain measurement system must be evaluated to determine reliable estimates for the accuracy of the resulting Derived Data. SCOPE 1.1 The purpose of this document is to assist potential users in understanding the issues related to the accuracy of non-contacting strain measurement systems and to provide a common framework for quantitative comparison of optical systems. The output from a non-contacting optical strain and deformation measurement system is generally divided into optical data and image analysis data. Optical data contains information related to specimen strains and the image analysis process converts the encoded optical information into strain data. The enclosed document describes potential sources of error in the strain data and describes general methods for quantifying the error and estimating the accuracy of the measurements when applying non-contacting methods to the study of events for which the optical integration time is much smaller than the inverse of the maximum temporal frequency in the encoded data (that is, events that can be regarded as static during the integration time). A brief application of the approach, along with specific examples defining the various terms, is given in the Appendix. 1.2 This international standard was developed in accordance with internationally recognized principles on standardization established in the Decision on Principles for the Development of International Standards, Guides and Recommendations issued by the World Trade Organization Technical Barriers to Trade (TBT) Committee.
ASTM E2208-02(2018)e1 is classified under the following ICS (International Classification for Standards) categories: 17.180.30 - Optical measuring instruments. The ICS classification helps identify the subject area and facilitates finding related standards.
ASTM E2208-02(2018)e1 has the following relationships with other standards: It is inter standard links to ASTM E2208-02(2010)e1, ASTM E1823-24a, ASTM E1823-24, ASTM E251-20a, ASTM E251-20, ASTM E1823-20, ASTM E251-92(2014), ASTM E1823-12e, ASTM E399-12e3, ASTM E1823-12d, ASTM E399-12, ASTM E399-12e1, ASTM E399-12e2, ASTM E1823-12c, ASTM E1823-12b. Understanding these relationships helps ensure you are using the most current and applicable version of the standard.
ASTM E2208-02(2018)e1 is available in PDF format for immediate download after purchase. The document can be added to your cart and obtained through the secure checkout process. Digital delivery ensures instant access to the complete standard document.
Standards Content (Sample)
This international standard was developed in accordance with internationally recognized principles on standardization established in the Decision on Principles for the
Development of International Standards, Guides and Recommendations issued by the World Trade Organization Technical Barriers to Trade (TBT) Committee.
´1
Designation: E2208 − 02 (Reapproved 2018)
Standard Guide for
Evaluating Non-Contacting Optical Strain Measurement
Systems
This standard is issued under the fixed designation E2208; the number immediately following the designation indicates the year of
original adoption or, in the case of revision, the year of last revision. A number in parentheses indicates the year of last reapproval. A
superscript epsilon (´) indicates an editorial change since the last revision or reapproval.
ε NOTE—3.1.2 was editorially revised in June 2018.
1. Scope E83 Practice for Verification and Classification of Exten-
someter Systems
1.1 The purpose of this document is to assist potential users
E251 Test Methods for Performance Characteristics of Me-
in understanding the issues related to the accuracy of non-
tallic Bonded Resistance Strain Gages
contacting strain measurement systems and to provide a
E399 Test Method for Linear-Elastic Plane-Strain Fracture
common framework for quantitative comparison of optical
Toughness K of Metallic Materials
Ic
systems. The output from a non-contacting optical strain and
E1823 TerminologyRelatingtoFatigueandFractureTesting
deformation measurement system is generally divided into
optical data and image analysis data. Optical data contains
3. Terminology
information related to specimen strains and the image analysis
process converts the encoded optical information into strain
3.1 Definitions:
data. The enclosed document describes potential sources of 3.1.1 accuracy—the quantitative difference between a test
error in the strain data and describes general methods for
measurement and a reference value.
quantifying the error and estimating the accuracy of the
3.1.2 raw data—the sampled values of a sensor output.
measurements when applying non-contacting methods to the
3.2 Definitions of Terms Specific to This Standard:
study of events for which the optical integration time is much
3.2.1 coherent illumination—light source where the differ-
smallerthantheinverseofthemaximumtemporalfrequencyin
ence in phase is solely a function of optical path differences;
the encoded data (that is, events that can be regarded as static
interference is a direct consequence.
during the integration time). A brief application of the
3.2.2 decoded data—measurement information related to
approach, along with specific examples defining the various
the displacement or displacement gradient field.
terms, is given in the Appendix.
1.2 This international standard was developed in accor- 3.2.3 decoded data bandwidth—spatial frequency range of
the information after decoding of the optical data.
dance with internationally recognized principles on standard-
ization established in the Decision on Principles for the
3.2.4 derived data—data obtained through processing of the
Development of International Standards, Guides and Recom-
raw data.
mendations issued by the World Trade Organization Technical
3.2.5 dynamic range—the range of physical parameter val-
Barriers to Trade (TBT) Committee.
ues for which measurements can be acquired with the mea-
surement system.
2. Referenced Documents
3.2.6 illumination wavelength—wavelength of illumination,
2.1 ASTM Standards:
ζ.
E8 Test Methods for Tension Testing of Metallic Materials
3.2.7 incoherent illumination—light source with random
variations in optical path differences; constructive or destruc-
tive interference of waves is not possible.
This guide is under the jurisdiction of ASTM Committee E08 on Fatigue and
Fracture and is the direct responsibility of Subcommittee E08.03 on Advanced 3.2.8 maximum temporal frequency of encoded data—
Apparatus and Techniques.
reciprocal of the shortest event time contained in the encoded
Current edition approved May 1, 2018. Published June 2018. Originally
data (for example, time variations in displacement field).
ɛ1
approved in 2002. Last previous edition approved in 2010 as E2208–02(2010) .
DOI: 10.1520/E2208-02R18E01.
3.2.9 measurement noise—variations in the measurements
For referenced ASTM standards, visit the ASTM website, www.astm.org, or
that are not related to actual changes in the physical property
contact ASTM Customer Service at service@astm.org. For Annual Book of ASTM
being measured. May be quantified by statistical properties
Standards volume information, refer to the standard’s Document Summary page on
the ASTM website. such as standard deviation.
Copyright © ASTM International, 100 Barr Harbor Drive, PO Box C700, West Conshohocken, PA 19428-2959. United States
´1
E2208 − 02 (2018)
3.2.10 measurement resolution—smallest change in the frequency band of the optical data. Note that decoded data may
physical property that can be reliably measured. have a lower spatial resolution due to the decoding process.
3.2.11 numerical aperture, (N.A.)—non-dimensional mea- 3.2.20 systematic errors—biased variations in the measure-
sure of diffraction-limitation for imaging system; N.A. = D/f ments due to the effects of test environment, hardware and/or
for a simple lens system, where D is lens diameter and f is lens software. Test environment effects include changes in
focal length. temperature, humidity, lighting, out-of-plane displacements
(for 2-D systems) etc. Hardware effects include lens
3.2.12 optical data—recorded images of specimen, contain-
aberrations, thermal drift in recording media, variations in
ing encoded information related to the displacement or dis-
sensing elements, interlacing of lines, phase lag due to refresh
placement gradient field, or both.
rates, depth of field for recording system, etc. Software effects
3.2.13 optical data bandwidth—spatial frequency range of
include interpolation errors, search algorithm processes, image
the optical pattern (for example, fringes, speckle pattern, etc.)
boundary effects, etc.
that can be recorded in the images without aliasing or loss of
information.
4. Description of General Optical Non-Contacting Strain
3.2.14 optical integration time—time over which digital Measurement Systems
image data is averaged to obtain a discretely sampled repre-
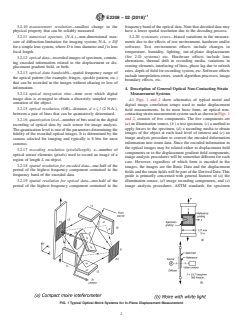
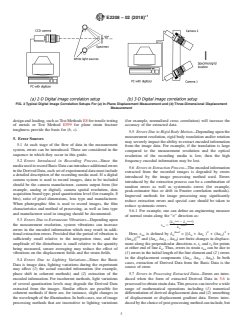
4.1 Figs. 1 and 2 show schematics of typical moiré and
sentation of the object.
digital image correlation setups used to make displacement
3.2.15 optical resolution, (OR)—distance, d = ζ / (2 N.A.), field measurements. In its most basic form, an optical non-
between a pair of lines that can be quantatively determined.
contacting strain measurement system such as shown in Figs. 1
and 2, consists of five components. The five components are
3.2.16 quantization level—number of bits used in the digital
(a) an illumination source, (b ) a test specimen, (c) a method to
recording of optical data by each sensor for image analysis.
apply forces to the specimen, (d) a recording media to obtain
The quantization level is one of the parameters determining the
images of the object at each load level of interest and (e)an
fidelity of the recorded optical images. It is determined by the
image analysis procedure to convert the encoded deformation
camera selected for imaging and typically is 8 bits for most
information into strain data. Since the encoded information in
cameras.
the optical images may be related either to displacement field
3.2.17 recording resolution (pixels/length), κ—number of
components or to the displacement gradient field components,
optical sensor elements (pixels) used to record an image of a
image analysis procedures will be somewhat different for each
region of length L on object.
case. However, regardless of which form is encoded in the
3.2.18 spatial resolution for encoded data—one-half of the
images, the images are the Basic Data and the displacement
period of the highest frequency component contained in the
fieldsandthestrainfieldswillbepartoftheDerivedData.This
frequency band of the encoded data.
guide is primarily concerned with general features of (a) the
3.2.19 spatial resolution for optical data—one-half of the illumination source, (d) image recording components, and (e)
period of the highest frequency component contained in the image analysis procedures. ASTM standards for specimen
FIG. 1 Typical Optical Moiré Systems for In-Plane Displacement Measurement
´1
E2208 − 02 (2018)
FIG. 2 Typical Digital Image Correlation Setups For (a) In-Plane Displacement Measurement and (b) Three-Dimensional Displacement
Measurement
design and loading, such asTest Methods E8 for tensile testing (for example, normalized cross correlation) will increase the
of metals or Test Method E399 for plane strain fracture accuracy of the extracted data.
toughness provide the basis for (b, c).
5.5 Errors Due to Rigid Body Motion—Depending upon the
measurement resolution, rigid body translation and/or rotation
5. Error Sources
may severely impact the ability to extract encoded information
5.1 At each stage of the flow of data in the measurement
from the image data. For example, if the translation is large
system, errors can be introduced. These are considered in the
compared to the measurement resolution and the optical
sequence in which they occur in this guide.
resolution of the recording media is low, then the high
5.2 Errors Introduced in Recording Process—Since the frequency encoded information may be lost.
mediausedtorecordBasicDatacanintroduceadditionalerrors
5.6 Errors in Extraction Process—The encoded information
intheDerivedData,eachsetofexperimentaldatamustinclude
extracted from the recorded images is degraded by errors
a detailed description of the recording media used. If a digital
introduced by the image processing method used. Errors
camera system is used to record images, data to be included
introduced by the extraction process can be a combination of
should be the camera manufacturer, camera output form (for
random errors as well as systematic errors (for example,
example, analog or digital), camera spatial resolution, data
peak-estimator bias or drift in Fourier correlation methods).
acquisition board type, pixel quantization level (for example, 8
Improved methods for image processing may significantly
bits), ratio of pixel dimensions, lens type and manufacturer.
reduce extraction errors and special care should be taken to
When photographic film is used to record images, the film
reduce systematic errors.
characteristics and method of processing, as well as lens type
5.6.1 For example, one can define an engineering measure
and manufacturer used in imaging should be documented.
of normal strain along the “n” direction as:
5.3 Errors Due to Extraneous Vibrations—Depending upon
final initial
L 2 L
~ !
n n
ε 5
the measurement resolution, system vibrations can increase
nn initial
L
n
errors in the encoded information which may result in addi-
final 2 2
tional extraction errors. Provided that the period of vibration is Here, ε is defined by L =[(L + ∆u ) +(∆u ) +
nn n n n t1
1/2
(∆u )] and (∆u , ∆u , ∆u ) are finite changes in displace-
sufficiently small relative to the integration time, and the
t2 n t1 t2
amplitude of the disturbance is small relative to the quantity ment along the perpendicular directions n, t and t for points
1 2
at either end of line L . Thus, errors in strainε can be due to
being measured, sensor averaging may reduce the effect of
n nn
vibrations on the displacement fields and the strain fields. (1) errors in the initial length of the line element and (2 ) errors
in the displacement components (∆u , ∆u , ∆u ). In both
n t1 t2
5.4 Errors Due to Lighting Variations—Since the Basic
cases, extraction of Derived Data from the Basic Data is the
Data is image data, lighting variations during the experiment
source of error.
may affect (1) the actual encoded information (for example,
phase shift in coherent methods) and (2) extraction of the 5.7 Errors in Processing Extracted Data—Errors are intro-
encoded information. For incoherent methods, light variations duced when the form of extracted Derived Data in 5.6 is
of several quantization levels may degrade the Derived Data processedtoobtainstraindata.Thisprocesscaninvolveawide
extracted from the images. Similar effects are possible for range of mathematical operations including (1) numerical
coherent methods if there are, for instance, slight changes in differentiation of derived displacement data and (2) smoothing
the wavelength of the illumination. In both cases, use of image of displacement or displacement gradient data. Errors intro-
processing methods that are insensitive to lighting variations ducedbythechoiceofpost-processingmethodcaninclude,but
´1
E2208 − 02 (2018)
are not limited to, (1) reduction of spatial resolution, (2) Methods E251)) whenever possible is the most reliable way to
systematic under-prediction of strain in areas of high strain obtainquantitativeestimatesfortheaccuracyof
...


Questions, Comments and Discussion
Ask us and Technical Secretary will try to provide an answer. You can facilitate discussion about the standard in here.
Loading comments...