ASTM F2511-05(2022)
(Specification)Standard Specification for Rollers, Bearing, Needle, Ferrous, Solid
Standard Specification for Rollers, Bearing, Needle, Ferrous, Solid
ABSTRACT
This specification covers the procurement requirements for solid ferrous needle rollers, including the MS19065 spherical ended solid ferrous needle rollers, intended for use in bearings and bearing applications. Rollers shall be made of chrome alloy steel E52100, and manufactured in any of the following types: Type I—spherical end; Type II—flat end; Type III—ball end; Type IV—crankpin end; Type V—conical end; and Type VI—trunnion end. Representative rollers shall be inspected by dimensional and visual examination, surface roughness examination, hot acid etch test, decarburization test, hardness test, chemical analysis, macro-examination, austenitic grain size test, and inclusion rating test.
SCOPE
1.1 This specification covers the procurement requirements for solid ferrous needle bearing rollers including the MS19065 spherical ended solid ferrous needle rollers as specified in Specification F2443.
1.2 Intended Use—The rollers covered in this specification are intended for use in bearings and bearing applications.
1.3 This specification contains many of the requirements of MIL-R-22440, which was originally developed by the Department of Defense and maintained by the Defense Supply Center in Richmond. The following government activity codes may be found in the Department of Defense, Standardization Directory SD-1.2
Preparing Activity
Custodians
Review Activities
DLA-GS4
Army-AT
Army-CR4
Navy-OS
Air Force-84
Air Force-99
DLA-GS4
1.4 The values stated in inch-pound units are to be regarded as standard. The values given in parentheses are mathematical conversions to SI units that are provided for information only and are not considered standard.
1.5 This standard does not purport to address all of the safety concerns, if any, associated with its use. It is the responsibility of the user of this standard to establish appropriate safety, health, and environmental practices and determine the applicability of regulatory limitations prior to use.
1.6 This international standard was developed in accordance with internationally recognized principles on standardization established in the Decision on Principles for the Development of International Standards, Guides and Recommendations issued by the World Trade Organization Technical Barriers to Trade (TBT) Committee.
General Information
- Status
- Published
- Publication Date
- 31-Dec-2021
- Technical Committee
- F34 - Rolling Element Bearings
- Drafting Committee
- F34.01 - Rolling Element
Relations
- Effective Date
- 01-Oct-2023
- Effective Date
- 01-Oct-2023
- Effective Date
- 01-Mar-2020
- Effective Date
- 01-Aug-2019
- Effective Date
- 01-Jul-2018
- Effective Date
- 01-May-2018
- Effective Date
- 01-Jul-2017
- Effective Date
- 01-Dec-2015
- Effective Date
- 01-Oct-2014
- Effective Date
- 01-Mar-2014
- Effective Date
- 01-Apr-2013
- Effective Date
- 01-Dec-2012
- Effective Date
- 01-Nov-2012
- Effective Date
- 01-May-2012
- Effective Date
- 01-Apr-2012
Overview
ASTM F2511-05(2022): Standard Specification for Rollers, Bearing, Needle, Ferrous, Solid provides detailed procurement and quality requirements for solid ferrous needle rollers. These components are essential in a wide range of bearing and bearing applications, including those used in industrial, military, and aerospace sectors. The standard includes specifications for various end configurations, materials, manufacturing quality, inspection, packaging, and certification.
Solid ferrous needle rollers covered by ASTM F2511 are typically produced from chrome alloy steel (E52100) and include MS19065 spherical-ended rollers. The document establishes the necessary criteria and testing methods to ensure performance, reliability, and conformity for critical rotating assemblies.
Key Topics
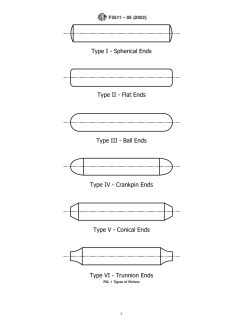
Roller Types: Six roller end designs are addressed:
- Type I: Spherical end
- Type II: Flat end
- Type III: Ball end
- Type IV: Crankpin end
- Type V: Conical end
- Type VI: Trunnion end
Material Requirements: Rollers must be made from chrome alloy steel conforming to AISI E52100 specifications, ensuring high strength and consistent metallurgical properties.
Inspection and Testing:
- Dimensional and visual examination
- Surface roughness tests
- Hardness testing (typically Rockwell C scale)
- Chemical analysis, macro-examination, and grain size evaluation
- Decarburization and inclusion rating tests
Packaging and Shipping:
- Clearly defined levels: Level A, Level B, and commercial packaging
- Cleaning, preservation, and demagnetization processes
- Marking and identification requirements on packaging
Quality Assurance:
- Sampling procedures and acceptance criteria
- Traceability by lot numbers
- Recordkeeping and certification provisions as specified by contracts or orders
Applications
ASTM F2511-05(2022) needle bearing rollers are critical components in systems where precise, durable, and high-strength rolling elements are required. Applications include:
- Aerospace bearing assemblies, where adherence to standards such as MS19065 is essential for safety and reliability
- Automotive and industrial machinery bearings, using solid needle rollers for high load and speed performance
- Defense and military equipment, aligning with requirements originally detailed in MIL-R-22440
- General industrial equipment, supporting shafts, gears, and pivot points
By following this standard, manufacturers, suppliers, and end users can ensure consistent product quality, maintain compliance with defense and commercial requirements, and facilitate interoperability in international supply chains.
Related Standards
ASTM F2511 refers to and aligns with several international and national standards, including:
- ASTM F2443: Specification for solid, spherical-ended ferrous needle rollers
- ASTM A295/A295M: High-carbon anti-friction bearing steel requirements
- ASTM A751: Test methods for chemical analysis of steel products
- ASME B46.1: Surface texture (surface roughness) definitions and measurement
- ASME Y14.5: Dimensioning and tolerancing guidelines
- ISO 5593: Rolling bearings vocabulary
- MIL-R-22440: Legacy military needle roller requirements
- SAE AMS-STD-66: Steel chemical composition and hardenability
By referencing these and related specifications, ASTM F2511 ensures broad compatibility and harmonization with established industry practices and international trade agreements.
Keywords: ASTM F2511, solid needle rollers, bearing components, chrome alloy steel E52100, MS19065, bearing roller inspection, industrial standards, bearing packaging, international standardization.
Buy Documents
ASTM F2511-05(2022) - Standard Specification for Rollers, Bearing, Needle, Ferrous, Solid
Frequently Asked Questions
ASTM F2511-05(2022) is a technical specification published by ASTM International. Its full title is "Standard Specification for Rollers, Bearing, Needle, Ferrous, Solid". This standard covers: ABSTRACT This specification covers the procurement requirements for solid ferrous needle rollers, including the MS19065 spherical ended solid ferrous needle rollers, intended for use in bearings and bearing applications. Rollers shall be made of chrome alloy steel E52100, and manufactured in any of the following types: Type I—spherical end; Type II—flat end; Type III—ball end; Type IV—crankpin end; Type V—conical end; and Type VI—trunnion end. Representative rollers shall be inspected by dimensional and visual examination, surface roughness examination, hot acid etch test, decarburization test, hardness test, chemical analysis, macro-examination, austenitic grain size test, and inclusion rating test. SCOPE 1.1 This specification covers the procurement requirements for solid ferrous needle bearing rollers including the MS19065 spherical ended solid ferrous needle rollers as specified in Specification F2443. 1.2 Intended Use—The rollers covered in this specification are intended for use in bearings and bearing applications. 1.3 This specification contains many of the requirements of MIL-R-22440, which was originally developed by the Department of Defense and maintained by the Defense Supply Center in Richmond. The following government activity codes may be found in the Department of Defense, Standardization Directory SD-1.2 Preparing Activity Custodians Review Activities DLA-GS4 Army-AT Army-CR4 Navy-OS Air Force-84 Air Force-99 DLA-GS4 1.4 The values stated in inch-pound units are to be regarded as standard. The values given in parentheses are mathematical conversions to SI units that are provided for information only and are not considered standard. 1.5 This standard does not purport to address all of the safety concerns, if any, associated with its use. It is the responsibility of the user of this standard to establish appropriate safety, health, and environmental practices and determine the applicability of regulatory limitations prior to use. 1.6 This international standard was developed in accordance with internationally recognized principles on standardization established in the Decision on Principles for the Development of International Standards, Guides and Recommendations issued by the World Trade Organization Technical Barriers to Trade (TBT) Committee.
ABSTRACT This specification covers the procurement requirements for solid ferrous needle rollers, including the MS19065 spherical ended solid ferrous needle rollers, intended for use in bearings and bearing applications. Rollers shall be made of chrome alloy steel E52100, and manufactured in any of the following types: Type I—spherical end; Type II—flat end; Type III—ball end; Type IV—crankpin end; Type V—conical end; and Type VI—trunnion end. Representative rollers shall be inspected by dimensional and visual examination, surface roughness examination, hot acid etch test, decarburization test, hardness test, chemical analysis, macro-examination, austenitic grain size test, and inclusion rating test. SCOPE 1.1 This specification covers the procurement requirements for solid ferrous needle bearing rollers including the MS19065 spherical ended solid ferrous needle rollers as specified in Specification F2443. 1.2 Intended Use—The rollers covered in this specification are intended for use in bearings and bearing applications. 1.3 This specification contains many of the requirements of MIL-R-22440, which was originally developed by the Department of Defense and maintained by the Defense Supply Center in Richmond. The following government activity codes may be found in the Department of Defense, Standardization Directory SD-1.2 Preparing Activity Custodians Review Activities DLA-GS4 Army-AT Army-CR4 Navy-OS Air Force-84 Air Force-99 DLA-GS4 1.4 The values stated in inch-pound units are to be regarded as standard. The values given in parentheses are mathematical conversions to SI units that are provided for information only and are not considered standard. 1.5 This standard does not purport to address all of the safety concerns, if any, associated with its use. It is the responsibility of the user of this standard to establish appropriate safety, health, and environmental practices and determine the applicability of regulatory limitations prior to use. 1.6 This international standard was developed in accordance with internationally recognized principles on standardization established in the Decision on Principles for the Development of International Standards, Guides and Recommendations issued by the World Trade Organization Technical Barriers to Trade (TBT) Committee.
ASTM F2511-05(2022) is classified under the following ICS (International Classification for Standards) categories: 21.100.01 - Bearings in general. The ICS classification helps identify the subject area and facilitates finding related standards.
ASTM F2511-05(2022) has the following relationships with other standards: It is inter standard links to ASTM D6251/D6251M-23, ASTM D3951-18(2023), ASTM A295/A295M-14(2020), ASTM D6251/D6251M-19, ASTM E18-18, ASTM D3951-18, ASTM E18-17, ASTM D3951-15, ASTM A295/A295M-14, ASTM A751-14, ASTM D3953-13, ASTM E18-12, ASTM D3953-12, ASTM D5168-12, ASTM D5118/D5118M-12. Understanding these relationships helps ensure you are using the most current and applicable version of the standard.
ASTM F2511-05(2022) is available in PDF format for immediate download after purchase. The document can be added to your cart and obtained through the secure checkout process. Digital delivery ensures instant access to the complete standard document.
Standards Content (Sample)
This international standard was developed in accordance with internationally recognized principles on standardization established in the Decision on Principles for the
Development of International Standards, Guides and Recommendations issued by the World Trade Organization Technical Barriers to Trade (TBT) Committee.
Designation: F2511 −05 (Reapproved 2022)
Standard Specification for
Rollers, Bearing, Needle, Ferrous, Solid
This standard is issued under the fixed designation F2511; the number immediately following the designation indicates the year of
original adoption or, in the case of revision, the year of last revision. A number in parentheses indicates the year of last reapproval. A
superscript epsilon (´) indicates an editorial change since the last revision or reapproval.
This standard has been approved for use by agencies of the U.S. Department of Defense.
1. Scope 2. Referenced Documents
1.1 This specification covers the procurement requirements 2.1 ASTM Standards:
for solid ferrous needle bearing rollers including the MS19065 A295/A295M Specification for High-Carbon Anti-Friction
spherical ended solid ferrous needle rollers as specified in Bearing Steel
Specification F2443. A751 Test Methods and Practices for Chemical Analysis of
Steel Products
1.2 Intended Use—The rollers covered in this specification
D1974/D1974M Practice for Methods of Closing, Sealing,
are intended for use in bearings and bearing applications.
and Reinforcing Fiberboard Boxes
1.3 This specification contains many of the requirements of
D3951 Practice for Commercial Packaging
MIL-R-22440, which was originally developed by the Depart-
D3953 Specification for Strapping, Flat Steel and Seals
ment of Defense and maintained by the Defense Supply Center
D5118/D5118M PracticeforFabricationofFiberboardShip-
inRichmond.Thefollowinggovernmentactivitycodesmaybe
ping Boxes
found in the Department of Defense, Standardization Directory
D5168 Practice for Fabrication and Closure of Triple-Wall
SD-1.
Corrugated Fiberboard Containers
Preparing Activity Custodians Review Activities
D6251/D6251M Specification forWood-Cleated Panelboard
DLA-GS4 Army-AT Army-CR4
Shipping Boxes
Navy-OS Air Force-84
E18 Test Methods for Rockwell Hardness of Metallic Ma-
Air Force-99
DLA-GS4
terials
1.4 The values stated in inch-pound units are to be regarded E140 Hardness Conversion Tables for Metals Relationship
Among Brinell Hardness, Vickers Hardness, Rockwell
as standard. The values given in parentheses are mathematical
conversions to SI units that are provided for information only Hardness, Superficial Hardness, Knoop Hardness, Sclero-
scope Hardness, and Leeb Hardness
and are not considered standard.
E381 Method of Macroetch Testing Steel Bars, Billets,
1.5 This standard does not purport to address all of the
Blooms, and Forgings
safety concerns, if any, associated with its use. It is the
E384 Test Method for Microindentation Hardness of Mate-
responsibility of the user of this standard to establish appro-
rials
priate safety, health, and environmental practices and deter-
F2443 Specification for Roller, Bearing, Needle, Ferrous,
mine the applicability of regulatory limitations prior to use.
Solid, Spherical End
1.6 This international standard was developed in accor-
2.2 ANSI Standards:
dance with internationally recognized principles on standard-
ASME B46.1 Surface Texture (Surface Roughness,
ization established in the Decision on Principles for the
Waviness, and Lay)
Development of International Standards, Guides and Recom-
ASME Y14.5 Dimensioning and Tolerancing
mendations issued by the World Trade Organization Technical
ANSI/ASQ Z1.4 Sampling Procedures and Tables for In-
Barriers to Trade (TBT) Committee.
spection by Attributes
ThisspecificationisunderthejurisdictionofASTMCommitteeF34onRolling
Element Bearings and is the direct responsibility of Subcommittee F34.01 on
Rolling Element.
Current edition approved Jan. 1, 2022. Published January 2022. Originally For referenced ASTM standards, visit the ASTM website, www.astm.org, or
approved in 2005. Last previous edition approved in 2013 as F2511 – 05(2013). contact ASTM Customer Service at service@astm.org. For Annual Book of ASTM
DOI: 10.1520/F2511-05R22. Standards volume information, refer to the standard’s Document Summary page on
The Military codes that are listed in SD-1 give the address and phone numbers the ASTM website.
of the DoD contacts. These are found in the DoD’s ASSIST website http:// Available fromAmerican National Standards Institute (ANSI), 25 W. 43rd St.,
assist.daps.dla.mil/online/start/. 4th Floor, New York, NY 10036.
Copyright © ASTM International, 100 Barr Harbor Drive, PO Box C700, West Conshohocken, PA 19428-2959. United States
F2511 − 05 (2022)
2.3 ISO Standards: 5. Ordering Information
ISO 5593 Rolling Bearings—Vocabulary
5.1 Procurement documents should specify the following:
ISO 10012–1 Quality Assurance Requirements for Measur-
5.1.1 Title, number, and date of this specification,
ing Equipment
5.1.2 Type of rollers required (see 4.1),
2.4 Military Standards:
5.1.3 Material required, if different than 6.1,
MIL-PRF-121 Barrier Materials, Greaseproof, Waterproof,
5.1.4 Diameter and length of rollers required (see 8.1),
Flexible, Heat-Sealable
5.1.5 Quantity required,
MIL-STD-129 Military Marking for Shipment and Storage
5.1.6 Dimensions and tolerances governing formulation of
MIL-PRF-131 Barrier Materials, Watervaporproof,
roller ends, if different than 8.1,
Greaseproof, Flexible, Heat-Sealable
5.1.7 Inspection records required (see 16.1.1),
MIL-STD-2073-1 DODStandardPracticeforMilitaryPack-
5.1.8 Required levels of packaging (see 15.1),
aging
5.1.9 Preservative required, if different than 15.2.1.2 and
MIL-PRF-22191 Barrier Materials, Transparent, Flexible,
15.2.1.3,
Heat-Sealable
5.1.10 Method of unit packaging required (see 15.2.1.3),
MIL-R-22440 Roller, Bearing, Needle, Ferrous, Solid
5.1.11 Number of rollers per unit package (see 15.2.1.3),
5.1.12 When case liner is not required (see 15.3.1.3), and
2.5 SAE Standards:
5.1.13 Special marking, if required (see 15.4).
SAEAMS-STD-66 Steel, Chemical Composition and Hard-
enability
6. Materials and Manufacture
SAE J418a Grain Size Determination of Steel
6.1 Material—Unless otherwise specified in the contract or
3. Terminology
order (see Section 5), the rollers shall be manufactured from
chrome alloy steel conforming to the chemical composition of
3.1 Definitions—For definitions of terms used in this
steel number AISI E52100 of SAE AMS-STD-66, AMS 6440
specification, refer to ISO 5593.
or AMS 6444. The steel shall be homogeneous in structure,
3.2 Definitions of Terms Specific to This Standard:
free from pipes, seams, laminations, bursts, flakes, excessive
3.2.1 heat of steel—batch of steel that was produced in a
segregation, and other detrimental defects (see 11.2.1). The
single furnace run. Steel from the same “heat” may be found in
steelshallhaveanaustenitegrainsizeof7orfiner(see11.3.3).
several different billets, bars, or coils of wire.
The rollers shall be free from surface decarburization (see
3.2.2 lot—lot shall consist of the finished rollers of the same
11.2.2).
type, diameter, length, and material, manufactured under the
6.1.1 Inclusion Rating—The chrome alloy steel shall not
same conditions, and submitted for acceptance at the same
exceed the inclusion rating specified for billets for wire and
time.This inspection lot shall be identified by a unique number
rods used in the manufacture of balls and rollers, as specified
(manufacturer’s lot control number) that will provide the
in Specification A295/A295M.
traceability of the rollers to be finished bearing assemblies.
7. Other Requirements
3.2.3 surface roughness (Ra)—the Ra, or roughness
average, surface roughness is the arithmetic average of the
7.1 Hardness—The rollers shall have a uniform hardness of
absolute value of the departure of the filtered roughness profile
60 to 64 Rockwell C or equivalent (see 11.2.3).
measured from the mean line. Ra values are normally specified
8. Dimensions and Permissible Variations
in microinches (micrometres). 1 µin. = 0.0254 µm (1 µm =
39.37 µin.). SeeASME B46.1 for more information on surface
8.1 Construction and Dimensions—The rollers shall be of
roughness.
the type, diameter, and length specified in the contract or order
(see Section 5) and shall be of solid construction. An illustra-
4. Classification
tion of the types of rollers covered herein is shown in Fig. 1.
Unless otherwise specified in the contract or order (see Section
4.1 The rollers shall be of the following types, as specified
in the contract or order (see Section 5 and Fig. 1): 5), dimensions and tolerances governing the formation of the
ends of the roller shall be in accordance with commercial
4.1.1 Type I—Spherical end.
4.1.2 Type II—Flat end. practice. Dimensions and tolerances shall be interpreted in
accordance was ASME Y14.5.
4.1.3 Type III—Ball end.
4.1.4 Type IV—Crankpin end. 8.1.1 Diameter—The diameter of the roller shall be within
+0.0000 in. (+0.000 mm) to –0.0002 in. (–0.005 mm) of the
4.1.5 Type V—Conical end.
4.1.6 Type VI—Trunnion end. value specified in the contract or order (see Section 5).
8.1.2 Length:
8.1.2.1 Types I, III, V, and VI—The length of the roller shall
be within +0.000 in. (+0.00 mm) to –0.020 in. (–0.51 mm) of
Available from International Organization for Standardization (ISO), 1 rue de
Varembé, Case postale 56, CH-1211, Geneva 20, Switzerland.
the value specified in the contract or order (see Section 5).
Available from DLA Document Services, Building 4/D, 700 Robbins Ave.,
8.1.2.2 Type II—The length of the roller shall be within
Philadelphia, PA 19111-5094, http://quicksearch.dla.mil.
+0.000 in. (+0.00 mm) to –0.006 in. (–0.15 mm) of the value
Available from Society of Automotive Engineers (SAE), 400 Commonwealth
Dr., Warrendale, PA 15096-0001. specified in the contract or order (see Section 5).
F2511 − 05 (2022)
FIG. 1 Types of Rollers
F2511 − 05 (2022)
8.1.2.3 Type IV—The length of the roller shall be within The test procedures shall be in accordance with Test Methods
+0.000 in. (+0.00 mm) to –0.010 in. (–0.25 mm) of the value E18 Rockwell for superficial hardness tests and Test Method
specified in the contract or order (see Section 5). E384 for microhardness testing. Tables E140 shall be used for
hardness conversion to the C Rockwell scale. The rollers shall
9. Workmanship, Finish, and Appearance
be subjected to the test on flats of sufficient width, and material
9.1 Visual Appearance—Thecylindricalsurfaceoftheroller
of sufficient thickness, to give a true reading. For rollers less
shall be free from scratches, pits, rust, indications of soft spots,
than ⁄16 in. (1.6 mm) in diameter, an appropriate superficial
and other surface imperfections.
hardness or microhardness method shall be used. If any unit of
the sample does not comply with the requirements of 7.1, the
9.2 Surface Roughness—The surface roughness of the roller
lot shall be rejected. The manufacturer may have a standard
diameter shall not exceed 8 µin. Ra (0.20 µm Ra). Surface
repair procedure to retemper the rollers. The rollers would
roughness shall be interpreted in accordance with ASME
require reinspection after a retempering process.
B46.1.
11.3 Inspection of Material—The material used in the
10. Sampling
manufacture of the rollers furnished under this specification
10.1 For Examination—Asampleofrollersshallbeselected
shall have been inspected in accordance with and passed the
from each lot by the inspector in accordance with the proce-
following examination and tests.
dures of ANSI/ASQ Z1.4 with an AQL of 1.0%.
11.3.1 Chemical Analysis—A chemical analysis shall be
made on each heat of steel. The samples for analysis shall be
10.2 For Tests—A sample of rollers shall be selected from
selected from the billets, bars, o
...


Questions, Comments and Discussion
Ask us and Technical Secretary will try to provide an answer. You can facilitate discussion about the standard in here.
Loading comments...