ASTM B106-08(2019)
(Test Method)Standard Test Methods for Flexivity of Thermostat Metals
Standard Test Methods for Flexivity of Thermostat Metals
SIGNIFICANCE AND USE
4.1 These test methods are used for determining response to temperature change or flexivity of thermostat metal. The flexivity is calculated from the temperatures, dimensions of specimen, and the relative movement of the specimen. The simple beam method (Method A) is the method for certification. Any use of the spiral coil method (Method B) is to be mutually agreed upon between the user and supplier.
SCOPE
1.1 These test methods cover the determination of flexivity (a measure of thermal deflection rate or deflection temperature characteristics) of thermostat metals.
1.1.1 Test Method A—Tested in the form of flat strip 0.015 in. (0.38 mm) or over in thickness.
1.1.2 Test Method B—Tested in the form of spiral coils less than 0.012 in. in thickness.
1.2 The values stated in inch-pound units are to be regarded as standard. The values given in parentheses are mathematical conversions to SI units that are provided for information only and are not considered standard.
1.3 This standard does not purport to address all of the safety concerns, if any, associated with its use. It is the responsibility of the user of this standard to become familiar with all hazards including those identified in the appropriate Material Safety Data Sheet (MSDS) for this product/material as provided by the manufacturer, to establish appropriate safety, health, and environmental practices, and determine the applicability of regulatory limitations prior to use.
1.4 This international standard was developed in accordance with internationally recognized principles on standardization established in the Decision on Principles for the Development of International Standards, Guides and Recommendations issued by the World Trade Organization Technical Barriers to Trade (TBT) Committee.
General Information
- Status
- Published
- Publication Date
- 31-Oct-2019
- Technical Committee
- B02 - Nonferrous Metals and Alloys
- Drafting Committee
- B02.10 - Thermostat Metals and Electrical Resistance Heating Materials
Relations
- Effective Date
- 01-Nov-2019
- Effective Date
- 01-Nov-2008
- Effective Date
- 01-May-2004
- Effective Date
- 10-Oct-1998
- Effective Date
- 01-Nov-2019
Overview
ASTM B106-08(2019): Standard Test Methods for Flexivity of Thermostat Metals establishes methods for determining the flexivity, or temperature-induced deflection, of thermostat metal composites. Developed by ASTM International, this standard is particularly relevant to materials with two or more metallic layers possessing different coefficients of thermal expansion. The test methods outlined enable manufacturers, quality assurance professionals, and suppliers to measure the thermal deflection rate or temperature response characteristics of thermostat metals used in devices such as thermostats, temperature switches, and precision control elements.
Flexivity is calculated using temperature, specimen dimensions, and measured movement of the test piece. The standard specifies two main approaches:
- Test Method A (Simple Beam): For flat strips 0.015 in. (0.38 mm) or thicker
- Test Method B (Spiral Coil): For coils under 0.012 in. (0.30 mm) in thickness
All procedures help ensure reliable and consistent assessment of thermostat metal performance in industrial and commercial applications.
Key Topics
- Flexivity Definition: Measurement of the change in curvature per unit temperature change per unit thickness of a metal strip.
- Test Specimen Types: Covers both flat strips and spiral coils, each with distinct preparation and measurement procedures.
- Apparatus Requirements: Details on precise instrumentation, specimen holders, and temperature control systems to achieve accurate readings.
- Specimen Preparation: Guidance on sample sizing, finishing, reference marking, and stabilizing heat treatment to prepare reliable test specimens.
- Measurement Accuracy: Recommendations for temperature control, measurement precision, and error minimization are central to repeatable results.
- Data Reporting: Defines the essential data for reporting, including specimen type, dimensions, temperature range, heat treatment, and measured flexivity.
- Safety Responsibilities: Reminds users to address all relevant safety and environmental protocols, referencing the appropriate Material Safety Data Sheets (MSDS).
- International Standardization: Developed in accordance with World Trade Organization (WTO) principles to ensure global acceptance.
Applications
ASTM B106-08(2019) is widely used in sectors that require precise control over material response to temperature variations, such as:
- Thermostat Manufacturing: Ensuring reliable operation of mechanical temperature controls in HVAC systems, automotive components, and appliances.
- Quality Assurance: Validating batch consistency and performance criteria for thermostat metal batches before shipment or installation.
- Research and Development: Developing new thermostat metals for improved performance in specialized environments.
- Regulatory Compliance: Demonstrating adherence to international material conformity requirements for export and certification processes.
By using standardized test methods to assess flexivity, industries can optimize product performance, prevent failures, and deliver safer, more effective thermal control devices to the market.
Related Standards
- ASTM B389: Standard Test Method for Thermal Deflection Rate of Spiral and Helical Coils of Thermostat Metal, referenced for procedures in Test Method B of B106.
- General ASTM Metals Standards: Broader set of standards available via ASTM International for assessment and specification of nonferrous metals and alloys.
- WTO TBT Guidelines: Underpinning principles for the international harmonization of testing and certification standards.
- Material Safety Data Sheets (MSDS): Required for safe handling and testing of thermostat metals.
Keywords: ASTM B106, flexivity, thermostat metals, thermal deflection, temperature response, test methods, ASTM standards, quality control, material testing, industrial metals, HVAC components.
Buy Documents
ASTM B106-08(2019) - Standard Test Methods for Flexivity of Thermostat Metals
Get Certified
Connect with accredited certification bodies for this standard

Element Materials Technology
Materials testing and product certification.

Inštitut za kovinske materiale in tehnologije
Institute of Metals and Technology. Materials testing, metallurgical analysis, NDT.
Sponsored listings
Frequently Asked Questions
ASTM B106-08(2019) is a standard published by ASTM International. Its full title is "Standard Test Methods for Flexivity of Thermostat Metals". This standard covers: SIGNIFICANCE AND USE 4.1 These test methods are used for determining response to temperature change or flexivity of thermostat metal. The flexivity is calculated from the temperatures, dimensions of specimen, and the relative movement of the specimen. The simple beam method (Method A) is the method for certification. Any use of the spiral coil method (Method B) is to be mutually agreed upon between the user and supplier. SCOPE 1.1 These test methods cover the determination of flexivity (a measure of thermal deflection rate or deflection temperature characteristics) of thermostat metals. 1.1.1 Test Method A—Tested in the form of flat strip 0.015 in. (0.38 mm) or over in thickness. 1.1.2 Test Method B—Tested in the form of spiral coils less than 0.012 in. in thickness. 1.2 The values stated in inch-pound units are to be regarded as standard. The values given in parentheses are mathematical conversions to SI units that are provided for information only and are not considered standard. 1.3 This standard does not purport to address all of the safety concerns, if any, associated with its use. It is the responsibility of the user of this standard to become familiar with all hazards including those identified in the appropriate Material Safety Data Sheet (MSDS) for this product/material as provided by the manufacturer, to establish appropriate safety, health, and environmental practices, and determine the applicability of regulatory limitations prior to use. 1.4 This international standard was developed in accordance with internationally recognized principles on standardization established in the Decision on Principles for the Development of International Standards, Guides and Recommendations issued by the World Trade Organization Technical Barriers to Trade (TBT) Committee.
SIGNIFICANCE AND USE 4.1 These test methods are used for determining response to temperature change or flexivity of thermostat metal. The flexivity is calculated from the temperatures, dimensions of specimen, and the relative movement of the specimen. The simple beam method (Method A) is the method for certification. Any use of the spiral coil method (Method B) is to be mutually agreed upon between the user and supplier. SCOPE 1.1 These test methods cover the determination of flexivity (a measure of thermal deflection rate or deflection temperature characteristics) of thermostat metals. 1.1.1 Test Method A—Tested in the form of flat strip 0.015 in. (0.38 mm) or over in thickness. 1.1.2 Test Method B—Tested in the form of spiral coils less than 0.012 in. in thickness. 1.2 The values stated in inch-pound units are to be regarded as standard. The values given in parentheses are mathematical conversions to SI units that are provided for information only and are not considered standard. 1.3 This standard does not purport to address all of the safety concerns, if any, associated with its use. It is the responsibility of the user of this standard to become familiar with all hazards including those identified in the appropriate Material Safety Data Sheet (MSDS) for this product/material as provided by the manufacturer, to establish appropriate safety, health, and environmental practices, and determine the applicability of regulatory limitations prior to use. 1.4 This international standard was developed in accordance with internationally recognized principles on standardization established in the Decision on Principles for the Development of International Standards, Guides and Recommendations issued by the World Trade Organization Technical Barriers to Trade (TBT) Committee.
ASTM B106-08(2019) is classified under the following ICS (International Classification for Standards) categories: 77.040.10 - Mechanical testing of metals. The ICS classification helps identify the subject area and facilitates finding related standards.
ASTM B106-08(2019) has the following relationships with other standards: It is inter standard links to ASTM B106-08(2013), ASTM B389-81(2008), ASTM B389-81(2004), ASTM B389-81(1998), ASTM B388-06(2018). Understanding these relationships helps ensure you are using the most current and applicable version of the standard.
ASTM B106-08(2019) is available in PDF format for immediate download after purchase. The document can be added to your cart and obtained through the secure checkout process. Digital delivery ensures instant access to the complete standard document.
Standards Content (Sample)
This international standard was developed in accordance with internationally recognized principles on standardization established in the Decision on Principles for the
Development of International Standards, Guides and Recommendations issued by the World Trade Organization Technical Barriers to Trade (TBT) Committee.
Designation: B106 − 08 (Reapproved 2019)
Standard Test Methods for
Flexivity of Thermostat Metals
This standard is issued under the fixed designation B106; the number immediately following the designation indicates the year of
original adoption or, in the case of revision, the year of last revision.Anumber in parentheses indicates the year of last reapproval.A
superscript epsilon (´) indicates an editorial change since the last revision or reapproval.
1. Scope 3.1.1 thermostat metal, n—a composite material in the form
of sheet or strip comprising two or more metallic layers of
1.1 These test methods cover the determination of flexivity
differingcoefficientsofthermalexpansion,suchthattheradius
(a measure of thermal deflection rate or deflection temperature
of curvature of the composite changes with temperature
characteristics) of thermostat metals.
change.
1.1.1 Test Method A—Tested in the form of flat strip
3.1.2 flexivity (F), n—the change of curvature of the longi-
0.015 in. (0.38 mm) or over in thickness.
tudinalcenterlineofthespecimenperunittemperaturechange
1.1.2 Test Method B—Tested in the form of spiral coils less
for unit thickness, given by the following equation:
than 0.012 in. in thickness.
~1/R ! 2 ~1/R !
1.2 The values stated in inch-pound units are to be regarded
2 1
F 5 t (1)
T 2 T
as standard. The values given in parentheses are mathematical
2 1
conversions to SI units that are provided for information only
To determine the flexivity between any two temperatures,
and are not considered standard.
T and T , it is necessary to measure the curvature 1/R and
1 2 1
1.3 This standard does not purport to address all of the
1/R at temperature T and T , respectively. To find the cur-
2 1 2
safety concerns, if any, associated with its use. It is the
vature at either temperature (Fig. 1 and Fig. 2), measure the
responsibility of the user of this standard to become familiar
distance D. The curvature is given by the following equa-
with all hazards including those identified in the appropriate
tion:
Material Safety Data Sheet (MSDS) for this product/material
2 2
1/R 5 8D/~Q 14Dt14D ! (2)
as provided by the manufacturer, to establish appropriate
where:
safety, health, and environmental practices, and determine the
applicability of regulatory limitations prior to use.
R = radius of curvature of the longitudinal center line of the
1.4 This international standard was developed in accor-
specimen, in. (mm),
dance with internationally recognized principles on standard- t = thickness of test specimen, in. (mm),
ization established in the Decision on Principles for the Q = distance between support points, in. (mm), and
D = for point support (simply supported beam),=perpen-
Development of International Standards, Guides and Recom-
dicular distance between the longitudinal center lines of
mendations issued by the World Trade Organization Technical
the lower surface of the specimen midway between the
Barriers to Trade (TBT) Committee.
point supports and the straight line joining the support
2. Referenced Documents
points, in. (mm).
2.1 ASTM Standards:
4. Significance and Use
B389TestMethodforThermalDeflectionRateofSpiraland
Helical Coils of Thermostat Metal
4.1 Thesetestmethodsareusedfordeterminingresponseto
temperature change or flexivity of thermostat metal. The
3. Terminology
flexivity is calculated from the temperatures, dimensions of
3.1 Definitions:
specimen, and the relative movement of the specimen. The
simple beam method (Method A) is the method for certifica-
These test methods are under the jurisdiction of ASTM Committee B02 on tion. Any use of the spiral coil method (Method B) is to be
Nonferrous Metals and Alloys and are the direct responsibility of Subcommittee
mutually agreed upon between the user and supplier.
B02.10 on Thermostat Metals and Electrical Resistance Heating Materials.
Current edition approved Nov. 1, 2019. Published November 2019. Originally
TEST METHOD A—FLAT STRIPS
approved in 1984. Last previous edition approved in 2013 as B106–08 (2013).
DOI: 10.1520/B0106-08R19.
For referenced ASTM standards, visit the ASTM website, www.astm.org, or 5. Apparatus
contact ASTM Customer Service at service@astm.org. For Annual Book of ASTM
5.1 Specimen Carrier, provided with two conical supports
Standards volume information, refer to the standard’s Document Summary page on
the ASTM website. for locating the specimen. The test length (that is, the distance
Copyright © ASTM International, 100 Barr Harbor Drive, PO Box C700, West Conshohocken, PA 19428-2959. United States
B106 − 08 (2019)
5.4 Temperature Measuring Apparatus, of such accuracy
that the individual temperatures shall be known to within
60.5°F (0.3°C).
5.5 Deflection Index—Means shall be provided for measur-
ing the deflection of the specimen at a point midway between
thepointsofsupportandalongtheverticallineintersectingthe
line joining the points of support. Such means may comprise a
transmissionroddisposedwithitsaxisverticalandterminating
in a point or knife-edge, which shall engage the specimen
midway between the points of contact with the supports.
5.5.1 The transmission rod shall be mounted in such a
manner that it is free to move in the direction of its axis. The
rodshallbearatitsfreeendanindexsuitableformicroscopical
observation,orelseanelectricalcontactwithwhichamicrom-
eterwillpermitthechangesofthedeflectionofspecimentobe
accurately observed. Alternatively, the deflection of the mid-
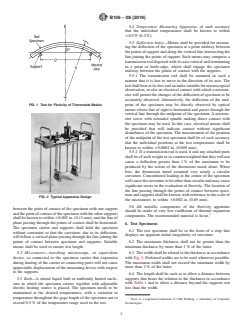
FIG. 1 Test for Flexivity of Thermostat Metals point of the specimen may be directly observed by optical
means whose line of sight is horizontal and passes through the
vertical line through the midpoint of the specimen.Amicrom-
eter screw with extended spindle making direct contact with
the specimen may be used. In this case, electrical means shall
be provided that will indicate contact without significant
disturbance of the specimen. The measurement of the position
of the midpoint of the test specimen shall be of such accuracy
that the individual positions at the test temperatures shall be
known to within 60.0002 in. (0.005 mm).
5.5.2 If a transmission rod is used, it and any attached parts
shallbeofsuchweightorsocounterweightedthattheywillnot
cause a deflection greater than 1% of the maximum to be
produced by the action of the thermostat metal alone. When
free, the thermostat metal assumed very nearly a circular
curvature. Concentrated loading at the center of the specimen
willcausethecurvaturetobeotherthancircularandmaycause
significant errors in the evaluation of flexivity. The location of
the line passing through the points of contact between speci-
menandsupportsshallbeknown,withreferencetothescaleof
FIG. 2 Typical Apparatus Design
the micrometer, to within 60.002 in. (0.05 mm).
5.6 All metallic components of the flexivity apparatus
between the point of contact of the specimen with one support
should be made of very low coefficient of thermal expansion
andthepointofcontactofthespecimenwiththeothersupport)
components. The recommended material is Invar.
shallbeknowntowithin 60.005in.(0.13mm),andthelineof
plane passing through the points of contact shall be horizontal.
6. Test Specimens
The specimen carrier and supports shall hold the specimen
6.1 The test specimen shall be in the form of a strip that
without constraint so that the curvature, due to its deflection,
displays no apparent initial irregularity of curvature.
willfollowaverticalplanepassingthroughthelinejoiningthe
6.2 The maximum thickness shall not be greater than the
points of contact between specimen and supports. Suitable
minimum thickness by more than 1% of the latter.
means shall be used to ensure test length.
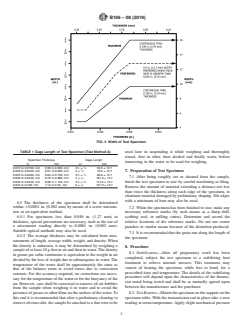
6.3 Thewidthshallberelatedtothethicknessinaccordance
5.2 Micrometer—traveling microscope, or equivalent
withFig.3.Preferredwidthsaretobeusedwheneverpossible.
device, so connected to the specimen carrier that expansion
The maximum width shall not exceed the minimum width by
during heating of the carrier or connecting parts will not cause
more than 2% of the latter.
appreciable displacement of the measuring device with respect
to the supports.
6.4 The length shall be such as to allow a distance between
supports that bears the relation to the thickness in accordance
5.3 Bath—A stirred liquid bath or uniformly heated enclo-
with Table 1 and to allow a distance beyond the supports not
sure in which the specimen carrier, together with adjustable
less than the width.
electric heating source is placed. The specimen needs to be
maintained at the desired temperatures, with a variation in
temperature throughout the gage length of the specimen not to
Invar is a registered trademark of CRS Holding, a subsidiary of Carpenter
exceed 0.5% of the temperature range used in the test. Technologies.
B106 − 08 (2019)
FIG. 3 Width of Test Specimen
TABLE 1 Gage Length of Test Specimen (Test Method A)
used later in suspending it while weighing and thoroughly
rinsed, first in ether, then alcohol and finally water, before
Specimen Thickness Gage Length
immersing in the water to be used for weighing.
in. mm in. mm
1 1
0.015 to 0.0199, incl 0.38 to 0.509, incl 2 ⁄2 ± ⁄2 63.5 ± 12.7
7. Preparation of Test Specimen
0.020 to 0.0249, incl 0.51 to 0.639, incl 3 ± ⁄2 76.2 ± 12.7
1 1
0.025 to 0.0299, incl 0.64 to 0.759, incl 3 ⁄2 ± ⁄2 88.9 ± 12.7
7.1 After being roughly cut or sheared from the sample,
0.030 to 0.0349, incl 0.76 to 0.889, incl 4 ± ⁄2 101.6 ± 12.7
1 1
0.035 to 0.0449, incl 0.89 to 1.139, incl 4 ⁄2 ± ⁄2 114.3 ± 12.7
finish the test specimen to size by careful machining or filing.
0.045 to 0.100, incl 1.14 to 2.54, incl 5 ± ⁄2 127.0 ± 12.7
Remove the amount of material extending a distance not less
than twice the thickness along each edge of the specimen, to
eliminate material damaged by preliminary shaping. Slit edges
with a minimum of burr may also be used.
6.5 The thickness of the specimen shall be determined
within 60.0001 in. (0.002 mm) by means of a screw microm- 7.2 When the specimen has been finished to size, make any
eter or an equivalent method.
necessary reference marks (by such means as a sharp drill,
6.5.1 For specimens less than 0.050 in. (1.27 mm) in scribing tool, or milling cutter). Determine and record the
thickness, special precautions are necessary, such as the use of
relative locations of the reference marks. Do not use center
a micrometer reading directly to 0.0001 in. (0.002 mm).
punches or similar means because of the distortion produced.
Suitable optical methods may also be used.
7.3 It is recommended that the grain run along the length of
6.5.2 The average thickness may be calculated from mea-
the specimen.
surements of length, average width, weight, and density.When
the density is unknown, it may be determined by weighing a
8. Procedure
sampleofatleast10gfirstinairandtheninwater.Thedensity
8.1 Stabilization—After all preparatory work has been
in grams per cubic centimetre is equivalent to the weight in air
completed, subject the test specimen to a stabilizing heat
dividedbythelossofweightduetosubmergenceinwater.The
treatment to relieve internal stresses. This treatment may
temperature of the water shall be approximately the same as
consist of heating the specimen, while free to bend, for a
that of the balance room to avoid errors due to convection
prescribed time and temperature. T
...


Questions, Comments and Discussion
Ask us and Technical Secretary will try to provide an answer. You can facilitate discussion about the standard in here.
Loading comments...