Standard Specification for Aluminum and Aluminum-Alloy Seamless Condenser and Heat-Exchanger Tubes with Integral Fins

SCOPE
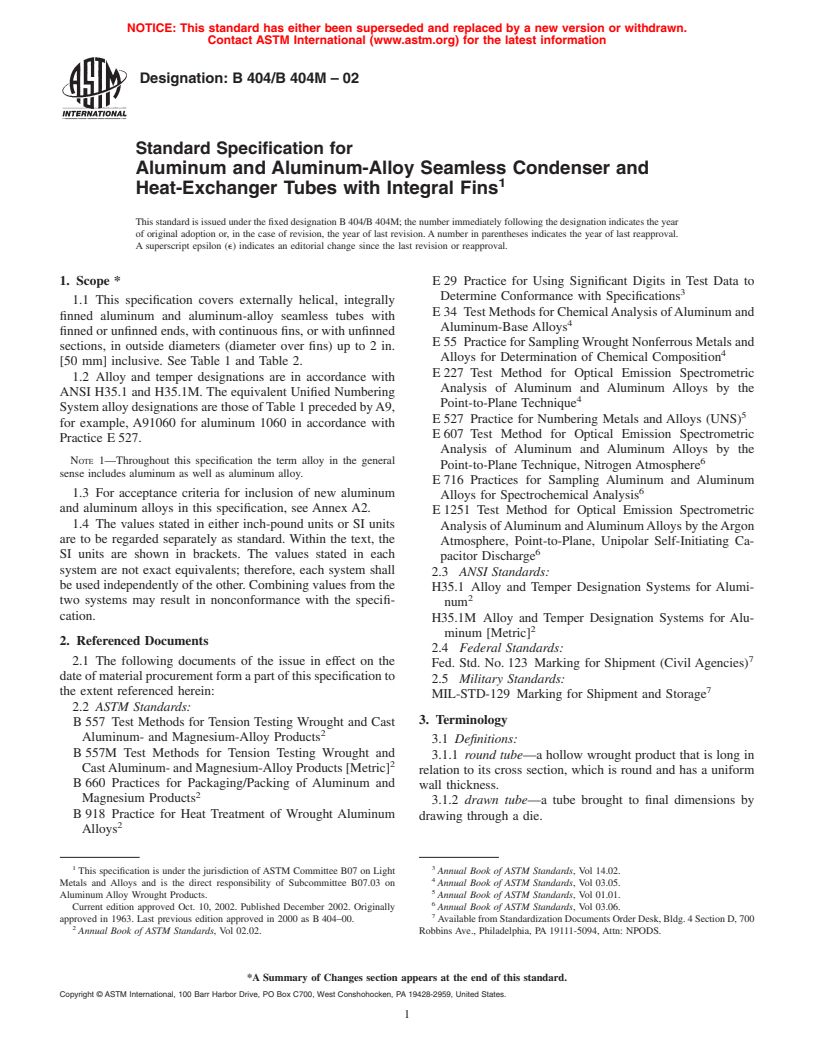
1.1 This specification covers externally helical, integrally finned aluminum-alloy seamless tubes with finned or unfinned ends, with continuous fins, or with unfinned sections, in outside diameters (diameter over fins) up to 2 in. inclusive.  
1.2 Alloy and temper designations are in accordance with ANSI H35.1. The equivalent Unified Numbering System alloy designations are those of Table 1 preceded by A9, for example, A91060 for aluminum 1060 in accordance with Practice E527.
1.3 For acceptance criteria for inclusion of new aluminum and aluminum alloys in this specification, see Annex A2.
1.4 A complete metric companion to Specification B404 has been developed-B404M; therefore, no metric equivalents are presented in this specification.

General Information

Status
Historical
Publication Date
09-May-2000
Current Stage
Ref Project

Relations

Buy Standard

Technical specification
ASTM B404/B404M-00 - Standard Specification for Aluminum and Aluminum-Alloy Seamless Condenser and Heat-Exchanger Tubes with Integral Fins
English language
6 pages
sale 15% off
Preview
sale 15% off
Preview

Standards Content (Sample)


NOTICE: This standard has either been superseded and replaced by a new version or discontinued.
Contact ASTM International (www.astm.org) for the latest information.
Designation: B 404/B 404M – 00
Standard Specification for
Aluminum and Aluminum-Alloy Seamless Condenser and
Heat-Exchanger Tubes with Integral Fins
This standard is issued under the fixed designation B 404/B 404M; the number immediately following the designation indicates the year
of original adoption or, in the case of revision, the year of last revision. A number in parentheses indicates the year of last reapproval.
A superscript epsilon (e) indicates an editorial change since the last revision or reapproval.
1. Scope * Determine Conformance with Specifications
E 34 Test Methods for Chemical Analysis of Aluminum and
1.1 This specification covers externally helical, integrally
Aluminum-Base Alloys
finned aluminum and aluminum-alloy seamless tubes with
E 55 Practice for Sampling Wrought Nonferrous Metals and
finned or unfinned ends, with continuous fins, or with unfinned
Alloys for Determination of Chemical Composition
sections, in outside diameters (diameter over fins) up to 2 in.
E 227 Test Method for Optical Emission Spectrometric
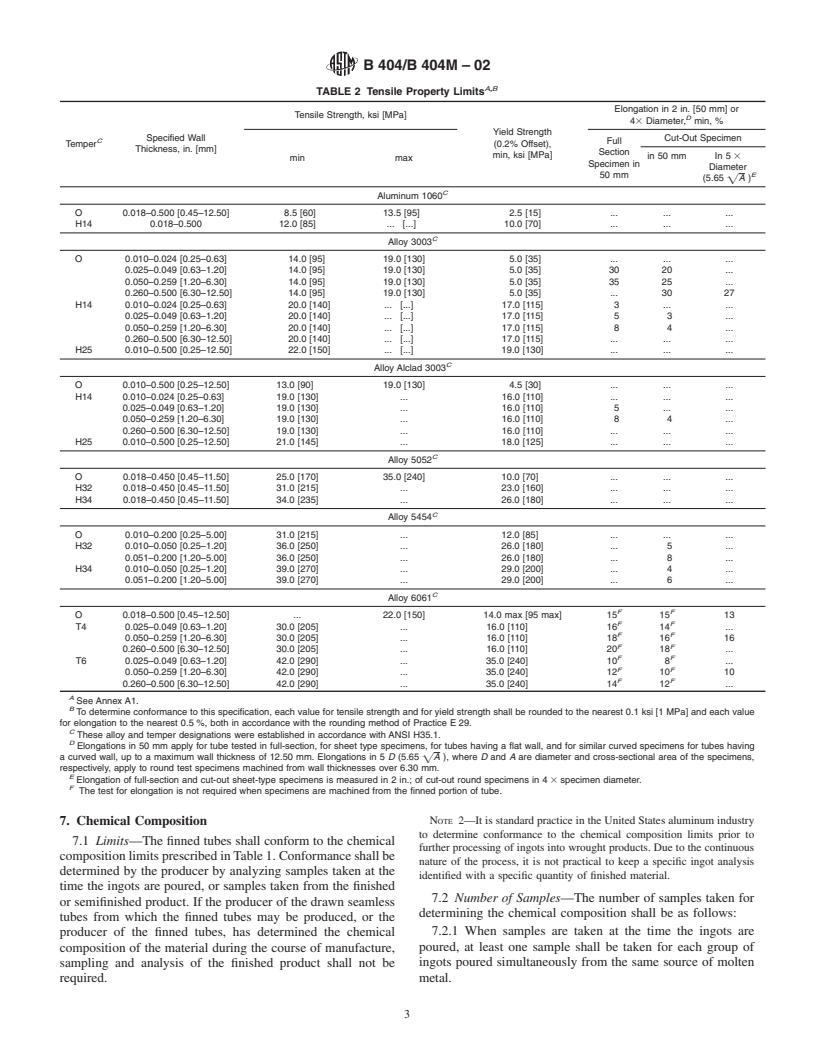
[50 mm] inclusive. See Table 1 and Table 2.
Analysis of Aluminum and Aluminum Alloys by the
1.2 Alloy and temper designations are in accordance with
Point-to-Plane Technique
ANSI H35.1 and H35.1M. The equivalent Unified Numbering
E 527 Practice for Numbering Metals and Alloys (UNS)
System alloy designations are those of Table 1 preceded by A9,
E 607 Test Method for Optical Emission Spectrometric
for example, A91060 for aluminum 1060 in accordance with
Analysis of Aluminum and Aluminum Alloys by the
Practice E 527.
Point-to-Plane Technique, Nitrogen Atmosphere
NOTE 1—Throughout this specification the term alloy in the general
E 716 Practices for Sampling Aluminum and Aluminum
sense includes aluminum as well as aluminum alloy.
Alloys for Spectrochemical Analysis
1.3 For acceptance criteria for inclusion of new aluminum
E 1251 Test Method for Optical Emission Spectrometric
and aluminum alloys in this specification, see Annex A2.
Analysis of Aluminum and Aluminum Alloys by the Argon
1.4 The values stated in either inch-pound units or SI units
Atmosphere, Point-to-Plane, Unipolar Self-Initiating Ca-
are to be regarded separately as standard. Within the text, the
pacitor Discharge
SI units are shown in brackets. The values stated in each
2.3 ANSI Standards:
system are not exact equivalents; therefore, each system shall
H35.1 Alloy and Temper Designation Systems for Alumi-
be used independently of the other. Combining values from the
num
two systems may result in nonconformance with the specifi-
H35.1M Alloy and Temper Designation Systems for Alu-
cation.
minum [Metric]
2.4 Federal Standards:
2. Referenced Documents
Fed. Std. No. 123 Marking for Shipment (Civil Agencies)
2.1 The following documents of the issue in effect on the
2.5 Military Standards:
date of material procurement form a part of this specification to
MIL-STD-129 Marking for Shipment and Storage
the extent referenced herein:
3. Terminology
2.2 ASTM Standards:
B 557 Test Methods for Tension Testing Wrought and Cast
3.1 Definitions:
Aluminum- and Magnesium-Alloy Products
3.1.1 round tube—a hollow wrought product that is long in
B 557M Test Methods for Tension Testing Wrought and
relation to its cross section, which is round and has a uniform
Cast Aluminum- and Magnesium-Alloy Products [Metric]
wall thickness.
B 597 Practice for Heat Treatment of Aluminum Alloys
3.1.2 drawn tube—a tube brought to final dimensions by
B 660 Practices for Packaging/Packing of Aluminum and
drawing through a die.
Magnesium Products
3.1.3 seamless tube—a tube which does not contain any line
E 29 Practice for Using Significant Digits in Test Data to
junctures resulting from the method of manufacture.
3.1.4 alclad tube—a composite tube product composed of
1 3
This specification is under the jurisdiction of ASTM Committee B07 on Light Annual Book of ASTM Standards, Vol 14.02.
Metals and Alloys and is the direct responsibility of Subcommittee B07.03 on Annual Book of ASTM Standards, Vol 03.05.
Aluminum Alloy Wrought Products. Annual Book of ASTM Standards, Vol 01.01.
Current edition approved May 10, 2000. Published August 2000. Originally Annual Book of ASTM Standards, Vol 03.06.
e1 7
published as B 404–63T. Last previous edition B 404–95 . Available from Standardization Documents Order Desk, Bldg. 4 Section D, 700
Annual Book of ASTM Standards, Vol 02.02. Robbins Ave., Philadelphia, PA 19111-5094, Attn: NPODS.
*A Summary of Changes section appears at the end of this standard.
Copyright © ASTM, 100 Barr Harbor Drive, West Conshohocken, PA 19428-2959, United States.
NOTICE: This standard has either been superseded and replaced by a new version or discontinued.
Contact ASTM International (www.astm.org) for the latest information.
B 404/B 404M
A,B,C
TABLE 1 Chemical Composition Limits
E
Other Elements
D
Alloy Silicon Iron Copper Manganese Magnesium Chromium Zinc Titanium Aluminum
F
Each Total
G H
1060 0.25 0.35 0.05 0.03 0.03 . 0.05 0.03 0.03 . 99.60 min
3003 0.6 0.7 0.05–0.20 1.0–1.5 . . 0.10 . 0.05 0.15 remainder
Alclad 3003 3003 alloy clad with 7072 alloy
5052 0.25 0.40 0.10 0.10 2.2–2.8 0.15–0.35 0.10 . 0.05 0.15 remainder
5454 0.25 0.40 0.10 0.50–1.0 2.4–3.0 0.05–0.20 0.25 0.20 0.05 0.15 remainder
6061 0.40–0.8 0.7 0.15–0.40 0.15 0.8–1.2 0.04–0.35 0.25 0.15 0.05 0.15 remainder
7072 Cladding 0.7 Si + Fe 0.10 0.10 0.10 . 0.8–1.3 . 0.05 0.15 remainder
A
Limits are in percent maximum unless shown as a range or shown otherwise.
B
Analysis shall be made for the elements for which limits are shown in this table.
C
For purposes of determining conformance to these limits, an observed value or a calculated value obtained from analysis shall be rounded to the nearest unit in the
last right-hand place of figures used in expressing the specified limit, in accordance with the rounding method of Practice E 29.
D
These designations were established in accordance with ANSI H35.1.
E
Others includes listed elements for which no specific limit is shown as well as unlisted metallic elements. The producer may analyze samples for trace elements not
specified in the specification. However, such analysis is not required and may not cover all metallic Others elements. Should any analysis by the producer or the purchaser
establish that an Others element exceeds the limit of Each or that the aggregate of several Others elements exceeds the limit of Total, the material shall be considered
non-conforming.
F
Other Elements—Total shall be the sum of unspecified metallic elements 0.010 % or more, rounded to the second decimal before determining the sum.
G
Vanadium 0.05 %, maximum.
H
The aluminum content shall be calculated by subtracting from 100.00 % the sum of all metallic elements present in amounts of 0.010 % or more each, roundedtothe
second decimal before determining the sum.
an aluminum-alloy core having on either the inside or outside 5. Manufacture
surface a metallurgically bonded aluminum or aluminum-alloy
5.1 The fins shall be produced by the cold forming of
coating that is anodic to the core, thus electrolytically protect-
aluminum alloy drawn seamless tubes so that the fins are
ing the core against corrosion.
integral with the tube.
3.1.5 finned tube—a tube which has integral fins or projec-
5.2 The fin geometry and number of fins per unit length
tions protruding from its outside surface.
shall be as agreed upon between the manufacturer and the
3.1.6 producer—the primary manufacturer of the material.
purchaser (Fig. 1). The finned tubes shall normally be fur-
3.1.7 supplier—includes only the category of jobbers and
nished with unfinned ends, but may be furnished with finned
distributors as distinct from producers.
ends or stripped ends from which the fins have been removed
3.2 Definition of Term Specific to This Standard:
by machining.
3.2.1 capable of—The term capable of as used in this
6. Responsibility for Quality Assurance
specification means that the test need not be performed by the
producer of the material. However, should testing by the
6.1 Responsibility for Inspection and Tests—Unless other-
purchaser establish that the material does not meet these
wise specified in the contract or purchase order, the producer is
requirements, the material shall be subject to rejection.
responsible for the performance of all inspection and test
requirements specified herein. Except as otherwise specified in
4. Ordering Information
the contract or order, the producer may use his own or any
4.1 Orders for material to this specification shall include the
other suitable facilities for the performance of the inspection
following information:
and test requirements specified herein, unless disapproved by
4.1.1 This specification designation (which includes the
the purchaser. The purchaser shall have the right to perform
number, the year, and the revision letter, if applicable),
any of the inspections and tests set forth in this specification
4.1.2 Quantity of each size (number of pounds [pieces]),
where such inspections are deemed necessary to assure that
4.1.3 Alloy and temper (Sections 7 and 8),
material conforms to prescribed requirements.
4.1.4 Description of tube ends (plain or finned),
6.2 Lot Definition—An inspection lot shall be defined as
4.1.5 Dimensions: outside diameter, wall thickness, length
follows:
of unfinned ends (if applicable), root diameter and wall
6.2.1 For heat-treated tempers, an inspection lot shall con-
thickness of finned section, number of fins per unit length, fin
sist of all the material of the same mill form, alloy, temper, and
geometry, and total tube length (Section 5),
nominal dimensions traceable to a heat-treat lot or lots, and
4.2 Additionally, orders for material to this specification
subjected to inspection at one time.
shall include the following information when required by the
6.2.2 For nonheat-treated tempers, an inspection lot shall
purchaser:
consist of all the material of the same mill form, alloy, temper,
4.2.1 Whether identification marking is required (Section
and nominal dimensions subjected to inspection at one time.
17),
7. Chemical Composition
4.2.2 Whether inspection or witness of inspection and tests
by the purchaser’s representative is required prior to material 7.1 Limits—The finned tubes shall conform to the chemical
shipment (Section 14), composition limits prescribed in Table 1. Conformance shall be
4.2.3 Whether certification is required (Section 16), and determined by the producer by analyzing samples taken at the
4.2.4 Whether Practices B 660 applies and, if so, the levels time the ingots are poured, or samples taken from the finished
of preservation, packaging, and packing required (18.3). or semifinished product. If the producer of the drawn seamless
NOTICE: This standard has either been superseded and replaced by a new version or discontinued.
Contact ASTM International (www.astm.org) for the latest information.
B 404/B 404M
A,B
TABLE 2 Tensile Property Limits
Elongation in 2 in. [50 mm] or
Tensile Strength, ksi [MPa]
D
43 Diameter, min, %
Yield Strength
Specified Wall Cut-Out Specimen
C
Full
Temper (0.2% Offset),
Thickness, in. [mm]
Section
min, ksi [MPa]
in 50 mm In 5 3
min max
Specimen in
Diameter
50 mm E
A )
(5.65 =
C
Aluminum 1060
O 0.018–0.500 [0.45–12.50] 8.5 [60] 13.5 [95] 2.5 [15] . . .
H14 0.018–0.500 12.0 [85] . [.] 10.0 [70] . . .
C
Alloy 3003
O 0.010–0.024 [0.25–0.63] 14.0 [95] 19.0 [130] 5.0 [35] . . .
0.025–0.049 [0.63–1.20] 14.0 [95] 19.0 [130] 5.0 [35] 30 20 .
0.050–0.259 [1.20–6.30] 14.0 [95] 19.0 [130] 5.0 [35] 35 25 .
0.260–0.500 [6.30–12.50] 14.0 [95] 19.0 [130] 5.0 [35] . 30 27
H14 0.010–0.024 [0.25–0.63] 20.0 [140] . [.] 17.0 [115] 3 . .
0.025–0.049 [0.63–1.20] 20.0 [140] . [.] 17.0 [115] 5 3 .
0.050–0.259 [1.20–6.30] 20.0 [140] . [.] 17.0 [115] 8 4 .
0.260–0.500 [6.30–12.50] 20.0 [140] . [.] 17.0 [115] . . .
H25 0.010–0.500 [0.25–12.50] 22.0 [150] . [.] 19.0 [130] . . .
C
Alloy Alclad 3003
O 0.010–0.500 [0.25–12.50] 13.0 [90] 19.0 [130] 4.5 [30] . . .
H14 0.010–0.024 [0.25–0.63] 19.0 [130] . 16.0 [110] . . .
0.025–0.049 [0.63–1.20] 19.0 [130] . 16.0 [110] 5 . .
0.050–0.259 [1.20–6.30] 19.0 [130] . 16.0 [110] 8 4 .
0.260–0.500 [6.30–12.50] 19.0 [130] . 16.0 [110] . . .
H25 0.010–0.500 [0.25–12.50] 21.0 [145] . 18.0 [125] . . .
C
Alloy 5052
O 0.018–0.450 [0.45–11.50] 25.0 [170] 35.0 [240] 10.0 [70] . . .
H32 0.018–0.450 [0.45–11.50] 31.0 [215] . 23.0 [160] . . .
H34 0.018–0.450 [0.45–11.50] 34.0 [235] . 26.0 [180] . . .
C
Alloy 5454
O 0.010–0.200 [0.25–5.00] 31.0 [215] . 12.0 [85] . . .
H32 0.010–0.050 [0.25–1.20] 36.0 [250] . 26.0 [180] . 5 .
0.051–0.200 [1.20–5.00] 36.0 [250] . 26.0 [180] . 8 .
H34 0.010–0.050 [0.25–1.20] 39.0 [270] . 29.0 [200] . 4 .
0.051–0.200 [1.20–5.00] 39.0 [270] . 29.0 [200] . 6 .
C
Alloy 6061
F F
O 0.018–0.500 [0.45–12.50] . 22.0 [150] 14.0 max [95 max] 15 15 13
F F
T4 0.025–0.049 [0.63–1.20] 30.0 [205] . 16.0 [110] 16 14 .
F F
0.050–0.259 [1.20–6.30] 30.0 [205] . 16.0 [110] 18 16 16
F F
0.260–0.500 [6.30–12.50] 30.0 [205] . 16.0 [110] 20 18 .
F F
T6 0.025–0.049 [0.63–1.20] 42.0 [290] . 35.0 [240] 10 8 .
F F
0.050–0.259 [1.20–6.30] 42.0 [290] . 35.0 [240] 12 10 10
F F
0.260–0.500 [6.30–12.50] 42.0 [290] . 35.0 [240] 14 12 .
A
See Annex A1.
B
To determine conformance to this specification, each value for tensile strength and for yield strength shall be rounded to the nearest 0.1 ksi [1 MPa] and each value
for elongation to the nearest 0.5 %, both in accordance with the rounding method of Practice E 29.
C
These alloy and temper designations were established in accordance with ANSI H35.1.
D
Elongations in 50 mm apply for tube tested in full-section, for sheet type specimens, for tubes having a flat wall, and for similar curved specimens for tubes having
a curved wall, up to a maximum wall thickness of 12.50 mm. Elongations in 5 D (5.65 =A ), where D and A are diameter and cross-sectional area of the specimens,
respectively, apply to round test specimens machined from wall thicknesses over 6.30 mm.
E
Elongation of full-section and cut-out sheet-type specimens is measured in 2 in.; of cut-out round specimens in 4 3 specimen diameter.
F
The test for elongation is not required when specimens are machined from the finned portion of tube.
tubes from which the finned tubes may be produced, or the determining the chemical composition shall be as follows:
producer of the finned tubes, has determined the chemical 7.2.1 When samples are taken at the time the ingots are
composition of the material during the course of manufac
...

Questions, Comments and Discussion

Ask us and Technical Secretary will try to provide an answer. You can facilitate discussion about the standard in here.