ASTM D3795-20
(Test Method)Standard Test Method for Thermal Flow, Cure, and Behavior Properties of Pourable Thermosetting Materials by Torque Rheometer
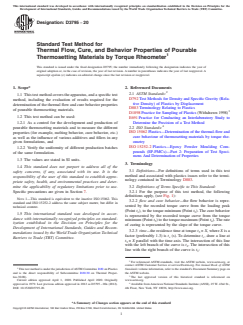
Standard Test Method for Thermal Flow, Cure, and Behavior Properties of Pourable Thermosetting Materials by Torque Rheometer
SIGNIFICANCE AND USE
5.1 The continuous recording of torque and temperature while going through these various stages can be used to predict the behavior of the material during processing.
5.2 The torque rheometer test has two important functions. First, it is a means to predict flow/viscosity and cure characteristics of pourable thermosetting compounds. For example, the test provides useful data to predict the processibility of a material in a particular molding method. This information is also useful to optimize process conditions for a particular material such as the minimum pressure to fill a mold and the time to cure a part. A second capability of the test is to provide a graphic record of the batch-to-batch uniformity of the molding compound.
SCOPE
1.1 This test method covers the apparatus, and a specific test method, including the evaluation of results required for the determination of the thermal flow and cure behavior properties of pourable thermosetting materials.
1.2 This test method can be used:
1.2.1 As a control for the development and production of pourable thermosetting materials and to measure the different properties (for example, melting behavior, cure behavior, etc.) as well as the influence of various additives and fillers in any given formulations, and
1.2.2 Verify the uniformity of different production batches of the same formulation.
1.3 The values are stated in SI units.
1.4 This standard does not purport to address all of the safety concerns, if any, associated with its use. It is the responsibility of the user of this standard to establish appropriate safety, health, and environmental practices and determine the applicability of regulatory limitations prior to use. Specific precautions are given in Section 7.
Note 1: This standard is equivalent to the inactive ISO 15062. This standard and ISO 15252-2 address the same subject matter, but differ in technical content.
1.5 This international standard was developed in accordance with internationally recognized principles on standardization established in the Decision on Principles for the Development of International Standards, Guides and Recommendations issued by the World Trade Organization Technical Barriers to Trade (TBT) Committee.
General Information
- Status
- Published
- Publication Date
- 31-Mar-2020
- Technical Committee
- D20 - Plastics
- Drafting Committee
- D20.30 - Thermal Properties
Relations
- Effective Date
- 01-Apr-2020
- Effective Date
- 01-Feb-2024
- Effective Date
- 01-Nov-2023
- Effective Date
- 29-Sep-2023
- Effective Date
- 01-Jan-2020
- Effective Date
- 01-Aug-2019
- Effective Date
- 15-Apr-2019
- Effective Date
- 01-Feb-2019
- Effective Date
- 01-Dec-2018
- Effective Date
- 01-Nov-2018
- Effective Date
- 15-Aug-2017
- Effective Date
- 01-May-2013
- Effective Date
- 15-Nov-2012
- Effective Date
- 01-Nov-2011
- Effective Date
- 15-May-2011
Overview
ASTM D3795-20, "Standard Test Method for Thermal Flow, Cure, and Behavior Properties of Pourable Thermosetting Materials by Torque Rheometer," is a key international standard published by ASTM International. It provides a systematic procedure for determining the thermal flow, cure behavior, and processing characteristics of pourable thermosetting materials using a torque rheometer. This test method generates detailed data that support material development, process optimization, and quality control across various industries that rely on thermosetting compounds, such as plastics and composites manufacturing.
Key Topics
- Thermal Flow and Cure Behavior: The method measures the changes in viscosity and curing properties of thermosetting materials by continuously recording torque and temperature during processing.
- Assessment of Processing Characteristics: This procedure helps predict the processability of a material, essential for molding, molding pressure determination, and optimal cure times.
- Batch-to-Batch Uniformity: By providing a graphic record of each batch, the method assists in verifying uniformity between different production runs.
- Torque Rheometry: The use of a torque rheometer enables precise control and measurement of key variables-including torque, temperature, and mixing speed-during the heating, melting, and curing stages.
- Material and Formulation Evaluation: The test can evaluate the influence of additives, fillers, and other formulation variables on melting and cure behaviors.
- Standardization and Calibration: The procedure includes recommendations for sample handling, equipment calibration, and quality control to ensure consistent and reliable results.
Applications
ASTM D3795-20 is widely used for:
- Material Development: Supports research and development teams in formulating new thermosetting compounds and evaluating the effect of ingredients on processing characteristics.
- Production Quality Control: Helps manufacturers ensure that thermosetting materials maintain consistent thermal flow and cure performance from batch to batch.
- Process Optimization: Provides data to adjust mold filling pressures and cure times, reducing waste and improving production efficiency.
- Comparative Analysis: Enables comparison of different thermosetting compounds for suitability in specific molding processes.
- Supplier and Customer Agreements: Offers a standardized approach for verifying material properties between suppliers and end-users.
Typical materials tested under this method include epoxies, phenolics, polyesters, alkyds, and silicones, among other pourable thermosetting materials.
Related Standards
- ASTM D792 - Test Methods for Density and Specific Gravity (Relative Density) of Plastics by Displacement
- ASTM D883 - Terminology Relating to Plastics
- ISO 15062 (inactive) - Plastics-Determination of the Thermal-Flow and Cure Behaviour of Thermosetting Materials by Torque Rheometry (ASTM D3795-20 is equivalent with some differences in technical content)
- ISO 15252-2 - Plastics-Epoxy Powder Moulding Compounds (EP-PMCs)-Part 2: Preparation of Test Specimens and Determination of Properties
Practical Value
By implementing ASTM D3795-20, laboratories and manufacturers can:
- Minimize production variability and defects in parts made from thermosetting materials
- Fine-tune processing parameters for new or modified formulations based on real-world simulation of processing conditions
- Meet quality and regulatory requirements for thermoset molding compounds
- Generate reliable data used for product development, specification writing, and supplier qualification
Keywords
Thermal flow, cure behavior, pourable thermosetting materials, torque rheometer, processing characteristics, material uniformity, plastic molding, ASTM D3795-20, quality control, rheometry standard.
Buy Documents
ASTM D3795-20 - Standard Test Method for Thermal Flow, Cure, and Behavior Properties of Pourable Thermosetting Materials by Torque Rheometer
REDLINE ASTM D3795-20 - Standard Test Method for Thermal Flow, Cure, and Behavior Properties of Pourable Thermosetting Materials by Torque Rheometer
Get Certified
Connect with accredited certification bodies for this standard

Smithers Quality Assessments
US management systems and product certification.

DIN CERTCO
DIN Group product certification.
Sponsored listings
Frequently Asked Questions
ASTM D3795-20 is a standard published by ASTM International. Its full title is "Standard Test Method for Thermal Flow, Cure, and Behavior Properties of Pourable Thermosetting Materials by Torque Rheometer". This standard covers: SIGNIFICANCE AND USE 5.1 The continuous recording of torque and temperature while going through these various stages can be used to predict the behavior of the material during processing. 5.2 The torque rheometer test has two important functions. First, it is a means to predict flow/viscosity and cure characteristics of pourable thermosetting compounds. For example, the test provides useful data to predict the processibility of a material in a particular molding method. This information is also useful to optimize process conditions for a particular material such as the minimum pressure to fill a mold and the time to cure a part. A second capability of the test is to provide a graphic record of the batch-to-batch uniformity of the molding compound. SCOPE 1.1 This test method covers the apparatus, and a specific test method, including the evaluation of results required for the determination of the thermal flow and cure behavior properties of pourable thermosetting materials. 1.2 This test method can be used: 1.2.1 As a control for the development and production of pourable thermosetting materials and to measure the different properties (for example, melting behavior, cure behavior, etc.) as well as the influence of various additives and fillers in any given formulations, and 1.2.2 Verify the uniformity of different production batches of the same formulation. 1.3 The values are stated in SI units. 1.4 This standard does not purport to address all of the safety concerns, if any, associated with its use. It is the responsibility of the user of this standard to establish appropriate safety, health, and environmental practices and determine the applicability of regulatory limitations prior to use. Specific precautions are given in Section 7. Note 1: This standard is equivalent to the inactive ISO 15062. This standard and ISO 15252-2 address the same subject matter, but differ in technical content. 1.5 This international standard was developed in accordance with internationally recognized principles on standardization established in the Decision on Principles for the Development of International Standards, Guides and Recommendations issued by the World Trade Organization Technical Barriers to Trade (TBT) Committee.
SIGNIFICANCE AND USE 5.1 The continuous recording of torque and temperature while going through these various stages can be used to predict the behavior of the material during processing. 5.2 The torque rheometer test has two important functions. First, it is a means to predict flow/viscosity and cure characteristics of pourable thermosetting compounds. For example, the test provides useful data to predict the processibility of a material in a particular molding method. This information is also useful to optimize process conditions for a particular material such as the minimum pressure to fill a mold and the time to cure a part. A second capability of the test is to provide a graphic record of the batch-to-batch uniformity of the molding compound. SCOPE 1.1 This test method covers the apparatus, and a specific test method, including the evaluation of results required for the determination of the thermal flow and cure behavior properties of pourable thermosetting materials. 1.2 This test method can be used: 1.2.1 As a control for the development and production of pourable thermosetting materials and to measure the different properties (for example, melting behavior, cure behavior, etc.) as well as the influence of various additives and fillers in any given formulations, and 1.2.2 Verify the uniformity of different production batches of the same formulation. 1.3 The values are stated in SI units. 1.4 This standard does not purport to address all of the safety concerns, if any, associated with its use. It is the responsibility of the user of this standard to establish appropriate safety, health, and environmental practices and determine the applicability of regulatory limitations prior to use. Specific precautions are given in Section 7. Note 1: This standard is equivalent to the inactive ISO 15062. This standard and ISO 15252-2 address the same subject matter, but differ in technical content. 1.5 This international standard was developed in accordance with internationally recognized principles on standardization established in the Decision on Principles for the Development of International Standards, Guides and Recommendations issued by the World Trade Organization Technical Barriers to Trade (TBT) Committee.
ASTM D3795-20 is classified under the following ICS (International Classification for Standards) categories: 83.080.01 - Plastics in general. The ICS classification helps identify the subject area and facilitates finding related standards.
ASTM D3795-20 has the following relationships with other standards: It is inter standard links to ASTM D3795-00a(2012), ASTM D883-24, ASTM D883-23, ASTM D1898-68(1989), ASTM D883-20, ASTM D883-19c, ASTM D883-19a, ASTM D883-19, ASTM D883-18a, ASTM D883-18, ASTM D883-17, ASTM E691-13, ASTM D883-12e1, ASTM E691-11, ASTM D883-11. Understanding these relationships helps ensure you are using the most current and applicable version of the standard.
ASTM D3795-20 is available in PDF format for immediate download after purchase. The document can be added to your cart and obtained through the secure checkout process. Digital delivery ensures instant access to the complete standard document.
Standards Content (Sample)
This international standard was developed in accordance with internationally recognized principles on standardization established in the Decision on Principles for the
Development of International Standards, Guides and Recommendations issued by the World Trade Organization Technical Barriers to Trade (TBT) Committee.
Designation: D3795 − 20
Standard Test Method for
Thermal Flow, Cure, and Behavior Properties of Pourable
Thermosetting Materials by Torque Rheometer
This standard is issued under the fixed designation D3795; the number immediately following the designation indicates the year of
original adoption or, in the case of revision, the year of last revision.Anumber in parentheses indicates the year of last reapproval.A
superscript epsilon (´) indicates an editorial change since the last revision or reapproval.
1. Scope* 2. Referenced Documents
2.1 ASTM Standards:
1.1 Thistestmethodcoverstheapparatus,andaspecifictest
D792Test Methods for Density and Specific Gravity (Rela-
method, including the evaluation of results required for the
tive Density) of Plastics by Displacement
determination of the thermal flow and cure behavior properties
D883Terminology Relating to Plastics
of pourable thermosetting materials.
D1898Practice for Sampling of Plastics (Withdrawn 1998)
1.2 This test method can be used:
E691Practice for Conducting an Interlaboratory Study to
Determine the Precision of a Test Method
1.2.1 As a control for the development and production of
pourable thermosetting materials and to measure the different 2.2 ISO Standards:
ISO15062Plastics—Determination of the thermal-flow and
properties (for example, melting behavior, cure behavior, etc.)
cure behaviour of thermosetting materials by torque rhe-
as well as the influence of various additives and fillers in any
ometry
given formulations, and
ISO 15252-2 Plastics—Epoxy Powder Moulding Com-
1.2.2 Verify the uniformity of different production batches
pounds (EP-PMCs)—Part 2: Preparation of Test Speci-
of the same formulation.
mens And Determination of Properties
1.3 The values are stated in SI units.
3. Terminology
1.4 This standard does not purport to address all of the
3.1 Definitions—For definitions of terms used in this test
safety concerns, if any, associated with its use. It is the
method and associated with plastics issues refer to the termi-
responsibility of the user of this standard to establish appro-
nology contained in Terminology D883.
priate safety, health, and environmental practices and deter-
3.2 Definitions of Terms Specific to This Standard:
mine the applicability of regulatory limitations prior to use.
3.2.1 For the purpose of this test method, the following
Specific precautions are given in Section 7.
definitions apply, (see Fig. 1):
NOTE 1—This standard is equivalent to the inactive ISO15062. This
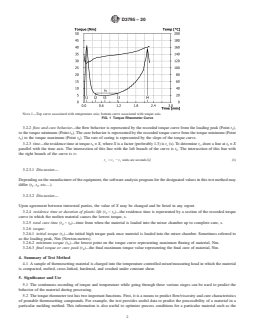
3.2.2 flow and cure behavior—the flow behavior is repre-
standard and ISO15252-2 address the same subject matter, but differ in
sented by the recorded torque curve from the loading peak
technical content.
(Point t ), to the torque minimum (Point t ).The cure behavior
1 5
1.5 This international standard was developed in accor-
is represented by the recorded torque curve from the torque
dance with internationally recognized principles on standard-
minimum(Point t )tothetorquemaximum(Point t ).Therate
5 4
ization established in the Decision on Principles for the
of curing is represented by the slope of the torque curve.
Development of International Standards, Guides and Recom-
3.2.3 time—theresidencetimeattorque t ×X,where Xisa
mendations issued by the World Trade Organization Technical
factor (preferably 1.3) is t (s). To determine t , draw a line at
v v
Barriers to Trade (TBT) Committee.
t ×X parallel with the time axis. The intersection of this line
with the left branch of the curve is t . The intersection of this
line with the right branch of the curve is t :
For referenced ASTM standards, visit the ASTM website, www.astm.org, or
contact ASTM Customer Service at service@astm.org. For Annual Book of ASTM
ThistestmethodisunderthejurisdictionofASTMCommitteeD20onPlastics Standards volume information, refer to the standard’s Document Summary page on
and is the direct responsibility of Subcommittee D20.30 on Thermal Proper- the ASTM website.
ties.30.08). The last approved version of this historical standard is referenced on
Current edition approved April 1, 2020. Published April 2020. Originally www.astm.org.
approved in 1979. Last previous edition approved in 2012 as D3795–00a (2012). Available fromAmerican National Standards Institute (ANSI), 25 W. 43rd St.,
DOI: 10.1520/D3795-20. 4th Floor, New York, NY 10036, http://www.ansi.org.
*A Summary of Changes section appears at the end of this standard
Copyright ©ASTM International, 100 Barr Harbor Drive, PO Box C700, West Conshohocken, PA19428-2959. United States
D3795 − 20
the test provides useful data to predict the processibility of a
material in a particular molding method. This information is
also useful to optimize process conditions for a particular
material such as the minimum pressure to fill a mold and the
time to cure a part.Asecond capability of the test is to provide
a graphic record of the batch-to-batch uniformity of the
molding compound.
6. Apparatus
6.1 Torque Rheometer, with a mixing bowl.
6.1.1 The torque rheometer shall be equipped with a drive
motorwithaload-independentspeedstabilityof 60.5%ofthe
top rotor speed.
6.1.2 The recording device selected shall be capable of
recording the measurable variables of torque, stock
temperature, and rotation per minute (RPM) as a function of
time. The rheometer should also be equipped with a real time
RPM indicator.
NOTE 1—Top curve associated with temperature axis; bottom curve
6.1.3 For the measurement, a surface hardened laboratory
associated with torque axis.
internal mixer is used, specified by a bowl volume of 25, 30 or
FIG. 1 Torque Rheometer Curve
60 cm , that can be attached to the above mentioned torque
rheometer. Either a set of triangular or roller blades shall be
t 5 t 2 t unitsareseconds ~s! (1)
used counter-rotating with a speed ratio of 3:2 (left to right).
v 3 2
3.2.3.1 Discussion—Depending on the manufacturer of the
(The mixer bowl may be heated with a circulated liquid
equipment, the software analysis program for the designated
temperature controlled by a thermostat or electrically with at
values in this test method may differ (t , t , etc.).
least two heating zones (see Note 2).
1 2
3.2.3.2 Discussion—Upon agreement between interested
NOTE 2—Only the results obtained with identical measuring systems
parties, the value of X may be changed and be listed in any
can be compared with one another. In this context, the mixer type, type of
report.
heating/cooling and loading weight used are of decisive importance.
3.2.4 residence time or duration of plastic life (t −t )—the
2 3 6.1.4 Liquid heated mixers shall be equipped with a circu-
residence time is represented by a section of the recorded
lation pump that has a capacity of at least 24 L/min at a back
torque curve in which the molten material causes the lowest
pressure of approximately 500 mbars. The heat transfer me-
torque, s.
diumshallbestabilizedsiliconeoil,withamaximumviscosity
3.2.5 total cure time (t −t )—time from when the material of20mm /sat25°C.Theoiltemperatureshallbemonitoredby
4 0
is loaded into the mixer chamber up to complete cure, s. a device which has a resolution of 0.2°C or better.
6.1.5 Electricallyheatedmixerbowlsshallhaveaminimum
3.2.6 torque:
of one independent electric controller and a maximum of two
3.2.6.1 initial torque (t )—the initial high torque peak once
independent electric controllers that utilize modern control
material is loaded into the mixer chamber. Sometimes referred
techniquesandalgorithms.Thesecontrollersshallprovideboth
to as the loading peak, Nm (Newton-meters).
heatingandcoolingcycles.Thetemperaturecontrolensembles
3.2.6.2 minimum torque (t )—the lowest point on the torque
that include the sensor, controller and actuators shall be
curve representing maximum fluxing of material, Nm.
accurate to within 2.0°C throughout their working range.
3.2.6.3 final torque or cure peak (t )—the final maximum
Reported values shall have a precision of 0.2°C or better.
torque value representing the final cure of material, Nm.
6.1.6 The torque recording ensemble shall be accurate to
0.25% of the reading.
4. Summary of Test Method
6.1.7 For feeding flowable or granular sample materials a
4.1 A sample of thermosetting material is charged into the
loading device shall be used. For feeding other coarse
temperature controlled mixer/measuring head in which the
materials, a pressure ram actuated manually or pneumatically
material is compacted, melted, cross-linked, hardened, and
shall be used. The loading chute has to be mounted onto the
crushed under constant shear.
mixer, with a ram and eithera5or2kg weight or with an
adjustable pneumatic cylinder (see Note 2).
5. Significance and Use
6.1.8 For recording of the stock temperature during the
5.1 The continuous recording of torque and temperature
measuring process, the temperature measuring device is
whilegoingthroughthesevariousstagescanbeusedtopredict
mountedfrombelowintothebottomofthemeasuringmixerin
the behavior of the material during processing.
such a way that it penetrates 1.5 mm into the mixer bowl. The
5.2 The torque rheometer test has two important functions. stock temperature versus time, is recorded simultaneously
together with the torque curve.
First, it is a means to predict flow/viscosity and cure charac-
teristics of pourable thermosetting compounds. For example, 6.1.9 SoftBrassSpatulaorStiffBrassBristleCleaningTool.
D3795 − 20
7. Hazards 9.1.1.3 Samples stored in this manner should be allowed a
full 24-h to reach equilibrium temperature with standard
7.1 Do not exceed the rated power of the instrument as
laboratory conditions of 23 6 2°C before removing from
damage to the mixer or to the torque rheometer may result.
storage pouches for standardization testing.
7.2 Do not attempt to clean or insert objects into the mixer
9.1.2 Samples should be used to test the standardization of
while it is running.
therespectiverheometersatagreeduponintervalsofoperation.
It is recommended that the standardization be tested at least
7.3 Use adequate exhausts and safety devices necessary to
meet applicable safety codes. every 120 h of operation. Operating time is defined not as the
total testing time; but rather as the total elapsed time that the
7.4 Use insulated gloves to protect operator from hot mixer
rheometer is powered up. This would be once per week for a
surface.
full time, five day per week laboratory operation. The samples
7.5 Refer to manufacturers’ operating instructions.
shouldbeusedtwoatatime,wherethefirstsampletestedwill
be used to condition the instrument mixing head and blades,
8. Sampling
and the second sample will be used as actual standardization
8.1 A batch of compound shall be considered as a unit of
data.
manufacture as prepared for shipment and may consist of a
9.1.2.1 It is recommended that sample pouches be drawn
manufacturer’s blend of one or more production runs of
from storage five at a time for conditioning to ambient
material.
conditions. The first will be used for rheometer conditioning,
the second for standardization testing, and the remaining be
8.2 Suitable methods of sampling shall follow Practice
used for additional standardization testing in the event that the
D1898. A 400-g sample will be sufficient for tests required.
instrument needs to be adjusted, or restandardized. If the extra
8.3 Crushanycompoundinapreformstatetoaparticlesize
three samples are not needed they may b
...
This document is not an ASTM standard and is intended only to provide the user of an ASTM standard an indication of what changes have been made to the previous version. Because
it may not be technically possible to adequately depict all changes accurately, ASTM recommends that users consult prior editions as appropriate. In all cases only the current version
of the standard as published by ASTM is to be considered the official document.
Designation: D3795 − 00a (Reapproved 2012) D3795 − 20
Standard Test Method for
Thermal Flow, Cure, and Behavior Properties of Pourable
Thermosetting Materials by Torque Rheometer
This standard is issued under the fixed designation D3795; the number immediately following the designation indicates the year of
original adoption or, in the case of revision, the year of last revision. A number in parentheses indicates the year of last reapproval. A
superscript epsilon (´) indicates an editorial change since the last revision or reapproval.
1. Scope*
1.1 This test method covers the apparatus, and a specific test method, including the evaluation of results required for the
determination of the thermal flow and cure behavior properties of pourable thermosetting materials.
1.2 This test method can be used:
1.2.1 As a control for the development and production of pourable thermosetting materials and to measure the different
properties (for example, melting behavior, cure behavior, etc.) as well as the influence of various additives and fillers in any given
formulations, and
1.2.2 Verify the uniformity of different production batches of the same formulation.
1.3 The values are stated in SI units.
1.4 This standard does not purport to address all of the safety concerns, if any, associated with its use. It is the responsibility
of the user of this standard to establish appropriate safety safety, health, and healthenvironmental practices and determine the
applicability of regulatory limitations prior to use. Specific precautions are given in Section 7.
NOTE 1—There is no similar or equivalent ISO standard.This standard is equivalent to the inactive ISO 15062. This standard and ISO 15252-2 address
the same subject matter, but differ in technical content.
1.5 This international standard was developed in accordance with internationally recognized principles on standardization
established in the Decision on Principles for the Development of International Standards, Guides and Recommendations issued
by the World Trade Organization Technical Barriers to Trade (TBT) Committee.
2. Referenced Documents
2.1 ASTM Standards:
D792 Test Methods for Density and Specific Gravity (Relative Density) of Plastics by Displacement
D883 Terminology Relating to Plastics
D1898 Practice for Sampling of Plastics (Withdrawn 1998)
E691 Practice for Conducting an Interlaboratory Study to Determine the Precision of a Test Method
2.2 ISO Standards:
ISO 15062 Plastics—Determination of the thermal-flow and cure behaviour of thermosetting materials by torque rheometry
ISO 15252-2 Plastics—Epoxy Powder Moulding Compounds (EP-PMCs)—Part 2: Preparation of Test Specimens And
Determination of Properties
3. Terminology
3.1 Definitions—For definitions of terms used in this test method and associated with plastics issues refer to the terminology
contained in Terminology D883.
3.2 Definitions of Terms Specific to This Standard:
3.2.1 For the purpose of this test method, the following definitions apply, (see Fig. 1):
This test method is under the jurisdiction of ASTM Committee D20 on Plastics and is the direct responsibility of Subcommittee D20.30 on Thermal Properties.30.08).
Current edition approved Oct. 1, 2012April 1, 2020. Published October 2012April 2020. Originally approved in 1979. Last previous edition approved in 20062012 as
D3795 – 00a (2006).(2012). DOI: 10.1520/D3795-00AR12.10.1520/D3795-20.
For referenced ASTM standards, visit the ASTM website, www.astm.org, or contact ASTM Customer Service at service@astm.org. For Annual Book of ASTM Standards
volume information, refer to the standard’s Document Summary page on the ASTM website.
The last approved version of this historical standard is referenced on www.astm.org.
Available from American National Standards Institute (ANSI), 25 W. 43rd St., 4th Floor, New York, NY 10036, http://www.ansi.org.
*A Summary of Changes section appears at the end of this standard
Copyright © ASTM International, 100 Barr Harbor Drive, PO Box C700, West Conshohocken, PA 19428-2959. United States
D3795 − 20
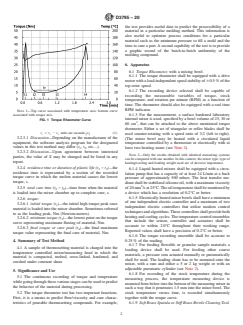
NOTE 1—Top curve associated with temperature axis; bottom curve associated with torque axis.
FIG. 1 Torque Rheometer Curve
3.2.2 flow and cure behavior—the flow behavior is represented by the recorded torque curve from the loading peak (Point t ),
to the torque minimum (Point t ). The cure behavior is represented by the recorded torque curve from the torque minimum (Point
t ) to the torque maximum (Point t ). The rate of curing is represented by the slope of the torque curve.
5 4
3.2.3 time—the residence time at torque t × X, where X is a factor (preferably 1.3) is t (s). To determine t , draw a line at t × X
5 v v 5
parallel with the time axis. The intersection of this line with the left branch of the curve is t . The intersection of this line with
the right branch of the curve is t :
t 5 t 2 t units are seconds ~s! (1)
v 3 2
3.2.3.1 Discussion—
Depending on the manufacturer of the equipment, the software analysis program for the designated values in this test method may
differ (t , t , etc.).
1 2
3.2.3.2 Discussion—
Upon agreement between interested parties, the value of X may be changed and be listed in any report.
3.2.4 residence time or duration of plastic life (t − t )—the residence time is represented by a section of the recorded torque
2 3
curve in which the molten material causes the lowest torque, s.
3.2.5 total cure time (t − t )—time from when the material is loaded into the mixer chamber up to complete cure, s.
4 0
3.2.6 torque:
3.2.6.1 initial torque (t )—the initial high torque peak once material is loaded into the mixer chamber. Sometimes referred to
as the loading peak, Nm (Newton-meters).
3.2.6.2 minimum torque (t )—the lowest point on the torque curve representing maximum fluxing of material, Nm.
3.2.6.3 final torque or cure peak (t )—the final maximum torque value representing the final cure of material, Nm.
4. Summary of Test Method
4.1 A sample of thermosetting material is charged into the temperature controlled mixer/measuring head in which the material
is compacted, melted, cross-linked, hardened, and crushed under constant shear.
5. Significance and Use
5.1 The continuous recording of torque and temperature while going through these various stages can be used to predict the
behavior of the material during processing.
5.2 The torque rheometer test has two important functions. First, it is a means to predict flow/viscosity and cure characteristics
of pourable thermosetting compounds. For example, the test provides useful data to predict the processibility of a material in a
particular molding method. This information is also useful to optimize process conditions for a particular material such as the
D3795 − 20
minimum pressure to fill a mold and the time to cure a part. A second capability of the test is to provide a graphic record of the
batch-to-batch uniformity of the molding compound.
6. Apparatus
6.1 Torque Rheometer, with a mixing bowl.
6.1.1 The torque rheometer shall be equipped with a drive motor with a load-independent speed stability of 60.5 % of the top
rotor speed.
6.1.2 The recording device selected shall be capable of recording the measurable variables of torque, stock temperature, and
rotation per minute (RPM) as a function of time. The rheometer should also be equipped with a real time RPM indicator.
6.1.3 For the measurement, a surface hardened laboratory internal mixer is used, specified by a bowl volume of 25, 30 or 60
cm , that can be attached to the above mentioned torque rheometer. Either a set of triangular or roller blades shall be used
counter-rotating with a speed ratio of 3:2 (left to right). (The mixer bowl may be heated with a circulated liquid temperature
controlled by a thermostat or electrically with at least two heating zones (see Note 2).
NOTE 2—Only the results obtained with identical measuring systems can be compared with one another. In this context, the mixer type, type of
heating/cooling and loading weight used are of decisive importance.
6.1.4 Liquid heated mixers shall be equipped with a circulation pump that has a capacity of at least 24 L/min at a back pressure
of approximately 500 mbars. The heat transfer medium shall be stabilized silicone oil, with a maximum viscosity of 20 mm /s at
25°C. The oil temperature shall be monitored by a device which has a resolution of 0.2°C or better.
6.1.5 Electrically heated mixer bowls shall have a minimum of one independent electric controller and a maximum of two
independent electric controllers that utilize modern control techniques and algorithms. These controllers shall provide both heating
and cooling cycles. The temperature control ensembles that include the sensor, controller and actuators shall be accurate to within
2.0°C throughout their working range. Reported values shall have a precision of 0.2°C or better.
6.1.6 The torque recording ensemble shall be accurate to 0.25 % of the reading.
6.1.7 For feeding flowable or granular sample materials a loading device shall be used. For feeding other coarse materials, a
pressure ram actuated manually or pneumatically shall be used. The loading chute has to be mounted onto the mixer, with a ram
and either a 5 or 2 kg weight or with an adjustable pneumatic cylinder (see Note 2).
6.1.8 For recording of the stock temperature during the measuring process, the temperature measuring device is mounted from
below into the bottom of the measuring mixer in such a way that it penetrates 1.5 mm into the mixer bowl. The stock temperature
versus time, is recorded simultaneously together with the torque curve.
6.1.9 Soft Brass Spatula or Stiff Brass Bristle Cleaning Tool.
7. Hazards
7.1 Do not exceed the rated power of the instrument as damage to the mixer or to the torque rheometer may result.
7.2 Do not attempt to clean or insert objects into the mixer while it is running.
7.3 Use adequate exhausts and safety devices necessary to meet applicable safety codes.
7.4 Use insulated gloves to protect operator from hot mixer surface.
7.5 Refer to manufacturers’ operating instructions.
8. Sampling
8.1 A batch of compound shall be considered as a unit of manufacture as prepared for shipment and may consist of a
manufacturer’s blend of one or more production runs of material.
8.2 Suitable methods of sampling shall follow Practice D1898. A 400-g sample will be sufficient for tests required.
8.3 Crush any compound in a preform state to a particle size that would pass through the loading chute.
9. Sample Selection, Handling and Use for Rheometer Standardization
9.1 Selection—The selection of the sample should be determined by the use for which it is intended. If it is to be an
intralaboratory standardization sample, (for example in a material compounder’s laboratory), the sample should be chosen to
closely approximate the materials expected to be tested. (For compounders having a wide range of product plasticities it is
recommended that one sample for each maximum torque range be available.) For interlaboratory standardization, the sample
should be of the product type being molded.
9.1.1 Handling:
9.1.1.1 Once the selection of the sample has been agreed upon among the interested parties it shall be gathered in sufficient
quantity that the supply of sample for each laboratory can be expected to outlast the need to change the mixing head or blades by
about 50 % of the life of the head or blades. This is to avoid running out of standardization standard at the same time as an
equipment change takes place on the rheometer (see Note 3).
D3795 − 20
NOTE 3—The determination for wear of the measuring mixer and blades shall be measured volumetrically. The equipment manufacturer shall provide
the procedure and values for the individual measuring mixers.
9.1.1.2 It is recommended that the sample be broken up into preweighed charges, the charge weight being based on the specific
gravity of the sample and the size of the mixing head in use on the respective rheometers. These should be heat-sealed in individual
polyethylene pouches. If the samples are of any compound which has a defined shelf-life, they should be stored at, or near freezing
in order to protect their plasticity properties from changing. If the samples have indefinite shelf-life, they should be stored below
the temperature at which volatile material could be driven off due to excessive vapor pressure.
9.1.1.3 Samples stored in this manner should be allowed a full 24-h to reach equilibrium temperature with standard laboratory
conditions of 23 6 2°C before removing from storage pouches for standardization testing.
9.1.2 Samples should be used to test the standardization of the respective rheometers at agreed upon intervals of operation. It
is recommended that the standardization be tested at least every 120 h of operation. Operating time is defined not as the total testing
time; but rather as the total elapsed time that the rheometer is powered up. This would be once per week for a full time, five day
per week laboratory operation. The sa
...
Questions, Comments and Discussion
Ask us and Technical Secretary will try to provide an answer. You can facilitate discussion about the standard in here.
Loading comments...