ASTM C1223-92(2003)
(Test Method)Standard Test Method for Testing of Glass Exudation from AZS Fusion-Cast Refractories
Standard Test Method for Testing of Glass Exudation from AZS Fusion-Cast Refractories
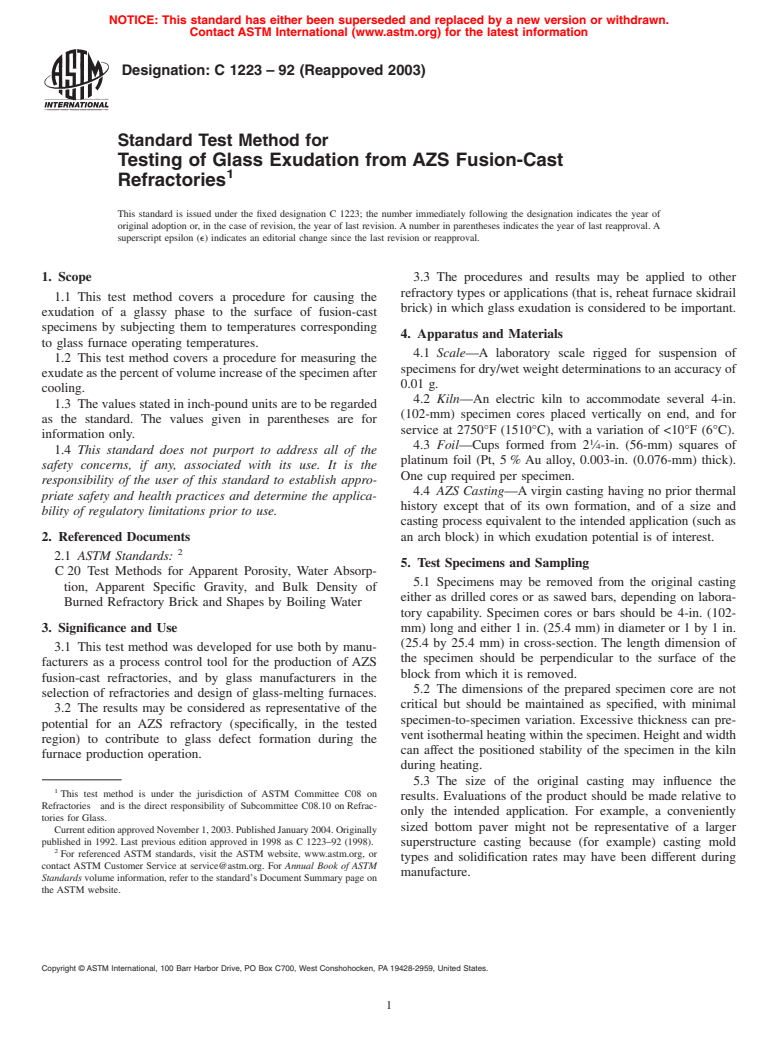
SIGNIFICANCE AND USE
This test method was developed for use both by manufacturers as a process control tool for the production of AZS fusion-cast refractories, and by glass manufacturers in the selection of refractories and design of glass-melting furnaces.
The results may be considered as representative of the potential for an AZS refractory (specifically, in the tested region) to contribute to glass defect formation during the furnace production operation.
The procedures and results may be applied to other refractory types or applications (that is, reheat furnace skidrail brick) in which glass exudation is considered to be important.
SCOPE
1.1 This test method covers a procedure for causing the exudation of a glassy phase to the surface of fusion-cast specimens by subjecting them to temperatures corresponding to glass furnace operating temperatures.
1.2 This test method covers a procedure for measuring the exudate as the percent of volume increase of the specimen after cooling.
1.3 The values stated in inch-pound units are to be regarded as the standard. The values given in parentheses are for information only.
1.4 This standard does not purport to address all of the safety problems, if any, associated with its use. It is the responsibility of the user of this standard to establish appropriate safety and health practices and determine the applicability of regulatory limitations prior to use.
General Information
Relations
Standards Content (Sample)
NOTICE: This standard has either been superseded and replaced by a new version or withdrawn.
Contact ASTM International (www.astm.org) for the latest information
Designation:C 1223–92 (Reappoved 2003)
Standard Test Method for
Testing of Glass Exudation from AZS Fusion-Cast
Refractories
This standard is issued under the fixed designation C 1223; the number immediately following the designation indicates the year of
original adoption or, in the case of revision, the year of last revision. A number in parentheses indicates the year of last reapproval. A
superscript epsilon (e) indicates an editorial change since the last revision or reapproval.
1. Scope 3.3 The procedures and results may be applied to other
refractory types or applications (that is, reheat furnace skidrail
1.1 This test method covers a procedure for causing the
brick) in which glass exudation is considered to be important.
exudation of a glassy phase to the surface of fusion-cast
specimens by subjecting them to temperatures corresponding
4. Apparatus and Materials
to glass furnace operating temperatures.
4.1 Scale—A laboratory scale rigged for suspension of
1.2 This test method covers a procedure for measuring the
specimens for dry/wet weight determinations to an accuracy of
exudateasthepercentofvolumeincreaseofthespecimenafter
0.01 g.
cooling.
4.2 Kiln—An electric kiln to accommodate several 4-in.
1.3 The values stated in inch-pound units are to be regarded
(102-mm) specimen cores placed vertically on end, and for
as the standard. The values given in parentheses are for
service at 2750°F (1510°C), with a variation of <10°F (6°C).
information only.
4.3 Foil—Cups formed from 2 ⁄4-in. (56-mm) squares of
1.4 This standard does not purport to address all of the
platinum foil (Pt, 5 % Au alloy, 0.003-in. (0.076-mm) thick).
safety concerns, if any, associated with its use. It is the
One cup required per specimen.
responsibility of the user of this standard to establish appro-
4.4 AZS Casting—A virgin casting having no prior thermal
priate safety and health practices and determine the applica-
history except that of its own formation, and of a size and
bility of regulatory limitations prior to use.
casting process equivalent to the intended application (such as
2. Referenced Documents an arch block) in which exudation potential is of interest.
2.1 ASTM Standards:
5. Test Specimens and Sampling
C 20 Test Methods for Apparent Porosity, Water Absorp-
5.1 Specimens may be removed from the original casting
tion, Apparent Specific Gravity, and Bulk Density of
either as drilled cores or as sawed bars, depending on labora-
Burned Refractory Brick and Shapes by Boiling Water
tory capability. Specimen cores or bars should be 4-in. (102-
3. Significance and Use mm) long and either 1 in. (25.4 mm) in diameter or 1 by 1 in.
(25.4 by 25.4 mm) in cross-section. The length dimension of
3.1 This test method was developed for use both by manu-
the specimen should be perpendicular to the surface of the
facturers as a process control tool for the production of AZS
block from which it is removed.
fusion-cast refractories, and by glass manufacturers in the
5.2 The dimensions of the prepared specimen core are not
selection of refractories and design of glass-melting furnaces.
critical but should be maintained as specified, with minimal
3.2 The results may be considered as representative of the
specimen-to-specimen variation. Excessive thickness can pre-
potential for an AZS refractory (specifically, in the tested
vent isothermal heating within the specimen. Height and width
region) to contribute to glass defect formation during the
can affect the positioned stability of the specimen in the kiln
furnace production operation.
during heating.
5.3 The size of the original casting may influence the
This test method is under the jurisdiction of ASTM Committee C08 on
results. Evaluations of the product should be made relative to
Refractories and is the direct responsibility of Subcommittee C08.10 on Refrac-
only the intended application. For example, a conveniently
tories for Glass.
sized bottom paver might not be representative of a larger
Current edition approved November 1, 2003. Published January 2004. Originally
published in 1992. Last previous edition approved in 1998 as C 1223–92 (1998).
superstructure casting because (for example) casting mold
For referenced ASTM standards, visit the ASTM website, www.astm.org, or
types and solidification rates may have been different during
contact ASTM Customer Service at service@astm.org. For Annual Book of ASTM
manufacture.
Standards volume information, refer to the standard’s Document Summary page on
the ASTM website.
Copyright © ASTM International, 100 Barr Harbor Drive, PO Box C700, West Conshohocken, PA 19428-2959, United States.
C 1223–92 (Reappoved 2003)
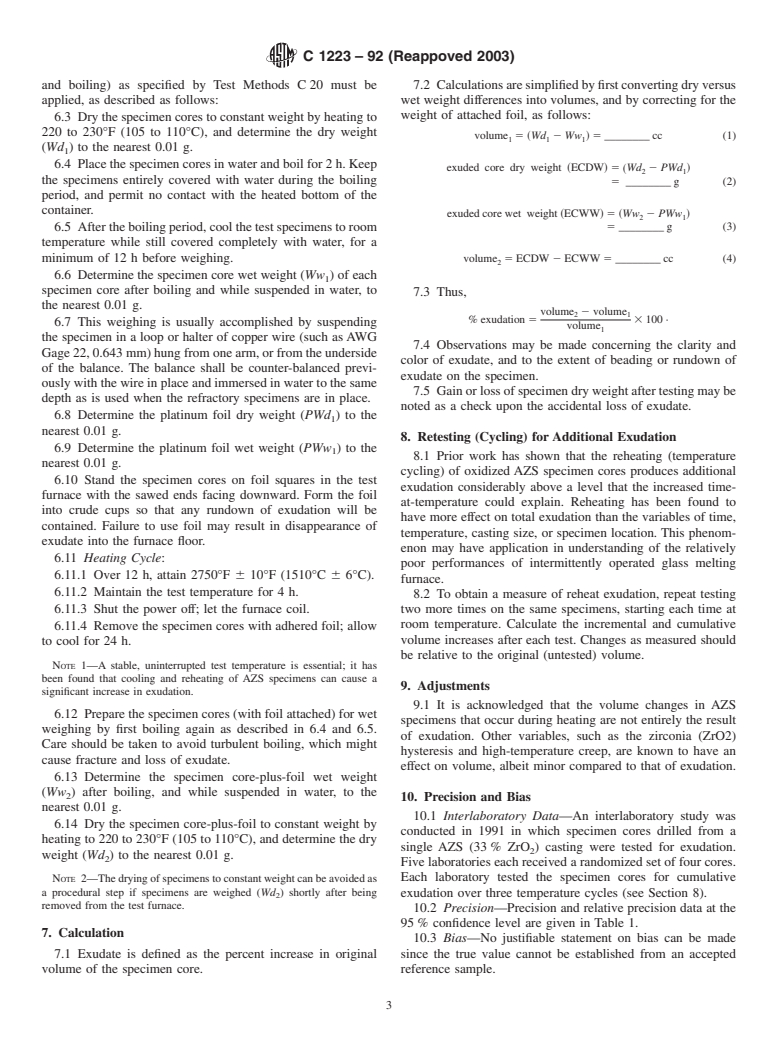
5.4 The location and depth of specimens within the original edge should be no less than half the casting thickness. The
casting can influence the results. Regions closely underlying specimen length should be approximately half the casting
the surface of the casting (particularly near the corners and thickness.
edges) are thermally quenched and have aligned microstruc- 5.7 Solid-cast tile (3 in. (76 mm)) should be sampled
turesthatareatypicalofmoreslowlycooledregions.Deeperin perpendicularly to a major face, with the proximity to any edge
a casting, glass phase pockets and crystal sizes are larger, and being no less than half the thickness of the casting. The
certain shifts in chemical stratification exist due to fractional specimen length should be either half the thickness or full
crystallization during solidification. No single point in anAZS surface-to-surface thickness.
casting represents the whole entirely. 5.8 Large, vertically-cast blocks, such as those that are used
5.5 Regular-cast AZS blocks, approximately 8 to 12-in. commonly in high-wear glass-contact applications, may be
(203 to 305-mm) thick, such as is typical of furnace super- sampled perpendicularly to any of the four major vertical
structure and sidewall sizes, are sampled by drilling or plunge- surfaces, with the following restrictions: sampling should be at
cutting perpendicularly to the bottom surface (the surface least 4 in. (102 mm) from any edge, and the entire bottom
opposite the casting scar). region should be avoided up to 8 in. (203 mm) from the bottom
5.5.1 The location of entry (by drilling or sawing) should be (as-cast). This lower region, which often becomes the top
at least 4-in. (102-mm) away from any edge, yet not immedi- “metal-line” region, as when the casting is inverted, has been
ately under the casting scar. found to be not representative of the overall casting.
5.5.2 Drill or cut deeper than specified; then break out from
6. Procedure
the casting and saw square to 4-in. (102-mm) length, retaining
the moldskin (original surface of the block) on one end of the 6.1 Weights must be obtained individually for both the
specimen by cutting off the end opposite it. untested specimen cores and the foil squares on which the
5.5.3 The quantity of specimens per casting is not specified. cores will be placed. This is because each core and its foil will
(Correlation coefficients of 10 to 20 % have been obtained by usually be fused together at the end of testing and cannot be
thisprocedureonlargespecimenpopulationstakenfromsingle separated before weighing without risk of lost exudate. Once
castings.) paired, each set of core-and-foil must remain together through-
5.6
...


Questions, Comments and Discussion
Ask us and Technical Secretary will try to provide an answer. You can facilitate discussion about the standard in here.