ASTM A159-83(2001)
(Specification)Standard Specification for Automotive Gray Iron Castings
Standard Specification for Automotive Gray Iron Castings
SCOPE
1.1 This specification applies to gray iron castings, cast in sand molds, used in the products of the automobile, truck, tractor, and allied industries.
1.2 The values stated in inch-pound units are to be regarded as the standard.
General Information
Relations
Standards Content (Sample)
NOTICE: This standard has either been superseded and replaced by a new version or withdrawn.
Contact ASTM International (www.astm.org) for the latest information
Designation: A 159 – 83 (Reapproved 2001)
Standard Specification for
Automotive Gray Iron Castings
This standard is issued under the fixed designation A 159; the number immediately following the designation indicates the year of
original adoption or, in the case of revision, the year of last revision. A number in parentheses indicates the year of last reapproval. A
superscript epsilon (e) indicates an editorial change since the last revision or reapproval.
This standard has been approved for use by agencies of the Department of Defense. This specification replaces Federal specification
AA-I-653A.
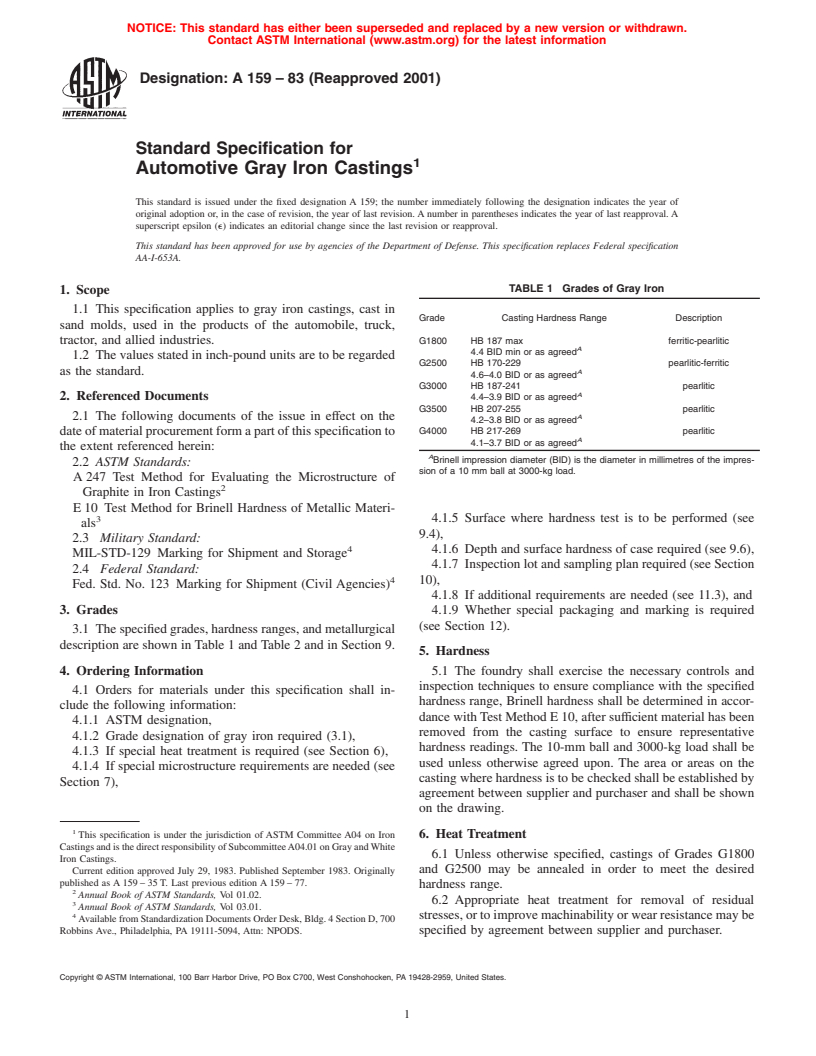
TABLE 1 Grades of Gray Iron
1. Scope
1.1 This specification applies to gray iron castings, cast in
Grade Casting Hardness Range Description
sand molds, used in the products of the automobile, truck,
tractor, and allied industries. G1800 HB 187 max ferritic-pearlitic
A
4.4 BID min or as agreed
1.2 The values stated in inch-pound units are to be regarded
G2500 HB 170-229 pearlitic-ferritic
as the standard. A
4.6–4.0 BID or as agreed
G3000 HB 187-241 pearlitic
A
2. Referenced Documents 4.4–3.9 BID or as agreed
G3500 HB 207-255 pearlitic
2.1 The following documents of the issue in effect on the A
4.2–3.8 BID or as agreed
G4000 HB 217-269 pearlitic
dateofmaterialprocurementformapartofthisspecificationto
A
4.1–3.7 BID or as agreed
the extent referenced herein:
A
Brinell impression diameter (BID) is the diameter in millimetres of the impres-
2.2 ASTM Standards:
sion of a 10 mm ball at 3000-kg load.
A 247 Test Method for Evaluating the Microstructure of
Graphite in Iron Castings
E 10 Test Method for Brinell Hardness of Metallic Materi-
3 4.1.5 Surface where hardness test is to be performed (see
als
9.4),
2.3 Military Standard:
4 4.1.6 Depth and surface hardness of case required (see 9.6),
MIL-STD-129 Marking for Shipment and Storage
4.1.7 Inspection lot and sampling plan required (see Section
2.4 Federal Standard:
4 10),
Fed. Std. No. 123 Marking for Shipment (Civil Agencies)
4.1.8 If additional requirements are needed (see 11.3), and
3. Grades 4.1.9 Whether special packaging and marking is required
(see Section 12).
3.1 The specified grades, hardness ranges, and metallurgical
description are shown in Table 1 and Table 2 and in Section 9.
5. Hardness
4. Ordering Information
5.1 The foundry shall exercise the necessary controls and
inspection techniques to ensure compliance with the specified
4.1 Orders for materials under this specification shall in-
hardness range, Brinell hardness shall be determined in accor-
clude the following information:
dance withTest Method E 10, after sufficient material has been
4.1.1 ASTM designation,
removed from the casting surface to ensure representative
4.1.2 Grade designation of gray iron required (3.1),
hardness readings. The 10-mm ball and 3000-kg load shall be
4.1.3 If special heat treatment is required (see Section 6),
used unless otherwise agreed upon. The area or areas on the
4.1.4 If special microstructure requirements are needed (see
casting where hardness is to be checked shall be established by
Section 7),
agreement between supplier and purchaser and shall be shown
on the drawing.
This specification is under the jurisdiction of ASTM Committee A04 on Iron 6. Heat Treatment
CastingsandisthedirectresponsibilityofSubcommitteeA04.01onGrayandWhite
6.1 Unless otherwise specified, castings of Grades G1800
Iron Castings.
and G2500 may be annealed in order to meet the desired
Current edition approved July 29, 1983. Published September 1983. Originally
published as A 159 – 35 T. Last previous edition A 159 – 77.
hardness range.
Annual Book of ASTM Standards, Vol 01.02.
6.2 Appropriate heat treatment for removal of residual
Annual Book of ASTM Standards, Vol 03.01.
stresses,ortoimprovemachinabilityorwearresistancemaybe
AvailablefromStandardizationDocumentsOrderDesk,Bldg.4SectionD,700
Robbins Ave., Philadelphia, PA 19111-5094, Attn: NPODS. specified by agreement between supplier and purchaser.
Copyright © ASTM International, 100 Barr Harbor Drive, PO Box C700, West Conshohocken, PA 19428-2959, United States.
A 159 – 83 (2001)
TABLE 2 Brake Drums and Clutch Plates for Special Service
A
Grade Carbon min, % Microstructure
Casting Hardness
Graphite Matrix
B
G2500a 3.40 HB 170-229 Type VII, size 2–4 lamellar pearlite
4.6–4.0 BID or as agreed A distribution ferrite if present not to exceed 15%
C B
G3500b 3.40 HB 207-255 Type VII, size 3–5 lamellar pearlite
4.2–3.8 BID or as agreed A distribution ferrite or carbide if present not to exceed 5%
C B
G3500c 3.50 HB 207-255 Type VII, size 3–5 lamellar pearlite
4.2–3.8 BID or as agreed A distribution ferrite or carbide, if present not to exceed 5%
A
The chemical analysis for total carbon shall be made on chilled pencil-type specimens or from thin wafers approximately 1/32 in. (0.8 mm) thick cut from test coupons.
Drillings are not reliable because of the probable loss of graphite.
B
See Method A 247.
C
Grades G 3500b and G 3500c normally require alloying to obtain the specified hardness at the high carbon levels specified.
7. Microstructure hardening by the supplier. The depth and surface hardness of
thehardenedcaseshallbeasagreeduponbetweensupplierand
7.1 The microstructure shall consist of flake graphite in a
purchaser.
matrix of ferrite or pearlite or mixtures thereof.
7.2 As graphite size and shape somewhat affect hardness-
10. Quality Assurance Provisions
strength ratio and other properties, the type size and distribu-
tion of the graphite flakes at a designated location on the
10.1 Responsibility for Inspection—Unless otherwise speci-
casting may be specified by agreement between supplier and
fied in the contract or purchase order, the producer is respon-
purchaser in accordance with Method A 247.
sible for the performance of all inspection and tests require-
7.3 Unless otherwise specified, the matrix microstructure of
ments specified in this specification. Except as otherwise
castingscoveredbythisspecificationshallbesubstantiallyfree
specified in the contract or purchase order, the producer may
of primary cementite. Castings in Grades G1800 and G2500
use his own or any other suitable facilities for the performance
may have a matrix of ferrite or pearlite or both. Grades G3000,
of the inspection and test requirements specified herein, unless
G3500, and G4000 shall be substantially pearlite in matrix
disapproved by the purchaser. The purchaser shall have the
structure.
right to perform any of the inspection and tests set for in this
specification where such inspections are deemed necessary to
8. Heavy-Duty Brake Drums and Clutch Plates
assure that material conform to prescribed requirements.
8.1 These castings are considered as special cases and are
10.2 Lot—For the purpose of inspection, lot and sampling
covered in Table 2.
plans shall be agreed upon between the purchaser and the
producer.
9. Alloy Gray Iron Automotive Camshafts
9.1 These castings are considered as special cases.
11. General
9.2 Grade Designation—G4000d.
11.1 Castings furnished to this specification shall be repre-
9.3 Chemistry—Alloy gray iron camshafts shall contain
sentative of good foundry practice and shall conform to
alloys within the following range or as agreed upon between
dimensions and tolerances specified on the casting drawing.
supplier and purchaser.
11.2 Minor imperfections usually not associated with the
Chromium 0.85–1.25 %
structural function may occur in castings. These are often
Molybdenum 0.40–0.60 %
repairable but repairs shall be made only where allowed by the
Nickel as agreed
purchaser and only by approved methods.
9.4 Casting Hardness—HB 241-321 determined on a bear-
11.3 Additional casting requirements may be agreed upon
ing surface as agreed by supplier and purchaser.
by purchaser and supplier. These should appear as product
9.5 Microstructure—Extending 45° on both sides of the
specifications on the casting or part drawing.
centerline of the cam nose and to a minimum depth of 1 8 in.
/
(3.2 mm), the surface shall consist of primary carbides (of
12. Preparation for Delivery
acicular or cellular form or a mixture thereof) and graphite in
12.1 Unless otherwise specified in the contract or purchase
a fine pearlitic matrix. The graphite shall be Type VIIAand E
order, castings shall be cleaned, preserved, and packaged in
distribution,4to7flakesizeinaccordancewithMethodA 247.
accordance with supplier’s standard commercial practice.
The amount of primary carbides and location at which the
structure is checked shall be a matter of agreement between the 12.2 Government Procurement—When specified for Gov-
ernment procurement, castings shall be marked for shipment in
supplier and the purchaser.
9.6 Selective Hardening—The cam areas of camshaft cast- accordance with MIL-STD-129 for military procurement and
Fed. Std. No. 123 for civil agency procurement.
ing are usually selectively hardened by flame or induction
A 159 – 83 (2001)
APPENDIX
(Nonmandatory Information)
X1. GRAY IRON
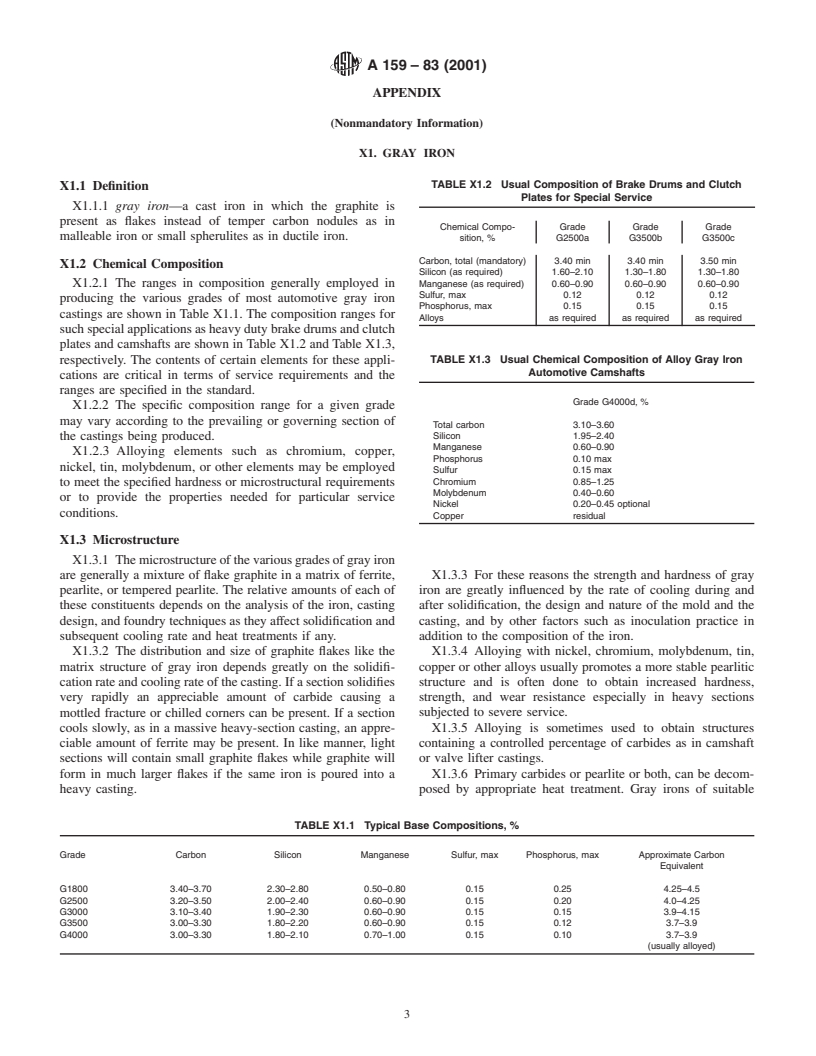
TABLE X1.2 Usual Composition of Brake Drums and Clutch
X1.1 Definition
Plates for Special Service
X1.1.1 gray iron—a cast iron in which the graphite is
present as flakes instead of temper carbon nodules as in
Chemical Compo- Grade Grade Grade
malleable iron or small spherulites as in ductile iron. sition, % G2500a G3500b G3500c
Carbon, total (mandatory) 3.40 min 3.40 min 3.50 min
X1.2 Chemical Composition
Silicon (as required) 1.60–2.10 1.30–1.80 1.30–1.80
Manganese (as required) 0.60–0.90 0.60–0.90 0.60–0.90
X1.2.1 The ranges in composition generally employed in
Sulfur, max 0.12 0.12 0.12
producing the various grades of most automotive gray iron
Phosphorus, max 0.15 0.15 0.15
castings are shown in Table X1.1. The composition ranges for
Alloys as required as required as required
such special applications as heavy duty brake drums and clutch
plates and camshafts are shown in Table X1.2 and Table X1.3,
respectively. The contents of certain elements for these appli- TABLE X1.3 Usual Chemical Composition of Alloy Gray Iron
Automotive Camshafts
cations are critical in terms of service requirements and the
ranges are specified in the standard.
Grade G4000d, %
X1.2.2 The specific composition range for a given grade
may vary according to the prevailing or governing section of
Total carbon 3.10–3.60
Silicon 1.95–2.40
the castings being produced.
Manganese 0.60–0.90
X1.2.3 Alloying elements such as chromium, copper,
P
...


Questions, Comments and Discussion
Ask us and Technical Secretary will try to provide an answer. You can facilitate discussion about the standard in here.