Standard Test Methods for Laminated Round Rods Used for Electrical Insulation

SCOPE
1.1 These test methods cover the procedures for testing rigid round rods used in electrical insulation. These round rods include many types made from fibrous sheets of basic materials, such as cellulose, asbestos, glass, or nylon in the form of paper, woven fabrics, or mats, bonded together by natural or synthetic resins, or by adhesives. Such round rods include vulcanized fiber and thermosetting laminates as well as round rods made from cast, molded, or extruded natural or synthetic resins, with or without fillers or reinforcing materials.  
1.2 The procedures appear in the following sections: Section Compressive strength (axial) 19 to 24 Density 27 to 29 Dielectric strength 30 to 38 Flexural strength 12 to 18 Tensile strength 6 to 11 Water absorption 25 to 26
1.3 The values stated in inch-pound units are to be regarded as the standard.  
1.4 This standard does not purport to address all of the safety problems, if any, associated with its use. It is the responsibility of the user of this standard to establish appropriate safety and health practices and determine the applicability of regulatory limitations prior to use.> For a specific warning statement see 35.2.

General Information

Status
Historical
Publication Date
09-Apr-1999
Current Stage
Ref Project

Relations

Buy Standard

Standard
ASTM D349-99 - Standard Test Methods for Laminated Round Rods Used for Electrical Insulation
English language
5 pages
sale 15% off
Preview
sale 15% off
Preview

Standards Content (Sample)


NOTICE: This standard has either been superseded and replaced by a new version or withdrawn.
Contact ASTM International (www.astm.org) for the latest information
An American National Standard
Designation:D349–99
Standard Test Methods for
Laminated Round Rods Used for Electrical Insulation
This standard is issued under the fixed designation D 349; the number immediately following the designation indicates the year of
original adoption or, in the case of revision, the year of last revision. A number in parentheses indicates the year of last reapproval. A
superscript epsilon (e) indicates an editorial change since the last revision or reapproval.
1. Scope D 792 TestMethodsforDensityandSpecificGravity(Rela-
tive Density) of Plastics by Displacement
1.1 Thesetestmethodscovertheproceduresfortestingrigid
D 1711 Terminology Relating to Electrical Insulation
round rods used in electrical insulation. These round rods
D 6054 Practice for Conditioning Electrical Insulating Ma-
include many types made from fibrous sheets of basic materi-
terials
als, such as cellulose, asbestos, glass, or nylon in the form of
paper, woven fabrics, or mats, bonded together by natural or
3. Terminology
synthetic resins, or by adhesives. Such round rods include
3.1 Definitions—Use Terminology D 1711 for definitions of
vulcanized fiber and thermosetting laminates as well as round
terms used in these test methods and associated with electrical
rods made from cast, molded, or extruded natural or synthetic
or electronic insulation materials.
resins, with or without fillers or reinforcing materials.
1.2 The procedures appear in the following sections:
4. Selection of Test Specimens
Section
4.1 Specimens for tests shall be selected from portions of
Compressive strength (axial) 20-25
Density 28-30
material that are free of obvious defects unless the purpose of
Dielectric strength 31-39
the test is to evaluate the effect of these defects.
Flexural strength 13-19
Tensile strength 7-12
5. Conditioning
Water absorption 26-27
5.1 In order to eliminate the effects of previous history of
1.3 The values stated in inch-pound units are to be regarded
humidity exposure and to obtain reproducible results (Note 1),
as the standard.
in all cases of dispute give the test specimens of laminated rods
1.4 This standard does not purport to address all of the
a conditioning treatment for physical test as follows:
safety concerns, if any, associated with its use. It is the
5.1.1 Tensile, Flexural, and Compressive Strengths, and
responsibility of the user of this standard to establish appro-
Density—Prior to test, condition the machined specimens in
priate safety and health practices and determine the applica-
accordance with Procedure B of Practice D 6054. All speci-
bility of regulatory limitations prior to use. For a specific
mens shall be tested at room temperature maintained at 23 6
warning statement see 36.2.
5°C.
2. Referenced Documents
NOTE 1—Conditioning of specimens may be undertaken: (a) for the
2.1 ASTM Standards: purpose of bringing the material into equilibrium with normal or average
room conditions of 23°C and 50 % relative humidity; (b) simply to obtain
D 149 Test Method for Dielectric Breakdown Voltage and
reproducible results, irrespective of previous history of exposure; or (c)to
Dielectric Strength of Solid Electrical Insulating Materials
2 subject the material to abnormal conditions of temperature or humidity in
at Commercial Power Frequencies
order to predict its service behavior.
D 570 Test Method for Water Absorption of Plastics
The conditions given here to obtain reproducible results may give
D 668 Test Methods of Measuring Dimensions of Rigid
physical values somewhat higher or somewhat lower than values under
Rods and Tubes Used for Electrical Insulation
equilibrium at normal conditions, depending upon the particular material
and test. To ensure substantial equilibrium under normal conditions of
humidity and temperature, however, will require from 20 to 100 days or
These test methods are under the jurisdiction of ASTM Committee D-9 on
more depending upon thickness and type of material and its previous
Electrical and Electronic Insulating Materials and are the direct responsibility of
history. Consequently, conditioning for reproducibility must of necessity
Subcommittee D09.07 on Flexible and Rigid Insulating Materials.
be used for general purchase specifications and product control tests.
Current edition approved April 10, 1999. Published June 1999. Originally
published as D 349 – 32 T. Last previous edition D 349 – 92 (1997).
Annual Book of ASTM Standards, Vol 10.01.
3 4
Annual Book of ASTM Standards, Vol 08.01. Annual Book of ASTM Standards, Vol 10.02.
Copyright © ASTM International, 100 Barr Harbor Drive, PO Box C700, West Conshohocken, PA 19428-2959, United States.
D349
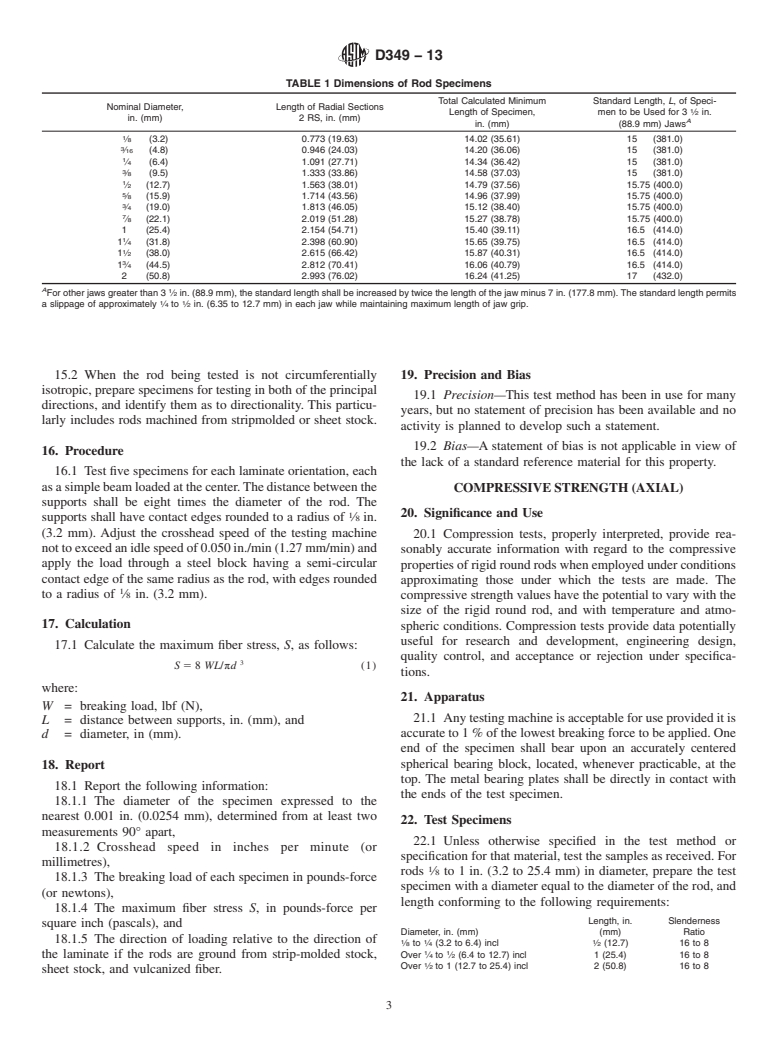
6. Dimensional Measurements L, is as shown in Table 1. Machine a groove around the
specimen at the center of its length so that the diameter of the
6.1 Make dimensional measurements of rods in accordance
machined portion is 60 % of the original nominal diameter.
with Test Methods D 668.
This groove consists of a straight section 2 ⁄4 in. (57 mm) in
TENSILE STRENGTH length with a radius of 3 in. (76 mm) at each end joining it to
the outside diameter.
7. Significance and Use
10. Procedure
7.1 This test method is designed to provide data for the
control and specification of materials and for characterization 10.1 Adjust the crosshead speed of the testing machine not
purposes in research and development of new materials.
to exceed 0.050 in. (1.27 mm)/min when running idle and test
Tensile properties may vary with the size of specimens and the
five specimens.
speed of testing. Consequently, these factors along with others
11. Report
noted herein must be controlled where precise comparative
results are desired.
11.1 Report the following information:
11.1.1 The average diameter of the specimen, expressed to
8. Apparatus
the nearest 0.001 in. (0.0254 mm), determined from at least
8.1 Any testing machine may be used provided it is accurate
two measurements 90° apart,
to 1 % of the lowest breaking force to be applied. Use jaws
11.1.2 The average diameter of the reduced section, ex-
which tighten under load, such as wedge grip jaws, with the
pressed to the nearest 0.001 in. (0.025 mm), determined from
specimen properly aligned.
at least two measurements 90° apart,
11.1.3 Crosshead speed in inches per minute (or millime-
9. Test Specimens
tres).
9.1 PreparethetestspecimenasshowninFig.1.Thelength,
11.1.4 The breaking load of each specimen in pounds-force
(or newtons),
11.1.5 The tensile strength of each specimen in pounds-
force per square inch, (or pascals), and
11.1.6 The room temperature in degrees Celsius.
12. Precision and Bias
12.1 Precision—This test method has been in use for many
years, but no statement of precision has been available and no
activity is planned to develop such a statement.
12.2 Bias—A statement of bias is not applicable in view of
the lack of a standard reference material for this property.
FLEXURAL STRENGTH
13. Significance and Use
13.1 Flexural strength data are useful for the control and
specification of materials and to provide guidance in the design
of electrical equipment. Flexural properties may vary with the
size of the specimens and the speed of testing. Consequently,
these factors, together with others noted herein, must be
controlled where precise comparative results are desired.
14. Apparatus
14.1 Any testing machine may be used provided it is
accurate to 1 % of the lowest breaking force to be applied.
15. Test Specimens
15.1 Prepare the test specimen with a diameter equal to that
of the rod and a length eight times the diameter, plus 1 in. (25.4
Metric Equivalents
mm) for rods under ⁄2 in. (12.7 mm) in diameter. For rods over
in. mm
⁄2in.andupto2in.(50.8mm)indiameter,machinespecimens
2 50.8 1
to a diameter of ⁄2 in. and cut to a length of 6 in. (152.4 mm).
2 ⁄4 57.1
15.2 When the rod being tested is not circumferentially
3 76.2
3 ⁄2 88.9
isotropic, prepare specimens for testing in both of the principal
directions, and identify them as to directionality. This particu-
FIG. 1 Diagram Showing Location of Rod Tension Test
Specimen in Testing Machine larly includes rods machined from stripmolded or sheet stock.
D349
TABLE 1 Dimensions of Rod Specimens
Total Calculated Minimum Standard Length, L, of Speci-
Nominal Diameter, Length of Radial Sections
Length of Specimen, men to be Used for 3 ⁄2 in.
in. (mm) 2 RS, in. (mm)
A
in. (mm) (88.9 mm) Jaws
⁄8 (3.2) 0.773 (19.63) 14.02 (35.61) 15 (381.0)
⁄16 (4.8) 0.946 (24.03) 14.20 (36.06) 15 (381.0)
⁄4 (6.4) 1.091 (27.71) 14.34 (36.42) 15 (381.0)
⁄8 (9.5) 1.333 (33.86) 14.58 (37.03) 15 (381.0)
⁄2 (12.7) 1.563 (38.01) 14.79 (37.56) 15.75 (400.0)
⁄8 (15.9) 1.714 (43.56) 14.96 (37.99) 15.75 (400.0)
⁄4 (19.0) 1.813 (46.05) 15.12 (38.40) 15.75 (400.0)
⁄8 (22.1) 2.019 (51.28) 15.27 (38.78) 15.75 (400.0)
1 (25.4) 2.154 (54.71) 15.40 (39.11) 16.5 (414.0)
1 ⁄4 (31.8) 2.398 (60.90) 15.65 (39.75) 16.5 (414.0)
1 ⁄2 (38.0) 2.615 (66.42) 15.87 (40.31) 16.5 (414.0)
1 ⁄4 (44.5) 2.812 (70.41) 16.06 (40.79) 16.5 (414.0)
2 (50.8) 2.993 (76.02) 16.24 (41.25) 17 (432.0)
A 1
For other jaws greater than 3 ⁄2 in. (88.9 mm), the standard length shall be increased by twice the length of the jaw minus 7 in. (177.8 mm).The standard length permits
1 1
a slippage of approximately ⁄4 to ⁄2 in. (6.35 to 12.7 mm) in each jaw while maintaining maximum length of jaw grip.
16. Procedure COMPRESSIVESTRENGTH(AXIAL)
16.1 Test five specimens for each laminate orientation, each
20. Significance and Use
asasimplebeamloadedatthecenter.Thedistancebetweenthe
20.1 Compression tests, properly interpreted, provide rea-
supports shall be eight times the diameter of the rod. The
1 sonably accurate information with regard to the compressive
supports shall have contact edges rounded to a radius of ⁄8 in.
properties of rigid round rods when employed under conditions
(3.2 mm). Adjust the crosshead speed of the testing machine
approximating those under which the tests are made. The
nottoexceedanidlespeedof0.050in./min(1.27mm/min)and
compressive strength values may vary with the size of the rigid
apply the load through a steel block having a semi-circular
round rod, and with temperature and atmospheric conditions.
contact edge of the same radius as the rod, with edges rounded
1 Compression tests may provide data for research and develop-
to a radius of ⁄8 in. (3.2 mm).
ment, engineering design, quality control, and acceptance or
rejection under specifications.
17. Calculation
17.1 Calculate the maximum fiber stress, S, as follows:
21. Apparatus
S 5 8 WL/pd (1)
21.1 Any testing machine may be used provided it is
accurate to 1 % of the lowest breaking force to be applied. One
where:
end of the specimen shall bear upon an accurately centered
W 5 breaking load, lbf (N),
spherical bearing block, located, whenever practicable, at the
L 5 distance between supports, in. (mm), and
top. The metal bearing plates shall be directly in contact with
d 5 diameter, in (mm).
the ends of the test specimen.
18. Report
22. Test Specimens
18.1 Report the following information:
22.1 Unless otherwise specified in the test method or
18.1.1 The diameter of the specimen expressed to the
specification for that material, test the samples as received. For
nearest 0.001 in. (0.0254 mm), determined from at least two
rods ⁄8 to 1 in. (3.2 to 25.4 mm) in diameter, prepare the test
measurements 90° apart,
specimen with a diameter equal to the diameter of the rod, and
18.1.2 Crosshead speed in inches per minute (or millime-
length conforming to the following requirements:
tres),
Length, in. Slenderness
18.1.3 The breaking load of each specimen in pounds-force
Diameter, in. (mm) (mm) Ratio
(or newtons),
1 1 1
⁄8 to ⁄4 (3.2 to 6.4) incl ⁄2 (12.7) 16 to 8
1 1
18.1.4 The maximum fiber stress S, in pounds-force per Over ⁄4 to ⁄2 (6.4 to 12.7) incl 1 (25.4) 16 to 8
Over ⁄2 to 1 (12.7 to 25.4) incl 2 (50.8) 16 to 8
square inch (pascals), and
18.1.5 The direction of loading relative to the direction of
22.2 For rods over 1 in. (25.4 mm) in diameter, specimens
1 1
the laminate if the rods are ground from strip-molded stock,
are standard ⁄2 by ⁄2 by 1-in. (12.7 by 12.7 by 25.4-mm) right
sheet stock, and vulcanized fiber.
parallelepiped, cut from the rods so as to be representative of
their cross sections both at the center and near the edges.
19. Precision and Bias
22.3 Accurately cut or grind the ends of each specimen
parallel to each other.
19.1 Precision—This test method has been in use for many
years, but no statement of precision has been available and no
23. Procedure
activity is planned to develop such a statement.
19.2 Bias—A statement of bias is not applicable in view of 23.1 Adjust the crosshead speed of the testing machine not
the lack of a standard reference material for this property. to exceed an idle speed of 0.050 in./min (1.27 mm/min), and
D349
test five specimens with the load applied perpendicular to the 30. Report
faces or ends of the specimen.
30.1 Report the following information:
23.2 Discardspecimensthatbreakatsomeobviousflawand
30.1.1 Complete identification of the material tested, and
make retests unless such flaws constitute a variable, the effect
30.1.2 Average density in grams per cubic centimetre.
of which it is desired to study.
DIELECTRIC STRENGTH
24. Report
24.1 Report the following information:
31. Significance and Use
24.1.1 The diameter of the specimen expressed to the
31.1 The dielectric strength of a rigid round rod will depend
nearest 0.001 in. (0.0254 mm), determined from at least two
upon a number of factors such as rod diameter, which deter-
measurements 90° apart,
mines the electrode diameter to be used in the test; direction of
24.1.2 The load on each specimen in pounds at the first sign
applied dielectric stress, whether transverse or parallel to the
of rupture, and
axis; rate of application and the frequency of the voltage;
24.1.3 The compressive strength in pounds-force per square
temperature, and surrounding atmospheric humidity. The test
inch (or pascals) calculated from the data obtained on the
values for dielectric strength determined by standard proce-
application of the load perpendicular to the face of the
dure, which stresses a rod section ⁄16 in. (1.6 mm) in a
specimen.
direction parallel to the axis, may not necessarily indicate the
25. Precision and Bias
safe operation in service. In actual service, the voltage may be
applied over a considerably greater rod section than ⁄16 in. (1.6
25.1 Precision—This test method has been in use for many
mm) or the voltage stress may be applied in a direction
years, but no statement of precision has been available a
...

Questions, Comments and Discussion

Ask us and Technical Secretary will try to provide an answer. You can facilitate discussion about the standard in here.