ASTM D3658-90(1995)
(Test Method)Standard Test Method for Determining the Torque Strength of Ultraviolet (UV) Light-Cured Glass/Metal Adhesive Joints
Standard Test Method for Determining the Torque Strength of Ultraviolet (UV) Light-Cured Glass/Metal Adhesive Joints
SCOPE
1.1 This test method covers the simplistic comparison of strengths of glass/metal joints when the adhesive is cured by ultraviolet (UV) radiation and standard specimens are used and tested under specified conditions of preparation, radiation, and load.
1.2 The values stated in inch-pound units are to be regarded as the standard. The values given in parentheses are provided for information purposes only.
1.3 This test method involves torque loading UV-bonded hexagonal metal blocks to glass plates.
1.4 This test method may be used to obtain comparative torque strength-to-failure data for other bonded joint systems, radiation cured or not.
1.5 This standard does not purport to address all of the safety concerns, if any, associated with its use. It is the responsibility of the user of this standard to establish appropriate safety and health practices and determine the applicability of regulatory limitations prior to use.
General Information
Relations
Standards Content (Sample)
NOTICE: This standard has either been superseded and replaced by a new version or discontinued.
Contact ASTM International (www.astm.org) for the latest information.
Designation: D 3658 – 90 (Reapproved 1995)
Standard Test Method for
Determining the Torque Strength of Ultraviolet (UV) Light-
Cured Glass/Metal Adhesive Joints
This standard is issued under the fixed designation D 3658; the number immediately following the designation indicates the year of
original adoption or, in the case of revision, the year of last revision. A number in parentheses indicates the year of last reapproval. A
superscript epsilon (e) indicates an editorial change since the last revision or reapproval.
1. Scope 3. Terminology
1.1 This test method covers the simplistic comparison of 3.1 Definitions—Definitions of terms in this test method
strengths of glass/metal joints when the adhesive is cured by may be found in Terminology D 907.
ultraviolet (UV) radiation and standard specimens are used and
4. Significance and Use
tested under specified conditions of preparation, radiation, and
4.1 This test method provides reasonably accurate informa-
load.
tion with regard to the ability of UV curing adhesives to
1.2 This test method involves torque loading UV-bonded
hexagonal metal blocks to glass plates. withstand torsional shearing forces. It may be used to deter-
mine the effect of environment on torsional shear strength.
1.3 This test method may be used to obtain comparative
torque strength-to-failure data for other bonded joint systems,
5. Apparatus
radiation cured or not.
5.1 The apparatus is schematically shown in Fig. 1.
1.4 This standard does not purport to address all of the
5.2 The apparatus shall be capable of transferring a uniform
safety concerns, if any, associated with its use. It is the
and continuous torque to the bonded hexagonal block.
responsibility of the user of this standard to establish appro-
5.3 An accurate and reliable means of recording load to
priate safety and health practices and determine the applica-
failure, that is, x-y or strip chart recorder, should also be a part
bility of regulatory limitations prior to use.
of the test system.
2. Referenced Documents
5.4 A safety shield or other safety device shall be incorpo-
2.1 ASTM Standards: rated as part of the system to prevent injury from possible
shattering glass.
A 109 Specification for Steel, Strip, Carbon, Cold-Rolled
A 167 Specification for Stainless and Heat-Resisting
2 6. Test Specimens
Chromium-Nickel Steel Plate, Sheet, and Strip
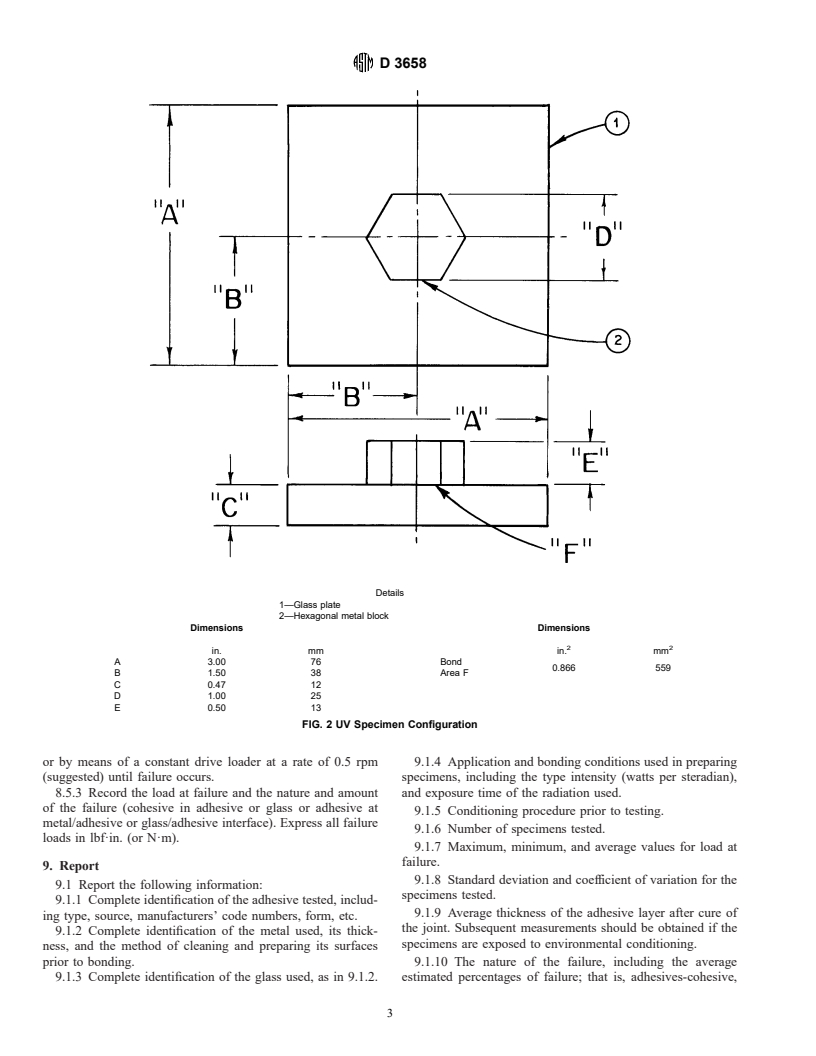
6.1 Recommended specimens are as shown in Fig. 2.
B 36 Specification for Brass Plate, Sheet, Strip, and Rolled
6.2 Selection of the test metal for hexagonal blocks is at the
Bar
discretion of the user; however, the following grades are
B 152 Specification for Copper Sheet, Strip, Plate and
recommended (see Test Method D 1002):
Rolled Bar
B 209 Specification for Aluminum and Aluminum-Alloy Metal Specification
Brass B 36, Alloy 8
Sheet and Plate
Copper B 152, Type A
B 265 Specification for Titanium and Titanium Alloy Strip,
Aluminum B 209, Alloy 2024, T3 Temper
Sheet, and Plate Steel A 109, Grade 2
Corrosion-resisting steel A 167, Type 302
D 907 Terminology of Adhesives
Titanium B 265
D 1002 Test Method for Apparent Shear Strength of Single-
6.3 Hexagonal blocks may be reused after testing by bond-
Lap-Joint Adhesively Bonded Metal Specimens by Ten-
ing the opposite end of the block or by cleaning the original
sion Loading (Metal-to-Metal)
bonded end by sanding or grinding and taking care to ensure
that ends are smooth and parallel.
This test method is under the jurisdiction of ASTM Committee D-14 on
6.4 Selection of the glass plate is at the discretion of the
Adhesives and is the direct responsibility of Subcommittee D 14.80 on Metal
user. Standard ⁄2-in. (13-mm) thick pressed plate glass is
Bonding Adhesives.
recommended.
Current edition approved March 30, 1990. Published May 1990. Originally
published as D 3658 – 78. Last previous edition D 3658 – 78(1984).
7. Preparation of Test Specimens
Annual Book of ASTM Standards, Vol 01.03.
Annual Book of ASTM Standards, Vol 02.01.
7.1 The assembly and cure of the specimen is recommended
Annual Book of ASTM Standards, Vol 02.02.
5 as shown in Fig. 3.
Annual Book of ASTM Standards, Vol 02.04.
Annual Book of ASTM Standards, Vol 15.06. 7.2 Cut glass plates 3 by 3 in. (76 by 76 mm) square to fit
Copyright © ASTM, 100 Barr Harbor Drive, West Conshohocken, PA 19428-2959, United States.
D 3658
Details
1—Base plate
2—Upright
3—Mounting bracket
4—Lebow socket wrench sensor Model 2133-103
5—Pillow block—Boston #PPB10
6—Extension—Armstrong #4-105 A
7—1-in. (25.4-mm) hexagonal socket–Armstrong #A4-632
8—UV specimen (see Fig. 2)
9—Adjustable side guides (Fig. 2)
10—Neoprene pad (bonded to Detail 9) (Fig. 2)
Dimensions
in. mm
A 0.50 13
B 3.75 95
C 0.62 16
D 5.50 140
E 0.50 13
F 6.75 170
G 6.25 160
H 2.62 66
FIG. 1 UV Testing Apparatus
the holding fixture without lateral movement. pressure is applied by means of two 10-lb (0.9-kg) spring
7.3 A recommended cleaning procedure is to soak the glass clamps.
plates in a
...


Questions, Comments and Discussion
Ask us and Technical Secretary will try to provide an answer. You can facilitate discussion about the standard in here.