ASTM F390-98(2003)
(Test Method)Standard Test Method for Sheet Resistance of Thin Metallic Films With a Collinear Four-Probe Array
Standard Test Method for Sheet Resistance of Thin Metallic Films With a Collinear Four-Probe Array
ABSTRACT
This test method covers the measurement of the sheet resistance of metallic thin films with a collinear four-probe array. It is intended for use with rectangular metallic films formed by deposition of a material or by a thinning process and supported by an insulating substrate. This test method is suitable for referee measurement purposes as well as for routine acceptance measurements. A collinear four-probe array is used to determine the sheet resistance by passing a measured direct current through the specimen between the outer probes and measuring the resulting potential difference between the inner probes. The sheet resistance is calculated from the measured current and potential values using correction factors associated with the geometry of the specimen and the probe spacing. The accuracy of the electrical measuring equipment is tested by means of an analog circuit containing a known standard resistor together with other resistors which simulate the resistance at the contacts between the probe tips and the film surface.
SCOPE
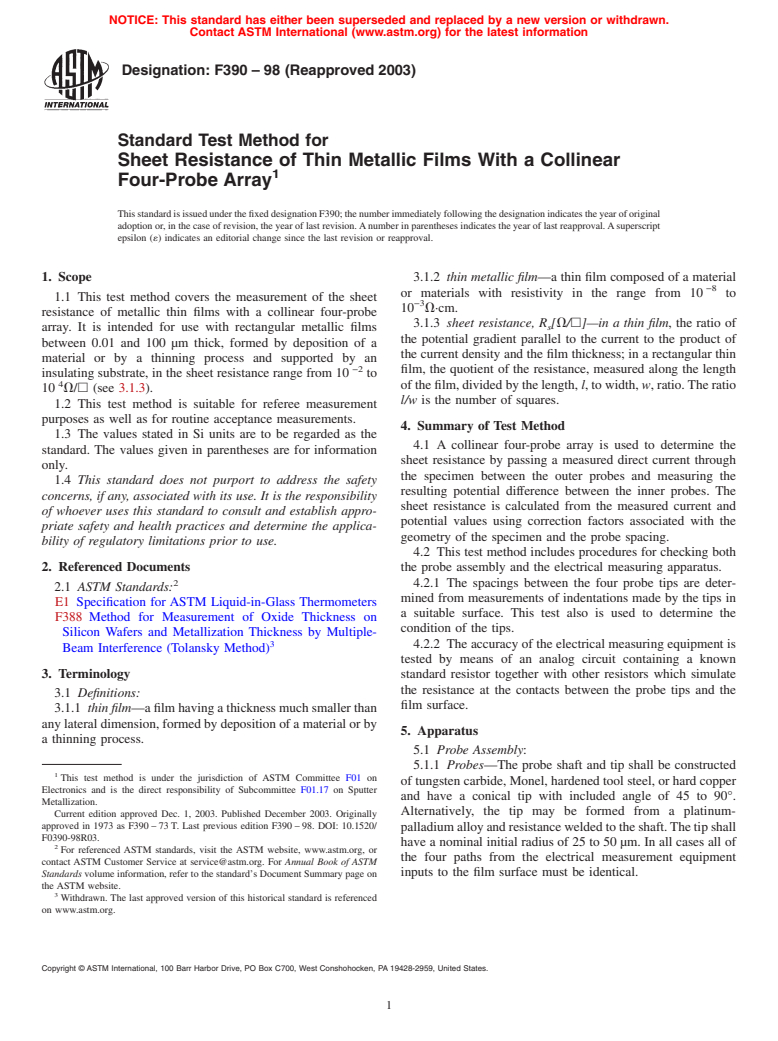
1.1 This test method covers the measurement of the sheet resistance of metallic thin films with a collinear four-probe array. It is intended for use with rectangular metallic films between 0.01 and 100 [mu]m thick, formed by deposition of a material or by a thinning process and supported by an insulating substrate, in the sheet resistance range from 10 to 10 [omega]/[open-box] (see 3.1.3).
1.2 This test method is suitable for referee measurement purposes as well as for routine acceptance measurements.
1.3 The values stated in Si units are to be regarded as the standard. The values given in parentheses are for information only.
1.4 This standard does not purport to address all of the safety concerns, if any, associated with its use. It is the responsibility of the user of this standard to establish appropriate safety and health practices and determine the applicability of regulatory limitations prior to use.
General Information
Relations
Standards Content (Sample)
NOTICE: This standard has either been superseded and replaced by a new version or withdrawn.
Contact ASTM International (www.astm.org) for the latest information
Designation:F390–98 (Reapproved2003)
Standard Test Method for
Sheet Resistance of Thin Metallic Films With a Collinear
Four-Probe Array
ThisstandardisissuedunderthefixeddesignationF390;thenumberimmediatelyfollowingthedesignationindicatestheyearoforiginal
adoptionor,inthecaseofrevision,theyearoflastrevision.Anumberinparenthesesindicatestheyearoflastreapproval.Asuperscript
epsilon (´) indicates an editorial change since the last revision or reapproval.
1. Scope 3.1.2 thin metallic film—a thin film composed of a material
−8
or materials with resistivity in the range from 10 to
1.1 This test method covers the measurement of the sheet
−3
10 V·cm.
resistance of metallic thin films with a collinear four-probe
3.1.3 sheet resistance, R [V/h]—in a thin film, the ratio of
array. It is intended for use with rectangular metallic films s
the potential gradient parallel to the current to the product of
between 0.01 and 100 µm thick, formed by deposition of a
the current density and the film thickness; in a rectangular thin
material or by a thinning process and supported by an
−2
film, the quotient of the resistance, measured along the length
insulating substrate, in the sheet resistance range from 10 to
ofthefilm,dividedbythelength, l,towidth, w,ratio.Theratio
10 V/h (see 3.1.3).
l/w is the number of squares.
1.2 This test method is suitable for referee measurement
purposes as well as for routine acceptance measurements.
4. Summary of Test Method
1.3 The values stated in Si units are to be regarded as the
4.1 A collinear four-probe array is used to determine the
standard. The values given in parentheses are for information
sheet resistance by passing a measured direct current through
only.
the specimen between the outer probes and measuring the
1.4 This standard does not purport to address the safety
resulting potential difference between the inner probes. The
concerns, if any, associated with its use. It is the responsibility
sheet resistance is calculated from the measured current and
of whoever uses this standard to consult and establish appro-
potential values using correction factors associated with the
priate safety and health practices and determine the applica-
geometry of the specimen and the probe spacing.
bility of regulatory limitations prior to use.
4.2 This test method includes procedures for checking both
2. Referenced Documents the probe assembly and the electrical measuring apparatus.
4.2.1 The spacings between the four probe tips are deter-
2.1 ASTM Standards:
mined from measurements of indentations made by the tips in
E1 Specification for ASTM Liquid-in-Glass Thermometers
a suitable surface. This test also is used to determine the
F388 Method for Measurement of Oxide Thickness on
condition of the tips.
Silicon Wafers and Metallization Thickness by Multiple-
4.2.2 The accuracy of the electrical measuring equipment is
Beam Interference (Tolansky Method)
tested by means of an analog circuit containing a known
3. Terminology
standard resistor together with other resistors which simulate
the resistance at the contacts between the probe tips and the
3.1 Definitions:
film surface.
3.1.1 thin film—afilmhavingathicknessmuchsmallerthan
anylateraldimension,formedbydepositionofamaterialorby
5. Apparatus
a thinning process.
5.1 Probe Assembly:
5.1.1 Probes—The probe shaft and tip shall be constructed
This test method is under the jurisdiction of ASTM Committee F01 on
oftungstencarbide,Monel,hardenedtoolsteel,orhardcopper
Electronics and is the direct responsibility of Subcommittee F01.17 on Sputter
and have a conical tip with included angle of 45 to 90°.
Metallization.
Alternatively, the tip may be formed from a platinum-
Current edition approved Dec. 1, 2003. Published December 2003. Originally
approved in 1973 as F390–73T. Last previous edition F390–98. DOI: 10.1520/
palladiumalloyandresistanceweldedtotheshaft.Thetipshall
F0390-98R03.
have a nominal initial radius of 25 to 50 µm. In all cases all of
For referenced ASTM standards, visit the ASTM website, www.astm.org, or
the four paths from the electrical measurement equipment
contact ASTM Customer Service at service@astm.org. For Annual Book of ASTM
Standards volume information, refer to the standard’s Document Summary page on inputs to the film surface must be identical.
the ASTM website.
Withdrawn. The last approved version of this historical standard is referenced
on www.astm.org.
Copyright © ASTM International, 100 Barr Harbor Drive, PO Box C700, West Conshohocken, PA 19428-2959, United States.
F390–98 (2003)
5.1.2 Probe Force—The probes shall be uniformly loaded 6.2 Geometry—Measure the length, l, and width, w,ofthe
to exert a force sufficient to deform the metal film but specimen with vernier calipers. Record the values.
insufficient to puncture the film.Arough guide for loading is a 6.3 Measure the thickness, t, of the film in accordance with
load of 20 g/Mohs (unit of hardness) of the film material on Method F388.
each probe.
7. Suitability of Test Equipment
5.1.3 Probe Characteristics—The probes shall be mounted
in an insulating fixture such as a sapphire bearing in a methyl
7.1 Probe Assembly—The probe spacing and tip condition
methacrylate or hardened polystyrene block in an equally
shall be established in the following manner. It is recom-
spaced linear array. The electrical insulation between adjacent
mended that this be done immediately prior to a referee
probepointsshallbeatleast10 timesgreaterthanthe V/Iratio
measurement.
of the film. The spacing shall be 0.64 to 1.00 mm inclusive
7.1.1 Procedure:
(0.025 to 0.040 in. inclusive) as agreed upon between the
7.1.1.1 Make a series of indentations on the surface of the
parties concerned with the test. The precision and reproduc-
specimen to be tested or other surface of similar hardness with
ibilityoftheprobespacingshallbeestablishedaccordingtothe
the four-probe array. Make these indentations by applying the
procedure of 7.1.
probes to the surface using normal point pressures. Lift the
5.1.4 Probe Support—The probe support shall allow the
probesandmoveeitherthespecimensurfaceortheprobes0.05
probes to be lowered perpendicularly onto the surface of the
to 0.10 mm in a direction perpendicular to a line through the
specimen so that the center of the array is centered on the
probe tips. Again apply the probes to the specimen surface.
specimenwithin 610%ofthespecimenlength landwidth w.
Repeat the procedure until a series of ten indentation sets is
5.2 Electrical Measuring Apparatus:
obtained.
5.2.1 The electrical apparatus shall consist of a suitable
NOTE 1—It is recommended that the surface or the probes be moved
voltmeter, current source, ammeter, and electrical connections
twice the usual distance after every second or every third indentation set
(see 7.2).
in order to assist the operator in identifying the indentations belonging to
5.2.2 Voltmeter with input impedance 10 times the V/I
each set.
ratio of the film.Avacuum-tube voltmeter, a digital voltmeter,
7.1.1.2 Place the specimen so indented on the stage of the
or similar high-impedance input apparatus is suitable.
toolmaker’s microscope so that the Y-axis readings (Y and Y
A B
5.2.3 Current Source with current regulation and stability
in Fig. 1) do not differ by more than 0.15 mm (0.006 in.). For
of 60.1% or better. The recommended current range is from
each of the ten indentation sets record the readings A through
0.01 to 100 mA.
H (defined in Fig. 1) on the X-axis of the toolmaker’s
5.2.4 Ammeter capable of reading direct current in the
microscope and the readings Y and Y on the Y-axis.
A B
rangefrom0.01to100mAtoanaccuracyof 60.1%orbetter.
7.1.2 Calculations:
5.2.5 The current source and ammeter are connected to the
7.1.2.1 For each of the ten sets of measurements calculate
outer probes; the voltmeter is connected to the inner probes.
the probe separations, S ,S , and S from the equations:
1j 2j 3j
5.3 Specimen Support—A copper block at least 100 mm
S 5[~C 1 D !/2] 2[~A 1 B !/2],
(approximately 4 in.) in lateral dimensions and at least 40 mm
1j j j j j
(approximately 1.5 in.) thick, shall be used to support the
specimen and provide a heat sink. It shall contain a hole that S 5[~E 1 F !/2] 2[~C 1 D !/2],and
2j j j j j
will accommodate a thermometer (see 5.4) in such a manner
thatthecenterofthebulbofthethermometershallbenotmore
S 5[~G 1 H !/2] 2[~E 1 F !/2]
3j j j j j
than 10 mm below the central area of the top of the block
where the specimen is to be placed.
where the index j is the set number and has a value from 1
5.4 Thermometer having a range from−8 to 32°C and
to 10.
conforming to the requirements for Thermometer 63C as
7.1.2.2 Calculate the average value for each of the three
prescribed in Specification E1.
separations using the S calculated above and the equation:
ij
5.5 Vernier Calipers.
5.6 Toolmaker’s Microscope capable of measuring incre- ¯
S 5 5 S
S D
i ( ij
j 51
ments of 2.5 µm.
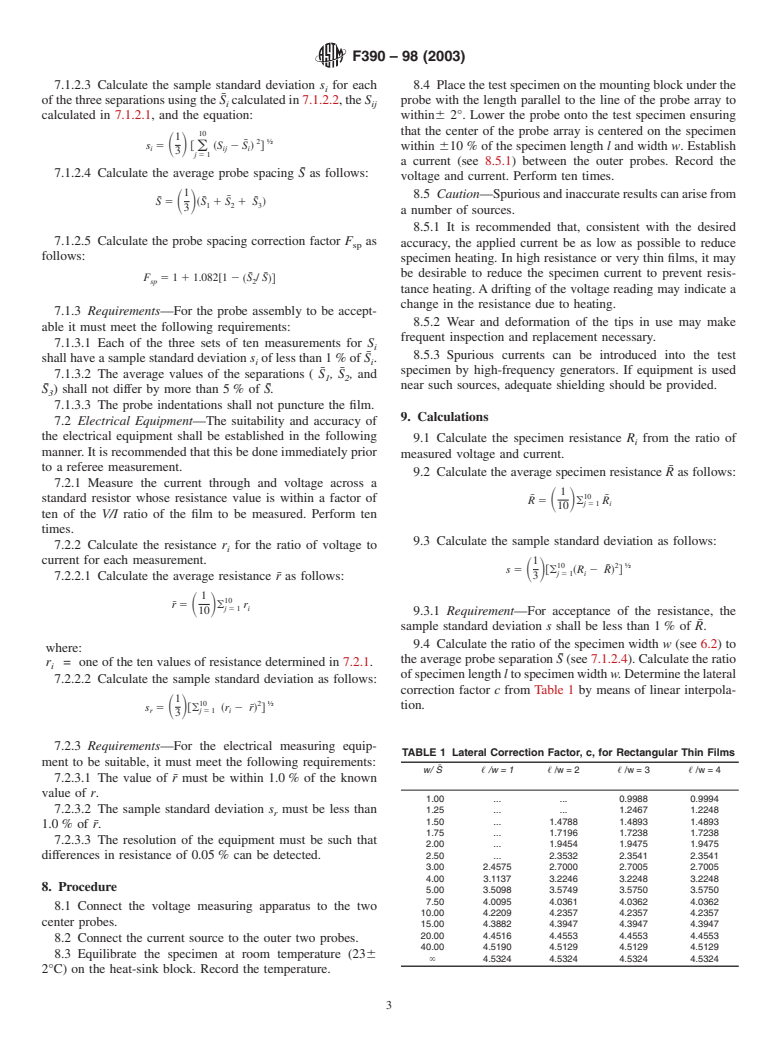
where the ind
...


Questions, Comments and Discussion
Ask us and Technical Secretary will try to provide an answer. You can facilitate discussion about the standard in here.