ASTM F682-82a(2004)
(Specification)Standard Specification for Wrought Carbon Steel Sleeve-Type Pipe Couplings
Standard Specification for Wrought Carbon Steel Sleeve-Type Pipe Couplings
ABSTRACT
This specification covers wrought carbon steel sleeve type pipe couplings suitable for joining carbon steel pipes. Couplings are furnished in two types as follows: Type I couplings are intended for use on all schedules of pipe in which the pipe wall thickness does not exceed the wall thickness of standard weight pipe. Type II couplings are intended for use on all schedules of pipe in which the pipe wall thickness does not exceed the wall thickness of extra strong pipe. The couplings shall be manufactured from material having a chemical composition conforming to the requirements specified. Couplings made from plate or tubular products need not to be heat treated. Hot-formed couplings finished at a temperature in excess of a certain value shall subsequently be annealed, normalized, or normalized and tempered. Cold-formed couplings upon which the final forming operation is completed at a temperature below a certain quantity shall be normalized or shall be stress-relieved. Carbon steel couplings made from forgings shall subsequently be annealed, normalized, or normalized and tempered. Mechanical properties of steel such as tensile strength, yield strength, yield point, and elongation shall be determined.
SCOPE
1.1 This specification covers wrought carbon steel sleeve-type pipe couplings suitable for joining carbon steel pipes.
1.2 Type I couplings are intended for use on all schedules of pipe in which the pipe wall thickness does not exceed the wall thickness of standard weight pipe. Type II couplings are intended for use on all schedules of pipe in which the pipe wall thickness does not exceed the wall thickness of extra strong pipe.
1.3 This specification does not cover cast steel couplings. The values stated in inch-pound units are to be regarded as the standard.
Note 1
See for rationale used to develop this specification.
General Information
Relations
Standards Content (Sample)
NOTICE: This standard has either been superseded and replaced by a new version or withdrawn.
Contact ASTM International (www.astm.org) for the latest information
An American National Standard
Designation: F 682 – 82a (Reapproved 2004)
Standard Specification for
Wrought Carbon Steel Sleeve-Type Pipe Couplings
This standard is issued under the fixed designation F 682; the number immediately following the designation indicates the year of
original adoption or, in the case of revision, the year of last revision.Anumber in parentheses indicates the year of last reapproval.A
superscript epsilon (e) indicates an editorial change since the last revision or reapproval.
This standard has been approved for use by agencies of the Department of Defense.
1. Scope 2.3 ASME Boiler and Pressure Vessel Code:
Section VIII Unfired Pressure Vessels
1.1 This specification covers wrought carbon steel sleeve-
Section IX Welding Qualifications
type pipe couplings suitable for joining carbon steel pipes.
2.4 Federal Regulations:
1.2 TypeIcouplingsareintendedforuseonallschedulesof
Title 46, Code of Federal Regulations (CFR), Shipping,
pipe in which the pipe wall thickness does not exceed the wall
Parts 41 to 69
thickness of standard weight pipe. Type II couplings are
2.5 ANSI Standards:
intendedforuseonallschedulesofpipeinwhichthepipewall
B16.5 Pipe Flanges and Flange Fittings
thickness does not exceed the wall thickness of extra strong
pipe.
3. Classification
1.3 This specification does not cover cast steel couplings.
3.1 Couplings are furnished in two types as follows:
NOTE 1—Thevaluesstatedininch-poundunitsaretoberegardedasthe
3.1.1 Type I—Couplings (see 1.2).
standard.
3.1.2 Type II—Couplings (see 1.2).
NOTE 2—See Appendix X1 for rationale used to develop this specifi-
cation.
NOTE 3—Type II couplings may be used in place of Type I couplings
for all schedules of pipe in which the pipe wall thickness does not exceed
2. Referenced Documents
thewallthicknessofstandardweightpipingthrough18in.orSchedule40
piping through 16 in.
2.1 ASTM Standards:
A53/A53M Specification for Pipe, Steel, Black and Hot-
4. Ordering Information
Dipped, Zinc-Coated, Welded and Seamless
4.1 Ordersformaterialunderthisspecificationshallinclude
A106/A106M Specification for Seamless Carbon Steel
the following information:
Pipe for High-Temperature Service
4.1.1 Quantity (number of couplings of each size and type),
A234/A234M Specification for Piping Fittings of Wrought
4.1.2 Name of material (sleeve-type pipe couplings),
Carbon Steel and Alloy Steel for Moderate and High
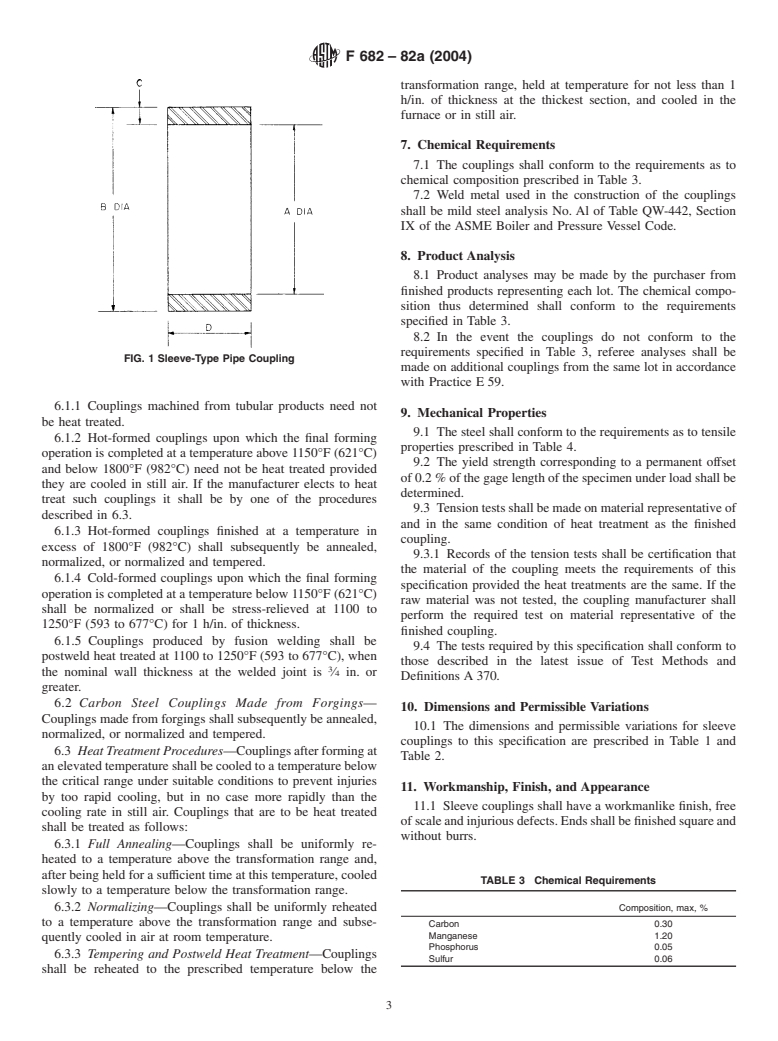
4.1.3 Size (nominal, see Table 1 and Table 2 and Fig. 1),
Temperature Service
4.1.4 Type (see 3.1),
A370 TestMethodsandDefinitionsforMechanicalTesting
4.1.5 ASTM designation and date of issue.
of Steel Products
E59 PracticeforSamplingSteelandIronforDetermination
5. Materials and Manufacture
of Chemical Composition
5.1 Materials—The couplings shall be manufactured from
2.2 Manufacturer’s Standardization Society of the Valve
material having a chemical composition conforming to the
and Fittings Industry Standard:
requirements of 7.1 and with the mechanical properties of
MSS SP-25 Standard Marking System for Valves, Fittings,
Section 9.
Flanges and Unions
5.2 Manufacture—Theinitialformoftherawmaterialshall
be at the discretion of the manufacturer except couplings shall
not be machined from unformed plate. The material shall be
This specification is under the jurisdiction ofASTM Committee F25 on Ships
and Marine Technology and is the direct responsibility of Subcommittee F25.11 on
such that the finished couplings conform to all of the specified
Machinery and Piping Systems.
requirements (see Appendix X2).
Current edition approved Nov. 1, 2004. Published November 2004. Originally
approved in 1980. Last previous edition approved in 1998 as F682–82a (1998).
For referenced ASTM standards, visit the ASTM website, www.astm.org, or
contact ASTM Customer Service at service@astm.org. For Annual Book of ASTM Available from American Society of Mechanical Engineers (ASME), ASME
Standards volume information, refer to the standard’s Document Summary page on International Headquarters, Three Park Ave., New York, NY 10016-5990.
the ASTM website. AvailablefromStandardizationDocumentsOrderDesk,Bldg.4SectionD,700
Withdrawn. Robbins Ave., Philadelphia, PA 19111-5094, Attn: NPODS.
4 7
AvailablefromManufacturersStandardizationSocietyoftheValveandFittings Available fromAmerican National Standards Institute (ANSI), 25 W. 43rd St.,
Industry (MSS), 127 Park St., NE, Vienna, VA 22180-4602. 4th Floor, New York, NY 10036.
Copyright © ASTM International, 100 Barr Harbor Drive, PO Box C700, West Conshohocken, PA 19428-2959, United States.
F 682 – 82a (2004)
TABLE 1 Dimensions for Type I Couplings (See Fig. 1)
Dimension A, Inside Dimension B, Outside Dimension C, Thick- Dimension D,
Nominal Size, in.
A B C
Diameter, in. (mm) Diameter, in. (mm) ness, min, in. (mm) Length, in. (mm)
⁄4 0.589 (15.0) 0.875 (22.2) 0.143 (3.6) 1 (25)
3 1
⁄8 0.724 (18.4) 0.992 (25.2) 0.134 (3.4) 1 ⁄4 (32)
1 1
⁄2 0.889 (22.6) 1.201 (30.5) 0.156 (4.0) 1 ⁄4 (32)
3 1
⁄4 1.099 (27.9) 1.401 (35.6) 0.151 (3.8) 1 ⁄2 (38)
1 1.364 (34.6) 1.710 (43.4) 0.173 (4.4) 1 ⁄2 (38)
1 1
1 ⁄4 1.709 (43.4) 2.057 (52.2) 0.174 (4.4) 1 ⁄2 (38)
1 1
1 ⁄2 1.949 (49.5) 2.306 (58.6) 0.179 (4.5) 1 ⁄2 (38)
2 2.424 (61.6) 2.807 (71.3) 0.192 (4.9) 1 ⁄2 (38)
1 1
2 ⁄2 2.924 (74.3) 3.444 (87.5) 0.260 (6.6) 1 ⁄2 (38)
3 3.545 (90.0) 4.105 (104.3) 0.280 (7.1) 1 ⁄2 (38)
3 ⁄2 4.070 (103.4) 4.633 (117.7) 0.282 (7.2) 2 (51)
4 4.570 (116.1) 5.164 (131.2) 0.297 (7.5) 2 (51)
5 5.660 (143.8) 6.286 (159.7) 0.313 (8.0) 2 (51)
6 6.720 (170.7) 7.409 (188.2) 0.345 (8.8) 2 (51)
8 8.720 (221.5) 9.527 (242.0) 0.404 (10.3) 2 ⁄2 (64)
10 10.880 (276.4) 11.875 (301.6) 0.498 (12.6) 2 ⁄2 (64)
12 12.880 (327.2) 13.800 (350.5) 0.460 (11.7) 2 ⁄2 (64)
14 14.140 (359.2) 15.050 (382.3) 0.455 (11.6) 2 ⁄2 (64)
16 16.160 (410.5) 17.050 (433.1) 0.445 (11.3) 2 ⁄2 (64)
18 18.180 (461.8) 19.050 (483.9) 0.435 (11.0) 2 ⁄2 (64)
A
Tolerances shall be (1) Sizes through 3 in. incl: +0.000, −0.010 in. (+0.000, −0.254 mm); (2) Sizes 3 ⁄2 through 10 in. incl: +0.030, −0.000 in. (+0.762, −0.000 mm);
and (3) Sizes above 10 in.: +0.060, −0.000 in. (+1.524, −0.000 mm).
B
Tolerances shall be (1) Sizes through 10 in. incl: +0.125, −0.000 in. (+3.175, −0.000 mm) and (2) Sizes above 10 in.: +1.000, −0.000 in. (+25.4, −0.000 mm).
C
Tolerances for all sizes shall be +0.250, −0.000 in. (+6.4, −0.000 mm).
TABLE 2 Dimensions for Type II Couplings (See Fig. 1)
Dimension A, Inside Dimension B, Outside Dimension C, Thick- Dimension D,
Nominal Size, in.
A B C
Diameter, in. (mm) Diameter, in. (mm) ness, min, in. (mm) Length, in. (mm)
⁄4 0.589 (15.0) 1.055 (26.8) 0.233 (5.9) 1 (25)
3 1
⁄8 0.724 (18.4) 1.156 (29.4) 0.216 (5.5) 1 ⁄4 (32)
1 1
⁄2 0.889 (22.6) 1.369 (34.8) 0.240 (6.1) 1 ⁄4 (32)
3 1
⁄4 1.099 (27.9) 1.557 (39.5) 0.229 (5.8) 1 ⁄2 (38)
1 1.364 (34.6) 1.876 (47.7)† 0.256 (6.5)† 1 ⁄2 (38)
1 1
1 ⁄4 1.709 (43.4) 2.221 (56.4)† 0.256 (6.5)† 1 ⁄2 (38)
1 1
1 ⁄2 1.949 (49.5) 2.469 (62.7)† 0.260 (6.6)† 1 ⁄2 (38)
2 2.424 61.6) 2.986 (75.8)† 0.281 (7.1)† 1 ⁄2 (38)
1 1
2 ⁄2 2.924 (74.3) 3.648 (92.7)† 0.362 (9.2)† 1 ⁄2 (38)
3 3.545 (90.0) 4.340 (110.2)† 0.398 (10.1)† 1 ⁄2 (38)
3 ⁄2 4.070 (103.4) 4.891 (124.2)† 0.411 (10.4)† 2 (51)
4 4.570 (116.1) 5.444 (138.3) 0.437 (11.1) 2 (51)
5 5.660 (143.8) 6.613 (168.0) 0.477 (12.1) 2 (51)
6 6.720 (170.7) 7.875 (200.0) 0.578 (14.7) 2 (51)
8 8.720 (221.5) 10.125 (257.2) 0.703 (17.8) 2 ⁄2 (64)
10 10.880 (276.4) 12.150 (308.6) 0.635 (16.1) 2 ⁄2 (64)
12 12.880 (327.2) 14.150 (359.4) 0.635 (16.1) 2 ⁄2 (64)
14 14.140 (359.2) 15.400 (391.2) 0.630 (16.0) 2 ⁄2 (64)
16 16.160 (410.5) 17.400 (442.0) 0.620 (15.7) 2 ⁄2 (64)
18 18.180 (461.8) 19.400 (492.8) 0.610 (15.5) 2 ⁄2 (64)
A
Tolerances shall be (1) Sizes through 3 in. incl: +0.000, −0.010 in. (+0.000, −0.254 mm); (2) Sizes 3 ⁄2 through 10 in. incl: +0.030, −0.000 in. (+0.762, −0.000 mm);
and (3) Sizes above 10 in.: +0.060, −0.000 in. (+1.524, −0.000 mm).
B
Tolerances shall be (1) Sizes through 10 in. incl: +0.125, −0.000 in. (+3.175, −0.000 mm) and (2) Sizes above 10 in.: +1.000, −0.000 in. (+25.4, −0.000 mm).
C
Tolerances for all sizes shall be +0.250, −0.000 in. (+6.4, −0.000 mm).
† Editorially corrected.
5.3 Couplings fabricated by welding shall be (a) made by 5.3.2 Sizes 3 ⁄2 -in. NPS Through 16-in. NPS— No nonde-
welders, welding operators, and welding procedures qualified
structive tests required, and
under the provisions of ASME Boiler and Pressure Vessel
5.3.3 Sizes 18-in. NPS and Above—Any method of nonde-
Code, Section IX; (b) heat treated in accordance with Section
structive testing may be used provided the tests are conducted
6 of this specification; and (c) nondestructively tested as
in accordance with the applicable parts of ASME Code,
follows:
Section VIII.
5.3.1 Sizes 3-in. NPS and Below—Radiographically exam-
ined throughout the entire length of each fabricated weld in
6. Heat Treatment
accordance with Paragraph UW-51 of ASME Code, Section
VIII. 6.1 Couplings Made from Plate or Tubular Products:
F 682 – 82a (2004)
transformation range, held at temperature for not less than 1
h/in. of thickness at the thickest section, and cooled in the
furnace or in still air.
7. Chemical Requirements
7.1 The couplings shall conform to the requirements as to
chemical composition prescribed in Table 3.
7.2 Weld metal used in the construction of the couplings
shall be mild steel analysis No. Al of Table QW-442, Section
IX of the ASME Boiler and Pressure Vessel Code.
8. Product Analysis
8.1 Product analyses may be made by the purchaser from
finished products representing each lot. The chemical compo-
sition thus determined shall conform to the requirements
specified in Table 3.
8.2 In the event the couplings do not conform to the
requirements specified in Table 3, referee analyses shall be
FIG. 1 Sleeve-Type Pipe Coupling
made on additional couplings from the same lot in accordance
with Practice E59.
...


Questions, Comments and Discussion
Ask us and Technical Secretary will try to provide an answer. You can facilitate discussion about the standard in here.