ASTM D5483-05(2015)
(Test Method)Standard Test Method for Oxidation Induction Time of Lubricating Greases by Pressure Differential Scanning Calorimetry
Standard Test Method for Oxidation Induction Time of Lubricating Greases by Pressure Differential Scanning Calorimetry
SIGNIFICANCE AND USE
5.1 Oxidation induction time, as determined under the conditions of this test method, can be used as an indication of oxidation stability.3 This test method can be used for research and development, quality control and specification purposes. However, no correlation has been determined between the results of this test method and service performance.
SCOPE
1.1 This test method covers the determination of oxidation induction time of lubricating greases subjected to oxygen at 3.5 MPa (500 psig) and temperatures between 155 °C and 210 °C.
1.2 The values stated in SI units are to be regarded as standard. The values given in parentheses are for information only.
1.3 This standard does not purport to address all of the safety concerns, if any, associated with its use. It is the responsibility of the user of this standard to establish appropriate safety and health practices and determine the applicability of regulatory limitations prior to use.
General Information
Relations
Buy Standard
Standards Content (Sample)
NOTICE: This standard has either been superseded and replaced by a new version or withdrawn.
Contact ASTM International (www.astm.org) for the latest information
Designation: D5483 − 05 (Reapproved 2015)
Standard Test Method for
Oxidation Induction Time of Lubricating Greases by
Pressure Differential Scanning Calorimetry
This standard is issued under the fixed designation D5483; the number immediately following the designation indicates the year of
original adoption or, in the case of revision, the year of last revision. A number in parentheses indicates the year of last reapproval. A
superscript epsilon (´) indicates an editorial change since the last revision or reapproval.
1. Scope 3.1.4 thermal curve, n—a graph of sample heat flow versus
time.
1.1 This test method covers the determination of oxidation
induction time of lubricating greases subjected to oxygen at
4. Summary of Test Method
3.5 MPa (500 psig) and temperatures between 155 °C and
4.1 Asmall quantity of grease is weighed into a sample pan
210 °C.
and placed in a test cell. The cell is heated to a specified
1.2 The values stated in SI units are to be regarded as
temperature and then pressurized with oxygen. The cell is held
standard. The values given in parentheses are for information
at a regulated temperature and pressure until an exothermic
only.
reaction occurs. The extrapolated onset time is measured and
1.3 This standard does not purport to address all of the
reported as the oxidation induction time for the grease under
safety concerns, if any, associated with its use. It is the
the specified test temperature.
responsibility of the user of this standard to establish appro-
4.2 A kinetic equation incorporated with this test method
priate safety and health practices and determine the applica-
can estimate oxidation induction times at other temperatures.
bility of regulatory limitations prior to use.
5. Significance and Use
2. Referenced Documents
5.1 Oxidation induction time, as determined under the
2.1 ASTM Standards:
conditions of this test method, can be used as an indication of
E473 Terminology Relating to Thermal Analysis and Rhe-
oxidation stability. This test method can be used for research
ology
and development, quality control and specification purposes.
3. Terminology However, no correlation has been determined between the
results of this test method and service performance.
3.1 Definitions of Terms Specific to This Standard:
3.1.1 extrapolated onset time, n—a time determined on a
6. Apparatus
thermal curve, as the intersection of the extrapolated baseline
6.1 Pressure Differential Scanning Calorimeter (PDSC),
and a line tangent to the oxidation exotherm constructed at its
equipped with the following items (see Fig. 1).
maximum rate.
3.1.2 oxidation induction time (OIT), n— the period of time NOTE 1—At the time that the round robin data for this test method was
generated, only TA Instruments manufactured equipment that met the
from the first exposure to an oxidizing atmosphere until the
requirements of 5.1. Subsequently, other companies have manufactured
extrapolated onset time.
equipment meeting these requirements. Their use is permitted provided
3.1.3 pressure differential scanning calorimeter, (PDSC),
their performance is consistent with the repeatability and reproducibility
described in Section 10.
n—a differential scanning calorimeter, as defined in Terminol-
ogy E473, that is capable of maintaining the test sample at a
6.1.1 Sample Enclosure, with capability to 3.5 MPa
controlled, elevated pressure.
(500 psig) at 210 °C and pressure gauge graduated at intervals
of 200 kPa (28.6 psi) or less.
This test method is under the jurisdiction of ASTM Committee D02 on
Petroleum Products, Liquid Fuels, and Lubricants and is the direct responsibility of
Subcommittee D02.09.0E on Oxidation of Greases. Rhee, In-Sik, “Development of a New Oxidation Stability Test Method for
Current edition approved Oct. 1, 2015. Published December 2015. Originally Greases Using a Pressure Differential Scanning Calorimeter (PDSC),” NLGI
approved in 1993. Last previous edition approved in 2010 as D5483 – 05 (2010). Spokesman, Vol 55, No. 4, July 1991, pp. 123–132.
DOI: 10.1520/D5483-05R15. The sole source of supply of the apparatus known to the committee at this time
For referenced ASTM standards, visit the ASTM website, www.astm.org, or isTAInstruments, Inc., 109 Lukens Drive, New Castle, DE 19720. If you are aware
contact ASTM Customer Service at service@astm.org. For Annual Book of ASTM of alternative suppliers, please provide this information to ASTM International
Standards volume information, refer to the standard’s Document Summary page on Headquarters.Your comments will receive careful consideration at a meeting of the
the ASTM website. responsible technical committee, which you may attend.
Copyright © ASTM International, 100 Barr Harbor Drive, PO Box C700, West Conshohocken, PA 19428-2959. United States
D5483 − 05 (2015)
differs from 157.4 °C 6 0.2 °C (see Note 4), correct the
difference by using either the hardware or software calibration
procedure described in the manufacturer’s instruction manual.
If the hardware calibration procedure is used, the temperature
correction should be performed under 3.5 MPa (500 psig)
oxygen pressure with a 100 mL⁄min purge rate. A typical
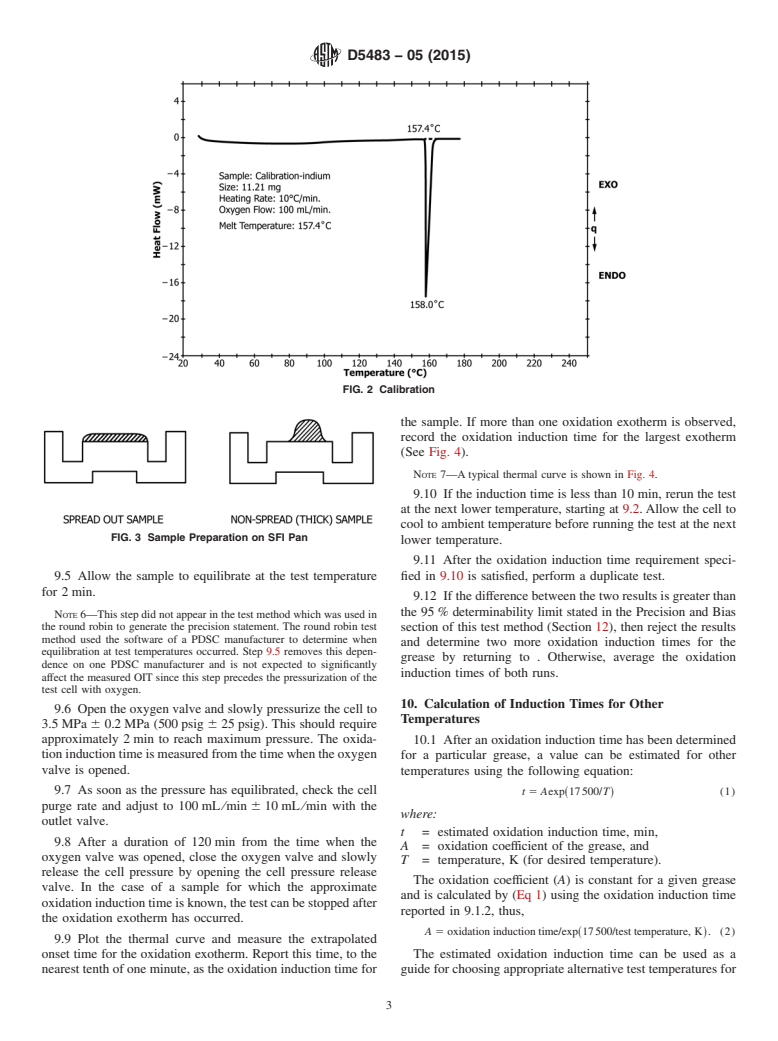
melting calibration curve is shown in Fig. 2.
NOTE4—Themeltingtemperatureofindiumis156.6 °Catatmospheric
pressure, but has been found to be elevated to 157.4 °C under the
conditions of this test method, 3.5 MPa (500 psig) of oxygen.
8.2 Temperature Controller Calibration:
8.2.1 Remove both the sample pan and the reference pan
from the cell, then close the cell. Slowly pressurize the cell
with 3.5 MPa 6 0.2 MPa (500 psig 6 25 psig) oxygen and
FIG. 1 PDSC Test Unit
adjust the purge rate to 100 mL⁄min 6 10 mL⁄min using the
cell outlet valve. Select the desired test temperature (either
210 °C, 180 °C, or 155 °C).
6.2 Thermal Analyzer.
8.2.2 Program the cell to maintain the selected test tempera-
6.3 Aluminum Sample Solid Fat Index (SFI), pan (see Note
ture. If, after 10 min, the displayed cell temperature differs by
2).
more than 60.2 °C from the selected temperature, slowly
adjustthetemperaturecontrolleruntiltheyagree.Aftermaking
6.4 Oxidation Stability Software.
an adjustment, wait at least 5 min to make certain that the
6.5 Calibration Software.
temperature is stable before continuing.
6.6 Flowmeter, with a capacity of at least 200 mL⁄min.
8.2.3 Some of the newest instruments do not need this step
due to their automatic calibration system. Therefore, the
6.7 Sample Encapsulation Press.
controlthermocouplecalibarationshouldbeperformedaccord-
NOTE 2—It has been found that grease samples can be prepared with
ing to the instrument’s manual.
more consistent surface areas using SFI pans as compared to flat bottom
pans, resulting in better reproducibility.
8.3 Cell Base Pressure Gauge Calibration—The calibration
NOTE 3—See Fig. 1 for a diagram of a typical test unit.
should be conducted using a calibrated pressure transducer or
a previously calibrated gauge according to the pressure cell
7. Reagents and Materials
manufacturer’s instructions.
7.1 Oxygen, extra dry, of not less than 99.5 % purity by
9. Procedure
volume. (Warning—Oxidizer. Gas under pressure. In addition
to other precautions, use stainless steel or copper tubing which
9.1 Before starting a test, the control thermocouple calibra-
is compatible with oxygen, and pressure gauges which are
tion shall be conducted at the test temperature (either 210 °C,
designated for use with oxygen.)
180 °C, or 155 °C) according to 8.2.1 and 8.2.2. When the test
temperature is not known, the calibration should be conducted
7.2 Indium, of not less than 99.9 % purity by mass.
at 210 °C. Ignore this step if the instrument already has an
8. Calibration
automatic temperature controller calibration system.
8.1 Sample Temperature Calibration:
9.2 Weigh 2.0 mg 6 0.1 mg of grease into a sample pan.
8.1.1 Weigh approximately 10 mg of indium into an alumi-
Spread the sample evenly upon the flat portion. Do not spill
num sample pan, insert a lid and crimp the lid to the pan using
any of the sample into the trough portion of the pan (See Fig.
the encapsulation press. Place the crimped pan onto the sample
3).
platform in the pressure cell. Seal an empty pan in the same
NOTE 5—Examples of suitable and poor sample on pan patterns are
manner and place it on the reference platform. Set the cell
shown in Fig. 3.
cover in place and close the cell.
9.3 Place the uncovered pan containing the sample onto the
8.1.2 Open the oxygen cylinder valve slightly and set a
platform of the cell according to the PDSC manufacturer’s
pressure of 3.5 MPa 6 0.2 MPa (500 psig 6 25 psig) on the
instructions for placing the sample pan. Place an empty pan of
cell inlet line with the pressure regulator. Partially op
...
This document is not an ASTM standard and is intended only to provide the user of an ASTM standard an indication of what changes have been made to the previous version. Because
it may not be technically possible to adequately depict all changes accurately, ASTM recommends that users consult prior editions as appropriate. In all cases only the current version
of the standard as published by ASTM is to be considered the official document.
Designation: D5483 − 05 (Reapproved 2010) D5483 − 05 (Reapproved 2015)
Standard Test Method for
Oxidation Induction Time of Lubricating Greases by
Pressure Differential Scanning Calorimetry
This standard is issued under the fixed designation D5483; the number immediately following the designation indicates the year of
original adoption or, in the case of revision, the year of last revision. A number in parentheses indicates the year of last reapproval. A
superscript epsilon (´) indicates an editorial change since the last revision or reapproval.
1. Scope
1.1 This test method covers the determination of oxidation induction time of lubricating greases subjected to oxygen at 3.5 MPa
(500 psig) (500 psig) and temperatures between 155155 °C and 210°C.210 °C.
1.2 The values stated in SI units are to be regarded as standard. The values given in parentheses are for information only.
1.3 This standard does not purport to address all of the safety concerns, if any, associated with its use. It is the responsibility
of the user of this standard to establish appropriate safety and health practices and determine the applicability of regulatory
limitations prior to use.
2. Referenced Documents
2.1 ASTM Standards:
E473 Terminology Relating to Thermal Analysis and Rheology
3. Terminology
3.1 Definitions of Terms Specific to This Standard:
3.1.1 extrapolated onset time, n—a time determined on a thermal curve, as the intersection of the extrapolated baseline and a
line tangent to the oxidation exotherm constructed at its maximum rate.
3.1.2 oxidation induction time (OIT), n— the period of time from the first exposure to an oxidizing atmosphere until the
extrapolated onset time.
3.1.3 pressure differential scanning calorimeter, (PDSC), n—a differential scanning calorimeter, as defined in Terminology
E473, that is capable of maintaining the test sample at a controlled, elevated pressure.
3.1.4 thermal curve, n—a graph of sample heat flow versus time.
4. Summary of Test Method
4.1 A small quantity of grease is weighed into a sample pan and placed in a test cell. The cell is heated to a specified temperature
and then pressurized with oxygen. The cell is held at a regulated temperature and pressure until an exothermic reaction occurs. The
extrapolated onset time is measured and reported as the oxidation induction time for the grease under the specified test temperature.
4.2 A kinetic equation incorporated with this test method can estimate oxidation induction times at other temperatures.
5. Significance and Use
5.1 Oxidation induction time, as determined under the conditions of this test method, can be used as an indication of oxidation
stability. This test method can be used for research and development, quality control and specification purposes. However, no
correlation has been determined between the results of this test method and service performance.
This test method is under the jurisdiction of ASTM Committee D02 on Petroleum Products, Liquid Fuels, and Lubricants and is the direct responsibility of Subcommittee
D02.09.0E on Oxidation of Greases.
Current edition approved Oct. 1, 2010Oct. 1, 2015. Published November 2010December 2015. Originally approved in 1993. Last previous edition approved in 20052010
as D5483D5483 – 05 (2010).–05. DOI: 10.1520/D5483-05R10.10.1520/D5483-05R15.
For referenced ASTM standards, visit the ASTM website, www.astm.org, or contact ASTM Customer Service at service@astm.org. For Annual Book of ASTM Standards
volume information, refer to the standard’s Document Summary page on the ASTM website.
Rhee, In-Sik, “Development of a New Oxidation Stability Test Method for Greases Using a Pressure Differential Scanning Calorimeter (PDSC),” NLGI Spokesman, Vol
55, No. 4, July 1991, pp. 123–132.
Copyright © ASTM International, 100 Barr Harbor Drive, PO Box C700, West Conshohocken, PA 19428-2959. United States
D5483 − 05 (2015)
FIG. 1 PDSC Test Unit
6. Apparatus
6.1 Pressure Differential Scanning Calorimeter (PDSC), equipped with the following items (see Fig. 1).
NOTE 1—At the time that the round robin data for this test method was generated, only TA Instruments manufactured equipment that met the
requirements of 5.1. Subsequently, other companies have manufactured equipment meeting these requirements. Their use is permitted provided their
performance is consistent with the repeatability and reproducibility described in Section 10.
6.1.1 Sample Enclosure, with capability to 3.5 MPa (500 psig) at 210°C3.5 MPa (500 psig) at 210 °C and pressure gauge
graduated at intervals of 200 kPa (28.6 psi) 200 kPa (28.6 psi) or less.
6.2 Thermal Analyzer.
6.3 Aluminum Sample Solid Fat Index (SFI), pan (see Note 2).
6.4 Oxidation Stability Software.
6.5 Calibration Software.
6.6 Flowmeter, with a capacity of at least 200 200 mL mL/min.⁄min.
6.7 Sample Encapsulation Press.
NOTE 2—It has been found that grease samples can be prepared with more consistent surface areas using SFI pans as compared to flat bottom pans,
resulting in better reproducibility.
NOTE 3—See Fig. 1 for a diagram of a typical test unit.
7. Reagents and Materials
7.1 Oxygen, extra dry, of not less than 99.5 % purity by volume. (Warning—Oxidizer. Gas under pressure. In addition to other
precautions, use stainless steel or copper tubing which is compatible with oxygen, and pressure gauges which are designated for
use with oxygen.)
7.2 Indium, of not less than 99.9 % purity by mass.
8. Calibration
8.1 Sample Temperature Calibration:
8.1.1 Weigh approximately 10 mg 10 mg of indium into an aluminum sample pan, insert a lid and crimp the lid to the pan using
the encapsulation press. Place the crimped pan onto the sample platform in the pressure cell. Seal an empty pan in the same manner
and place it on the reference platform. Set the cell cover in place and close the cell.
8.1.2 Open the oxygen cylinder valve slightly and set a pressure of 3.5 6 0.2 MPa (500 6 25 psig) 3.5 MPa 6 0.2 MPa
(500 psig 6 25 psig) on the cell inlet line with the pressure regulator. Partially open the inlet valve on the cell and allow the
pressure to slowly build up in the cell. This should require approximately 2 min. 2 min. Using the outlet valve, adjust the oxygen
purge rate through the flowmeter to 100100 mL ⁄min 6 1010 mL ⁄ mL/min. min. The open position of these valves should remain
fixed during the test.
The sole source of supply of the apparatus known to the committee at this time is TA Instruments, Inc., 109 Lukens Drive, New Castle, DE 19720. If you are aware
of alternative suppliers, please provide this information to ASTM International Headquarters. Your comments will receive careful consideration at a meeting of the responsible
technical committee, which you may attend.
D5483 − 05 (2015)
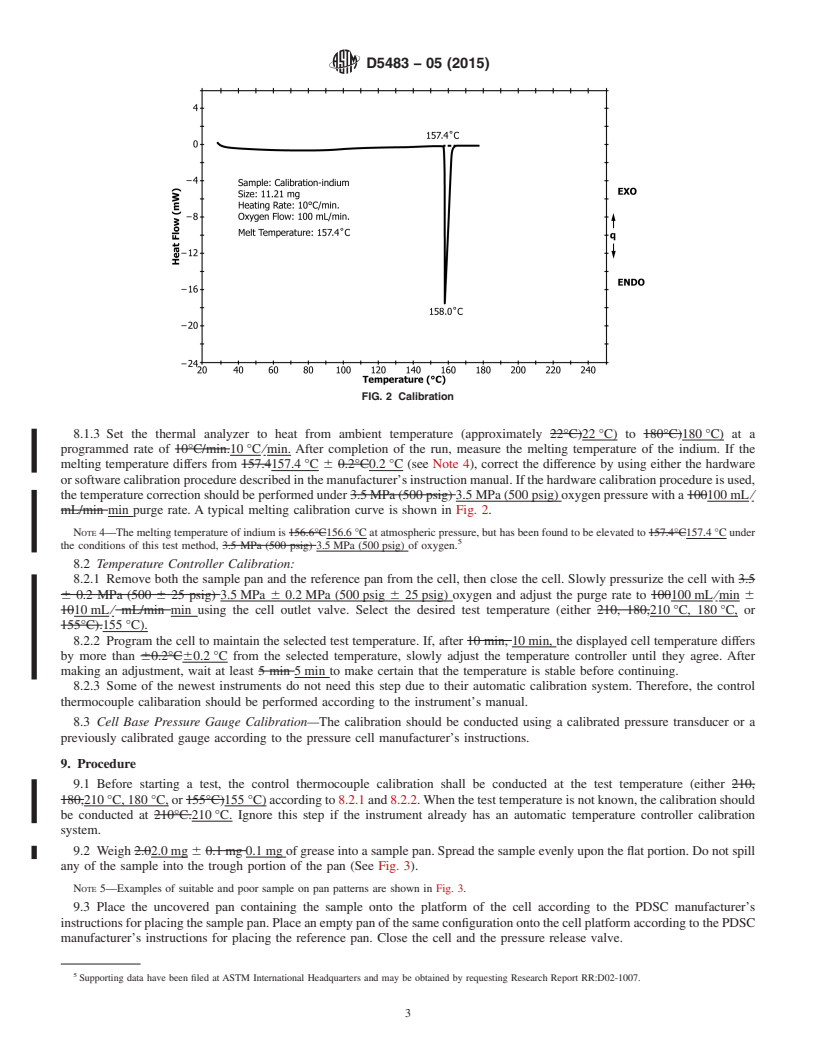
FIG. 2 Calibration
8.1.3 Set the thermal analyzer to heat from ambient temperature (approximately 22°C)22 °C) to 180°C)180 °C) at a
programmed rate of 10°C/min.10 °C ⁄min. After completion of the run, measure the melting temperature of the indium. If the
melting temperature differs from 157.4157.4 °C 6 0.2°C0.2 °C (see Note 4), correct the difference by using either the hardware
or software calibration procedure described in the manufacturer’s instruction manual. If the hardware calibration procedure is used,
the temperature correction should be performed under 3.5 MPa (500 psig) 3.5 MPa (500 psig) oxygen pressure with a 100100 mL ⁄
mL/min min purge rate. A typical melting calibration curve is shown in Fig. 2.
NOTE 4—The melting temperature of indium is 156.6°C156.6 °C at atmospheric pressure, but has been found to be elevated to 157.4°C157.4 °C under
the conditions of this test method, 3.5 MPa (500 psig) 3.5 MPa (500 psig) of oxygen.
8.2 Temperature Controller Calibration:
8.2.1 Remove both the sample pan and the reference pan from the cell, then close the cell. Slowly pressurize the cell with 3.5
6 0.2 MPa (500 6 25 psig) 3.5 MPa 6 0.2 MPa (500 psig 6 25 psig) oxygen and adjust the purge rate to 100100 mL ⁄min 6
1010 mL ⁄ mL/min min using the cell outlet valve. Select the desired test temperature (either 210, 180,210 °C, 180 °C, or
155°C).155 °C).
8.2.2 Program the cell to maintain the selected test temperature. If, after 10 min, 10 min, the displayed cell temperature differs
by more than 60.2°C60.2 °C from the selected temperature, slowly adjust the temperature controller until they agree. After
making an adjustment, wait at least 5 min 5 min to make certain that the temperature is stable before continuing.
8.2.3 Some of the newest instruments do not need this step due to their automatic calibration system. Therefore, the control
thermocouple calibaration should be performed according to the instrument’s manual.
8.3 Cell Base Pressure Gauge Calibration—The calibration should be conducted using a calibrated pressure transducer or a
previously calibrated gauge according to the pressure cell manufacturer’s
...


Questions, Comments and Discussion
Ask us and Technical Secretary will try to provide an answer. You can facilitate discussion about the standard in here.