ASTM E801-91(1995)e1
(Practice)Standard Practice for Controlling Quality of Radiological Examination of Electronic Devices
Standard Practice for Controlling Quality of Radiological Examination of Electronic Devices
General Information
Standards Content (Sample)
e1
Designation: E 801 – 91 (Reapproved 1995) An American National Standard
Standard Practice for
Controlling Quality of Radiological Examination of
Electronic Devices
This standard is issued under the fixed designation E 801; the number immediately following the designation indicates the year of
original adoption or, in the case of revision, the year of last revision. A number in parentheses indicates the year of last reapproval. A
superscript epsilon (e) indicates an editorial change since the last revision or reapproval.
This standard has been approved for use by agencies of the Department of Defense.
e NOTE—Section 16 was added editorially in December 1995.
1. Scope 3. Terminology
1.1 This practice relates to the radiological examination of 3.1 Definitions—Refer to Terminology E 1316, Section D.
electronic devices for internal discontinuities, extraneous ma-
4. Direction of Radiation
terial, missing components, crimped or broken wires, and
4.1 When not otherwise specified, the direction of the
defective solder joints in cavities, in the encapsulating materi-
als, or the boards. Requirements expressed in this practice are central beam of radiation shall be as perpendicular (65%) as
possible to the surface of the film.
intended to control the quality and repeatability of the radio-
logical images and are not intended for controlling the accept-
5. Image Quality Indicators (IQI’s)
ability or quality of the electronic devices imaged.
5.1 The quality of all levels of radiological examination
NOTE 1—Refer to the following publications for pertinent information
shall be determined by IQI’s conforming to the following
on methodology and safety and protection: Guide E 94, and “General
specifications:
Safety Standard for Installation Using Non-Medical X Ray and Sealed
5.1.1 The IQI’s shall be fabricated of clear acrylic plastic
Gamma Ray Sources, Energies Up to 10 MeV Equipment Design and
Use,” Handbook No. 114. with steel covers, lead spheres, gold or tungsten wires, and lead
numbers. The steel covers serve as shims.
1.2 If a nondestructive testing agency as described in
5.1.1.1 The IQI’s shall conform to the requirements of Fig.
Practice E 543 is used to perform the examination, the testing
1.
agency should meet the requirements of Practice E 543.
5.1.1.2 The IQI’s shall be permanently identified with the
1.3 This standard does not purport to address all of the
appropriate IQI number as shown in Fig. 1. The number may
safety concerns, if any, associated with its use. It is the
be affixed by engraving, steel stamping, or by mounting a
responsibility of the user of this standard to establish appro-
0.125-in. (3.18-mm) tall lead number on the flat bottom of a
priate safety and health practices and determine the applica-
0.188-in. (4.78-mm) diameter hole. In any case, the identifica-
bility of regulatory limitations prior to use.
tion shall be located as shown in Fig. 1 and shall be of sufficient
2. Referenced Documents contrast to be clearly discernible in the radiological image.
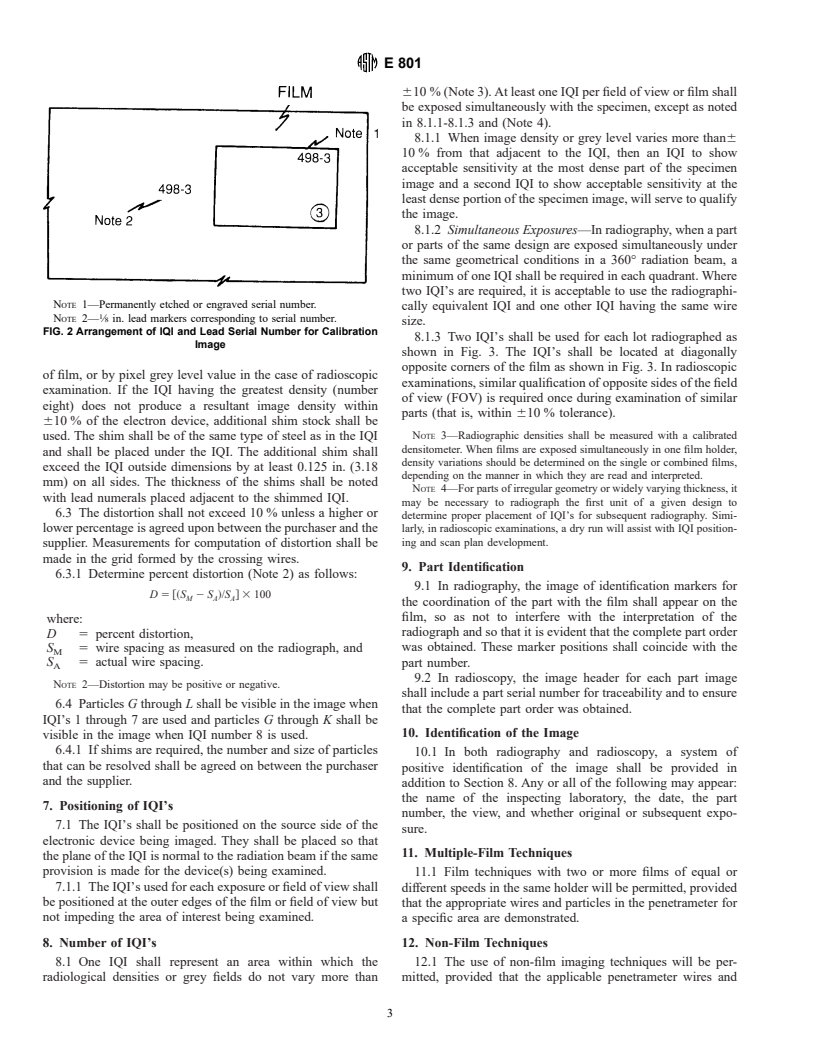
5.1.1.3 Each semiconductor IQI will have a serial number
2.1 ASTM Standards:
permanently etched or engraved in the upper right-hand corner.
E 94 Guide for Radiographic Testing
Each serial number will be traceable to the calibration image
E 543 Practice for Evaluating Agencies that Perform Non-
supplied by the manufacturer. The manufacturer will radio-
destructive Testing
3 graph the IQI with lead markers identifying the serial number.
E 1000 Guide for Radioscopy
See Fig. 2.
E 1255 Practice for Radioscopy
E 1316 Terminology for Nondestructive Examinations
6. Application of the Image Quality Indicator (IQI)
6.1 The application of the IQI’s shall be made in such a
manner as to simulate as closely as possible the device being
This practice is under the jurisdiction of ASTM Committee E-7 on Nonde-
examined. To accomplish this objective, a set of eight IQI’s is
structive Testing and is the direct responsibility of Subcommittee E07.01 on
provided. These provide a range of cover thickness (of steel
Radiology (X and Gamma) Method.
Current edition aproved Oct. 15, 1991. Published December 1991. Originally
shim stock) that is radiologically equivalent to the range of
published as E 801 – 81. Last previous edition E 801 – 90.
devices from glass diodes or plastic-encapsulated circuits
Available from the National Institute of Standards and Technology, Gaithers-
(number one) to large power or hybrid circuit devices (number
burg, MD 20899.
eight). Wire size increases with shim stock thickness because
Annual Book of ASTM Standards, Vol 03.03.
Copyright © ASTM, 100 Barr Harbor Drive, West Conshohocken, PA 19428-2959, United States.
E 801
FIG. 1 Image Quality Indicator for Electron Devices
Dimensions, in. (mm)
a. 0.187 ( 4.750) f. 1.00 (25.40) k. 1.125 (28.575)
b. 0.375 ( 9.525) g. 0.375 ( 9.525) l. 1.313 (33.350)
c. 0.500 (12.700) h. 0.500 (12.700) m. 1.50 (38.10)
d. 0.625 (15.875) i. 0.625 (15.875) n. 0.125 ( 3.175)
e. 0.813 (20.650) j. 0.938 (23.825) p. 0.250 ( 6.350)
Particle Diameter, in. (mm)
G. 0.015(0.381) J. 0.006(0.152)
H. 0.010(0.254) K. 0.004(0.102)
I. 0.008(0.203) L. 0.002(0.051)
Shim and Wire Specifications
Wire Diameters, in. (mm)
Penetrameter Shim
Number Thickness, in. (mm)
AB C D E F
1 0 0.002 0.001 0.0005 0.0005 0.001 0.002
0 (0.051) (0.025) (0.0127) (0.0127) (0.025) (0051)
2 0.002 0.002 0.001 0.0005 0.0005 0.001 0.002
(0.051) (0.051) (0.025) (0.0127) (0.0127) (0.025) (0.051)
3 0.005 0.002 0.001 0.0005 0.0005 0.001 0.002
(0.127) (0.051) (0.025) (0.0127) (0.0127) (0.025) (0.051)
4 0.007 0.002 0.001 0.0005 0.0005 0.001 0.002
0.178 (0.051) (0.025) (0.0127) (0.0127) (0.025) (0.051)
5 0.010 0.003 0.002 0.001 0.001 0.002 0.003
(0.254) (0.076) (0.051) (0.025) (0.025) (0.051) (0.076)
6 0.015 0.003 0.002 0.001 0.001 0.002 0.003
(0.381) (0.076) (0.051) (0.025) (0.025) (0.051) (0.076)
7 0.025 0.005 0.003 0.002 0.002 0.003 0.005
(0.635) (0.127) (0.076) (0.051) (0.051) (0.076) (0.127)
8 0.035 0.005 0.003 0.002 0.002 0.003 0.005
(0.889) (0.127) (0.076) (0.051) (0.051) (0.076) (0.127)
NOTE 1—Use additional layers of shim material as required. The layers shall be 1 3 2 in. (25.4 3 50.8 mm). The addition shall be identified by the
placement of lead numbers which denote the thickness immediately adjacent to the penetrameter numbers during exposure.
NOTE 2—Tolerance is 60.001 in. (0.025 mm) where dimensions are 0.000 and 60.003 in. (0.076 mm) where dimensions are 0.00.
NOTE 3—Bond materials together with cyanoacrylic or equivalent fast-drying epoxy.
NOTE 4—Particle holes are 0.031 in. (0.787 mm) nominal diameter.
NOTE 5—Tolerance on particle diameter is + 0.0003 in. (0.0076 mm).
NOTE 6—Wire grooves are 0.007 in. (0.178 mm) depth with 90° inclusive angle.
NOTE 7—The number hole is 0.25 in. (0.635 mm) nominal diameter and 0.125 in. (0.318 mm) deep.
the higher power devices, which are radiologically compatible 6.2 The IQI used shall be the one whose image has a
with the thicker coverings, normally use larger interconnecting radiological density or grey level equal to that of the electron
wires than small signal devices which use the thin coverings. device 610 %. The density or grey level is measured on an
Particle size is normally independent of device type, so these area of the IQI image that contains no wire or particle images.
remain constant. It shall be measured using a calibrated densitometer in the case
E 801
610 % (Note 3). At
...


Questions, Comments and Discussion
Ask us and Technical Secretary will try to provide an answer. You can facilitate discussion about the standard in here.