ASTM D2563-94(2002)e1
(Practice)Standard Practice for Classifying Visual Defects in Glass-Reinforced Plastic Laminate Parts
Standard Practice for Classifying Visual Defects in Glass-Reinforced Plastic Laminate Parts
SCOPE
1.1 This practice covers acceptance criteria for visual inspection of parts made from glass-reinforced plastic laminates.
1.2 This practice presents word descriptions of possible defects to serve as a guide for contracts, drawings, product specifications, and final inspection.
1.3 This practice also categorizes different inspection requirements for levels of product quality.
1.4 The allowable size and frequency of permitted defects within the acceptance level categories of this specification are general and not related to specific service requirements. A Level IV of allowable defects which defines allowable size, frequency, and permitted repair procedures should be established for specific service requirements as agreed upon between the purchaser and the supplier.
1.5 The values stated in SI units are to be regarded as the standard. The values given in parentheses are for information only.
1.6 This standard does not purport to address all of the safety concerns, if any, associated with its use. It is the responsibility of the user of this standard to establish appropriate safety and health practices and determine the applicability of regulatory limitations prior to use.
Note 1—There is no known ISO equivalent to this practice.
General Information
Relations
Standards Content (Sample)
NOTICE: This standard has either been superseded and replaced by a new version or withdrawn.
Contact ASTM International (www.astm.org) for the latest information
e1
Designation:D2563–94 (Reapproved 2002)
Standard Practice for
Classifying Visual Defects in Glass-Reinforced Plastic
Laminate Parts
This standard is issued under the fixed designation D 2563; the number immediately following the designation indicates the year of
original adoption or, in the case of revision, the year of last revision. A number in parentheses indicates the year of last reapproval. A
superscript epsilon (e) indicates an editorial change since the last revision or reapproval.
This standard has been approved for use by agencies of the Department of Defense.
e NOTE—Editorially revised 1.2 in March 2002.
1. Scope the drawings. Any dimensions falling outside the specified
limits shall be cause for rejection.
1.1 This practice covers acceptance criteria for visual in-
2.3 Inserts—All inserts, nuts, studs, and lugs shall not be
spection of parts made from glass-reinforced plastic laminates.
damaged in any way, nor coated with laminate materials in
1.2 This practice presents word descriptions of possible
such a way as to impair function or mechanical fit. Threads in
defects to serve as a guide for contracts, drawings, product
molded-in inserts shall be clean, smooth, free of nicks, tears, or
specifications, and final inspection.
other damage. There shall be no laminate materials or flash on
1.3 This practice also categorizes different inspection re-
the threads. If necessary, threaded inserts may be retapped to
quirements for levels of product quality.
clean them or remove flash. Threads containing locking fea-
1.4 The allowable size and frequency of permitted defects
tures or coated for corrosion resistance shall not be retapped.
within the acceptance level categories of this specification are
2.4 Molded-In Threads or Cored Holes— Molded-in
general and not related to specific service requirements. A
threads or cored holes shall be free of visible defects such as
Level IV of allowable defects which defines allowable size,
chips, cracks, shorts, etc. Molded-in threads may be retapped
frequency, and permitted repair procedures should be estab-
or repaired unless otherwise specifically noted on the product
lished for specific service requirements as agreed upon be-
drawings.
tween the purchaser and the supplier.
2.5 Workmanship—Workmanship shall be in accordance
1.5 The values stated in SI units are to be regarded as the
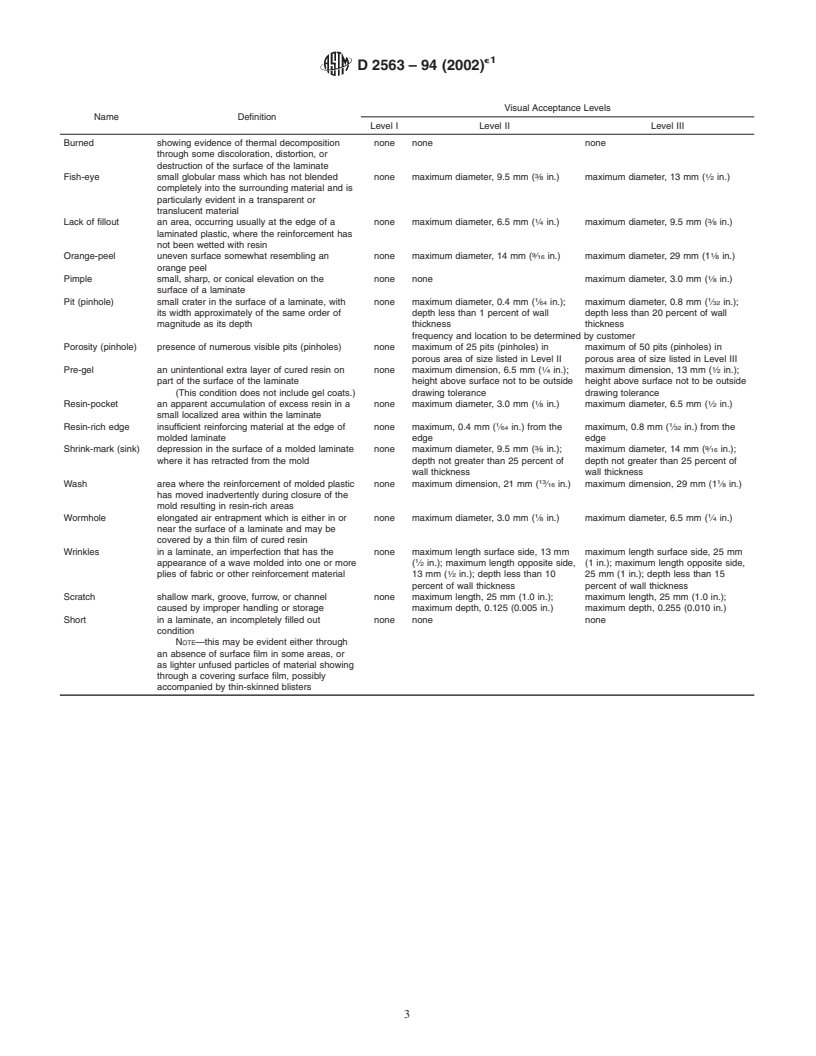
with good commercial practices as listed in
Table 1 for
standard. The values given in parentheses are for information
applicable acceptance levels.
only.
2.6 Critical Area—Some portions of a part may be consid-
1.6 This standard does not purport to address all of the
ered more critical than others.Acritical area is here defined as
safety concerns, if any, associated with its use. It is the
an area in which the presence of imperfections is considered to
responsibility of the user of this standard to establish appro-
be most detrimental. The areas of parts that are critical
priate safety and health practices and determine the applica-
structurally, aerodynamically, or electrically shall be uniform
bility of regulatory limitations prior to use.
and free of defects as listed in Table 1, if so stated on the
NOTE 1—There is no known ISO equivalent to this practice.
product drawing. Critical areas may be designated on the
product drawing by one of the following methods:
2. Acceptance Criteria
2.6.1 Encircle critical areas, or
2.1 The method and frequency of sampling and the allow-
2.6.2 Cross-hatch areas to designate areas of various levels,
able defects may be previously agreed upon between the
or
purchaser and the seller.
2.6.3 Word description.
2.2 Dimensions and Tolerances—Parts shall be inspected
2.7 Allowable Defects, Visual—The defects in noncritical
for conformance with dimensions and tolerances specified on
areas which by nature, content, or frequency do not affect
serviceability of the part are designated as allowable defects.
Allowable defects shall be fully described as to type, size,
This practice is under the jurisdiction ofASTM Committee D20 on Plastics and
number, extent allowed, and spacing. The appropriate accep-
is the direct responsibility of Subcommittee D20.18 on Reinforced Thermosetting
tance level (Table 1) for defects in these areas must be
Plastics.
specified. Where Level IV is used the defects must be fully
Current edition approved March 10, 2002. Published March 2002. Originally
published as D 2563 – 66 T. Last previous edition D 2563 – 70 (1987)e . described on the product drawing. Defects greater than those
Copyright © ASTM International, 100 Barr Harbor Drive, PO Box C700, West Conshohocken, PA 19428-2959, United States.
e1
D2563–94 (2002)
listed in the product specifications, drawings, or contracts for defects. If none of the first three levels (Level I, II, III) is
the part shall be cause for rejection. considered applicable, the level shall be Level IV, and allow-
2.8 Repairable Defects—Repairable defects, if any, shall able defects must be specified on the product drawing. Any
consist of those which can be repaired without affecting the excess of defects as specified under the required level shall be
serviceability of the part unless prohibited in the product cause for rejection. Unless otherwise specified, dimensions are
drawing or in the contract. Acceptable methods of repair shall surface dimensions.
be agreed upon between the purchaser and the seller and shall
NOTE 2—Typical defects as outlined in the word descriptions of Table
be only as specified in the product drawing or contracts for the 2
1 are illustrated in Figs. 1-21.
part.
3.2 Acceptance Level I—Presence of any defects in excess
2.9 SurfaceFinish—The over-all surface finish of laminates
of those listed in Table 1, Level I, shall be cause for rejection,
may vary with the process used and the type of reinforcement.
unless otherwise specified in Table 1, Level I.
Unlesssurfacefinishisspecifiedonpartdrawings,contracts,or
3.3 Acceptance Level II—Presence of more than one defect
orders from the purchaser, parts shall not be rejected for any
of those listed in Table 1, Level II, for each estimated 10 in.
reading less than 150 rms. Defects shall be considered as not
of surface shall be cause for rejection, unless otherwise
included in over-all surface finish.
specified in Table 1, Level II. No defect area shall be less than
2.10 Surface Appearance—The surface appearance or
2 in. from another.
color, or both, of laminated parts can vary considerably
3.4 Acceptance Level III—Presence of more than two de-
depending on the process used to make the laminate, thickness,
fects of those listed in Table 1, Level III, for each estimated 13
type of reinforcement, type of resin, resin-to-reinforcement
mm (5 in.) of surface shall be cause for rejection, unless
ratio and the presence of defects. Any questions concerning
otherwise specified in Table 1, Level III. No defect area shall
surface appearance and its influence on the properties of the
be less than 1 in. from another.
part should be brought to the attention of the responsible
3.5 Acceptance Level IV—To be specified on the product
materials engineer.
drawing.
3. Acceptance Levels
4. Keywords
3.1 Visual Inspection—Each part shall be checked visually
4.1 reinforced thermosetting plastics; visual defects
without the aid of magnification. Defects shall be classified as
to type and level as shown in Table 1 (see Note 2). The
acceptable quality level shall be determined by reference to the 2
Full-size (8 by 10-in.) glossy prints of these typical defects are available at a
part drawing for the applicable acceptance level for allowable nominal charge from ASTM Headquarters. Order Adjunct: ADJD2563.
TABLE 1 Allowable Defects
Visual Acceptance Levels
Name Definition
Level I Level II Level III
Chip a small piece broken off an edge or surface none maximum dimension of break, 3.0 mm maximum dimension of break, 6.5 mm
1 1
( ⁄8 in.) ( ⁄4 in.)
Crack an actual separation of the laminate, visible on none none none
opposite surfaces, and extending through the
thickness
1 1
Crack, surface crack existing only on the surface of the none maximum length, 3.0 mm ( ⁄8 in.) maximum length 6.5 mm ( ⁄4 in.)
laminate
Crazing fine cracks at or under the surface of a none maximum dimension of crazing, 13 mm maximum dimension of crazing, 25 mm
laminate ( ⁄2 in.) (1 in.).
frequency and location to be determined by customer
1 1
Delamination, edge separation of the layers of material at the edge none maximum dimension, 3.0 mm ( ⁄8 in.) maximum dimension, 6.5 mm ( ⁄4 in.)
of a laminate
Delamination, separation of the layers of material in a none none none
internal laminate
3 9
Dry-spot area of incomplete
...


Questions, Comments and Discussion
Ask us and Technical Secretary will try to provide an answer. You can facilitate discussion about the standard in here.