ASTM G39-99(2016)
(Practice)Standard Practice for Preparation and Use of Bent-Beam Stress-Corrosion Test Specimens
Standard Practice for Preparation and Use of Bent-Beam Stress-Corrosion Test Specimens
SIGNIFICANCE AND USE
5.1 The bent-beam specimen is designed for determining the stress-corrosion behavior of alloy sheets and plates in a variety of environments. The bent-beam specimens are designed for testing at stress levels below the elastic limit of the alloy. For testing in the plastic range, U-bend specimens should be employed (see Practice G30). Although it is possible to stress bent-beam specimens into the plastic range, the stress level cannot be calculated for plastically-stressed three- and four-point loaded specimens as well as the double-beam specimens. Therefore, the use of bent-beam specimens in the plastic range is not recommended for general use.
SCOPE
1.1 This practice covers procedures for designing, preparing, and using bent-beam stress-corrosion specimens.
1.2 Different specimen configurations are given for use with different product forms, such as sheet or plate. This practice is applicable to specimens of any metal that are stressed to levels less than the elastic limit of the material, and therefore, the applied stress can be accurately calculated or measured (see Note 1). Stress calculations by this practice are not applicable to plastically stressed specimens.
Note 1: It is the nature of these practices that only the applied stress can be calculated. Since stress-corrosion cracking is a function of the total stress, for critical applications and proper interpretation of results, the residual stress (before applying external stress) or the total elastic stress (after applying external stress) should be determined by appropriate nondestructive methods, such as X-ray diffraction (1).2
1.3 Test procedures are given for stress-corrosion testing by exposure to gaseous and liquid environments.
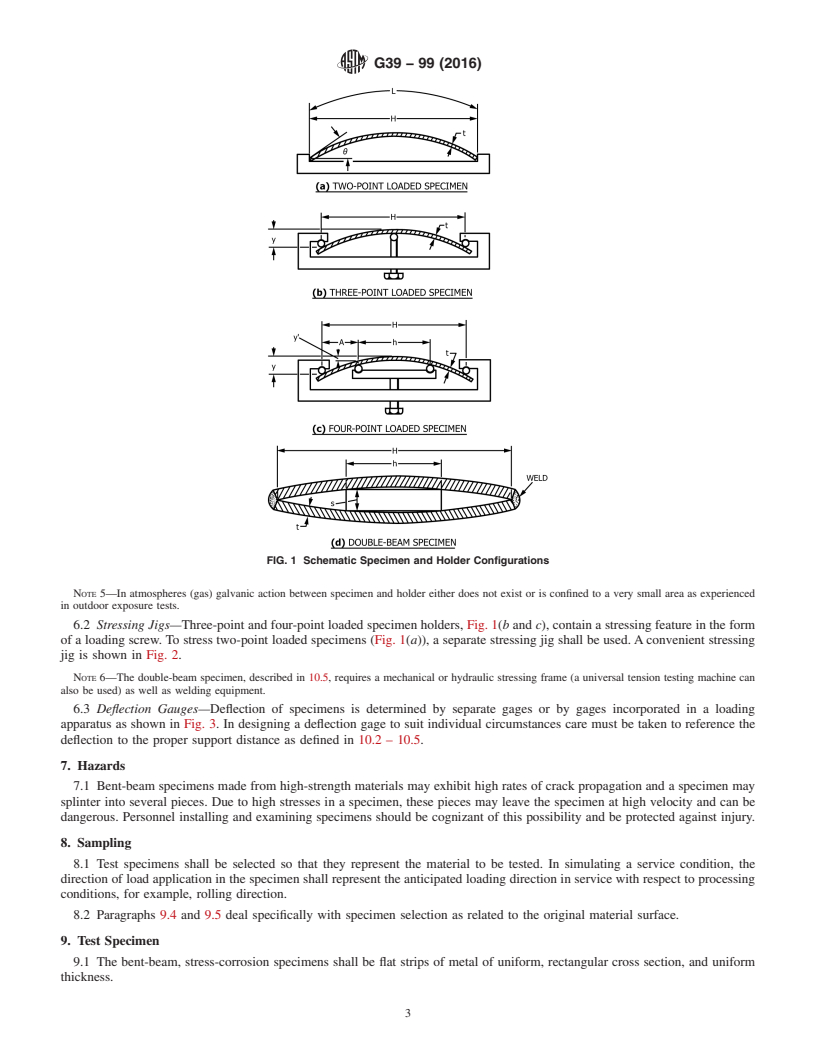
1.4 The bent-beam test is best suited for flat product forms, such as sheet, strip, and plate. For plate material the bent-beam specimen is more difficult to use because more rugged specimen holders must be built to accommodate the specimens. A double-beam modification of a four-point loaded specimen to utilize heavier materials is described in 10.5.
1.5 The exposure of specimens in a corrosive environment is treated only briefly since other practices deal with this aspect, for example, Specification D1141, and Practices G30, G36, G44, G50, and G85. The experimenter is referred to ASTM Special Technical Publication 425 (2).
1.6 The bent-beam practice generally constitutes a constant strain (deflection) test. Once cracking has initiated, the state of stress at the tip of the crack as well as in uncracked areas has changed, and therefore, the known or calculated stress or strain values discussed in this practice apply only to the state of stress existing before initiation of cracks.
1.7 The values stated in SI units are to be regarded as standard. The inch-pound values in parentheses are provided for information.
1.8 This standard does not purport to address all of the safety concerns, if any, associated with its use. It is the responsibility of the user of this standard to establish appropriate safety and health practices and determine the applicability of regulatory limitations prior to use. (For more specific safety hazard information see Section 7 and 12.1.)
General Information
Buy Standard
Standards Content (Sample)
NOTICE: This standard has either been superseded and replaced by a new version or withdrawn.
Contact ASTM International (www.astm.org) for the latest information
Designation:G39 −99 (Reapproved 2016)
Standard Practice for
Preparation and Use of Bent-Beam Stress-Corrosion Test
1
Specimens
ThisstandardisissuedunderthefixeddesignationG39;thenumberimmediatelyfollowingthedesignationindicatestheyearoforiginal
adoptionor,inthecaseofrevision,theyearoflastrevision.Anumberinparenthesesindicatestheyearoflastreapproval.Asuperscript
epsilon (´) indicates an editorial change since the last revision or reapproval.
1. Scope valuesdiscussedinthispracticeapplyonlytothestateofstress
existing before initiation of cracks.
1.1 This practice covers procedures for designing,
preparing, and using bent-beam stress-corrosion specimens. 1.7 The values stated in SI units are to be regarded as
standard. The inch-pound values in parentheses are provided
1.2 Differentspecimenconfigurationsaregivenforusewith
for information.
different product forms, such as sheet or plate. This practice is
1.8 This standard does not purport to address all of the
applicable to specimens of any metal that are stressed to levels
safety concerns, if any, associated with its use. It is the
less than the elastic limit of the material, and therefore, the
responsibility of the user of this standard to establish appro-
applied stress can be accurately calculated or measured (see
priate safety and health practices and determine the applica-
Note 1). Stress calculations by this practice are not applicable
bility of regulatory limitations prior to use. (For more specific
to plastically stressed specimens.
safety hazard information see Section 7 and 12.1.)
NOTE 1—It is the nature of these practices that only the applied stress
canbecalculated.Sincestress-corrosioncrackingisafunctionofthetotal
2. Referenced Documents
stress, for critical applications and proper interpretation of results, the
3
residual stress (before applying external stress) or the total elastic stress
2.1 ASTM Standards:
(after applying external stress) should be determined by appropriate
D1141Practice for the Preparation of Substitute Ocean
2
nondestructive methods, such as X-ray diffraction (1).
Water
1.3 Test procedures are given for stress-corrosion testing by
G30 Practice for Making and Using U-Bend Stress-
exposure to gaseous and liquid environments.
Corrosion Test Specimens
G36Practice for Evaluating Stress-Corrosion-Cracking Re-
1.4 The bent-beam test is best suited for flat product forms,
sistance of Metals and Alloys in a Boiling Magnesium
suchassheet,strip,andplate.Forplatematerialthebent-beam
specimen is more difficult to use because more rugged speci- Chloride Solution
G44PracticeforExposureofMetalsandAlloysbyAlternate
men holders must be built to accommodate the specimens. A
double-beam modification of a four-point loaded specimen to Immersion in Neutral 3.5 % Sodium Chloride Solution
G50Practice for Conducting Atmospheric Corrosion Tests
utilize heavier materials is described in 10.5.
on Metals
1.5 The exposure of specimens in a corrosive environment
G85Practice for Modified Salt Spray (Fog) Testing
is treated only briefly since other practices deal with this
4
2.2 NACE Documents:
aspect, for example, Specification D1141, and Practices G30,
NACE TM0177-96Laboratory Testing of Metals for Resis-
G36, G44, G50, and G85. The experimenter is referred to
tancetoSpecificFormsofEnvironmentalCrackinginH S
ASTM Special Technical Publication 425 (2). 2
Environments
1.6 The bent-beam practice generally constitutes a constant
strain (deflection) test. Once cracking has initiated, the state of
3. Terminology
stress at the tip of the crack as well as in uncracked areas has
3.1 Definitions of Terms Specific to This Standard:
changed,andtherefore,theknownorcalculatedstressorstrain
3.1.1 cracking time—the time elapsed from the inception of
test until the appearance of cracking.
1
This practice is under the jurisdiction ofASTM Committee G01 on Corrosion
of Metals and is the direct responsibility of Subcommittee G01.06 on Environmen-
3
tally Assisted Cracking. For referenced ASTM standards, visit the ASTM website, www.astm.org, or
Current edition approved May 1, 2016. Published May 2016. Originally contact ASTM Customer Service at service@astm.org. For Annual Book of ASTM
approvedin1973.Lastpreviouseditionapprovedin2011asG39–99(2011).DOI: Standards volume information, refer to the standard’s Document Summary page on
10.1520/G0039-99R16. the ASTM website.
2 4
The boldface numbers in parentheses refer to a list of references at the end of Available from NACE International (NACE), 1440 South Creek Dr., Houston,
this standard. TX 77084-4906, http://www.nace.org.
Copyright © ASTM International, 100 Barr Harbor Drive, PO Box C700, West Conshohocken, PA 19428-2959. United States
1
---------------------- Page: 1 ----------------------
G39−99 (2016)
3.1.1.1 Discussion—The test begins when the stress is
applied and the str
...
This document is not an ASTM standard and is intended only to provide the user of an ASTM standard an indication of what changes have been made to the previous version. Because
it may not be technically possible to adequately depict all changes accurately, ASTM recommends that users consult prior editions as appropriate. In all cases only the current version
of the standard as published by ASTM is to be considered the official document.
Designation: G39 − 99 (Reapproved 2011) G39 − 99 (Reapproved 2016)
Standard Practice for
Preparation and Use of Bent-Beam Stress-Corrosion Test
1
Specimens
This standard is issued under the fixed designation G39; the number immediately following the designation indicates the year of original
adoption or, in the case of revision, the year of last revision. A number in parentheses indicates the year of last reapproval. A superscript
epsilon (´) indicates an editorial change since the last revision or reapproval.
1. Scope
1.1 This practice covers procedures for designing, preparing, and using bent-beam stress-corrosion specimens.
1.2 Different specimen configurations are given for use with different product forms, such as sheet or plate. This practice is
applicable to specimens of any metal that are stressed to levels less than the elastic limit of the material, and therefore, the applied
stress can be accurately calculated or measured (see Note 1). Stress calculations by this practice are not applicable to plastically
stressed specimens.
NOTE 1—It is the nature of these practices that only the applied stress can be calculated. Since stress-corrosion cracking is a function of the total stress,
for critical applications and proper interpretation of results, the residual stress (before applying external stress) or the total elastic stress (after applying
2
external stress) should be determined by appropriate nondestructive methods, such as X-ray diffraction (1).
1.3 Test procedures are given for stress-corrosion testing by exposure to gaseous and liquid environments.
1.4 The bent-beam test is best suited for flat product forms, such as sheet, strip, and plate. For plate material the bent-beam
specimen is more difficult to use because more rugged specimen holders must be built to accommodate the specimens. A
double-beam modification of a four-point loaded specimen to utilize heavier materials is described in 10.5.
1.5 The exposure of specimens in a corrosive environment is treated only briefly since other practices deal with this aspect, for
example, Specification D1141, and Practices G30, G36, G44, G50, and G85. The experimenter is referred to ASTM Special
Technical Publication 425 (2).
1.6 The bent-beam practice generally constitutes a constant strain (deflection) test. Once cracking has initiated, the state of stress
at the tip of the crack as well as in uncracked areas has changed, and therefore, the known or calculated stress or strain values
discussed in this practice apply only to the state of stress existing before initiation of cracks.
1.7 The values stated in SI units are to be regarded as standard. The inch-pound values in parentheses are provided for
information.
1.8 This standard does not purport to address all of the safety concerns, if any, associated with its use. It is the responsibility
of the user of this standard to establish appropriate safety and health practices and determine the applicability of regulatory
limitations prior to use. (For more specific safety hazard information see Section 7 and 12.1.)
2. Referenced Documents
3
2.1 ASTM Standards:
D1141 Practice for the Preparation of Substitute Ocean Water
G30 Practice for Making and Using U-Bend Stress-Corrosion Test Specimens
G36 Practice for Evaluating Stress-Corrosion-Cracking Resistance of Metals and Alloys in a Boiling Magnesium Chloride
Solution
G44 Practice for Exposure of Metals and Alloys by Alternate Immersion in Neutral 3.5 % Sodium Chloride Solution
G50 Practice for Conducting Atmospheric Corrosion Tests on Metals
G85 Practice for Modified Salt Spray (Fog) Testing
1
This practice is under the jurisdiction of ASTM Committee G01 on Corrosion of Metals and is the direct responsibility of Subcommittee G01.06 on Environmentally
Assisted Cracking.
Current edition approved March 1, 2011May 1, 2016. Published April 2011May 2016. Originally approved in 1973. Last previous edition approved in 20052011 as
G39–99(2005).G39 – 99 (2011). DOI: 10.1520/G0039-99R11.10.1520/G0039-99R16.
2
The boldface numbers in parentheses refer to a list of references at the end of this standard.
3
For referenced ASTM standards, visit the ASTM website, www.astm.org, or contact ASTM Customer Service at service@astm.org. For Annual Book of ASTM Standards
volume information, refer to the standard’s Document Summary page on the ASTM website.
Copyright © ASTM International, 100 Barr Harbor Drive, PO Box C700, West Conshohocken, PA 19428-2959. United States
1
---------------------- Page: 1 ----------------------
G39 − 99 (2016)
4
2.2 NAC
...


Questions, Comments and Discussion
Ask us and Technical Secretary will try to provide an answer. You can facilitate discussion about the standard in here.