ASTM F1165-98(2004)
(Test Method)Standard Test Method for Measuring Angular Displacement of Multiple Images in Transparent Parts
Standard Test Method for Measuring Angular Displacement of Multiple Images in Transparent Parts
SIGNIFICANCE AND USE
With the advent of thick, highly angled aircraft transparencies, multiple imaging has been more frequently cited as an optical problem by pilots. Secondary images (of outside lights), often varying in intensity and displacement across the windscreen, can give the pilot deceptive optical cues of his altitude, velocity, and approach angle, increasing his visual workload. Current specifications for multiple imaging in transparencies are vague and not quantitative. Typical specifications state “multiple imaging shall not be objectionable.”
The angular separation of the secondary and primary images has been shown to relate to the pilot’acceptability of the windscreen. This procedure provides a way to quantify angular separation so a more objective evaluation of the transparency can be made. It may be used for research of multiple imaging, quantifying aircrew complaints, or as the basis for windscreen specifications.
It should be noted that the basic multiple imaging characteristics of a windscreen are determined early in the design phase and are virtually impossible to change after the windscreen has been manufactured. In fact, a perfectly manufactured windscreen has some multiple imaging. For a particular windscreen, caution should be taken in the selection of specification criteria for multiple imaging, as the inherent multiple imaging characteristics may vary significantly depending upon windscreen thickness, material, or installation angle. Any tolerances that might be established should allow for inherent multiple imaging characteristics.
FIG. 2 Schematic Drawing of Component Layout for Measuring Multiple Imaging Angular Displacement
SCOPE
1.1 This test method covers measuring the angular separation of secondary images from their respective primary images as viewed from the design eye position of an aircraft transparency. Angular separation is measured at 49 points within a 20 by 20° field of view. This procedure may be performed on any aircraft transparency in a laboratory or in the field. However, the procedure is limited to a dark environment. Laboratory measurements are done in a darkened room and field measurements are done at night.
1.2 The values stated in acceptable metric units are to be regarded as the standard. The values in parentheses are for information only.
1.3 This standard may involve hazardous materials, operations, and equipment. This standard does not purport to address all of the safety concerns, associated with its use. It is the responsibility of the user of this standard to establish appropriate safety and health practices and determine the applicability of regulatory limitations prior to use.
General Information
Relations
Standards Content (Sample)
NOTICE: This standard has either been superseded and replaced by a new version or withdrawn.
Contact ASTM International (www.astm.org) for the latest information.
Designation:F1165–98 (Reapproved 2004)
Standard Test Method for
Measuring Angular Displacement of Multiple Images in
Transparent Parts
This standard is issued under the fixed designation F1165; the number immediately following the designation indicates the year of
original adoption or, in the case of revision, the year of last revision. A number in parentheses indicates the year of last reapproval. A
superscript epsilon (´) indicates an editorial change since the last revision or reapproval.
1. Scope
1.1 This test method covers measuring the angular separa-
tion of secondary images from their respective primary images
as viewed from the design eye position of an aircraft transpar-
ency. Angular separation is measured at 49 points within a 20
by 20° field of view. This procedure may be performed on any
aircraft transparency in a laboratory or in the field. However,
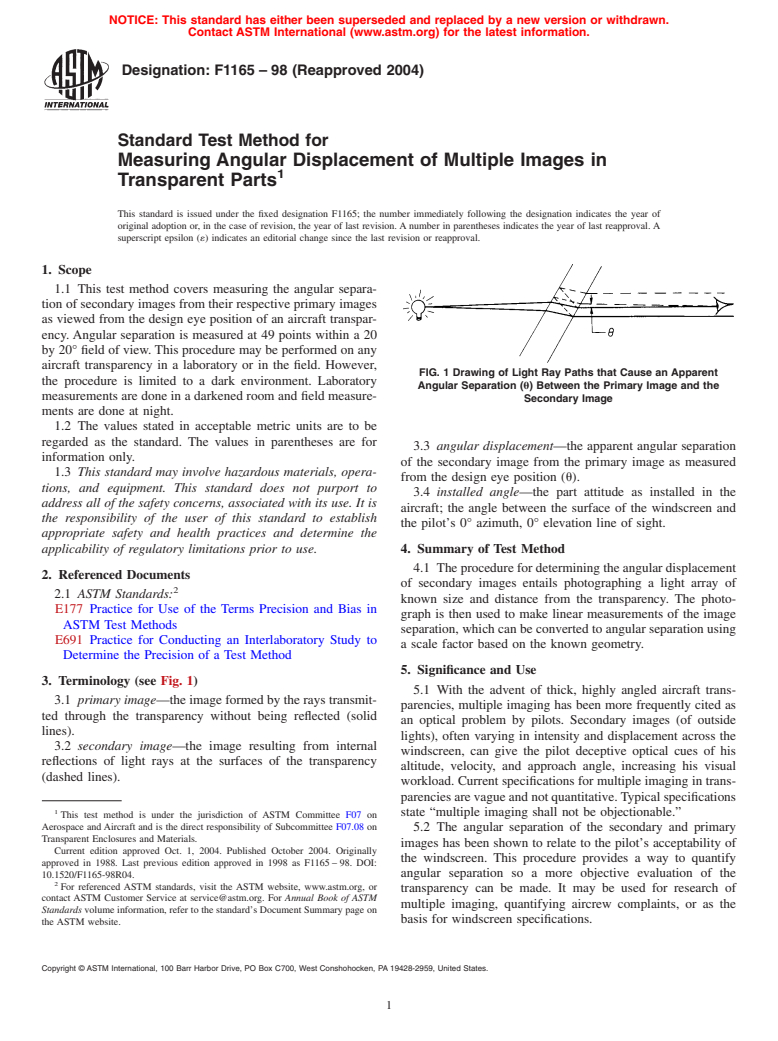
FIG. 1 Drawing of Light Ray Paths that Cause an Apparent
the procedure is limited to a dark environment. Laboratory
Angular Separation (u) Between the Primary Image and the
measurements are done in a darkened room and field measure-
Secondary Image
ments are done at night.
1.2 The values stated in acceptable metric units are to be
regarded as the standard. The values in parentheses are for
3.3 angular displacement—the apparent angular separation
information only.
of the secondary image from the primary image as measured
1.3 This standard may involve hazardous materials, opera-
from the design eye position (u).
tions, and equipment. This standard does not purport to
3.4 installed angle—the part attitude as installed in the
address all of the safety concerns, associated with its use. It is
aircraft; the angle between the surface of the windscreen and
the responsibility of the user of this standard to establish
the pilot’s 0° azimuth, 0° elevation line of sight.
appropriate safety and health practices and determine the
applicability of regulatory limitations prior to use. 4. Summary of Test Method
4.1 The procedure for determining the angular displacement
2. Referenced Documents
of secondary images entails photographing a light array of
2.1 ASTM Standards:
known size and distance from the transparency. The photo-
E177 Practice for Use of the Terms Precision and Bias in
graph is then used to make linear measurements of the image
ASTM Test Methods
separation, which can be converted to angular separation using
E691 Practice for Conducting an Interlaboratory Study to
a scale factor based on the known geometry.
Determine the Precision of a Test Method
5. Significance and Use
3. Terminology (see Fig. 1)
5.1 With the advent of thick, highly angled aircraft trans-
3.1 primary image—the image formed by the rays transmit-
parencies, multiple imaging has been more frequently cited as
ted through the transparency without being reflected (solid
an optical problem by pilots. Secondary images (of outside
lines).
lights), often varying in intensity and displacement across the
3.2 secondary image—the image resulting from internal
windscreen, can give the pilot deceptive optical cues of his
reflections of light rays at the surfaces of the transparency
altitude, velocity, and approach angle, increasing his visual
(dashed lines).
workload. Current specifications for multiple imaging in trans-
parencies are vague and not quantitative.Typical specifications
state “multiple imaging shall not be objectionable.”
This test method is under the jurisdiction of ASTM Committee F07 on
Aerospace and Aircraft and is the direct responsibility of Subcommittee F07.08 on
5.2 The angular separation of the secondary and primary
Transparent Enclosures and Materials.
images has been shown to relate to the pilot’s acceptability of
Current edition approved Oct. 1, 2004. Published October 2004. Originally
the windscreen. This procedure provides a way to quantify
approved in 1988. Last previous edition approved in 1998 as F1165 – 98. DOI:
10.1520/F1165-98R04. angular separation so a more objective evaluation of the
For referenced ASTM standards, visit the ASTM website, www.astm.org, or
transparency can be made. It may be used for research of
contact ASTM Customer Service at service@astm.org. For Annual Book of ASTM
multiple imaging, quantifying aircrew complaints, or as the
Standards volume information, refer to the standard’s Document Summary page on
basis for windscreen specifications.
the ASTM website.
Copyright © ASTM International, 100 Barr Harbor Drive, PO Box C700, West Conshohocken, PA 19428-2959, United States.
F1165–98 (2004)
8.2 Set up the light array so the center light is 7 m (23 ft 6
5 %) from the design eye position on the line of sight
corresponding to 0 azimuth, 0 elevation (Fig. 2). The array
should be perpendicular (65°) to the line of sight. For field
measurements, it may be necessary to attach the array to a
maintenance stand to elevate it to the appropriate height. Care
should be taken to ensure that the array is securely attached to
the maintenance stand railing and avoid hitting the nose of the
aircraft when moving the elevated array. If wind conditions
present a hazard, do not attempt to measure.
FIG. 2 Schematic Drawing of Component Layout for Measuring
8.3 Turn the array board on.
Multiple Imaging Angular Displacement
8.4 Place the camera in the design eye position and adjust
the camera such that the array is centered in the field of view;
focus the lens on the center light of the array.
5.3 It should be noted that the basic multiple imaging
8.5 Set the camera aperture to f/16 and the shutter speed to
characteristics of a windscreen are determined early in the
an appropriate setting.
design phase and are virtually impossible to change after the
8.6 Take the picture(s) and develop 8 by 10 prints or a
windscreen has been manufactured. In fact, a perfectly manu-
suitable enlargement.
factured windscreen has some multiple imaging. For a particu-
8.7 On the photograph, measure the distance (L) from the
lar windscreen, caution should be taken in the selection of
second light to the sixth light on the middle row. To ensure
specification criteria for multiple imaging, as the inherent
accuracy, use a precision measuring device, such as a digital
multiple imaging characteristics may vary significantly de-
caliper.
pending upon windscreen thickness, material, or installation
8.8 For each light in the 8 by 10 print, measure the linear
angle. Any tolerances that might be established should allow
separation (r) of the secondary image from the primary image
for inherent multiple imaging characteristics.
using the calipers. Measure from the center of both spots when
taking the measurement.
6. Apparatus
6.1 Light Array—The light array isa7by7 matrix of small
9. Calculation
incandescent lights (flashlight bulbs) mounted on a metal
9.1 To obtain the scale factor F, which relates the linear
frame. The separation of the lights is 406.4 mm (16 in.) on
distances on the photograph to actual angular distances as
center making the overall dimensions of the array 2.44 by 2.44
measured from the design eye position, use the equation as
m (8 by 8 ft). A suitable power supply, such as a rechargable
follows:
12-V dc gel cell, is also required. A backdrop of nonreflective
229.2
material (such as black velvet) should be placed several inches
F 5 mrads/mm (1)
L
behind the array to block out background lights and prevent
reflections.
9.2 Compute the angular separation u for each light of the
6.2 Camera/film—No special camera or modification is
array using the equation:
needed for this process. The lens should have a focal length of
about 50 mm or as is necessary to permit the ligh
...


Questions, Comments and Discussion
Ask us and Technical Secretary will try to provide an answer. You can facilitate discussion about the standard in here.