ASTM B415-98(2007)
(Specification)Standard Specification for Hard-Drawn Aluminum-Clad Steel Wire
Standard Specification for Hard-Drawn Aluminum-Clad Steel Wire
ABSTRACT
This specification covers four conductivities of bare, hard-drawn, round, aluminum-clad steel wire for general use for electrical purposes. The wire shall be composed of a steel core with a substantially uniform and continuous aluminum covering thoroughly bonded to it. The drawn wire shall have the properties and characteristics prescribed in the specification. The wire of varying nominal diameters shall conform to the prescribed tensile requirements such as tensile strength and elongation. The electrical resistance of the wire shall be determined by resistance measurements and maximum resistance shall be based on the nominal diameter of the wire and the resistivity value. The steel wire shall conform to the prescribed values of physical constants such as modulus of elasticity, coefficient of linear expansion, and temperature coefficient of resistance. Within a required range of diameters, the wire shall not vary from the specified diameter by more than the amount indicated. The aluminum thickness at any point shall not be less than the required values. The wire shall undergo a twist test, where the specimen shall be gripped at its ends in vises, one of which shall be free to move longitudinally during the test. The finished wire shall contain no joints or splices. The material shall also conform to the approximate properties of hard-drawn conductivity aluminum-clad steel wire.
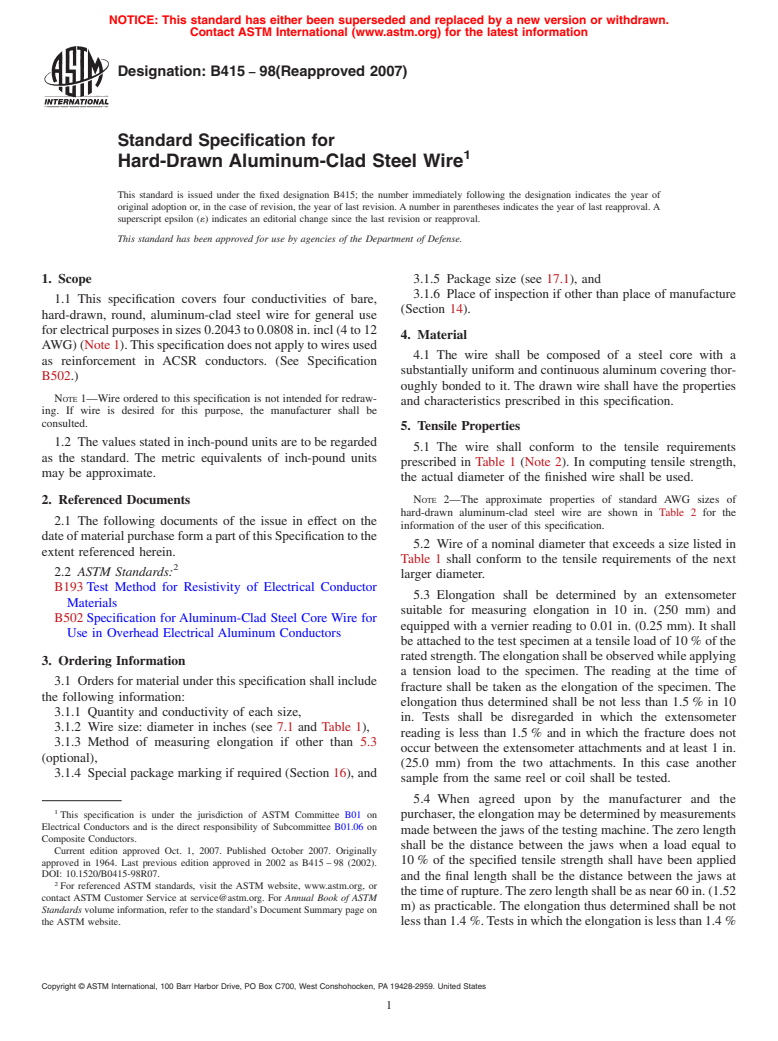
SCOPE
1.1 This specification covers four conductivities of bare, hard-drawn, round, aluminum-clad steel wire for general use for electrical purposes in sizes 0.2043 to 0.0808 in. incl (4 to 12 AWG) (Note 1). This specification does not apply to wires used as reinforcement in ACSR conductors. (See Specification B 502.) Note 1 - Wire ordered to this specification is not intended for redrawing. If wire is desired for this purpose, the manufacturer shall be consulted.
1.2 The values stated in inch-pound units are to be regarded as the standard. The metric equivalents of inch-pound units may be approximate.
General Information
Relations
Standards Content (Sample)
NOTICE: This standard has either been superseded and replaced by a new version or withdrawn.
Contact ASTM International (www.astm.org) for the latest information
Designation:B415 −98(Reapproved 2007)
Standard Specification for
Hard-Drawn Aluminum-Clad Steel Wire
This standard is issued under the fixed designation B415; the number immediately following the designation indicates the year of
original adoption or, in the case of revision, the year of last revision. A number in parentheses indicates the year of last reapproval. A
superscript epsilon (´) indicates an editorial change since the last revision or reapproval.
This standard has been approved for use by agencies of the Department of Defense.
1. Scope 3.1.5 Package size (see 17.1), and
3.1.6 Place of inspection if other than place of manufacture
1.1 This specification covers four conductivities of bare,
(Section 14).
hard-drawn, round, aluminum-clad steel wire for general use
forelectricalpurposesinsizes0.2043to0.0808in.incl(4to12
4. Material
AWG)(Note1).Thisspecificationdoesnotapplytowiresused
4.1 The wire shall be composed of a steel core with a
as reinforcement in ACSR conductors. (See Specification
substantially uniform and continuous aluminum covering thor-
B502.)
oughly bonded to it. The drawn wire shall have the properties
NOTE 1—Wire ordered to this specification is not intended for redraw-
and characteristics prescribed in this specification.
ing. If wire is desired for this purpose, the manufacturer shall be
consulted.
5. Tensile Properties
1.2 The values stated in inch-pound units are to be regarded
5.1 The wire shall conform to the tensile requirements
as the standard. The metric equivalents of inch-pound units
prescribed in Table 1 (Note 2). In computing tensile strength,
may be approximate.
the actual diameter of the finished wire shall be used.
NOTE 2—The approximate properties of standard AWG sizes of
2. Referenced Documents
hard-drawn aluminum-clad steel wire are shown in Table 2 for the
2.1 The following documents of the issue in effect on the
information of the user of this specification.
dateofmaterialpurchaseformapartofthisSpecificationtothe
5.2 Wire of a nominal diameter that exceeds a size listed in
extent referenced herein.
Table 1 shall conform to the tensile requirements of the next
2.2 ASTM Standards:
larger diameter.
B193 Test Method for Resistivity of Electrical Conductor
5.3 Elongation shall be determined by an extensometer
Materials
suitable for measuring elongation in 10 in. (250 mm) and
B502 Specification for Aluminum-Clad Steel Core Wire for
equipped with a vernier reading to 0.01 in. (0.25 mm). It shall
Use in Overhead Electrical Aluminum Conductors
be attached to the test specimen at a tensile load of 10 % of the
ratedstrength.Theelongationshallbeobservedwhileapplying
3. Ordering Information
a tension load to the specimen. The reading at the time of
3.1 Orders for material under this specification shall include
fracture shall be taken as the elongation of the specimen. The
the following information:
elongation thus determined shall be not less than 1.5 % in 10
3.1.1 Quantity and conductivity of each size,
in. Tests shall be disregarded in which the extensometer
3.1.2 Wire size: diameter in inches (see 7.1 and Table 1),
reading is less than 1.5 % and in which the fracture does not
3.1.3 Method of measuring elongation if other than 5.3
occur between the extensometer attachments and at least 1 in.
(optional),
(25.0 mm) from the two attachments. In this case another
3.1.4 Special package marking if required (Section 16), and
sample from the same reel or coil shall be tested.
5.4 When agreed upon by the manufacturer and the
This specification is under the jurisdiction of ASTM Committee B01 on
purchaser, the elongation may be determined by measurements
Electrical Conductors and is the direct responsibility of Subcommittee B01.06 on
made between the jaws of the testing machine.The zero length
Composite Conductors.
shall be the distance between the jaws when a load equal to
Current edition approved Oct. 1, 2007. Published October 2007. Originally
10 % of the specified tensile strength shall have been applied
approved in 1964. Last previous edition approved in 2002 as B415 – 98 (2002).
DOI: 10.1520/B0415-98R07.
and the final length shall be the distance between the jaws at
For referenced ASTM standards, visit the ASTM website, www.astm.org, or
thetimeofrupture.Thezerolengthshallbeasnear60in.(1.52
contact ASTM Customer Service at service@astm.org. For Annual Book of ASTM
m) as practicable. The elongation thus determined shall be not
Standards volume information, refer to the standard’s Document Summary page on
the ASTM website. lessthan1.4 %.Testsinwhichtheelongationislessthan1.4 %
Copyright © ASTM International, 100 Barr Harbor Drive, PO Box C700, West Conshohocken, PA 19428-2959. United States
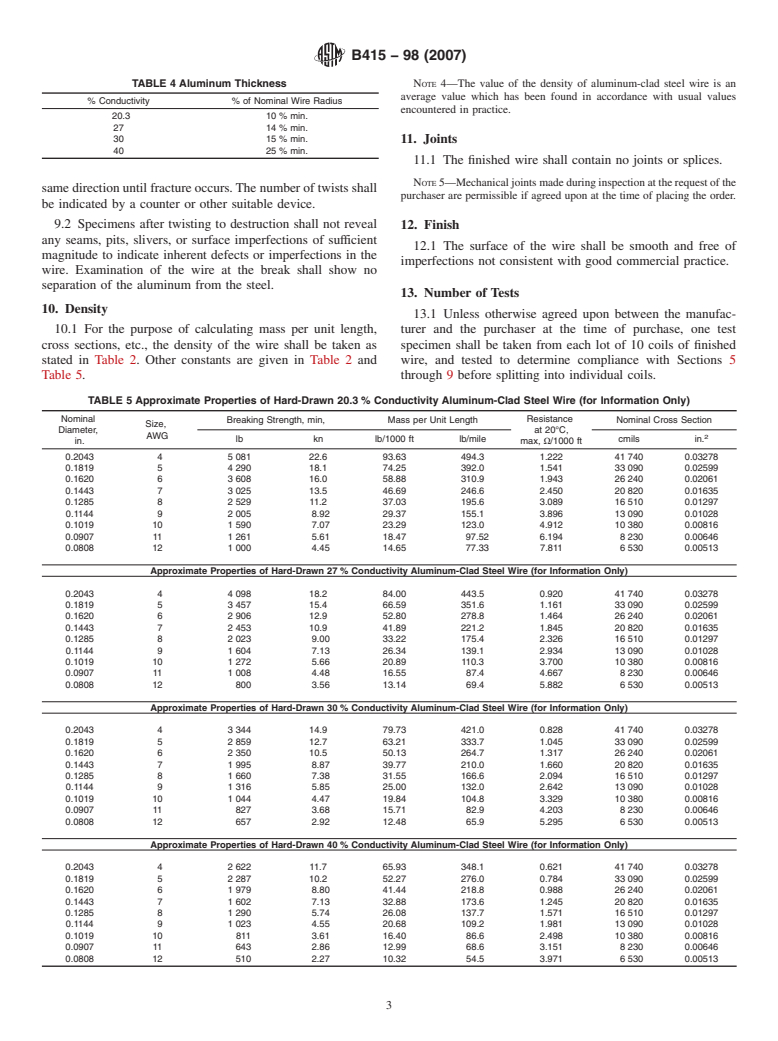
B415−98 (2007)
TABLE 1 Tensile Requirements
20 % 27 % 30 % 40 %
Nominal Size,
Diameter, in. AWG
psi MPa psi MPa psi MPa psi MPa
0.2043 4 155 000 1070 125 000 862 102 000 703 80 000 552
0.1880 160 000 1100 129 000 889 106 000 731 84 000 579
0.1819 5 165 000 1140 133 000 917 110 000 758 88 000 607
0.1729 170 000 1170 137 000 945 114 000 786 92 000 634
0.1620 6 175 000 1210 141 000 972 114 000 786 96 000 662
0.1549 180 000 1240 145 000 1000 118 000 814 96 000 662
0.1443 7 185 000 1280 150 000 1034 122 000 841 98 000 676
0.1369 190 000 1310 154 000 1062 126 000 869 98 000 676
0.1285 8 195 000 1340 156 000 1076 128 000 883 99 500 686
0.1144 9 195 000 1340 156 000 1076 128 000 883 99 500 686
0.1019 10 195 000 1340 156 000 1076 128 000 883 99 500 686
0.0907 11 195 000 1340 156 000 1076 128 000 883 99 500 686
0.0808 12 195 000 1340 156 000 1076 128 000 883 99 500 686
TABLE 2 Physical Constants
7.2 Within the range of diameters included in Table 3, the
Temperature wire shall not vary from the specified diameter by more than
% Density at Modulus of Coef. of Linear
Coef. of
the amounts shown in this table. In computing permissible
Conductivity 20°C Elasticity psi Exp.
Resistance
variations, diameters shall be rounded to the nearest 0.0001 in.
3 6
20.3 0.2381 lb/in 23.5 × 10 0.0000072/°F 0.0020/°F
3 (0.0025 mm).
(6.590 g/cm ) (162 GPa) (0.0000126/ (0.0036/°C)
°C)
7.3 If accessible, one diameter measurement shall be taken
3 6
27 0.2135 lb/in 20.3 × 10 0.0000077/°F 0.0020/°F
near each end and one near the middle of the coil or reel. In the
(5.91 g/cm ) (140 GPa) (0.0000134/ (0.0036/°C)
°C)
case of reels, the center and one end may not be accessible and
3 6
30 0.2027 lb/in 19.1 × 10 0.0000079/°F 0.0021/°F
the prescribed diameter measurement shall be taken along the
(5.61 g/cm ) (132 GPa) (0.0000138/ (0.0038/°C)
length of the accessible material. If any of the selected coils or
°C)
3 6
40 0.1676 lb/in 15.8 × 10 0.0000089/°F 0.0022/°F
reels fail to conform to the requirements for diameter as
(4.64 g/cm ) (109 GPa) (0.0000155/ (0.0040/°C)
prescribed in 7.2, all coils or reels shall be measured in the
°C)
manner specified.
8. Thickness of Aluminum
8.1 The aluminum thickness at any point shall be not less
and in which the fracture occurs at or within 1 in. (25.4 mm)
than stated in Table 4. Measurements shall be read to the
of the jaws shall be disregarded. In this case another sample
closest 0.001 in. (0.025 mm). In determining the required or
from the same reel or coil shall be tested.
measured thickness, 0.0005 in. (0.013 mm) or less shall be
dropped. For greater than 0.0005 in., the next larger 0.001 in.
6. Resistance
shall be used. Measurements shall be made by (a) using
6.1 The electrical resistance of the wire (Note 2 and Note 3)
suitable electrical indicating instruments operating on the
shall be determined by resistance measurements and maximum
permeameter principle, or (b) direct measurement. For referee
resistance shall be based on the nominal diameter of the wire
purposes, direct measurement shall be used to determine
and the resistivity value of:
aluminum thickness on specimens taken from the ends of the
51.01Ω·cmil/ft at 20°C for 20.3 % Conductivity
coils.
38.41Ω·cmil/ft at 20°C for 27 % Conductivity
34.57Ω·cmil/ft at 20°C for 30 % Conductivity
9. Twist Test
25.93Ω·cmil/ft at 20°C for 40 % Conductivity
9.1 The wire shall withstand without fracture not less than
NOTE 3—Electrical resistance is calculated by the following equation:
20 twists in a length equivalent to 100 times the nominal
Resistance,Ω/ft 5 Resistivit
...


Questions, Comments and Discussion
Ask us and Technical Secretary will try to provide an answer. You can facilitate discussion about the standard in here.