ASTM A438-80(1997)
(Test Method)Standard Test Method for Transverse Testing of Gray Cast Iron (Withdrawn 2003)
Standard Test Method for Transverse Testing of Gray Cast Iron (Withdrawn 2003)
SCOPE
1.1 This method covers a procedure for performing transverse bending tests on separately cast cylindrical test bars of gray cast iron.
1.2 This standard does not purport to address all of the safety problems, if any, associated with its use. It is the responsibility of the user of this standard to establish appropriate safety and health practices and determine the applicability of regulatory limitations prior to use.
General Information
Relations
Standards Content (Sample)
NOTICE: This standard has either been superceded and replaced by a new version or discontinued.
Contact ASTM International (www.astm.org) for the latest information.
Designation: A 438 – 80 (Reapproved 1997)
Standard Test Method for
Transverse Testing of Gray Cast Iron
This standard is issued under the fixed designation A 438; the number immediately following the designation indicates the year of
original adoption or, in the case of revision, the year of last revision. A number in parentheses indicates the year of last reapproval. A
superscript epsilon (e) indicates an editorial change since the last revision or reapproval.
This standard has been approved for use by agencies of the Department of Defense.
1. Scope tolerances given in Fig. 1.
3.2 Molds for the test bars shall be approximately at room
1.1 This test method covers a procedure for performing
temperature when poured. The test bars shall be cooled in the
transverse bending tests on separately cast cylindrical test bars
mold to a temperature less than 900°F (490°C), and then may
of gray cast iron.
be cooled in still air to room temperature.
1.2 This standard does not purport to address all of the
safety concerns, if any, associated with its use. It is the
4. Procedure
responsibility of the user of this standard to establish appro-
4.1 Perform the transverse test on a bar in the as-cast
priate safety and health practices and determine the applica-
(unmachined) condition, loading the bar as a simple beam with
bility of regulatory limitations prior to use.
the load applied midway between the supports as shown in Fig.
2. Significance and Use 1. The supports and the loading fixture shall be designed to
give essentially point contact with the test bar. Satisfactory
2.1 A transverse bending test on an unmachined test bar of
contact is considered to exist when the supports and loading
gray cast iron is useful as a rapid and inexpensive means for
fixture have a cylindrical surface with a diameter of about ⁄4 to
estimating the approximate strength of the test bar, but is not a
1 in. (6.4 to 25.4 mm) and when this surface is positioned
dependable substitute for a tension test on a machined speci-
normal to the length of the test bar.
men (Explanatory Note 1). The test yields easily measured
4.1.1 Round bars are those whose minimum and maximum
deflection values which are useful for comparing the relative
diameters, at the middle of the length of the bars, differ by less
ductilities of different test bars of gray cast iron (Explanatory
than 0.025 in. (0.64 mm) for test bar A and by less than 0.050
Note 2). The test can also be used to calculate a modulus of
in. (1.27 mm) for test bars B and C. Determine the reported
rupture or an apparent modulus of elasticity (Explanatory Note
breaking load, in pounds, for round bars by dividing the actual
3).
breaking load by a correction factor (Table 1), entering the
3. Dimensions and Form of Test Bars
table with the arithmetic average of the minimum diameters of
the bar. The load is to be applied in line with the minimum
3.1 The test bars shall be separate castings of essentially
diameter.
cylindrical shape (Explanatory Note 4), and available in three
4.1.2 Elliptical bars are those whose minimum and maxi-
standard sizes as shown in Fig. 1 (Explanatory Note 5). They
mum diameters, at the middle of the length of the bar, differ by
may contain a reasonable amount of pattern draft, but the
more than 0.025 in. (0.64 mm) for test bar A or 0.050 in. (1.27
diameter at the middle of the test bar shall be within the
mm) for test bars B and C. For elliptical bars, apply the load in
line with the minimum diameter. Determine the reported
This method is under the jurisdiction of ASTM Committee A04 on Iron
breaking load, in pounds, by dividing the actual breaking load
Castings and is the direct responsibility of Subcommittee A04.21 on Testing.
by a correction factor (Table 1) entering the table with the
Current edition approved March 28, 1980. Published July 1980. Originally
minimum diameter.
published as A 438 – 60 T. Last previous edition A 438 – 62 (1974).
Copyright © ASTM International, 100 Barr Harbor Drive, PO Box C700, West Conshohocken, PA 19428-2959, United States.
NOTICE: This standard has either been superceded and replaced by a new version or discontinued.
Contact ASTM International (www.astm.org) for the latest information.
A 438
Dimensions, in. (mm)
Transverse Length of Test Bar, l Diameter of Test Bar, d Distance Between,
Test Bar Supports, L
Nominal Tolerance Nominal Tolerance
A 15 (381) 61 (25.4) 0.88 (22.4) 60.03 (0.8) 12 (305)
B 21 (533) 61 (25.4) 1.20 (30.5) 60.06 (1.5) 18 (457)
C 27 (686) 61 (25.4) 2.00 (50.8) 60.10 (2.5) 24 (610)
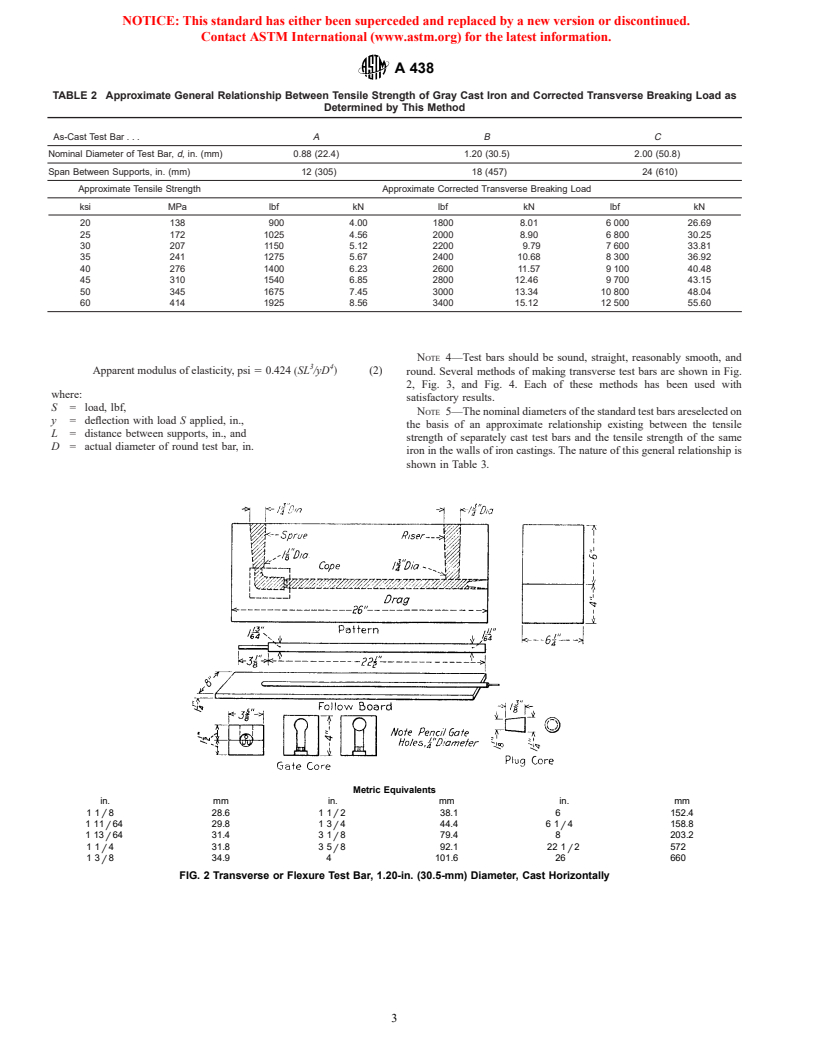
FIG. 1 Cast Transverse Test Bars and Illustration of Method of Loading
TABLE 1 Correction Factors for Round Transverse Test Bars
NOTE— In order to correct the standard nominal diameter, the actual breaking load and actual deflection obtained in testing the bar shall be divided
by the following correction factors in order to obtain reported breaking load and reported deflection.
Test Bar A Test Bar B Test Bar C
0.88 in. (22.4 mm) in Diameter in. (30.5 mm) in Diameter 2.00 in. (50.8 mm) in Diameter
Diameter of Test Correction Factor Diameter of Test Correction Factor Diameter of Test Correction Factor
Bars, in. (mm) Load Deflection Bars, in. (mm) Load Deflection Bars, in. (mm) Load Deflection
0.825 (20.96) 0.824 1.067 1.10 (27.9) 0.770 1.091 1.90 (48.3) 0.857 1.053
0.830 (21.08) 0.839 1.060 1.11 (28.2) 0.791 1.081 1.91 (48.5) 0.871 1.047
0.835 (21.21) 0.854 1.054 1.12 (28.4) 0.813 1.071 1.92 (48.8) 0.885 1.042
0.840 (21.34) 0.870 1.048 1.13 (28.7) 0.835 1.062 1.93 (49.0) 0.899 1.037
0.845 (21.46) 0.885 1.041 1.14 (29.0) 0.857 1.053 1.94 (49.3) 0.913 1.032
0.850 (21.59) 0.901 1.035 1.15 (29.2) 0.880 1.043 1.95 (49.5) 0.927 1.026
0.855 (21.72) 0.917 1.029 1.16 (29.5) 0.903 1.034 1.96 (49.8) 0.941 1.021
0.860 (21.84) 0.933 1.023 1.17 (29.7) 0.927 1.026 1.97 (50.0) 0.955 1.015
0.865 (21.97) 0.950 1.017 1.18 (30.0) 0.951 1.017 1.98 (50.3) 0.970 1.010
0.870 (22.10) 0.966 1.011 1.19 (30.2) 0.975 1.009 1.99 (50.5) 0.985 1.005
0.875 (22.22) 0.983 1.006 1.20 (30.5) 1.000 1.000 2.00 (50.8) 1.000 1.000
0.880 (22.35) 1.000 1.000 1.21 (30.7) 1.025 0.992 2.01 (51.0) 1.015 0.995
0.885 (22.48) 1.017
...


Questions, Comments and Discussion
Ask us and Technical Secretary will try to provide an answer. You can facilitate discussion about the standard in here.