ASTM G206-17(2021)e1
(Guide)Standard Guide for Measuring the Wear Volumes of Piston Ring Segments Run against Flat Coupons in Reciprocating Wear Tests
Standard Guide for Measuring the Wear Volumes of Piston Ring Segments Run against Flat Coupons in Reciprocating Wear Tests
SIGNIFICANCE AND USE
5.1 The practical life of an internal combustion engine is most often determined by monitoring its oil consumption. Excessive oil consumption is cause for engine repair or replacement and can be symptomatic of excessive wear of the piston ring or the cylinder bore or both. More wear-resistant materials of construction can extend engine life and reduce cost of operation. Although components made from more wear-resistant materials can be tested in actual operating engines, such tests tend to be expensive and time consuming, and they often lead to variable results because of the difficulty in controlling the operating environment. Although bench-scale tests do not simulate every aspect of a fired engine, they are used for cost-effective initial screening of candidate materials and lubricants. The test parameters for those tests are selected by the investigator, but the end result is a pair of worn specimens whose degree of wear needs to be accurately measured. The use of curved specimens, like segments of crowned piston rings, presents challenges for precise wear measurement. Weight loss or linear measurements of lengths and widths of wear scars may not provide sufficient accuracy to discriminate between small differences in wear. This guide is intended to address that problem.
SCOPE
1.1 This guide describes a profiling method for use accurately measuring the wear loss of compound-curved (crowned) piston ring specimens that run against flat counterfaces. It does not assume that the wear scars are ideally flat, as do some alternative measurement methods. Laboratory-scale wear tests have been used to evaluate the wear of materials, coatings, and surface treatments that are candidates for piston rings and cylinder liners in diesel engines or spark ignition engines. Various loads, temperatures, speeds, lubricants, and durations are used for such tests, but some of them use a curved piston ring segment as one sliding partner and a flat or curved specimen (simulating the cylinder liner) as its counterface. The goal of this guide is to provide more accurate wear measurements than alternative approaches involving weight loss or simply measuring the length and width of the wear marks.
1.2 This standard does not purport to address all of the safety concerns, if any, associated with its use. It is the responsibility of the user of this standard to establish appropriate safety, health, and environmental practices and determine the applicability of regulatory limitations prior to use.
1.3 This international standard was developed in accordance with internationally recognized principles on standardization established in the Decision on Principles for the Development of International Standards, Guides and Recommendations issued by the World Trade Organization Technical Barriers to Trade (TBT) Committee.
General Information
- Status
- Published
- Publication Date
- 31-Oct-2021
- Technical Committee
- G02 - Wear and Erosion
- Drafting Committee
- G02.40 - Non-Abrasive Wear
Relations
- Effective Date
- 01-Nov-2015
- Effective Date
- 01-Jun-2013
- Effective Date
- 01-May-2012
- Effective Date
- 01-May-2011
- Effective Date
- 01-Dec-2010
- Effective Date
- 01-Jul-2010
- Effective Date
- 01-Jan-2010
- Effective Date
- 15-Nov-2009
- Effective Date
- 01-Oct-2009
- Effective Date
- 01-May-2005
- Effective Date
- 01-Dec-2004
- Effective Date
- 01-Nov-2004
- Effective Date
- 10-Oct-2002
- Effective Date
- 10-Jun-2001
- Effective Date
- 10-Jun-2001
Overview
ASTM G206-17(2021)e1 - "Standard Guide for Measuring the Wear Volumes of Piston Ring Segments Run against Flat Coupons in Reciprocating Wear Tests" - provides a comprehensive profiling method for precisely measuring wear loss in piston ring segments with compound-curved (crowned) surfaces when tested against flat specimens. Developed and maintained by ASTM International, this standard addresses the need for more accurate and reproducible wear measurements in laboratory-scale reciprocating wear tests, particularly for internal combustion engine components.
Monitoring and controlling wear in engine parts such as piston rings and cylinder liners is crucial for extending engine life, improving performance, and reducing operational costs. Unlike full engine tests, laboratory-scale tests using this standard offer a cost-effective, controlled method for initial screening of candidate materials and lubricants.
Key Topics
Wear Measurement Accuracy
The guide outlines a profiling-based approach, overcoming limitations associated with traditional weight-loss or linear dimension measurement methods, which often lack the sensitivity needed to discriminate among materials with similar wear performance.Testing Methodology
Utilizes a reciprocating wear test simulating the movement of piston rings against a flat or similarly shaped counterface, considering various test parameters such as loads, speeds, temperatures, and lubricants relevant to engine conditions.Applicability to Compound-Curved Surfaces
Designed specifically for the curved surfaces typical of piston ring segments, the method does not assume wear scars are flat-improving measurement reliability for components with non-flat contact geometries.Metrology Requirements
Recommends using calibrated dimensional metrology instruments (including stylus-type, optical, or laser-based profilometers) to measure the shape and volume of wear scars with high precision.Reporting Practices Specifies that wear should be reported as volume loss, with the option to normalize this data to factors such as sliding distance or applied force, enabling the calculation of wear rates or wear factors for comparative analysis.
Applications
The ASTM G206 standard is widely applicable in the following areas:
Material and Coating Evaluation
Enables manufacturers and researchers to screen and rank new materials, surface treatments, and coatings for piston rings and cylinder liners used in diesel and spark-ignition engines.Lubricant Testing
Supports the assessment of new lubricants under simulated engine conditions, helping to optimize formulations for reduced wear and prolonged engine service life.Quality Assurance
Facilitates the accurate characterization of wear resistance during product development or quality control, aiding in benchmarking against industry standards or regulatory requirements.Cost-Effective R&D
Reduces reliance on costly and time-consuming engine tests, streamlining research and development processes in automotive, heavy-duty, and industrial engine applications.
Related Standards
Several ASTM standards and industry references complement or are relevant to ASTM G206:
ASTM G40 - Terminology Relating to Wear and Erosion
Provides definitions crucial for consistent interpretation of wear test data and methodologies.ASTM G181 - Test Method for Conducting Friction Tests of Piston Ring and Cylinder Liner Materials Under Lubricated Conditions
Covers related methods for assessing friction and wear in similar test configurations.International Standards Principles
ASTM G206 is developed in accordance with globally recognized standardization principles set by the World Trade Organization’s Technical Barriers to Trade (TBT) Committee, ensuring broad applicability and acceptance.
Keywords: wear measurement, piston ring segments, cylinder liner, reciprocating wear test, ASTM G206, compound-curved surfaces, engine component wear, laboratory-scale testing, volumetric wear loss, metrology.
Buy Documents
ASTM G206-17(2021)e1 - Standard Guide for Measuring the Wear Volumes of Piston Ring Segments Run against Flat Coupons in Reciprocating Wear Tests
Frequently Asked Questions
ASTM G206-17(2021)e1 is a guide published by ASTM International. Its full title is "Standard Guide for Measuring the Wear Volumes of Piston Ring Segments Run against Flat Coupons in Reciprocating Wear Tests". This standard covers: SIGNIFICANCE AND USE 5.1 The practical life of an internal combustion engine is most often determined by monitoring its oil consumption. Excessive oil consumption is cause for engine repair or replacement and can be symptomatic of excessive wear of the piston ring or the cylinder bore or both. More wear-resistant materials of construction can extend engine life and reduce cost of operation. Although components made from more wear-resistant materials can be tested in actual operating engines, such tests tend to be expensive and time consuming, and they often lead to variable results because of the difficulty in controlling the operating environment. Although bench-scale tests do not simulate every aspect of a fired engine, they are used for cost-effective initial screening of candidate materials and lubricants. The test parameters for those tests are selected by the investigator, but the end result is a pair of worn specimens whose degree of wear needs to be accurately measured. The use of curved specimens, like segments of crowned piston rings, presents challenges for precise wear measurement. Weight loss or linear measurements of lengths and widths of wear scars may not provide sufficient accuracy to discriminate between small differences in wear. This guide is intended to address that problem. SCOPE 1.1 This guide describes a profiling method for use accurately measuring the wear loss of compound-curved (crowned) piston ring specimens that run against flat counterfaces. It does not assume that the wear scars are ideally flat, as do some alternative measurement methods. Laboratory-scale wear tests have been used to evaluate the wear of materials, coatings, and surface treatments that are candidates for piston rings and cylinder liners in diesel engines or spark ignition engines. Various loads, temperatures, speeds, lubricants, and durations are used for such tests, but some of them use a curved piston ring segment as one sliding partner and a flat or curved specimen (simulating the cylinder liner) as its counterface. The goal of this guide is to provide more accurate wear measurements than alternative approaches involving weight loss or simply measuring the length and width of the wear marks. 1.2 This standard does not purport to address all of the safety concerns, if any, associated with its use. It is the responsibility of the user of this standard to establish appropriate safety, health, and environmental practices and determine the applicability of regulatory limitations prior to use. 1.3 This international standard was developed in accordance with internationally recognized principles on standardization established in the Decision on Principles for the Development of International Standards, Guides and Recommendations issued by the World Trade Organization Technical Barriers to Trade (TBT) Committee.
SIGNIFICANCE AND USE 5.1 The practical life of an internal combustion engine is most often determined by monitoring its oil consumption. Excessive oil consumption is cause for engine repair or replacement and can be symptomatic of excessive wear of the piston ring or the cylinder bore or both. More wear-resistant materials of construction can extend engine life and reduce cost of operation. Although components made from more wear-resistant materials can be tested in actual operating engines, such tests tend to be expensive and time consuming, and they often lead to variable results because of the difficulty in controlling the operating environment. Although bench-scale tests do not simulate every aspect of a fired engine, they are used for cost-effective initial screening of candidate materials and lubricants. The test parameters for those tests are selected by the investigator, but the end result is a pair of worn specimens whose degree of wear needs to be accurately measured. The use of curved specimens, like segments of crowned piston rings, presents challenges for precise wear measurement. Weight loss or linear measurements of lengths and widths of wear scars may not provide sufficient accuracy to discriminate between small differences in wear. This guide is intended to address that problem. SCOPE 1.1 This guide describes a profiling method for use accurately measuring the wear loss of compound-curved (crowned) piston ring specimens that run against flat counterfaces. It does not assume that the wear scars are ideally flat, as do some alternative measurement methods. Laboratory-scale wear tests have been used to evaluate the wear of materials, coatings, and surface treatments that are candidates for piston rings and cylinder liners in diesel engines or spark ignition engines. Various loads, temperatures, speeds, lubricants, and durations are used for such tests, but some of them use a curved piston ring segment as one sliding partner and a flat or curved specimen (simulating the cylinder liner) as its counterface. The goal of this guide is to provide more accurate wear measurements than alternative approaches involving weight loss or simply measuring the length and width of the wear marks. 1.2 This standard does not purport to address all of the safety concerns, if any, associated with its use. It is the responsibility of the user of this standard to establish appropriate safety, health, and environmental practices and determine the applicability of regulatory limitations prior to use. 1.3 This international standard was developed in accordance with internationally recognized principles on standardization established in the Decision on Principles for the Development of International Standards, Guides and Recommendations issued by the World Trade Organization Technical Barriers to Trade (TBT) Committee.
ASTM G206-17(2021)e1 is classified under the following ICS (International Classification for Standards) categories: 21.140 - Seals, glands. The ICS classification helps identify the subject area and facilitates finding related standards.
ASTM G206-17(2021)e1 has the following relationships with other standards: It is inter standard links to ASTM G40-15, ASTM G40-13, ASTM G40-12, ASTM G181-11, ASTM G40-10b, ASTM G40-10a, ASTM G40-10, ASTM G40-09, ASTM G181-04(2009), ASTM G40-05, ASTM G40-04, ASTM G181-04, ASTM G40-02, ASTM G40-01, ASTM G40-99. Understanding these relationships helps ensure you are using the most current and applicable version of the standard.
ASTM G206-17(2021)e1 is available in PDF format for immediate download after purchase. The document can be added to your cart and obtained through the secure checkout process. Digital delivery ensures instant access to the complete standard document.
Standards Content (Sample)
This international standard was developed in accordance with internationally recognized principles on standardization established in the Decision on Principles for the
Development of International Standards, Guides and Recommendations issued by the World Trade Organization Technical Barriers to Trade (TBT) Committee.
´1
Designation: G206 − 17 (Reapproved 2021)
Standard Guide for
Measuring the Wear Volumes of Piston Ring Segments Run
against Flat Coupons in Reciprocating Wear Tests
This standard is issued under the fixed designation G206; the number immediately following the designation indicates the year of
original adoption or, in the case of revision, the year of last revision. A number in parentheses indicates the year of last reapproval. A
superscript epsilon (´) indicates an editorial change since the last revision or reapproval.
ε NOTE—Editorial changes were made throughout in November 2021.
1. Scope G181 Test Method for Conducting Friction Tests of Piston
Ring and Cylinder Liner Materials Under Lubricated
1.1 This guide describes a profiling method for use accu-
Conditions
rately measuring the wear loss of compound-curved (crowned)
piston ring specimens that run against flat counterfaces. It does
3. Terminology
not assume that the wear scars are ideally flat, as do some
alternative measurement methods. Laboratory-scale wear tests 3.1 Definitions—See Terminology G40.
have been used to evaluate the wear of materials, coatings, and
3.2 Definitions of Terms Specific to This Standard:
surface treatments that are candidates for piston rings and
3.2.1 conformal contact, n—in friction and wear testing,
cylinder liners in diesel engines or spark ignition engines.
any macro-geometric specimen configuration in which the
Various loads, temperatures, speeds, lubricants, and durations
curvature of one contact surface matches that of the counter-
are used for such tests, but some of them use a curved piston
face.
ring segment as one sliding partner and a flat or curved
3.2.1.1 Discussion—Examples of conformal contact include
specimen (simulating the cylinder liner) as its counterface.The
a flat surface sliding on a flat surface and a ball rotating in a
goal of this guide is to provide more accurate wear measure-
socket that conforms to the shape of the ball.Apair of surfaces
ments than alternative approaches involving weight loss or
may begin a wear or friction test in a non-conformal contact
simply measuring the length and width of the wear marks.
configuration, but develop a conformal contact as a result of
1.2 This standard does not purport to address all of the wear.
safety concerns, if any, associated with its use. It is the
3.2.2 cylinder bore/cylinder liner, n—in an internal combus-
responsibility of the user of this standard to establish appro-
tion engine, the cylindrical cavity in which the piston moves.
priate safety, health, and environmental practices and deter-
3.2.2.1 Discussion—The terms cylinder bore and cylinder
mine the applicability of regulatory limitations prior to use.
liner are used interchangeably in the description of this guide.
1.3 This international standard was developed in accor-
Cylinder liners are most commonly used in heavy-duty engines
dance with internationally recognized principles on standard-
that are intended to be rebuilt. They are sleeves, generally of a
ization established in the Decision on Principles for the
cast iron, that are surrounded on their outer surface by coolant
Development of International Standards, Guides and Recom-
for better heat transfer, and meant to be replaced when
mendations issued by the World Trade Organization Technical
excessively worn. A cylinder bore is either machined directly
Barriers to Trade (TBT) Committee.
into an engine block or is added as a sleeve (typically of iron)
into a block of another material (typically aluminum). The
2. Referenced Documents
material of the cylinder bore, therefore, may or may not be the
2.1 ASTM Standards:
same material as the engine block and the inside surface of the
G40 Terminology Relating to Wear and Erosion
bore may or may not have additional surface treatment.
4. Summary of Guide
This guide is under the jurisdiction of ASTM Committee G02 on Wear and
Erosion and is the direct responsibility of Subcommittee G02.40 on Non-Abrasive
4.1 A reciprocating wear testing apparatus is used to simu-
Wear.
late the back-and-forth motion of a piston ring within a
Current edition approved Nov. 1, 2021. Published November 2021. Originally
cylinder bore in the presence of a heated lubricant. Depending
approved in 2011. Last previous edition approved in 2017 as G206 – 17. DOI:
ɛ1
10.1520/G0206-17R21 .
on the duration and severity of the imposed test conditions,
For referenced ASTM standards, visit the ASTM website, www.astm.org, or
some degree of wear is generally produced on one or both
contact ASTM Customer Service at service@astm.org. For Annual Book of ASTM
members of the sliding pair. Mathematical models of the wear
Standards volume information, refer to the standard’s Document Summary page on
the ASTM website. scar geometry on both the piston ring and cylinder liner
Copyright © ASTM International, 100 Barr Harbor Drive, PO Box C700, West Conshohocken, PA 19428-2959. United States
´1
G206 − 17 (2021)
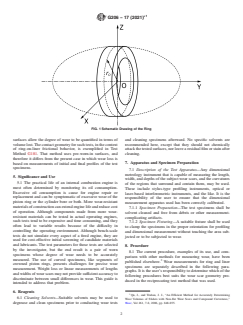
FIG. 1 Schematic Drawing of the Ring
surfaces allow the degree of wear to be quantified in terms of and cleaning specimens afterward. No specific solvents are
volumelost.Thecontactgeometryforsuchtests,inthecontext recommended here, except that they should not chemically
of ring-on-liner frictional behavior, is exemplified in Test attackthetestedsurfaces,norleavearesidualfilmorstainafter
Method G181. That method uses pre-worn-in surfaces, and cleaning.
therefore it differs from the present case in which wear loss is
7. Apparatus and Specimen Preparation
based on measurements of initial and final profiles of the test
specimens.
7.1 Description of the Test Apparatus—Any dimensional
metrology instrument that is capable of measuring the length,
5. Significance and Use
width, and depths of the subject wear scars, and the curvatures
5.1 The practical life of an internal combustion engine is
of the regions that surround and contain them, may be used.
most often determined by monitoring its oil consumption.
These include stylus-type profiling instruments, optical or
Excessive oil consumption is cause for engine repair or
laser-based interferometric instruments, and the like. It is the
replacement and can be symptomatic of excessive wear of the
responsibility of the user to ensure that the dimensional
piston ring or the cylinder bore or both. More wear-resistant
measurement apparatus used has been correctly calibrated.
materialsofconstructioncanextendenginelifeandreducecost
7.1.1 Specimen Preparation—The test specimens shall be
of operation. Although components made from more wear-
solvent cleaned and free from debris or other measurement-
resistant materials can be tested in actual operating engines,
complicating artifacts.
such tests tend to be expensive and time consuming, and they
7.1.2 Specimen Fixturing—A suitable fixture shall be used
often lead to variable results because of the difficulty in
to clamp the specimens in the proper orientation for profiling
controlling the operating environment. Although bench-scale
and dimensional measu
...


Questions, Comments and Discussion
Ask us and Technical Secretary will try to provide an answer. You can facilitate discussion about the standard in here.
Loading comments...