ASTM E749-96
(Practice)Standard Practice for Acoustic Emission Monitoring During Continuous Welding
Standard Practice for Acoustic Emission Monitoring During Continuous Welding
SCOPE
1.1 This practice provides recommended guidelines for acoustic emission (AE) monitoring of weldments during and immediately following their fabrication by continuous welding processes. The technique is in a developmental stage and is not used routinely on production welding. Depending on the results of ongoing research and preproduction weld monitoring experience, these procedures are subject to change before routine implementation on production welds.
1.2 The procedure described in this practice is applicable to the detection and location of AE sources in weldments and in their heat-affected zone during fabrication, particularly in those cases where the time duration of welding is such that fusion and solidification take place while welding is still in progress.
1.3 The effectiveness of acoustic emission to detect discontinuities in the weldment and the heat-affected zone is dependent on the design of the AE system, the calibration procedure, the weld process, and the material type. Materials that have been monitored include low-carbon steels, low-alloy steels, stainless steels, and some aluminum alloys. The system performance must be verified for each application by demonstrating that the defects of concern can be detected with the desired reliability.
1.4 This standard does not purport to address all of the safety concerns, if any, associated with its use. It is the responsibility of the user of this standard to establish appropriate safety and health practices and determine the applicability of regulatory limitations prior to use.
General Information
Relations
Standards Content (Sample)
NOTICE: This standard has either been superseded and replaced by a new version or discontinued.
Contact ASTM International (www.astm.org) for the latest information.
Designation: E 749 – 96 An American National Standard
Standard Practice for
Acoustic Emission Monitoring During Continuous Welding
This standard is issued under the fixed designation E 749; the number immediately following the designation indicates the year of
original adoption or, in the case of revision, the year of last revision. A number in parentheses indicates the year of last reapproval. A
superscript epsilon (e) indicates an editorial change since the last revision or reapproval.
1. Scope 2.2 ASNT Standards:
SNT-TC-1A Recommended Practice for Nondestructive
1.1 This practice provides recommended guidelines for
Testing Personnel Qualification and Certification
acoustic emission (AE) monitoring of weldments during and
ANSI/ASNT CP-189 Standard for Qualification and Certi-
immediately following their fabrication by continuous welding
fication of Nondestructive Testing Personnel
processes. The technique is in a developmental stage and is not
2.3 Military Standard:
used routinely on production welding. Depending on the
MIL-STD-410 Nondestructive Testing Personnel Qualifica-
results of ongoing research and preproduction weld monitoring
tion and Certification
experience, these procedures are subject to change before
routine implementation on production welds.
3. Terminology
1.2 The procedure described in this practice is applicable to
3.1 Definitions—For definitions of terms relating to acoustic
the detection and location of AE sources in weldments and in
emission testing, see Section B of Terminology E 1316.
their heat-affected zone during fabrication, particularly in those
cases where the time duration of welding is such that fusion
4. Significance and Use
and solidification take place while welding is still in progress.
4.1 Detection and location of AE sources in weldments
1.3 The effectiveness of acoustic emission to detect discon-
during fabrication may provide information related to the
tinuities in the weldment and the heat-affected zone is depen-
integrity of the weld. Such information may be used to direct
dent on the design of the AE system, the calibration procedure,
repair procedures on the weld or as a guide for application of
the weld process, and the material type. Materials that have
other nondestructive evaluation (NDE) methods. A major
been monitored include low-carbon steels, low-alloy steels,
attribute of applying AE for in-process monitoring of welds is
stainless steels, and some aluminum alloys. The system per-
the ability of the method to provide immediate real-time
formance must be verified for each application by demonstrat-
information on weld integrity. This feature makes the method
ing that the defects of concern can be detected with the desired
useful to lower weld costs by repairing defects at the most
reliability.
convenient point in the production process. The AE activity
1.4 This standard does not purport to address all of the
from discontinuities in the weldment is stimulated by the
safety concerns, if any, associated with its use. It is the
thermal stresses from the welding process. The AE activity
responsibility of the user of this standard to establish appro-
resulting from this stimulation is detected by AE sensors in the
priate safety and health practices and determine the applica-
vicinity of the weldment which convert the acoustic signals
bility of regulatory limitations prior to use.
into electronic signals. The AE instrumentation similar to that
described in Practice E 569 processes signals and may provide
2. Referenced Documents
means for immediate display or indication of AE activity and
2.1 ASTM Standards:
for permanent recordings of the data.
E 543 Practice for Evaluating Agencies that Perform Non-
2 4.2 Items to be considered in preparation and planning for
destructive Testing
monitoring should include but not be limited to the following:
E 569 Practice for Acoustic Emission Monitoring of Struc-
2 4.2.1 Description of the system or object to be monitored or
tures During Controlled Stimulation
examined,
E 650 Guide for Mounting Piezoelectric Acoustic Emission
2 4.2.2 Extent of monitoring, that is, entire weld, cover passes
Sensors
2 only, and so forth,
E 1316 Terminology for Nondestructive Examinations
4.2.3 Limitations or restrictions on the sensor mounting
procedures, if applicable,
This practice is under the jurisdiction of ASTM Committee E-7 on Nonde-
structive Testing and is the direct responsibility of Subcommittee E07.04 on
Acoustic Emission. Available from American Society of Nondestructive Testing, 1711 Arlingate
Current edition approved May 10, 1996. Published July 1996. Originally Plaza, P. O. Box 28518, Columbus, OH 43228-0518.
e1 4
published as E 749 – 80. Last previous edition E 749 – 80 (1991) . Available from Standardization Documents Order Desk, Bldg. 4 Section D, 700
Annual Book of ASTM Standards, Vol 03.03. Robbins Ave., Philadelphia, PA 19111-5094, Attn: NPODS.
Copyright © ASTM, 100 Barr Harbor Drive, West Conshohocken, PA 19428-2959, United States.
E 749
4.2.4 Performance parameters to be established and main-
tained during the calibration procedure (sensitivity, locational
accuracy, and so forth),
4.2.5 Maximum time interval between system calibration
checks,
4.2.6 Performance criteria for purchased equipment,
4.2.7 Requirements for permanent records of the AE re-
FIG. 1 Typical Sensor Placement for Single Channel AE
sponse, if applicable,
Monitoring of a Linear Weld
4.2.8 Content and format of testing report, if required, and
4.2.9 Operator qualification and certification, if required.
5. Basis of Application
5.1 Personnel Qualification:
5.1.1 Nondestructive Testing (NDT) personnel shall be
qualified in accordance with a nationally recognized NDT
personnel qualification practice or standard such as ANSI/
FIG. 2 Typical Sensor Placement for Two-Channel AE Monitoring
ASNT CP-189, SNT-TC-1A, MIL-STD-410, or similar docu-
of a Linear Weld
ment. The practice or standard used and its applicable revision
shall be specified in the contractual agreement between the
using parties.
5.1.2 In those cases in which AE monitoring is restricted to
use as a production tool to facilitate immediate repair, moni-
toring during welding may be performed by production per-
sonnel lacking the necessary certification; however, certified
personnel should verify that proper procedures are imple-
mented.
5.2 Qualification of Nondestructive Agencies—If specified
FIG. 3 Typical Sensor Placement for Three-Channel AE
in the contractual agreement, NDT agencies shall be qualified
Monitoring of a Circular Weld
and evaluated as described in Practice E 543. The applicable
edition of Practice E 543 shall be specified in the contractual
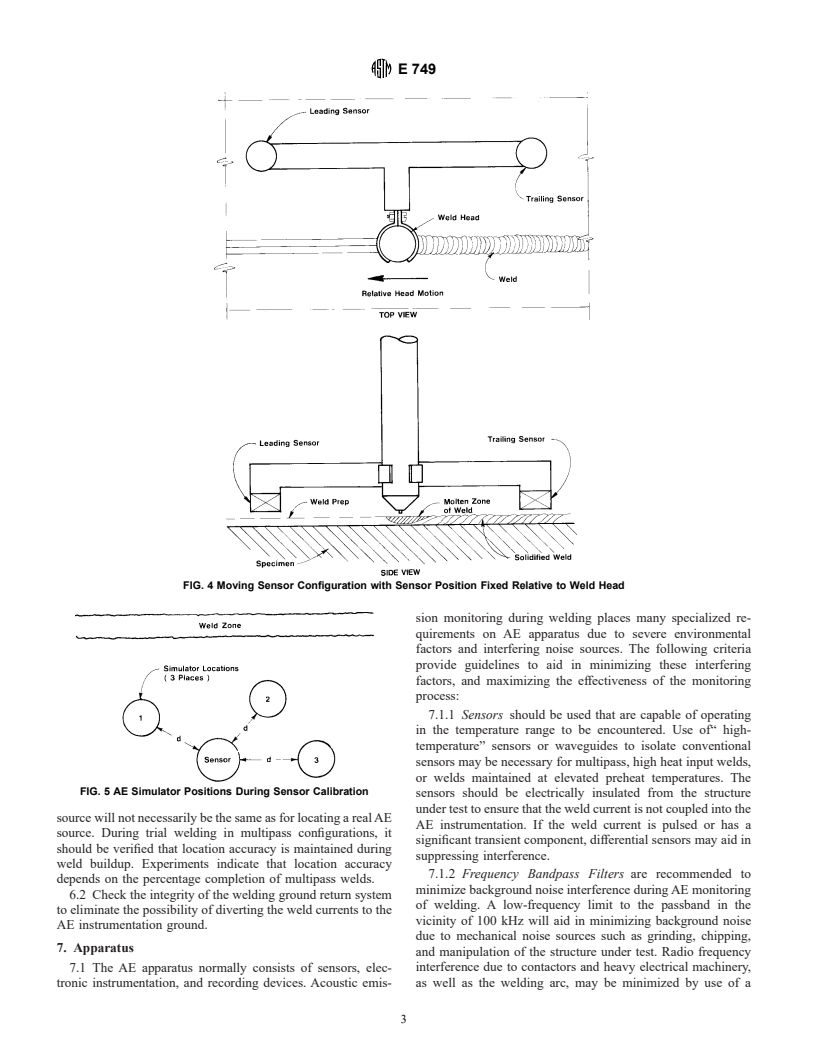
Fig. 4 shows side and top views of a typical configuration for
agreement.
moving sensors.
5.3 Procedures and Techniques—The procedures and tech-
6.1.2 Position and route the signal cables connecting the
niques to be used shall be as described in this practice unless
sensor(s) to the AE instrumentation to avoid contacting the hot
otherwise specified. Specific techniques may be specified in the
weld bead or entangling the welding and positioning equip-
contractual agreement.
ment.
6.1.3 Adjustment of Apparatus:
6. Examination Preparation
6.1.3.1 After all sensors are mounted, connected, and op-
6.1 The following preparatory procedures should be com-
erational (without objectionable background noise), the AE
pleted before initiating AE monitoring:
monitoring system can then be adjusted using an AE simulator.
6.1.1 Select the location(s) where the sensor(s) will be
6.1.3.2 Gain Adjustment—To set the gain for a channel,
acoustically coupled. The sensor(s) should be centrally located
locate the acoustic emission simulator at a selected distance
near the weldment to provide for optimal AE response from all
adjacent to the sensor. Monitor the response to the simulated
portions of the weld. If the sensor(s) are piezoelectric, this
emission, and adjust the channel gain to a specified amplitude
location should be such that the maximum temperature stays
level. Repeat this procedure two times, placing the simulator at
substantially below the Curie temperature of the sensor(s).
the same distance from the sensor but at different azimuthal
Take care in selecting the sensor mounting locations to avoid
positions relative to the original simulator positions (see Fig.
contact or disturbance, or both, of the sensor by any of the
5). Record the average gain for the three simulator positions.
welding or structural positioning equipment. Typical distances
Repeat the entire procedure for each AE sensor on the
from 6 in. to 1 ft (150 to 300 mm) from the heat-affected zone
structure, and adjust the gains. The average gains for all
of the weld are usually satisfactory. Typical fixed sensor
channels should give responses to the simulator that have peak
placement patterns that have been successfully used are shown voltages identical to within 63 dB.
in Figs. 1-3.
6.1.4 Determination of Source-Location Accuracy—Check
6.1.1.1 If a fixed contact sensor(s) is used, clean the area(s) the operation of the AE source-location function by analyzing
where attachment will be made to eliminate loose scale,
simulated AE signals from several random locations in the
welding
...


Questions, Comments and Discussion
Ask us and Technical Secretary will try to provide an answer. You can facilitate discussion about the standard in here.