ASTM C1279-23
(Test Method)Standard Test Method for Non-Destructive Photoelastic Measurement of Edge and Surface Stresses in Annealed, Heat-Strengthened, and Fully Tempered Flat Glass
Standard Test Method for Non-Destructive Photoelastic Measurement of Edge and Surface Stresses in Annealed, Heat-Strengthened, and Fully Tempered Flat Glass
SIGNIFICANCE AND USE
5.1 The strength and performance of heat-strengthened and fully-tempered glass is greatly affected by the surface and edge stress induced during the heat-treating process.
5.2 The edge and surface stress levels are specified in Specification C1048, in the Engineering Standards Manual3 of GANA Tempering Division and in foreign specifications.
5.3 This test method offers a direct and convenient way to non-destructively determine the residual state of stress on the surface and at the edge of annealed and heat-treated glass.
SCOPE
1.1 This test method covers the determination of edge stresses and surface stresses in annealed, heat-strengthened, and fully tempered flat glass products.
1.2 This test method is non-destructive.
1.3 This test method uses transmitted light and is, therefore, applicable to light-transmitting glasses.
1.4 The test method is not applicable to chemically-tempered glass.
1.5 Using the procedure described, surface stresses can be measured only on the “tin” side of float glass.
1.6 Surface-stress measuring instruments are designed for a specific range of surface index of refraction.
1.7 The values stated in SI units are to be regarded as standard. No other units of measurement are included in this standard.
1.8 This standard does not purport to address all of the safety concerns, if any, associated with its use. It is the responsibility of the user of this standard to establish appropriate safety, health, and environmental practices and determine the applicability of regulatory limitations prior to use.
1.9 This international standard was developed in accordance with internationally recognized principles on standardization established in the Decision on Principles for the Development of International Standards, Guides and Recommendations issued by the World Trade Organization Technical Barriers to Trade (TBT) Committee.
General Information
- Status
- Published
- Publication Date
- 31-Oct-2023
- Technical Committee
- C14 - Glass and Glass Products
- Drafting Committee
- C14.08 - Flat Glass
Relations
- Effective Date
- 01-Nov-2023
- Effective Date
- 01-Oct-2023
- Effective Date
- 01-Nov-2015
- Effective Date
- 01-Nov-2023
- Effective Date
- 01-Nov-2023
- Referred By
ASTM C1048-18 - Standard Specification for Heat-Strengthened and Fully Tempered Flat Glass - Effective Date
- 01-Nov-2023
- Referred By
ASTM C1901-21e2 - Standard Test Method for Measuring Optical Retardation in Flat Architectural Glass - Effective Date
- 01-Nov-2023
Overview
ASTM C1279-23 is the Standard Test Method for Non-Destructive Photoelastic Measurement of Edge and Surface Stresses in Annealed, Heat-Strengthened, and Fully Tempered Flat Glass. Developed by ASTM International, this standard provides a reliable, non-destructive method for measuring residual stress on the surface and at the edges of flat glass products. By using photoelastic techniques and transmitted light, this test method enables accurate assessment of stress levels, which are crucial for ensuring the strength and performance of processed glass used in architectural, automotive, and other glazing applications.
Key Topics
- Applicability: The method applies to annealed, heat-strengthened, and fully tempered flat glass that transmits light. It is not intended for chemically-tempered glass.
- Non-Destructive: Utilizes non-invasive photoelastic measurement to determine stress distribution without damaging the specimen.
- Surface and Edge Stress: Measures both surface and edge stresses, factors critical to the mechanical integrity and safety of glass installations.
- Photoelastic Principles: Uses polarized light and compensators to detect birefringence caused by residual stresses in glass.
- Sampling & Calibration: Specifies protocols for sampling, calibration against traceable standards, and the use of reference specimens for secondary verification.
- Directionality: Allows for stress measurement in multiple orientations to assess uniformity or directional differences in glass stress profiles.
- Traceability: All measurements are made in SI units, ensuring consistency and international comparability.
Applications
The ASTM C1279-23 test method is invaluable across industries where the mechanical properties of processed flat glass are paramount. Key applications include:
- Quality Control in Glass Manufacturing: Enables manufacturers to monitor and control the heat-treating process, ensuring compliance with specified stress levels.
- Verification of Heat Strengthening and Tempering: Ensures that glass meets the requirements of international and national specifications, supporting safety and performance claims.
- Architectural Glazing: Commonly used for curtain walls, façades, and structural glass where surface and edge integrity are essential.
- Automotive Glass: Helps automotive manufacturers ensure windshield and window glass meet safety regulations.
- Standard Compliance: Supports conformity with requirements in ASTM C1048 and similar international specifications for heat-treated glass products.
Related Standards
ASTM C1279-23 is interconnected with several key standards in the glass industry:
- ASTM C1048: Specification for Heat-Strengthened and Fully Tempered Flat Glass, outlining required stress levels.
- ASTM C162: Terminology of Glass and Glass Products, providing essential definitions.
- ASTM C158: Test Methods for Strength of Glass by Flexure (modulus of rupture).
- ASTM C770: Test Method for Measurement of Glass Stress-Optical Coefficient, relevant for calibration.
- ASTM E691: Practice for Conducting Interlaboratory Studies, underpinning precision and bias validation.
Practical Value
By following ASTM C1279-23, users gain:
- Improved Product Reliability: Non-destructive stress measurement reduces risk of glass failure without sacrificing usable material.
- Process Optimization: Real-time, accurate stress profiling supports process control and uniform product quality.
- Regulatory Compliance: Facilitates adherence to international building codes and safety standards.
- Quality Assurance: Supports manufacturers’ and installers’ quality control systems, helping to minimize warranty claims and product recalls.
Keywords: ASTM C1279, glass stress measurement, photoelastic method, non-destructive testing, surface stress, edge stress, tempered glass, heat-strengthened glass, flat glass, quality control, glazing industry, ASTM International, architectural glass standards.
Buy Documents
ASTM C1279-23 - Standard Test Method for Non-Destructive Photoelastic Measurement of Edge and Surface Stresses in Annealed, Heat-Strengthened, and Fully Tempered Flat Glass
REDLINE ASTM C1279-23 - Standard Test Method for Non-Destructive Photoelastic Measurement of Edge and Surface Stresses in Annealed, Heat-Strengthened, and Fully Tempered Flat Glass
Frequently Asked Questions
ASTM C1279-23 is a standard published by ASTM International. Its full title is "Standard Test Method for Non-Destructive Photoelastic Measurement of Edge and Surface Stresses in Annealed, Heat-Strengthened, and Fully Tempered Flat Glass". This standard covers: SIGNIFICANCE AND USE 5.1 The strength and performance of heat-strengthened and fully-tempered glass is greatly affected by the surface and edge stress induced during the heat-treating process. 5.2 The edge and surface stress levels are specified in Specification C1048, in the Engineering Standards Manual3 of GANA Tempering Division and in foreign specifications. 5.3 This test method offers a direct and convenient way to non-destructively determine the residual state of stress on the surface and at the edge of annealed and heat-treated glass. SCOPE 1.1 This test method covers the determination of edge stresses and surface stresses in annealed, heat-strengthened, and fully tempered flat glass products. 1.2 This test method is non-destructive. 1.3 This test method uses transmitted light and is, therefore, applicable to light-transmitting glasses. 1.4 The test method is not applicable to chemically-tempered glass. 1.5 Using the procedure described, surface stresses can be measured only on the “tin” side of float glass. 1.6 Surface-stress measuring instruments are designed for a specific range of surface index of refraction. 1.7 The values stated in SI units are to be regarded as standard. No other units of measurement are included in this standard. 1.8 This standard does not purport to address all of the safety concerns, if any, associated with its use. It is the responsibility of the user of this standard to establish appropriate safety, health, and environmental practices and determine the applicability of regulatory limitations prior to use. 1.9 This international standard was developed in accordance with internationally recognized principles on standardization established in the Decision on Principles for the Development of International Standards, Guides and Recommendations issued by the World Trade Organization Technical Barriers to Trade (TBT) Committee.
SIGNIFICANCE AND USE 5.1 The strength and performance of heat-strengthened and fully-tempered glass is greatly affected by the surface and edge stress induced during the heat-treating process. 5.2 The edge and surface stress levels are specified in Specification C1048, in the Engineering Standards Manual3 of GANA Tempering Division and in foreign specifications. 5.3 This test method offers a direct and convenient way to non-destructively determine the residual state of stress on the surface and at the edge of annealed and heat-treated glass. SCOPE 1.1 This test method covers the determination of edge stresses and surface stresses in annealed, heat-strengthened, and fully tempered flat glass products. 1.2 This test method is non-destructive. 1.3 This test method uses transmitted light and is, therefore, applicable to light-transmitting glasses. 1.4 The test method is not applicable to chemically-tempered glass. 1.5 Using the procedure described, surface stresses can be measured only on the “tin” side of float glass. 1.6 Surface-stress measuring instruments are designed for a specific range of surface index of refraction. 1.7 The values stated in SI units are to be regarded as standard. No other units of measurement are included in this standard. 1.8 This standard does not purport to address all of the safety concerns, if any, associated with its use. It is the responsibility of the user of this standard to establish appropriate safety, health, and environmental practices and determine the applicability of regulatory limitations prior to use. 1.9 This international standard was developed in accordance with internationally recognized principles on standardization established in the Decision on Principles for the Development of International Standards, Guides and Recommendations issued by the World Trade Organization Technical Barriers to Trade (TBT) Committee.
ASTM C1279-23 is classified under the following ICS (International Classification for Standards) categories: 81.040.20 - Glass in building. The ICS classification helps identify the subject area and facilitates finding related standards.
ASTM C1279-23 has the following relationships with other standards: It is inter standard links to ASTM C1279-13(2019), ASTM C162-23, ASTM C162-05(2015), ASTM E2813-18, ASTM C1422/C1422M-20a, ASTM C1048-18, ASTM C1901-21e2. Understanding these relationships helps ensure you are using the most current and applicable version of the standard.
ASTM C1279-23 is available in PDF format for immediate download after purchase. The document can be added to your cart and obtained through the secure checkout process. Digital delivery ensures instant access to the complete standard document.
Standards Content (Sample)
This international standard was developed in accordance with internationally recognized principles on standardization established in the Decision on Principles for the
Development of International Standards, Guides and Recommendations issued by the World Trade Organization Technical Barriers to Trade (TBT) Committee.
Designation: C1279 − 23
Standard Test Method for
Non-Destructive Photoelastic Measurement of Edge and
Surface Stresses in Annealed, Heat-Strengthened, and Fully
Tempered Flat Glass
This standard is issued under the fixed designation C1279; the number immediately following the designation indicates the year of
original adoption or, in the case of revision, the year of last revision. A number in parentheses indicates the year of last reapproval. A
superscript epsilon (´) indicates an editorial change since the last revision or reapproval.
1. Scope 2. Referenced Documents
1.1 This test method covers the determination of edge 2.1 ASTM Standards:
stresses and surface stresses in annealed, heat-strengthened, C158 Test Methods for Strength of Glass by Flexure (De-
and fully tempered flat glass products. termination of Modulus of Rupture)
C162 Terminology of Glass and Glass Products
1.2 This test method is non-destructive.
C770 Test Method for Measurement of Glass Stress—
1.3 This test method uses transmitted light and is, therefore,
Optical Coefficient
applicable to light-transmitting glasses.
C1048 Specification for Heat-Strengthened and Fully Tem-
pered Flat Glass
1.4 The test method is not applicable to chemically-
E691 Practice for Conducting an Interlaboratory Study to
tempered glass.
Determine the Precision of a Test Method
1.5 Using the procedure described, surface stresses can be
2.2 Other Documents:
measured only on the “tin” side of float glass.
Engineering Standards Manual
1.6 Surface-stress measuring instruments are designed for a
“Surface and Edge Stress in Tempered Glass”
specific range of surface index of refraction.
3. Terminology
1.7 The values stated in SI units are to be regarded as
3.1 Definitions:
standard. No other units of measurement are included in this
3.1.1 analyzer—a polarizing element, typically positioned
standard.
between the specimen being evaluated and the viewer.
1.8 This standard does not purport to address all of the
3.1.2 polarizer—an optical assembly that transmits light
safety concerns, if any, associated with its use. It is the
vibrating in a single planar direction, typically positioned
responsibility of the user of this standard to establish appro-
between a light source and the specimen being evaluated.
priate safety, health, and environmental practices and deter-
mine the applicability of regulatory limitations prior to use.
3.1.3 retardation compensator—an optical device, variants
1.9 This international standard was developed in accor-
of which are used to quantify the optical retardation produced
dance with internationally recognized principles on standard-
in transparent birefringent materials: typically positioned be-
ization established in the Decision on Principles for the
tween the specimen being evaluated and the analyzer.
Development of International Standards, Guides and Recom-
3.2 For definition of terms used in this test method, refer to
mendations issued by the World Trade Organization Technical
Terminology C162.
Barriers to Trade (TBT) Committee.
For referenced ASTM standards, visit the ASTM website, www.astm.org, or
contact ASTM Customer Service at service@astm.org. For Annual Book of ASTM
This test method is under the jurisdiction of ASTM Committee C14 on Glass Standards volume information, refer to the standard’s Document Summary page on
and Glass Products and is the direct responsibility of Subcommittee C14.08 on Flat the ASTM website.
Glass. Available from Glass Association of North America (GANA), 800 SW Jackson
Current edition approved Nov. 1, 2023. Published December 2023. Originally Street, Ste 1500, Topeka, Kansas 66612–1200. http://www.glasswebsite.com.
approved in 1994. Last previous edition approved in 2019 as C1279 – 13 (2019). Redner, A. S. and Voloshin, A. S., Proceedings of the Ninth International
DOI: 10.1520/C1279-23. Conference on Experimental Mechanics, Denmark, 1990.
Copyright © ASTM International, 100 Barr Harbor Drive, PO Box C700, West Conshohocken, PA 19428-2959. United States
C1279 − 23
4. Summary of Test Methods analyzer, A, placed between the eyepiece, E, and the wedge-
compensator, W , generates a visible set of fringes or lines of
c
4.1 Two test methods are described in this standard:
constant retardation R where
4.1.1 Procedure A—describes a test method for measuring
R 5 R 1R (1)
surface stress using light propagating nearly parallel to the
s c
surface.
Since the specimen-induced retardation is proportional to the
4.1.2 Procedure B—describes a test method for measuring
surface stress, S, and the path, t, we have:
edge-stress using light propagating in the direction perpendicu-
R 5 C·S·t 5 C·S·ax (2)
lar to the surface. s
4.2 In both methods, the fundamental photoelastic concept where:
is used. As a result of stresses, the material becomes optically
R = is the relative retardation,
anisotropic or birefringent. When polarized light propagates
C = stress-optical constant (see Note 2),
through such anisotropic materials, the differences in the speed S = surface stress in the direction perpendicular to the path,
of light rays vibrating along the maximum and minimum t
principal stress introduce a relative retardation between these t = path of light traveling between the entrance and exit
rays. This relative retardation is proportional to the measured points 1, 2 (Fig. 1), and
a = Geometrical factor, (depending upon the prism design)
stresses, and can be accurately determined using compensators.
a = t ⁄x . This constant is determined by the
For additional background see “Surface and Edge Stress in
manufacturer.
Tempered Glass.”
6.1.3 The compensator adds its own retardation. It is lin-
5. Significance and Use
early variable along its length y and is calculated as
5.1 The strength and performance of heat-strengthened and
R 5 b·y (3)
c
fully-tempered glass is greatly affected by the surface and edge
Where b is a constant, determined by the manufacturer of the
stress induced during the heat-treating process.
compensator. The observer sees in the compensator plane a
5.2 The edge and surface stress levels are specified in
3 total retardation R.
Specification C1048, in the Engineering Standards Manual of
R 5 R 1R 5 a·C·S·x1b·y (4)
GANA Tempering Division and in foreign specifications.
s c
5.3 This test method offers a direct and convenient way to
6.1.4 The fringes (lines of R = Constant) are, therefore,
non-destructively determine the residual state of stress on the
tilted lines. (See Fig. 2). The angle θ is the tilt of these fringes
surface and at the edge of annealed and heat-treated glass.
relative to a plane containing the light path of Figs. 1 and 2.
The measured stress is proportional to the tangent of the tilt
6. Principles of Operation
angle θ, measured using a goniometer, and to an instrument
6.1 Procedure A: Measuring Surface Stress: calibration constant, K MPa, determined by the manufacturer.
6.1.1 Measurement of surface stresses requires an optical
a·C·S
tan θ 5 and (5)
apparatus that permits the injection of polarized light rays
b
propagating in a thin layer adjacent to the surface (see Note 1).
b
A prism is usually used for this purpose. The rays emerge at
Stress 5 · tan θ 5 K· tan θ
Ca
critical angle i . The photoelastic retardation due to the surface
c
stresses, (see Fig. 1), is measured using a wedge-compensator.
In the actual procedure (see 15.1 below) the operator
6.1.2 The incident light beam should be arriving at the
measures the tilt angle θ of the observed set of fringes.
critical angle i and polarized at 45° to the entrance of the prism
c
NOTE 1—The surface-stress measuring apparatus described in this
edge. A quartz wedge-compensator, W , placed in the path of
c
section is manufactured by Strainoptics, Inc. in North Wales, Pennsylva-
emerging light adds a retardation, R , to the retardation R
c s nia. The measured stress reported by the Strainoptics apparatus is in the
induced by stresses in the surface of the specimen. The direction perpendicular to apparatus’ long axis.
FIG. 1 Apparatus For Measuring Surface Stress
C1279 − 23
FIG. 1 Apparatus For Measuring Surface Stress (continued)
FIG. 2 Fringes Observed in the Plane of the Compensator
NOTE 2—The stress constant of float glass is typically 2.55 to 2.65
Brewsters. Calibration can be performed using one of the test methods
described in Test Methods C770.
6.2 Procedure B: Measuring Edge Stress:
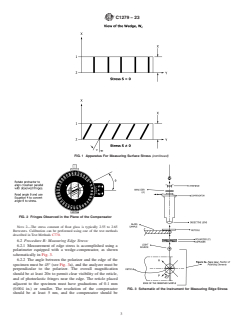
6.2.1 Measurement of edge stress is accomplished using a
polarimeter equipped with a wedge-compensator, as shown
schematically in Fig. 3.
6.2.2 The angle between the polarizer and the edge of the
specimen must be 45° (see Fig. 3a), and the analyzer must be
perpendicular to the polarizer. The overall magnification
should be at least 20× to permit clear visibility of the reticle,
and of photoelastic fringes near the edge. The reticle placed
adjacent to the specimen must have graduations of 0.1 mm
(0.004 in.) or smaller. The resolution of the compensator FIG. 3 Schematic of the Instrument for Measuring Edge Stress
should be at least 5 nm, and the compensator should be
C1279 − 23
calibrated by the manufacturer at 565 nm wavelength with Section 11. To increase the precision of measurement, several
results of calibration expressed in nm/div or nm/mm or levels of stress are produced by applying forces incrementally.
nm/count.
Measurement of stress using the instrument to be calibrated is
6.2.3 The compensator used could be of linear wedge type
repeated for each stress level and these measurements are used
(Babinet) or uniform-field type (Babinet-Soleil). The linear-
to calibrate the instrument.
wedge type requires a reticle placed adjacent to the compen-
sator wedge and a linear-motion scale, or lead screw, locating
9. Test Specimens and Loading Schemes
the wedge position with reference to the reticle.
9.1 Two loading geometries can be practiced: cantilever and
6.2.4 The uniform field does not require a reticle, and must
four-point bending.
be equipped with a lead screw measuring the relative motion of
its wedges.
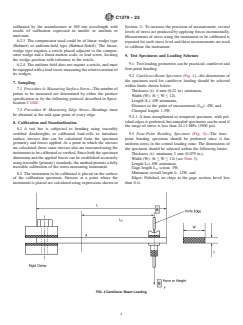
9.2 Cantilever-Beam Specimen (Fig. 4)—the dimensions of
the specimen used for cantilever loading should be selected
7. Sampling
within limits shown below:
7.1 Procedure A: Measuring Surface Stress—The number of
Thickness (t): 6 mm (0.22 in.) minimum,
points to be measured are determined by either the product
Width (W): 8t ≤ W ≤ 12t,
specification or by the following protocol described in Speci-
Length (L): 6W minimum,
fication C1048.
Distance to the point of measurement (L ): 4W, and
O
7.2 Procedure B: Measuring Edge Stress—Readings must
Clamped length: 1.5W.
be obtained at the mid-span point of every edge.
9.2.1 A heat-strengthened or tempered specimen, with pol-
ished edges is preferred, but annealed specimens can be used if
8. Calibration and Standardization
the range of stress is less than 24.13 MPa (3500 psi).
8.1 A test bar is subjected to bending using traceably
certified deadweights or calibrated load-cells to introduce 9.3 Four-Point Bending Specimen (Fig. 5)—The four-
surface stresses that can be calculated from the specimen
point bending specimen should be preferred since it has
geometry and forces applied. At a point in which the stresses
uniform stress in the central loading zone. The dimensions of
are calculated, those same stresses also are measured using the
the specimen should be selected within the following limits:
instrument to be calibrated or verified. Since both the specimen
Thickness (t): minimum 2 mm (0.079 in.),
dimension and the applied forces can be established accurately
Width (W): 8t ≤ W ≤ 12t (see Note 3),
using traceable (primary) standards, the method permits a fully
Length L : 6W minimum,
O
traceable calibration of the stress-measuring instrument.
Gage length L sction: 3W,
C
Minimum overall length L: 12W, and
8.2 The instrument to be calibrated is placed on the surface
of the calibration specimen. Stresses at a point where the Edges: Polished, no chips in the gage section, bevel less
instrument is placed are calculated using expressions shown in than 0.1t.
FIG. 4 Cantilever Beam Loading
C1279 − 23
FIG. 5 Calibration Using Four-Point Bending
NOTE 3—When the thickness t is less than 6 mm, and width of the beam
9.4.1 Cantilever Specimen—The specimen must be clamped
exceeds 12t, instead of the beam bending, plate bending equations should
securely using wood, plastic, or rubber-lined metal clamping
be used to calculate surface stress, or suitable corrections are required in
surfaces, with rounded edges, as shown in Fig. 6. The forces
5 6
the equations in 11.1. Barata and Ashwell show the correction proce-
can be applied using a calibrated testing machine or dead
dures.
weights, by means of knife edges, to insure exact positioning of
9.4 Application of Forces—Forces required must be calcu-
the line-of-loading B-B. The pad used for load application can
lated to eliminate possible breakage. Stresses must be esti-
be secured from slipping using high-friction materials. To
mated first using the equations in 9.1. A tempered specimen
eliminate possible twisting action, the knife edge should be
may be subjected to stress levels up to 10 000 psi (69 MPa).
narrow, or a steel ball used to center the point of application of
Using annealed specimens, the stress should remain at a safe
force.
level, typically below 3500 psi (24 MPa).
9.4.2 Four-Point Bending Specimen—In the case of four-
point bending, the force must be applied equally at two points,
Barata, F. I., “When Is a Beam a Plate?” American Ceramic Society
and two articulated knives or roller supports are required to
Communications, May 1981.
6 ascertain accurately the length L and L . Particular precau-
0 c
Ashwell, D. G., “The Anticlastic Curvature of Rectangular Beams and Plates,”
tions are required to insure that the end supports do not
Journal of Aeronautics, Vol 54, 1950, pp. 708-715.
FIG. 6 Clamping of a Cantilever Beam
C1279 − 23
introduce a twist in the specimen, as a result of nonparallel 6L
0 m m
~ !
Stress 5 FORCE × (7)
~M P a! ~N! 2
support surfaces or nonflatness of the specimen itself. Fig. 5
W t
~m m! ~m m!
illustrates the setup for application of forces to obtain tension
11.2 Construct a graph as described in 10.3 showing tan θ
and compression on the upper face. Test Methods C158
versus stress, when using surface polarimeter, or division
provides a description of support design.
versus stress, using critical angle measurement (see Fig. 7).
10. Calibration Procedure
11.3 Trace “best fit” straight line, to establish the instru-
ment constant K for the surface polarimeter:
10.1 When calibrating a surface polarimeter, apply forces in
five equal increments, using a testing machine or dead weight.
ΔStress
K 5 (8)
When calibrating a critical angle measuring instrument, at least
Δtanθ
ten increments are needed, and a tempered specimen must be
11.4 Since the relation between the measured distance and
used.
the stress in the refractometry is nonlinear, the calibration of
10.2 For each incremental loading, including zero, obtain
this instrument requires an annealed specimen or a specimen
the instrument reading. Repeat the reading at least three times,
exhibiting known surface stress in the unloaded state. For each
and average the readings. When calibrating a surface
increment, add the unloaded-specimen stress to the calculated
polarimeter, measure the fringe tilt θ. When calibrating a
stress and verify calibration of the critical-angle measuring
differential refractometer, measure the different
...
This document is not an ASTM standard and is intended only to provide the user of an ASTM standard an indication of what changes have been made to the previous version. Because
it may not be technically possible to adequately depict all changes accurately, ASTM recommends that users consult prior editions as appropriate. In all cases only the current version
of the standard as published by ASTM is to be considered the official document.
Designation: C1279 − 13 (Reapproved 2019) C1279 − 23
Standard Test Method for
Non-Destructive Photoelastic Measurement of Edge and
Surface Stresses in Annealed, Heat-Strengthened, and Fully
Tempered Flat Glass
This standard is issued under the fixed designation C1279; the number immediately following the designation indicates the year of
original adoption or, in the case of revision, the year of last revision. A number in parentheses indicates the year of last reapproval. A
superscript epsilon (´) indicates an editorial change since the last revision or reapproval.
1. Scope
1.1 This test method covers the determination of edge stresses and surface stresses in annealed, heat-strengthened, and fully
tempered flat glass products.
1.2 This test method is non-destructive.
1.3 This test method uses transmitted light and is, therefore, applicable to light-transmitting glasses.
1.4 The test method is not applicable to chemically-tempered glass.
1.5 Using the procedure described, surface stresses can be measured only on the “tin” side of float glass.
1.6 Surface-stress measuring instruments are designed for a specific range of surface index of refraction.
1.7 The values stated in SI units are to be regarded as standard. No other units of measurement are included in this standard.
1.8 This standard does not purport to address all of the safety concerns, if any, associated with its use. It is the responsibility
of the user of this standard to establish appropriate safety, health, and environmental practices and determine the applicability of
regulatory limitations prior to use.
1.9 This international standard was developed in accordance with internationally recognized principles on standardization
established in the Decision on Principles for the Development of International Standards, Guides and Recommendations issued
by the World Trade Organization Technical Barriers to Trade (TBT) Committee.
2. Referenced Documents
2.1 ASTM Standards:
C158 Test Methods for Strength of Glass by Flexure (Determination of Modulus of Rupture)
C162 Terminology of Glass and Glass Products
C770 Test Method for Measurement of Glass Stress—Optical Coefficient
This test method is under the jurisdiction of ASTM Committee C14 on Glass and Glass Products and is the direct responsibility of Subcommittee C14.08 on Flat Glass.
Current edition approved Aug. 1, 2019Nov. 1, 2023. Published August 2019December 2023. Originally approved in 1994. Last previous edition approved in 20132019
as C1279 – 13.C1279 – 13 (2019). DOI: 10.1520/C1279-13R19.10.1520/C1279-23.
For referenced ASTM standards, visit the ASTM website, www.astm.org, or contact ASTM Customer Service at service@astm.org. For Annual Book of ASTM Standards
volume information, refer to the standard’s Document Summary page on the ASTM website.
Copyright © ASTM International, 100 Barr Harbor Drive, PO Box C700, West Conshohocken, PA 19428-2959. United States
C1279 − 23
C1048 Specification for Heat-Strengthened and Fully Tempered Flat Glass
E691 Practice for Conducting an Interlaboratory Study to Determine the Precision of a Test Method
2.2 Other Documents:
Engineering Standards Manual
“Surface and Edge Stress in Tempered Glass”
3. Terminology
3.1 Definitions:
3.1.1 analyzer—a polarizing element, typically positioned between the specimen being evaluated and the viewer.
3.1.2 polarizer—an optical assembly that transmits light vibrating in a single planar direction, typically positioned between a light
source and the specimen being evaluated.
3.1.3 retardation compensator—an optical device, variants of which are used to quantify the optical retardation produced in
transparent birefringent materials: typically positioned between the specimen being evaluated and the analyzer.
3.2 For definition of terms used in this test method, refer to Terminology C162.
4. Summary of Test Methods
4.1 Two test methods are described in this standard:
4.1.1 Procedure A—describes a test method for measuring surface stress using light propagating nearly parallel to the surface.
4.1.2 Procedure B—describes a test method for measuring edge-stress using light propagating in the direction perpendicular to the
surface.
4.2 In both methods, the fundamental photoelastic concept is used. As a result of stresses, the material becomes optically
anisotropic or birefringent. When polarized light propagates through such anisotropic materials, the differences in the speed of light
rays vibrating along the maximum and minimum principal stress introduce a relative retardation between these rays. This relative
retardation is proportional to the measured stresses, and can be accurately determined using compensators. For additional
background see “Surface and Edge Stress in Tempered Glass”Glass.” .
5. Significance and Use
5.1 The strength and performance of heat-strengthened and fully-tempered glass is greatly affected by the surface and edge stress
induced during the heat-treating process.
5.2 The edge and surface stress levels are specified in Specification C1048, in the Engineering Standards Manual of GANA
Tempering Division and in foreign specifications.
5.3 This test method offers a direct and convenient way to non-destructively determine the residual state of stress on the surface
and at the edge of annealed and heat-treated glass.
6. Principles of Operation
6.1 Procedure A: Measuring Surface Stress:
6.1.1 Measurement of surface stresses requires an optical apparatus that permits the injection of polarized light rays propagating
in a thin layer adjacent to the surface (see Note 1). A prism is usually used for this purpose. The rays emerge at critical angle i .
c
The photoelastic retardation due to the surface stresses, (see Fig. 1), is measured using a wedge-compensator.
Available from Glass Association of North America (GANA), 800 SW Jackson Street, Ste 1500, Topeka, Kansas 66612–1200. http://www.glasswebsite.comhttp://
www.glasswebsite.com.
Redner, A. S. and Voloshin, A. S., Proceedings of the Ninth International Conference on Experimental Mechanics, Denmark, 1990.
C1279 − 23
FIG. 1 Apparatus For Measuring Surface Stress
FIG. 1 Apparatus For Measuring Surface Stress (continued)
6.1.2 The incident light beam should be arriving at the critical angle i and polarized at 45° to the entrance of the prism edge. A
c
quartz wedge-compensator, W , placed in the path of emerging light adds a retardation, R , to the retardation R induced by stresses
c c s
in the surface of the specimen. The analyzer, A, placed between the eyepiece, E, and the wedge-compensator, W , generates a
c
visible set of fringes or lines of constant retardation R where
R 5 R 1R (1)
s c
Since the specimen-induced retardation is proportional to the surface stress, S, and the path, t, we have:
R 5 C·S·t 5 C·S·ax (2)
s
where:
R = is the relative retardation,
C = stress-optical constant (see Note 2),
S = surface stress in the direction perpendicular to the path, t
t = path of light traveling between the entrance and exit points 1, 2 (Fig. 1), and
C1279 − 23
a = Geometrical factor, (depending upon the prism design) a = t ⁄x . This constant is determined by the manufacturer.
6.1.3 The compensator adds its own retardation. It is linearly variable along its length y and is calculated as
R 5 b·y (3)
c
Where b is a constant, determined by the manufacturer of the compensator. The observer sees in the compensator plane a total
retardation R.
R 5 R 1R 5 a·C·S·x1b·y (4)
s c
6.1.4 The fringes (lines of R = Constant) are, therefore, tilted lines. (See Fig. 2). The angle θ is the tilt of these fringes relative
to a plane containing the light path of Figs. 1 and 2. The measured stress is proportional to the tangent of the tilt angle θ, measured
using a goniometer, and to an instrument calibration constant, K MPa, determined by the manufacturer.
a·C·S
tan θ5 and (5)
b
b
Stress 5 · tan θ5 K· tan θ
Ca
In the actual procedure (see 15.1 below) the operator measures the tilt angle θ of the observed set of fringes.
NOTE 1—The surface-stress measuring apparatus described in this section is manufactured by Strainoptic Technologies, Strainoptics, Inc. in North Wales,
Pennsylvania. The measured stress reported by the Strainoptics apparatus is in the direction perpendicular to apparatus’ long axis.
FIG. 2 Fringes Observed in the Plane of the Compensator
C1279 − 23
NOTE 2—The stress constant of float glass is typically 2.55 to 2.65 Brewsters. Calibration can be performed using one of the test methods described in
Test Methods C770.
6.2 Procedure B: Measuring Edge Stress:
6.2.1 Measurement of edge stress is accomplished using a polarimeter equipped with a wedge-compensator, as shown
schematically in Fig. 3.
6.2.2 The angle between the polarizer and the edge of the specimen must be 45° (see Fig. 3a), and the analyzer must be
perpendicular to the polarizer. The overall magnification should be at least 20× to permit clear visibility of the reticle, and of
photoelastic fringes near the edge. The reticle placed adjacent to the specimen must have graduations of 0.1 mm (0.004 in.) or
smaller. The resolution of the compensator should be at least 5 nm, and the compensator should be calibrated by the manufacturer
at 565 nm wavelength with results of calibration expressed in nm/div.nm/div or nm/mm or nm/count.
6.2.3 The compensator used could be of linear wedge type (Babinet) or uniform-field type (Babinet-Soleil). The linear-wedge type
requires a reticle placed adjacent to the compensator wedge and a linear-motion scale, or lead screw, locating the wedge position
with reference to the reticle.
6.2.4 The uniform field does not require a reticle, and must be equipped with a lead screw measuring the relative motion of its
wedges.
7. Sampling
7.1 Procedure A: Measuring Surface Stress—The number of points to be measured are determined by either the product
specification or by the following protocol described in Specification C1048.
7.2 Procedure B: Measuring Edge Stress—Readings must be obtained at the mid-span point of every edge.
FIG. 3 Schematic of the Instrument for Measuring Edge Stress
C1279 − 23
8. Calibration and Standardization
8.1 A test bar is subjected to bending using traceably certified deadweights or calibrated load-cells to introduce surface stresses
that can be calculated from the specimen geometry and forces applied. At a point in which the stresses are calculated, those same
stresses also are measured using the instrument to be calibrated or verified. Since both the specimen dimension and the applied
forces can be established accurately using traceable (primary) standards, the method permits a fully traceable calibration of the
stress-measuring instrument.
8.2 The instrument to be calibrated is placed on the surface of the calibration specimen. Stresses at a point where the instrument
is placed are calculated using expressions shown in Section 11. To increase the precision of measurement, several levels of stress
are produced by applying forces incrementally. Measurement of stress using the instrument to be calibrated is repeated for each
stress level and these measurements are used to calibrate the instrument.
9. Test Specimens and Loading Schemes
9.1 Two loading geometries can be practiced: cantilever and four-point bending.
9.2 Cantilever-Beam Specimen (Fig. 4)—the dimensions of the specimen used for cantilever loading should be selected within
limits shown below:
Thickness (t): 6 mm (0.22 in.) minimum,
Width (W): 8t ≤ W ≤ 12t,
Length (L): 6W minimum,
Distance to the point of measurement (L ): 4W, and
O
Clamped length: 1.5W1.5W.
9.2.1 A heat-strengthened or tempered specimen, with polished edges is preferred, but annealed specimens can be used if the range
of stress is less than 24.13 MPa (3500 psi).
9.3 Four-Point Bending Specimen (Fig. 5)—The four-point bending specimen should be preferred since it has uniform stress in
the central loading zone. The dimensions of the specimen should be selected within the following limits:
Thickness (t): minimum 2 mm (0.079 in.),
Width (W): 8t ≤ W ≤ 12t (see Note 3),
Length L : 6W minimum,
O
Gage length L sction: 3W,
C
FIG. 4 Cantilever Beam Loading
C1279 − 23
FIG. 5 Calibration Using Four-Point Bending
Minimum overall length L: 12W, and
Edges: Polished, no chips in the gage section, bevel less than 0.1t.
C1279 − 23
NOTE 3—When the thickness t is less than 6 mm, and width of the beam exceeds 12t, instead of the beam bending, plate bending equations should be
5 6
used to calculate surface stress, or suitable corrections are required in the equations in 11.1. Barata and Ashwell show the correction procedures.
9.4 Application of Forces—Forces required must be calculated to eliminate possible breakage. Stresses must be estimated first
using the equations in 9.1. A tempered specimen may be subjected to stress levels up to 10 000 psi (69 MPa). Using annealed
specimens, the stress should remain at a safe level, typically below 3500 psi (24 MPa).
9.4.1 Cantilever Specimen—The specimen must be clamped securely using wood, plastic, or rubber-lined metal clamping surfaces,
with rounded edges, as shown in Fig. 6. The forces can be applied using a calibrated testing machine or dead weights, by means
of knife edges, to insure exact positioning of the line-of-loading B-B. The pad used for load application can be secured from
slipping using high-friction materials. To eliminate possible twisting action, the knife edge should be narrow, or a steel ball used
to center the point of application of force.
9.4.2 Four-Point Bending Specimen—In the case of four-point bending, the force must be applied equally at two points, and two
articulated knives or roller supports are required to ascertain accurately the length L and L . Particular precautions are required
0 c
to insure that the end supports do not introduce a twist in the specimen, as a result of nonparallel support surfaces or nonflatness
of the specimen itself. Fig. 5 illustrates the setup for application of forces to obtain tension and compression on the upper face.
Test Methods C158 provides a description of support design.
10. Calibration Procedure
10.1 When calibrating a surface polarimeter, apply forces in five equal increments, using a testing machine or dead weight. When
calibrating a critical angle measuring instrument, at least ten increments are needed, and a tempered specimen must be used.
10.2 For each incremental loading, including zero, obtain the instrument reading. Repeat the reading at least three times, and
average the readings. When calibrating a surface polarimeter, measure the fringe tilt θ. When calibrating a differential
refractometer, measure the differential angle using a micrometer reticle, and read the distance between the borders of illuminated
zones at mutually perpendicular polarization in accordance with instrument manual.
10.3 Prepare a table of results, and plot these data, with applied stress as the ordinant (x axis) and tan θ (using surface Polarimeter
or angular distance between emerging light beams (using refractometer) versus applied stress (see Fig. 7).
FIG. 6 Clamping of a Cantilever Beam
Barata, F. I., “When Is a Beam a Plate?” American Ceramic Society Communications, May 1981.
Ashwell, D. G., “The Anticlastic Curvature of Rectangular Beams and Plates,” Journal of Aeronautics, Vol 54, 1950, pp. 708-715.
C1279 − 23
FIG. 7 Graphical Plot of Results
11. Calculation
11.1 For each force increment, calculate the stress at Point A where measurements are obtained using the following formula:
6L
0~i n .!
Stress 5 FORCE × (6)
p s i l b s 2
~ ! ~ !
W t
i n . i n .
~ ! ~ !
or
6L
0~m m!
Stress 5 FORCE × (7)
M P a N 2
~ ! ~ !
W t
m m m m
~ ! ~ !
11.2 Construct a graph as described in 10.3 showing tan θ versus stress, when using surface polarimeter,
...
Questions, Comments and Discussion
Ask us and Technical Secretary will try to provide an answer. You can facilitate discussion about the standard in here.
Loading comments...