ASTM D3914-96
(Test Method)Standard Test Method for In-Plane Shear Strength of Pultruded Glass-Reinforced Plastic Rod
Standard Test Method for In-Plane Shear Strength of Pultruded Glass-Reinforced Plastic Rod
SCOPE
1.1 This test method covers the determination of the in-plane shear strength of pultruded, glass-fiber reinforced, thermosetting plastic rod of diameters ranging from 19 to 32 mm (¾ to 1¼ in.).
1.2 The values stated in SI units are to be regarded as the standard.
1.3 This standard does not purport to address all of the safety concerns, if any, associated with its use. It is the responsibility of the user of this standard to establish appropriate safety and health practices and determine the applicability of regulatory limitations prior to use. Specific precautionary statements are given in Note 2 and Note 3.
Note 1—There is no similar or equivalent ISO standard.
General Information
Relations
Standards Content (Sample)
NOTICE: This standard has either been superseded and replaced by a new version or discontinued.
Contact ASTM International (www.astm.org) for the latest information.
Designation: D 3914 – 96
Standard Test Method for
In-Plane Shear Strength of Pultruded Glass-Reinforced
Plastic Rod
This standard is issued under the fixed designation D 3914; the number immediately following the designation indicates the year of
original adoption or, in the case of revision, the year of last revision. A number in parentheses indicates the year of last reapproval. A
superscript epsilon (e) indicates an editorial change since the last revision or reapproval.
1. Scope between two centrally located notches, diametrically opposed
and machined halfway through its diameter at a fixed distance
1.1 This test method covers the determination of the in-
apart. The notches are accurately machined in the specimen
plane shear strength of pultruded, glass-fiber reinforced, ther-
with maximum reproducibility by means of a special notching
mosetting plastic rod of diameters ranging from 19 to 32 mm
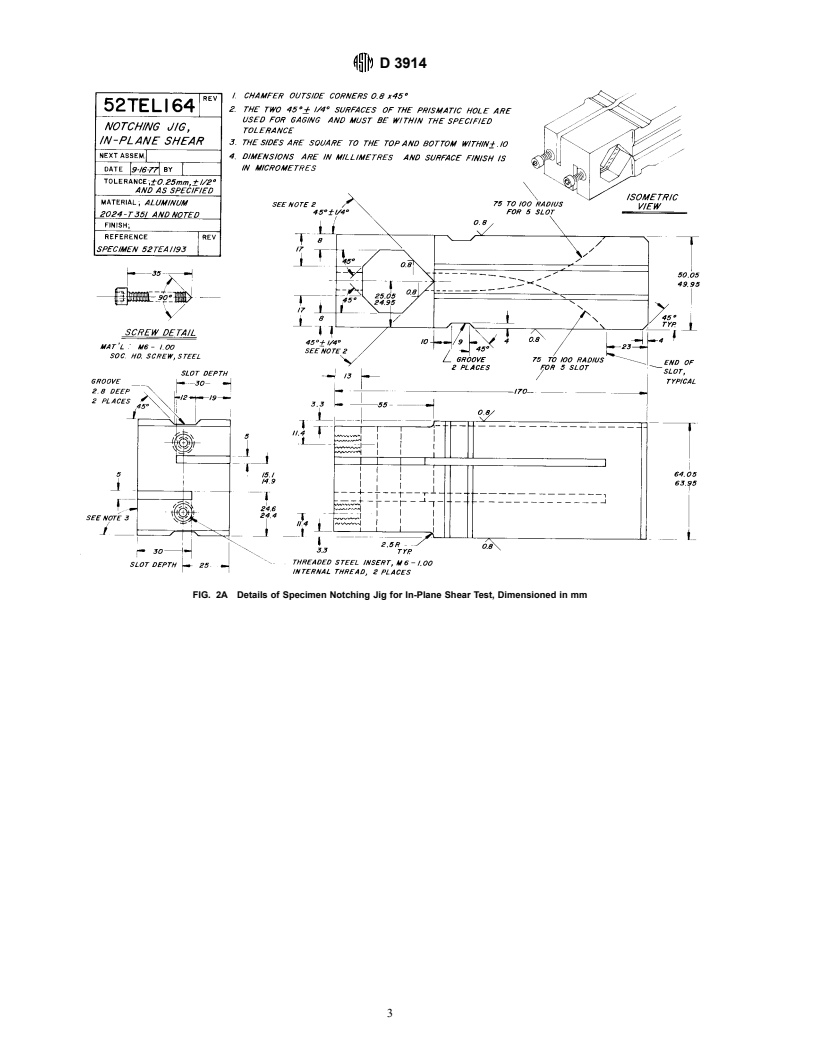
jig (Fig. 2a and Fig. 2b) designed specifically for this purpose.
3 1
( ⁄4 to 1 ⁄4 in.).
1.2 The values stated in SI units are to be regarded as the
5. Significance and Use
standard.
5.1 Shear tests of various kinds are widely used in the
1.3 This standard does not purport to address all of the
reinforced plastics industry to assess the strength of the
safety concerns, if any, associated with its use. It is the
reinforcement-to-resin bond in polyester-, vinyl ester-, and
responsibility of the user of this standard to establish appro-
epoxy-resin composites. In addition to their importance for the
priate safety and health practices and determine the applica-
generation of data for research and development, quality
bility of regulatory limitations prior to use. Specific precau-
control, and specification purposes, such tests are of fundamen-
tionary statements are given in Note 2 and Note 3.
tal value to the fiberous reinforcement industry, since they can
NOTE 1—There is no similar or equivalent ISO standard.
be used to determine the potential of new sizing systems for the
surface treatment of glass fibers.
2. Referenced Documents
5.2 The in-plane shear strength of pultruded cylindrical
2.1 ASTM Standards:
composites is an important property from an engineering
D 618 Practice for Conditioning Plastics for Testing
standpoint, since pultruded rod, as such, is used in many
D 695 Test Method for Compressive Properties of Rigid
structural applications.
Plastics
E 4 Practices for Force Verification of Testing Machines 6. Apparatus
6.1 Testing Machine—Any suitable testing machine capable
3. Terminology
of control of constant-rate-of-crosshead movement and com-
3.1 Definition:
prising essentially the following:
3.1.1 in-plane shear strength—the shear strength at maxi-
6.1.1 Drive Mechanism—A drive mechanism for imparting
mum load in which the plane of fracture is centrally located
to the movable member a uniform, controlled velocity with
along the longitudinal axis of the specimen between two
respect to the stationary member, as required in 10.3.
diametrically opposed notches machined halfway through its
6.1.2 Load Indicator—A load-indicating mechanism ca-
diameter.
pable of showing the total compressive load carried by the test
specimen. The mechanism shall be essentially free of inertial
4. Summary of Test Method
lag at the specified rate of testing and shall indicate the load
4.1 In-plane shear strength, as determined by this test
with an accuracy of 61 % of the maximum indicated value of
method, is measured by applying a compressive load to
the test (load). The accuracy of the testing machine shall be
notched cylindrical specimens of the type shown in Fig. 1.
verified at least once a year in accordance with Practices E 4.
Loading of the specimen is accomplished with a subpress, or
6.1.3 Notching Jig—A notching jig of the type shown in
compression tool, such as those shown in Fig. 1 and Fig. 2 of
Fig. 2a and Fig. 2b, or the equivalent, for notching the test
Test Method D 695. Failure of the specimen occurs in shear
specimens.
6.1.4 Compression Tool—A compression tool for applying
This test method is under the jurisdiction of ASTM Committee D-20 on Plastics
the load to the test specimen, such as those shown in Fig. 1 and
and is the direct responsibility of Subcommittee D20.18 on Reinforced Thermoset-
Fig. 2 of Test Method D 695.
ting Plastics.
6.1.5 Micrometers—Suitable micrometers, reading to 0.025
Current edition approved Nov. 10, 1996. Published May 1997. Originally
mm or 0.001 in., for measuring the diameter of the specimen,
published as D 3914 – 80. Last previous edition D 3914 – 84 (1990).
Annual Book of ASTM Standards, Vol 08.01.
as well as the depth of, and distance between, the notches.
Annual Book of ASTM Standards, Vols 03.01 and 04.02.
Copyright © ASTM, 100 Barr Harbor Drive, West Conshohocken, PA 19428-2959, United States.
D 3914
FIG. 1 Notched Rod In-Plane Shear Specimen; Dimensions: Top, mm; Bottom, in.
7. Test Specimens sliding contact with the fence of the table saw as the jig is
pushed along the table to a stop. After machining one notch,
7.1 Configuration—Test specimens shall be carefully ma-
turn the tool over and repeat the procedure to provide a second
chined from the rod sample of interest and shall conform to the
notch in the specimen diametrically opposed to the first and at
shape and dimensions given in Fig. 1. The ends of the
a fixed, defined distance (Fig. 1) from it.
specimen shall be machined flat and parallel to prevent point
loading upon application of the compressive load.
NOTE 2—Caution: When fabricating composite specimens by machin-
7.2 Preparation—After machining the specimen to proper ing operations, a fine dust consisting of particles of fibers or the matrix
material, or both, may be formed. These fine dusts can be a health or safety
length, insert it in the notching jig, flush it with one face of the
hazard, or both. Adequate protection should be afforded operating person-
jig, and tighten the cap screws of the jig to secure it in place.
nel and equipment. This may require adequate ventilation or dust
Push the assembly (jig and specimen) into a diamond grit
collecting facilities, or both, at a minimum.
cutoff wheel (or equivalent blade) after setting the blade to give
the proper depth of notch. This arrangement is shown in Fig. 3. 7.3 Number—A minimum of five specimens shall be tested.
Guidance of the jig during specimen notching is by means of
D 3914
FIG. 2A Details of Specimen Notching Jig for In-Plane Shear Test, Dimensioned in mm
D 3914
FIG. 2B Details of Specimen Notching Jig for In-P
...


Questions, Comments and Discussion
Ask us and Technical Secretary will try to provide an answer. You can facilitate discussion about the standard in here.