ASTM F1164-97(2014)
(Test Method)Standard Test Method for Evaluation of Transparent Plastics Exposed to Accelerated Weathering Combined with Biaxial Stress
Standard Test Method for Evaluation of Transparent Plastics Exposed to Accelerated Weathering Combined with Biaxial Stress
SIGNIFICANCE AND USE
4.1 The degradation of optical properties of transparent plastics is the single greatest cause for in-service removal and replacement. Some optical qualities are inherent in the geometry, manufacturing process, and materials, and remain relatively unchanged after manufacture, while others are subject to gradual change during exposure to the service environment. Factors having an influence on the crazing of transparent plastics include stress, ultraviolet (UV), moisture, and temperature. Sufficient data has been generated to make it evident that real-world conditioning must be experienced by developmental test specimens, as opposed to testing new unexposed material to determine durability, prior to in-service usage. However, the laboratory simulation of natural weathering, and especially accelerated simulation, is imprecise and correlation of results obtained for different plastics or from using different exposure apparatus should not be attempted until a valid database has been generated for such cross-correlation.
SCOPE
1.1 This test method covers the resistance of transparent plastics exposed to environmental conditioning (accelerated weathering) under a biaxial stress state induced by a pressure cell/test fixture.
1.2 The values stated in acceptable metric units are to be regarded as the standard.
1.3 This standard does not purport to address all of the safety concerns, if any, associated with its use. It is the responsibility of the user of this standard to establish appropriate safety and health practices and determine the applicability of regulatory limitations prior to use.
General Information
Relations
Buy Standard
Standards Content (Sample)
NOTICE: This standard has either been superseded and replaced by a new version or withdrawn.
Contact ASTM International (www.astm.org) for the latest information
Designation: F1164 − 97 (Reapproved 2014)
Standard Test Method for
Evaluation of Transparent Plastics Exposed to Accelerated
Weathering Combined with Biaxial Stress
This standard is issued under the fixed designation F1164; the number immediately following the designation indicates the year of
original adoption or, in the case of revision, the year of last revision.Anumber in parentheses indicates the year of last reapproval.A
superscript epsilon (´) indicates an editorial change since the last revision or reapproval.
1. Scope test specimen; mounting the specimen in the test fixture;
pressurizing the fixture to induce the desired biaxial stress in
1.1 This test method covers the resistance of transparent
the specimen; and exposing the stressed specimen to specific
plastics exposed to environmental conditioning (accelerated
accelerated weathering conditions. After conditioning, the
weathering) under a biaxial stress state induced by a pressure
specimen is removed and haze/transmittance are measured to
cell/test fixture.
determine any changes in value. Coating adhesion is measured
1.2 The values stated in acceptable metric units are to be
when applicable.
regarded as the standard.
3.2 The resistance of the plastic to stress-during-weathering
1.3 This standard does not purport to address all of the
is determined by the onset of crazing, the change in haze and
safety concerns, if any, associated with its use. It is the
luminous transmittance, and adhesion of coating.
responsibility of the user of this standard to establish appro-
priate safety and health practices and determine the applica-
4. Significance and Use
bility of regulatory limitations prior to use.
4.1 The degradation of optical properties of transparent
2. Referenced Documents
plastics is the single greatest cause for in-service removal and
2.1 ASTM Standards:
replacement. Some optical qualities are inherent in the
D1003Test Method for Haze and Luminous Transmittance
geometry, manufacturing process, and materials, and remain
of Transparent Plastics
relatively unchanged after manufacture, while others are sub-
D3359Test Methods for Measuring Adhesion by Tape Test
ject to gradual change during exposure to the service environ-
G26 Practice for Operating Light-Exposure Apparatus
ment.Factorshavinganinfluenceonthecrazingoftransparent
(Xenon-Arc Type) With and Without Water for Exposure
plasticsincludestress,ultraviolet(UV),moisture,andtempera-
of Nonmetallic Materials (Discontinued 2001) (With-
ture. Sufficient data has been generated to make it evident that
drawn 2000)
real-worldconditioningmustbeexperiencedbydevelopmental
G53Practice for Operating Light-and Water-Exposure Ap-
test specimens, as opposed to testing new unexposed material
paratus (Fluorescent UV-Condensation Type) for Expo-
todeterminedurability,priortoin-serviceusage.However,the
sure of Nonmetallic Materials (Withdrawn 2000)
laboratory simulation of natural weathering, and especially
G90Practice for Performing Accelerated Outdoor Weather-
accelerated simulation, is imprecise and correlation of results
ing of Nonmetallic Materials Using Concentrated Natural
obtained for different plastics or from using different exposure
Sunlight
apparatus should not be attempted until a valid database has
been generated for such cross-correlation.
3. Summary of Test Method
3.1 This test method consists of measuring and recording
5. Apparatus
the haze and light transmittance of an unexposed circular plate
5.1 Manifold Test Fixture—An exploded view of the
This test method is under the jurisdiction of ASTM Committee F07 on
pressure-cell/test-fixture used to induce a biaxial stress state in
Aerospace andAircraft and is the direct responsibility of Subcommittee F07.08 on
aclampedspecimenisillustratedinFig.1.Themountingplate
Transparent Enclosures and Materials.
and clamping ring for a 76.2-mm (30-in.) wide three-cell test
Current edition approved Dec. 1, 2014. Published December 2014. Originally
ε1
approved in 1988. Last previous edition approved in 2009 as F1164–97(2009) . fixture are detailed in Fig. 2. A 254-mm (10-in.) wide single-
DOI: 10.1520/F1164-97R14.
cell fixture or a 508-mm (20-in.) wide double-cell fixture is
For referenced ASTM standards, visit the ASTM website, www.astm.org, or
also acceptable.
contactASTM Customer Service at service@astm.org. ForAnnual Book ofASTM
Standards volume information, refer to the standard’s Document Summary page on
5.2 Accelerated Weathering Apparatus:
the ASTM website.
5.2.1 Operating procedures for using water- or light-
The last approved version of this historical standard is referenced on
www.astm.org. exposure apparatus, or both, employing a Xenon-arc light
Copyright © ASTM International, 100 Barr Harbor Drive, PO Box C700, West Conshohocken, PA 19428-2959. United States
F1164 − 97 (2014)
8.2.1 Using 5.334 mm (0.210 in.) thick stretched acrylic,
υ=0.35, and E =3.10×10 Pa (450000 psi), a calibrated
pressure of 80.0×10 Pa (11.6 psi) induced an outer surface
−3
strainof2.888×10 m/m(2888µin./in.);beingtheequivalent
of a 13.8×10 Pa (2000 psi) stress level in the center of the
test specimen.
8.2.2 Knowing υ, the pressure required to induce a biaxial
stress of 13.8×10 Pa (2000 psi) in the center of a transparent
specimen of nominal 0.00508 m (0.200 in.) thickness may be
theoretically calculated as follows:
6 2
~13.8 310 ! t
SIUnits:M 5 (1)
2000t
Inch 2PoundUnits:M 5 (2)
where:
M = bending moment at plate center (lb-in./in. or N-m/m)
and
t = plate thickness, in. or m.
FIG. 1 Stress Weathering Test Apparatus
The desired pressure is as follows:
16M
source to simulate the deterioration caused by accelerated
P 5 (3)
a ~11υ!
weathering exposure, shall comply with Practice G26.
5.2.2 Operating procedures for using fluorescent UV and
where: a = distance from plate center to clamped
condensation apparatus to simulate the deterioration caused by
edge=0.0984 m (3.875 in.) or
accelerated weathering exposure shall comply with Practice
1652M
G53.
SIUnits:P 5 (4)
11υ
5.2.3 OperatingproceduresforusingFresnel-reflectingcon-
centratorsemployingthesunasasource,withorwithoutwater 1.065M
Inch 2PoundUnits:P 5 (5)
spray cycles, to simulate the deterioration caused by acceler- 11υ
ated weathering exposure, shall comply with Practice G90.
8.3 In accordance with the procedures in 5.2, condition the
specimens under stress for 1, 2, 3, 4, and 5 equivalent years of
5.3 Hazemeter—The Hazemeter shall conform to the re-
quirements of Test Method D1003. acceleratedweathering.Usingafluorescentultravioletconden-
sation test chamber with UV B-313 lamps, an operating
6. Test Specimens
temperature of 48.89°C (120°F), alternate cycles of 7 h UV
followe
...
This document is not an ASTM standard and is intended only to provide the user of an ASTM standard an indication of what changes have been made to the previous version. Because
it may not be technically possible to adequately depict all changes accurately, ASTM recommends that users consult prior editions as appropriate. In all cases only the current version
of the standard as published by ASTM is to be considered the official document.
´1
Designation: F1164 − 97 (Reapproved 2009) F1164 − 97 (Reapproved 2014)
Standard Test Method for
Evaluation of Transparent Plastics Exposed to Accelerated
Weathering Combined with Biaxial Stress
This standard is issued under the fixed designation F1164; the number immediately following the designation indicates the year of
original adoption or, in the case of revision, the year of last revision. A number in parentheses indicates the year of last reapproval. A
superscript epsilon (´) indicates an editorial change since the last revision or reapproval.
ε NOTE—Editorial changes were made throughout in June 2009.
1. Scope
1.1 This test method covers the resistance of transparent plastics exposed to environmental conditioning (accelerated
weathering) under a biaxial stress state induced by a pressure cell/test fixture.
1.2 The values stated in acceptable metric units are to be regarded as the standard.
1.3 This standard does not purport to address all of the safety concerns, if any, associated with its use. It is the responsibility
of the user of this standard to establish appropriate safety and health practices and determine the applicability of regulatory
limitations prior to use.
2. Referenced Documents
2.1 ASTM Standards:
D1003 Test Method for Haze and Luminous Transmittance of Transparent Plastics
D3359 Test Methods for Measuring Adhesion by Tape Test
G26 Practice for Operating Light-Exposure Apparatus (Xenon-Arc Type) With and Without Water for Exposure of Nonmetallic
Materials (Discontinued 2001) (Withdrawn 2000)
G53 Practice for Operating Light-and Water-Exposure Apparatus (Fluorescent UV-Condensation Type) for Exposure of
Nonmetallic Materials (Withdrawn 2000)
G90 Practice for Performing Accelerated Outdoor Weathering of Nonmetallic Materials Using Concentrated Natural Sunlight
3. Summary of Test Method
3.1 This test method consists of measuring and recording the haze and light transmittance of an unexposed circular plate test
specimen; mounting the specimen in the test fixture; pressurizing the fixture to induce the desired biaxial stress in the specimen;
and exposing the stressed specimen to specific accelerated weathering conditions. After conditioning, the specimen is removed and
haze/transmittance are measured to determine any changes in value. Coating adhesion is measured when applicable.
3.2 The resistance of the plastic to stress-during-weathering is determined by the onset of crazing, the change in haze and
luminous transmittance, and adhesion of coating.
4. Significance and Use
4.1 The degradation of optical properties of transparent plastics is the single greatest cause for in-service removal and
replacement. Some optical qualities are inherent in the geometry, manufacturing process, and materials, and remain relatively
unchanged after manufacture, while others are subject to gradual change during exposure to the service environment. Factors
having an influence on the crazing of transparent plastics include stress, ultraviolet (UV), moisture, and temperature. Sufficient data
has been generated to make it evident that real-world conditioning must be experienced by developmental test specimens, as
opposed to testing new unexposed material to determine durability, prior to in-service usage. However, the laboratory simulation
This test method is under the jurisdiction of ASTM Committee F07 on Aerospace and Aircraft and is the direct responsibility of Subcommittee F07.08 on Transparent
Enclosures and Materials.
Current edition approved May 15, 2009Dec. 1, 2014. Published June 2009December 2014. Originally approved in 1988. Last previous edition approved in 20032009 as
ε1
F1164 – 07F1164 – 97(2003).(2009) . DOI: 10.1520/F1164-97R09E01.10.1520/F1164-97R14.
For referenced ASTM standards, visit the ASTM website, www.astm.org, or contact ASTM Customer Service at service@astm.org. For Annual Book of ASTM Standards
volume information, refer to the standard’s Document Summary page on the ASTM website.
The last approved version of this historical standard is referenced on www.astm.org.
Copyright © ASTM International, 100 Barr Harbor Drive, PO Box C700, West Conshohocken, PA 19428-2959. United States
F1164 − 97 (2014)
of natural weathering, and especially accelerated simulation, is imprecise and correlation of results obtained for different plastics
or from using different exposure apparatus should not be attempted until a valid database has been generated for such
cross-correlation.
5. Apparatus
5.1 Manifold Test Fixture—An exploded view of the pressure-cell/test-fixture used to induce a biaxial stress state in a clamped
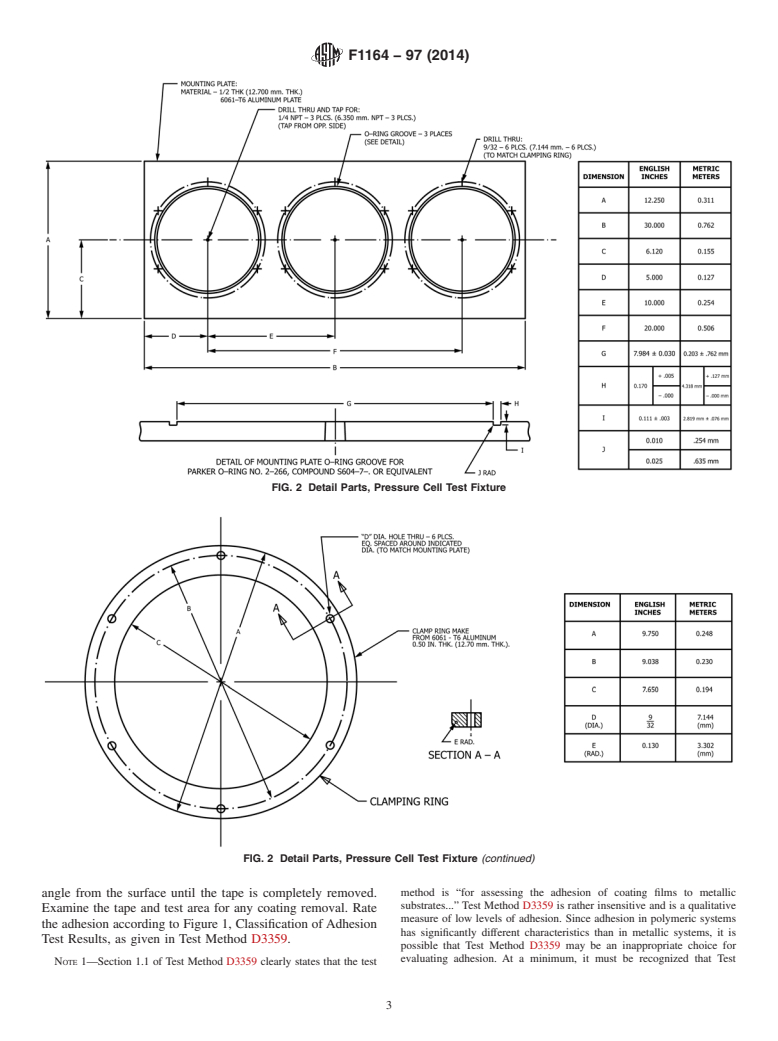
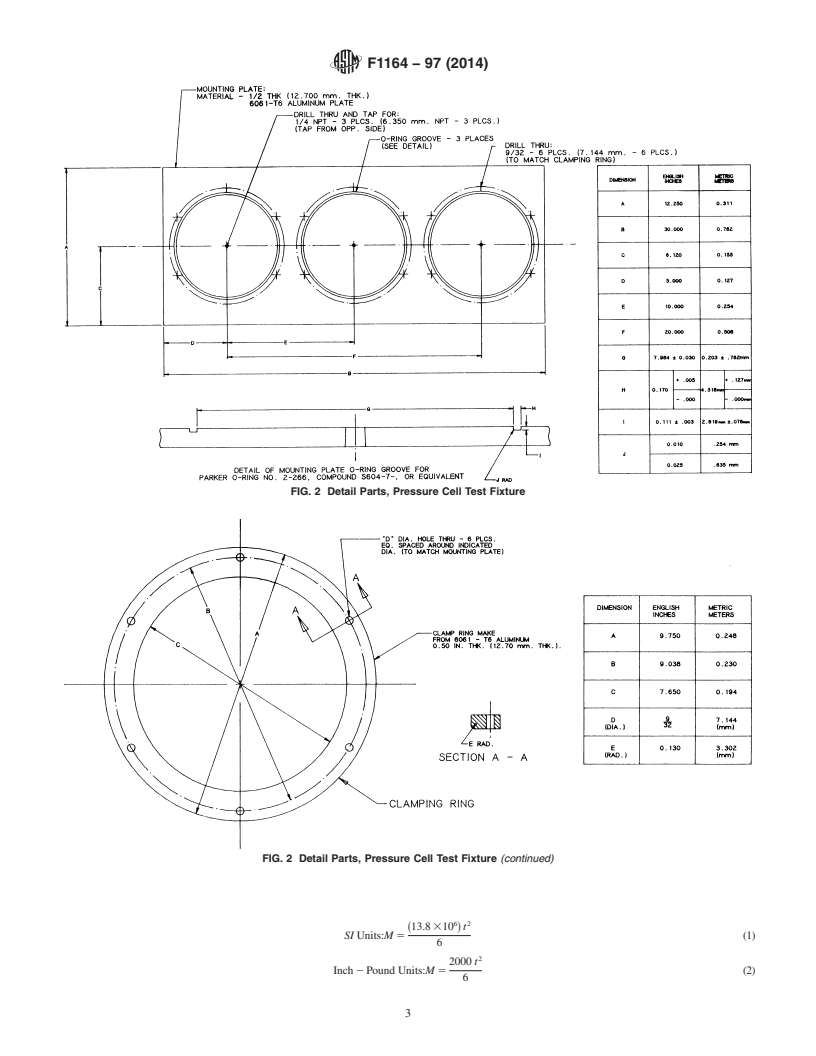
specimen is illustrated in Fig. 1. The mounting plate and clamping ring for a 76.2-mm (30-in.) wide three-cell test fixture are
detailed in Fig. 2. A 254-mm (10-in.) wide single-cell fixture or a 508-mm (20-in.) wide double-cell fixture is also acceptable.
5.2 Accelerated Weathering Apparatus:
5.2.1 Operating procedures for using water- or light-exposure apparatus, or both, employing a Xenon-arc light source to
simulate the deterioration caused by accelerated weathering exposure, shall comply with Practice G26.
5.2.2 Operating procedures for using fluorescent UV and condensation apparatus to simulate the deterioration caused by
accelerated weathering exposure shall comply with Practice G53.
5.2.3 Operating procedures for using Fresnel-reflecting concentrators employing the sun as a source, with or without water spray
cycles, to simulate the deterioration caused by accelerated weathering exposure, shall comply with Practice G90.
5.3 Hazemeter—The Hazemeter shall conform to the requirements of Test Method D1003.
6. Test Specimens
6.1 Use at least three specimens for each material being tested and for each specified exposure. The specimens shall be as
follows: clean, transparent circular plates, 0.216 m (8.500 in.) in diameter, having both sides substantially plane and parallel;
specimen nominal thickness being 0.00508 m (0.200 in.).
7. Conditioning
7.1 Conduct tests in the standard laboratory atmosphere.
8. Procedure
8.1 Code mark each specimen. Measure and record haze and transmittance at the plate center prior to exposure.
8.2 Circumferentially clamp specimens in the manifold test fixture using 2.825 J (25 in.-lb) bolt torque, and pressurize to induce
an outer surface (tensile) strain of 13.8 × 10 (1-υ)/E metre/metre (2000 (1-υ)/E inch/inch) in the center of the specimen (note that
this strain corresponds to a tensile stress of 13.8 × 10 Pa or 2000 psi), where υ = Poisson’s ratio at room temperature and E
= modulus of elasticity (Pa or psi) at room temperature for the test material. For coated material, the outer tensile test/exposure
side of each specimen shall be the coated surface.
8.2.1 Using 5.334 mm (0
...


Questions, Comments and Discussion
Ask us and Technical Secretary will try to provide an answer. You can facilitate discussion about the standard in here.