ASTM A571/A571M-01(2023)e1
(Specification)Standard Specification for Austenitic Ductile Iron Castings for Pressure-Containing Parts Suitable for Low-Temperature Service
Standard Specification for Austenitic Ductile Iron Castings for Pressure-Containing Parts Suitable for Low-Temperature Service
ABSTRACT
This specification covers austenitic ductile iron castings for compressors, expanders, pumps, valves, and other pressure-containing parts intended primarily for low-temperature service. The castings covered here are Type D-2M, Class 1, Class 2, Class 3, and Class 4. The castings shall be made in the electric-arc furnace, induction furnace, cupola, or any other furnace which is capable of producing castings. Heat and product analyses shall be performed wherein specimens shall conform to required chemical composition of carbon, silicon, manganese, nickel, chromium, and phosphorus. The castings shall undergo tension tests and impact tests, and shall conform to the following mechanical requirements: tensile strength, yield strength, elongation, Brinell hardness, and Charpy V-notch.
SCOPE
1.1 This specification2 covers austenitic ductile iron, Type D-2M, Classes 1 and 2, for compressors, expanders, pumps, valves, and other pressure-containing parts intended primarily for low-temperature service.
1.2 These grades of austenitic ductile iron are characterized by having their graphite substantially in a spheroidal form and free of flake graphite. They are essentially free of carbides and contain sufficient alloy content to produce a stable austenitic matrix down to −423 °F [−252 °C] (liquid hydrogen).
1.3 The values stated in either SI units or inch-pound units are to be regarded separately as standard. The values stated in each system may not be exact equivalents; therefore, each system shall be used independently of the other. Combining values from the two systems may result in nonconformance with the standard.
1.3.1 Within the text, the SI units are shown in brackets.
1.4 The following precautionary caveat pertains only to the test methods portion, Section 11, of this specification: This standard does not purport to address all of the safety concerns, if any, associated with its use. It is the responsibility of the user of this standard to establish appropriate safety, health, and environmental practices and determine the applicability of regulatory limitations prior to use.
1.5 This international standard was developed in accordance with internationally recognized principles on standardization established in the Decision on Principles for the Development of International Standards, Guides and Recommendations issued by the World Trade Organization Technical Barriers to Trade (TBT) Committee.
General Information
- Status
- Published
- Publication Date
- 31-Oct-2023
- Technical Committee
- A04 - Iron Castings
- Drafting Committee
- A04.02 - Malleable and Ductile Iron Castings
Relations
- Effective Date
- 01-Nov-2023
- Effective Date
- 01-Apr-2024
- Effective Date
- 01-Mar-2024
- Effective Date
- 01-Jan-2024
- Effective Date
- 01-May-2023
- Effective Date
- 01-Mar-2023
- Effective Date
- 01-May-2022
- Effective Date
- 01-Nov-2023
Overview
ASTM A571/A571M-01(2023)e1 is a recognized ASTM International standard that specifies requirements for austenitic ductile iron castings used in pressure-containing parts, especially those operating in low-temperature environments. This standard is particularly vital for industries seeking reliable materials for compressors, expanders, pumps, valves, and similar components where mechanical performance must be maintained under sub-zero conditions. ASTM A571/A571M ensures that castings are manufactured to provide excellent ductility, toughness, and strength, even at temperatures as low as −423 °F (−252 °C).
Key Topics
- Material Grades: Covers Type D-2M, Classes 1 and 2, austenitic ductile iron castings, designed for stability at extremely low temperatures with a fully spheroidal graphite structure and minimal flake graphite or carbides.
- Manufacturing Process: Castings must be produced using electric-arc, induction, cupola, or other suitable furnaces, followed by mandatory heat treatment (annealing) to achieve specified mechanical properties.
- Mechanical Properties: Specifies minimum requirements for tensile strength, yield strength, elongation, Brinell hardness, and Charpy V-notch impact energy for reliable performance in demanding applications.
- Chemical Composition: Outlines necessary levels of carbon, silicon, manganese, nickel, chromium, and limits for phosphorus to ensure the austenitic matrix remains stable at cryogenic temperatures.
- Testing Protocols: Requires comprehensive heat and product analysis, tension and impact testing, hardness checks, and, where applicable, hydrostatic pressure tests ensuring conformity to all mechanical and chemical standards.
- Quality Assurance: Sets provisions for inspection, certification, and acceptance, enabling transparent supplier-buyer communications and product reliability.
Applications
ASTM A571/A571M is essential in industries where equipment operates under pressure and at low temperatures, such as:
- Cryogenic Storage and Transfer: Pumps, valves, and pipe fittings handling liquefied gases, including hydrogen and natural gas, rely on these castings for integrity at extreme cold.
- Pressure Vessels: Components within compressors or expanders subject to both internal pressure and low ambient temperatures.
- Petrochemical and Process Industries: Applied in zones where process streams or utilities operate below freezing, ensuring safe containment.
- Power Generation: Suitable for specialized machinery and auxiliary systems exposed to low-temperature environments.
- Safety-Critical Infrastructure: Where component failure due to brittle fracture at low temperature would have severe consequences.
The use of austenitic ductile iron in these contexts results in improved lifecycle durability, resistance to embrittlement, and enhanced mechanical performance compared to traditional cast irons.
Related Standards
Organizations may reference the following standards alongside or as part of compliance with ASTM A571/A571M:
- ASME SA-571: Equivalent specification for Boiler and Pressure Vessel Code applications.
- ASTM A941: Terminology relating to steel, stainless steel, and ferroalloys.
- ASTM E8/E8M: Standard test methods for tension testing of metallic materials.
- ASTM E23: Standard test methods for notched bar impact testing of metallic materials.
- ASTM E30: Methods for chemical analysis of steel, cast iron, open-hearth iron, and wrought iron (withdrawn but referenced).
- ASTM E59: Practice for sampling steel and iron for determination of chemical composition (withdrawn but referenced).
Adhering to ASTM A571/A571M-01(2023)e1 helps manufacturers and engineers ensure compliance with international expectations for low-temperature pressure-containing iron castings, facilitating safe, efficient, and durable design in critical applications.
Buy Documents
ASTM A571/A571M-01(2023)e1 - Standard Specification for Austenitic Ductile Iron Castings for Pressure-Containing Parts Suitable for Low-Temperature Service
Get Certified
Connect with accredited certification bodies for this standard

Element Materials Technology
Materials testing and product certification.

Inštitut za kovinske materiale in tehnologije
Institute of Metals and Technology. Materials testing, metallurgical analysis, NDT.
Sponsored listings
Frequently Asked Questions
ASTM A571/A571M-01(2023)e1 is a technical specification published by ASTM International. Its full title is "Standard Specification for Austenitic Ductile Iron Castings for Pressure-Containing Parts Suitable for Low-Temperature Service". This standard covers: ABSTRACT This specification covers austenitic ductile iron castings for compressors, expanders, pumps, valves, and other pressure-containing parts intended primarily for low-temperature service. The castings covered here are Type D-2M, Class 1, Class 2, Class 3, and Class 4. The castings shall be made in the electric-arc furnace, induction furnace, cupola, or any other furnace which is capable of producing castings. Heat and product analyses shall be performed wherein specimens shall conform to required chemical composition of carbon, silicon, manganese, nickel, chromium, and phosphorus. The castings shall undergo tension tests and impact tests, and shall conform to the following mechanical requirements: tensile strength, yield strength, elongation, Brinell hardness, and Charpy V-notch. SCOPE 1.1 This specification2 covers austenitic ductile iron, Type D-2M, Classes 1 and 2, for compressors, expanders, pumps, valves, and other pressure-containing parts intended primarily for low-temperature service. 1.2 These grades of austenitic ductile iron are characterized by having their graphite substantially in a spheroidal form and free of flake graphite. They are essentially free of carbides and contain sufficient alloy content to produce a stable austenitic matrix down to −423 °F [−252 °C] (liquid hydrogen). 1.3 The values stated in either SI units or inch-pound units are to be regarded separately as standard. The values stated in each system may not be exact equivalents; therefore, each system shall be used independently of the other. Combining values from the two systems may result in nonconformance with the standard. 1.3.1 Within the text, the SI units are shown in brackets. 1.4 The following precautionary caveat pertains only to the test methods portion, Section 11, of this specification: This standard does not purport to address all of the safety concerns, if any, associated with its use. It is the responsibility of the user of this standard to establish appropriate safety, health, and environmental practices and determine the applicability of regulatory limitations prior to use. 1.5 This international standard was developed in accordance with internationally recognized principles on standardization established in the Decision on Principles for the Development of International Standards, Guides and Recommendations issued by the World Trade Organization Technical Barriers to Trade (TBT) Committee.
ABSTRACT This specification covers austenitic ductile iron castings for compressors, expanders, pumps, valves, and other pressure-containing parts intended primarily for low-temperature service. The castings covered here are Type D-2M, Class 1, Class 2, Class 3, and Class 4. The castings shall be made in the electric-arc furnace, induction furnace, cupola, or any other furnace which is capable of producing castings. Heat and product analyses shall be performed wherein specimens shall conform to required chemical composition of carbon, silicon, manganese, nickel, chromium, and phosphorus. The castings shall undergo tension tests and impact tests, and shall conform to the following mechanical requirements: tensile strength, yield strength, elongation, Brinell hardness, and Charpy V-notch. SCOPE 1.1 This specification2 covers austenitic ductile iron, Type D-2M, Classes 1 and 2, for compressors, expanders, pumps, valves, and other pressure-containing parts intended primarily for low-temperature service. 1.2 These grades of austenitic ductile iron are characterized by having their graphite substantially in a spheroidal form and free of flake graphite. They are essentially free of carbides and contain sufficient alloy content to produce a stable austenitic matrix down to −423 °F [−252 °C] (liquid hydrogen). 1.3 The values stated in either SI units or inch-pound units are to be regarded separately as standard. The values stated in each system may not be exact equivalents; therefore, each system shall be used independently of the other. Combining values from the two systems may result in nonconformance with the standard. 1.3.1 Within the text, the SI units are shown in brackets. 1.4 The following precautionary caveat pertains only to the test methods portion, Section 11, of this specification: This standard does not purport to address all of the safety concerns, if any, associated with its use. It is the responsibility of the user of this standard to establish appropriate safety, health, and environmental practices and determine the applicability of regulatory limitations prior to use. 1.5 This international standard was developed in accordance with internationally recognized principles on standardization established in the Decision on Principles for the Development of International Standards, Guides and Recommendations issued by the World Trade Organization Technical Barriers to Trade (TBT) Committee.
ASTM A571/A571M-01(2023)e1 is classified under the following ICS (International Classification for Standards) categories: 77.140.80 - Iron and steel castings. The ICS classification helps identify the subject area and facilitates finding related standards.
ASTM A571/A571M-01(2023)e1 has the following relationships with other standards: It is inter standard links to ASTM A571/A571M-01(2019), ASTM E23-24, ASTM A941-24, ASTM E8/E8M-24, ASTM A941-23, ASTM E23-23a, ASTM E8/E8M-22, ASTM A834-95(2020). Understanding these relationships helps ensure you are using the most current and applicable version of the standard.
ASTM A571/A571M-01(2023)e1 is available in PDF format for immediate download after purchase. The document can be added to your cart and obtained through the secure checkout process. Digital delivery ensures instant access to the complete standard document.
Standards Content (Sample)
This international standard was developed in accordance with internationally recognized principles on standardization established in the Decision on Principles for the
Development of International Standards, Guides and Recommendations issued by the World Trade Organization Technical Barriers to Trade (TBT) Committee.
´1
Designation: A571/A571M − 01 (Reapproved 2023)
Standard Specification for
Austenitic Ductile Iron Castings for Pressure-Containing
Parts Suitable for Low-Temperature Service
This standard is issued under the fixed designation A571/A571M; the number immediately following the designation indicates the year
of original adoption or, in the case of revision, the year of last revision. A number in parentheses indicates the year of last reapproval.
A superscript epsilon (´) indicates an editorial change since the last revision or reapproval.
ε NOTE—A typo in X1.1 was editorially corrected in November 2023.
1. Scope 2. Referenced Documents
2.1 ASTM Standards:
1.1 This specification covers austenitic ductile iron, Type
A941 Terminology Relating to Steel, Stainless Steel, Related
D-2M, Classes 1 and 2, for compressors, expanders, pumps,
Alloys, and Ferroalloys
valves, and other pressure-containing parts intended primarily
E8/E8M Test Methods for Tension Testing of Metallic Ma-
for low-temperature service.
terials
1.2 These grades of austenitic ductile iron are characterized
E23 Test Methods for Notched Bar Impact Testing of Me-
by having their graphite substantially in a spheroidal form and
tallic Materials
free of flake graphite. They are essentially free of carbides and
E30 Test Methods for Chemical Analysis of Steel, Cast Iron,
contain sufficient alloy content to produce a stable austenitic
Open-Hearth Iron, and Wrought Iron (Withdrawn 1995)
matrix down to −423 °F [−252 °C] (liquid hydrogen).
E59 Practice for Sampling Steel and Iron for Determination
of Chemical Composition (Withdrawn 1996)
1.3 The values stated in either SI units or inch-pound units
are to be regarded separately as standard. The values stated in
3. Ordering Information
each system may not be exact equivalents; therefore, each
3.1 Orders for material under this specification shall include
system shall be used independently of the other. Combining
the following information:
values from the two systems may result in nonconformance
3.1.1 Quantity (weight or number of pieces),
with the standard.
3.1.2 ASTM designation and year of issue,
1.3.1 Within the text, the SI units are shown in brackets.
3.1.3 Material class (Table 1),
1.4 The following precautionary caveat pertains only to the
3.1.4 Impact test temperature requirement (Section 11),
test methods portion, Section 11, of this specification: This
3.1.5 Place of inspection (Section 13), and
standard does not purport to address all of the safety concerns,
3.1.6 Certification requirements (Section 14).
if any, associated with its use. It is the responsibility of the user
4. Materials and Manufacture
of this standard to establish appropriate safety, health, and
environmental practices and determine the applicability of
4.1 Material—The iron shall be made in the electric-arc
regulatory limitations prior to use.
furnace, induction furnace, cupola, or any other furnace which
1.5 This international standard was developed in accor-
is capable of producing castings meeting the chemical compo-
dance with internationally recognized principles on standard-
sitions and mechanical properties in this specification.
ization established in the Decision on Principles for the
4.2 Heat Treatment:
Development of International Standards, Guides and Recom-
4.2.1 All castings shall be heat treated.
mendations issued by the World Trade Organization Technical
4.2.2 Heat treatment shall be performed before machining
Barriers to Trade (TBT) Committee.
except in instances when reheat treating is necessary.
4.2.3 Heat treatment shall consist of annealing. The proce-
dure for this type of treatment shall consist of heating the
This specification is under the jurisdiction of the ASTM Committee A04 on
Iron Castings and is the direct responsibility of Subcommittee A04.02 on Malleable
and Ductile Iron Castings. For referenced ASTM standards, visit the ASTM website, www.astm.org, or
Current edition approved Nov. 1, 2023. Published November 2023. Originally contact ASTM Customer Service at service@astm.org. For Annual Book of ASTM
approved in 1966. Last previous edition approved in 2019 as A571/ Standards volume information, refer to the standard’s Document Summary page on
A571M – 01 (2019). DOI: 10.1520/A0571_A0571M-01R23E01. the ASTM website.
2 4
For ASME Boiler and Pressure Vessel Code applications, see related Specifi- The last approved version of this historical standard is referenced on
cation SA-571 in Section II of that code. www.astm.org.
Copyright © ASTM International, 100 Barr Harbor Drive, PO Box C700, West Conshohocken, PA 19428-2959. United States
´1
A571/A571M − 01 (2023)
A
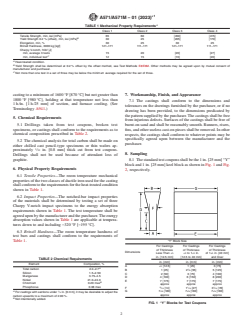
TABLE 1 Mechanical Property Requirements
Class 1 Class 2 Class 3 Class 4
Tensile Strength, min, ksi [mPa] 65 60 [450] [415]
B
Yield Strength 0.2 % (offset), min, ksi [mPa] 30 25 [205] [170]
Elongation, min, % 30 25 30 25
Brinell Hardness, 3000 kg [kgf] 121–171 111–171 121–171 111–171
Charpy V-notch, ft·lbf [J]
min, average 3 tests 15 20 [20] [27]
C
min, individual test 12 15 [16] [20]
A
Heat-treated condition.
B
Yield Strength shall be determined at 0.2 % offset by the offset method, see Test Methods E8/E8M. Other methods may be agreed upon by mutual consent of
manufacturer and purchaser.
C
Not more than one test in a set of three may be below the minimum average required for the set of three.
casting to a minimum of 1600 °F [870 °C] but not greater than 7. Workmanship, Finish, and Appearance
1800 °F [980 °C], holding at that temperature not less than
7.1 The castings shall conform to the dimensions and
1 h ⁄in. [1 h ⁄25 mm] of section, and furnace cooling. (See
tolerances on the drawings furnished by the purchaser, or if no
Terminology A941.)
drawing has been provided, to the dimensions predicated by
the pattern supplied by the purchaser. The castings shall be free
5. Chemical Requirements
from injurious defects. Surfaces of the castings shall be free of
5.1 Drillings taken from test coupons, broken test
burnt-on sand and shall be reasonably smooth. Runners, risers,
specimens, or castings shall conform to the requirements as to fins, and other useless cast-on pieces shall be removed. In other
chemical composition prescribed in Table 2.
respects, the castings shall conform to whatever points may be
specifically agreed upon between the manufacturer and the
5.2 The chemical analysis for total carbon shall be made on
purchaser.
either chilled cast pencil-type specimens or thin wafers ap-
proximately ⁄32 in. [0.8 mm] thick cut from test coupons.
8. Sampling
Drillings shall not be used because of attendant loss of
graphite. 8.1 The standard test coupons shall be the 1 in. [25 mm] “Y”
block and 1 in. [25 mm] keel block as shown in Fig. 1 and Fig.
6. Physical Property Requirements
2, respectively.
6.1 Tensile Properties—The room temperature mechanical
properties of the two classes of ductile iron used for the casting
shall conform to the requirements for the heat-treated condition
shown in Table 1.
6.2 Impact Properties—The notched-bar impact properties
of the materials shall be determined by testing a set of three
Charpy V-notch impact specimens to the energy absorption
requirements shown in Table 1. The test temperature shall be
agreed upon by the manufacturer and the purchaser. The energy
absorption values shown in Table 1 are applicable at tempera-
tures down to and including −320 °F [−195 °C].
6.3 Brinell Hardness—The room temperature hardness of
test bars and castings shall conform to the requirements of
Table 1.
“Y” Block Size
For Castings For Castings For Castings
of Thickness of Thickness of Thickness
Dimensions
1 1 1 1
Less Than ⁄2 ⁄2 to 1 ⁄2 in. of 1 ⁄2 in. [40 mm]
in. [12.5 mm] [12.5 to 40 mm] and Over
TABLE 2 Chemical Requirements
in. [mm] in. [mm] in. [mm]
Element Composition, %
A ⁄2 [12.5] 1 [25] 3 [75]
A
Total carbon 2.2–2.7 1
B 1 [25] 2 ⁄8 [55] 5 [125]
Silicon 1.5–2.50
C 2 [50] 3 [75] 4 [100]
Manganese 3.75–4.5
D 4 [100] 6 [150] 8 [200]
Nickel 21.0–24.0
E 7 [175] 7 [175] 7 [175]
B
Chromium 0.20 max
approx approx approx
Phosphorus 0.08 max 9 1 1
F ⁄16 [14] 1 ⁄16 [27] 3 ⁄16 [78]
1 1 1
A
1 G 7 ⁄8 [180] 7 ⁄8 [180] 7 ⁄8 [180]
For castings with sections under ⁄4 in. [6 mm], it may be desirable to adjust the
approx approx approx
carbon upwards to a maximum of 2.90 %.
B
Not intentionally added.
FIG. 1 “Y” Blocks for Test Coupons
---------------------- Page
...


Questions, Comments and Discussion
Ask us and Technical Secretary will try to provide an answer. You can facilitate discussion about the standard in here.
Loading comments...