ASTM D950-03(2011)
(Test Method)Standard Test Method for Impact Strength of Adhesive Bonds
Standard Test Method for Impact Strength of Adhesive Bonds
SIGNIFICANCE AND USE
Adhesives can fail under a sudden impact load and not under a slowly applied load of the same or greater force.
This test method can be used to compare the sensitivity of various adhesives to suddenly applied loads.
SCOPE
1.1 This test method covers the determination of the comparative impact strength of adhesive bonds in shear, when tested on standard specimens under specified conditions of preparation, conditioning, and testing.
1.2 The values stated in SI units are to be regarded as the standard. The values in parentheses are for information only.
1.3 This standard does not purport to address all of the safety concerns, if any, associated with its use. It is the responsibility of the user of this standard to establish appropriate safety and health practices and determine the applicability of regulatory limitations prior to use.
General Information
Relations
Standards Content (Sample)
NOTICE: This standard has either been superseded and replaced by a new version or withdrawn.
Contact ASTM International (www.astm.org) for the latest information
Designation: D950 − 03 (Reapproved 2011)
Standard Test Method for
Impact Strength of Adhesive Bonds
This standard is issued under the fixed designation D950; the number immediately following the designation indicates the year of
original adoption or, in the case of revision, the year of last revision. A number in parentheses indicates the year of last reapproval. A
superscript epsilon (´) indicates an editorial change since the last revision or reapproval.
This standard has been approved for use by agencies of the U.S. Department of Defense.
INTRODUCTION
The accuracy of the results of strength tests of adhesive bonds will depend on the conditions under
which the bonding process is carried out. Unless otherwise agreed upon between the manufacturer and
the purchaser, the bonding conditions shall be prescribed by the manufacturer of the adhesive. In order
to ensure that complete information is available to the individual conducting the tests, the
manufacturer of the adhesive shall furnish numerical values and other specific information for each of
the following variables:
(1) Procedure for preparation of surfaces prior to application of the adhesive the cleaning and
drying of metal surfaces, and special surface treatments such as sanding which are not specifically
limited by the pertinent test method.
(2) Complete mixing directions for the adhesive.
(3) Conditions for application of the adhesive including the rate of spread or thickness of film,
number of coats to be applied, whether to be applied to one or both surfaces, and the conditions of
drying where more than one coat is required.
(4) Assembly conditions before application of pressure, including the room temperature, length of
time, and whether open or closed assembly is to be used.
(5) Curing conditions, including the amount of pressure to be applied, the length of time under
pressure and the temperature of the assembly when under pressure. It should be stated whether this
temperature is that of the bond line, or of the atmosphere at which the assembly is to be maintained.
(6) Conditioning procedure before testing, unless a standard procedure is specified, including the
length of time, temperature, and relative humidity.
Arange may be prescribed for any variable by the manufacturer of the adhesive if it can be assumed
by the test operator that any arbitrarily chosen value within such a range or any combination of such
values for several variables will be acceptable to both the manufacturer and the purchaser of the
adhesive.
1. Scope responsibility of the user of this standard to establish appro-
priate safety and health practices and determine the applica-
1.1 This test method covers the determination of the com-
bility of regulatory limitations prior to use.
parative impact strength of adhesive bonds in shear, when
tested on standard specimens under specified conditions of
2. Referenced Documents
preparation, conditioning, and testing.
2.1 ASTM Standards:
1.2 The values stated in SI units are to be regarded as the
A108 Specification for Steel Bar, Carbon and Alloy, Cold-
standard. The values in parentheses are for information only.
Finished
1.3 This standard does not purport to address all of the
B16/B16M Specification for Free-Cutting Brass Rod, Bar
safety concerns, if any, associated with its use. It is the
and Shapes for Use in Screw Machines
This test method is under the jurisdiction of ASTM Committee D14 on
Adhesives and is the direct responsibility of Subcommittee D14.80 on Metal
Bonding Adhesives. For referenced ASTM standards, visit the ASTM website, www.astm.org, or
Current edition approved April 1, 2011. Published April 2011. Originally contact ASTM Customer Service at service@astm.org. For Annual Book of ASTM
approved in 1952. Last previous edition approved in 2003 as D950 – 03. DOI: Standards volume information, refer to the standard’s Document Summary page on
10.1520/D0950-03R11. the ASTM website.
Copyright © ASTM International, 100 Barr Harbor Drive, PO Box C700, West Conshohocken, PA 19428-2959. United States
D950 − 03 (2011)
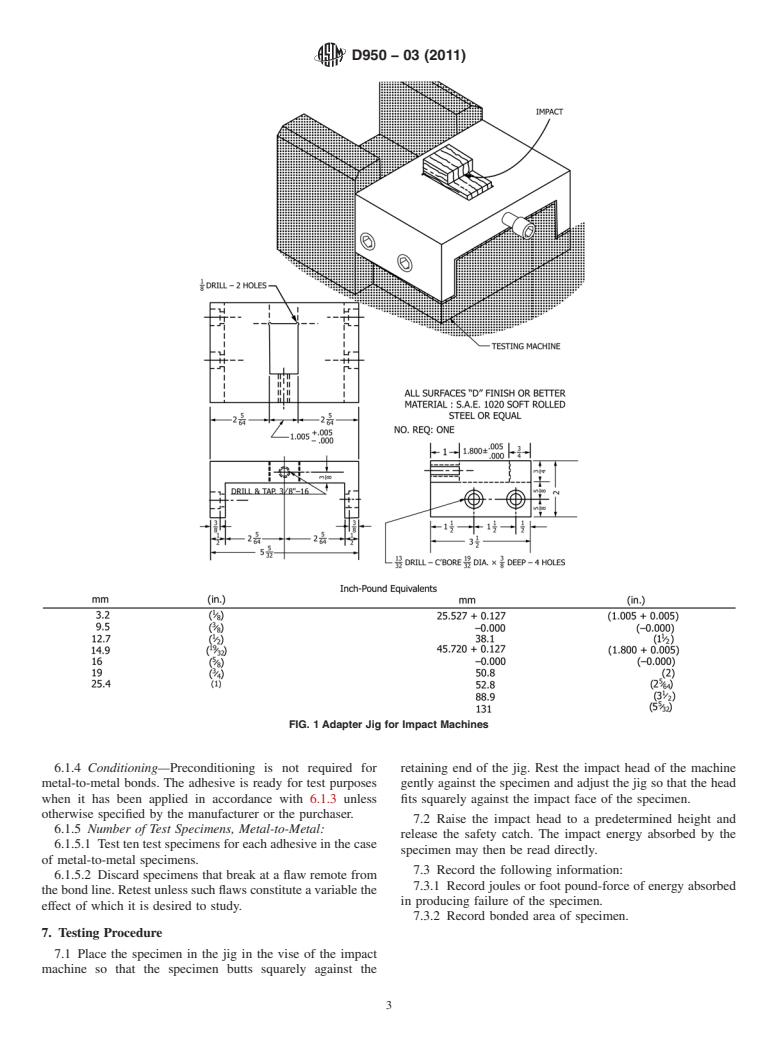
B107/B107M Specification for Magnesium-Alloy Extruded 5.1.1.3 Vise or Bolts to hold the jig rigid and immobile
Bars, Rods, Profiles, Tubes, and Wire under the stress of the testing machine hammer with the total
B133 Specification for Copper Rod, Bar,And Shapes (With- height of the vise, jig, and test specimen such that the lower
drawn 1994) edge of the striking face of the impact head strikes the
B139/B139M Specification for Phosphor Bronze Rod, Bar, specimen as near the adhesive line as possible, preferably
and Shapes within 0.79 mm ( ⁄32 in.). Ordinarily the distance between the
B151/B151M Specification for Copper-Nickel-Zinc Alloy top of the jaws of the vise of the machine and the bottom of the
(Nickel Silver) and Copper-Nickel Rod and Bar striking face of the head is 22 mm (0.866 in.), and proper
B211 Specification for Aluminum and Aluminum-Alloy height of the specimen may be obtained by adjusting its height
Rolled or Cold Finished Bar, Rod, and Wire in the jig.
D905 Test Method for Strength Properties of Adhesive
5.1.2 See Test Methods E23 for additional information on
Bonds in Shear by Compression Loading
impact testing machines and their calibration.
D907 Terminology of Adhesives
5.2 Conditioning Room or Desiccators—A conditioning
E23 Test Methods for Notched Bar Impact Testing of Me-
room capable of maintaining a relative humidity of 50 62%
tallic Materials
at 23 6 1.1°C (73.4 6 2°F), or desiccators filled with a
saturatedsaltsolution(Note1)togivearelativehumidityof50
3. Terminology
6 2 % at 23 6 1.1°C.
3.1 Definitions—Many terms in this test method are defined
in Terminology D907. NOTE 1—A saturated salt solution of calcium nitrate will give approxi-
mately 51 % relative humidity at the test temperature.
3.2 Definitions of Terms Specific to This Standard:
3.2.1 impact strength, n—the energy absorbed expressed in
6. Test Specimens
joules per square metre or foot-pounds-force (ft-lbf) per square
inch, by a specimen of standard design when impacted to
6.1 Metal-to-Metal Specimens:
failure by a single blow of a testing-machine hammer. (Syn-
6.1.1 Material—Metals conforming to the following speci-
onym impact value.)
fications are recommended:
3.2.2 impact value, n—synonym for impact strength.
Metal Designation
Brass ASTM B16/B16M, C36000; half-hard temper
Copper ASTM B133, C11000; hard temper
4. Significance and Use
Aluminum ASTM B211, A92024; G-3
Steel AISI 1020, G10200; cold-finished bar
4.1 Adhesives can fail under a sudden impact load and not
Phosphor bronze ASTM B139/B139M, C54400
under a slowly applied load of the same or greater force.
Magnesium ASTM B107/B107M, AZ61A or M1A-F
Nickel silver ASTM B151/B151M, C77000; quarter-hard
4.2 This test method can be used to compare the sensitivity
of various adhesives to suddenly applied loads.
6.1.1.1 Run tests on adhesives with high-impact strength
preferably on steel to minimize deformation. The reuse of
5. Apparatus
specimens is allowed, provided that the face receiving the
impact is not deformed.
...


Questions, Comments and Discussion
Ask us and Technical Secretary will try to provide an answer. You can facilitate discussion about the standard in here.