ASTM E587-10
(Practice)Standard Practice for Ultrasonic Angle-Beam Contact Testing
Standard Practice for Ultrasonic Angle-Beam Contact Testing
SIGNIFICANCE AND USE
An electrical pulse is applied to a piezoelectric transducer which converts electrical to mechanical energy. In the angle-beam search unit, the piezoelectric element is generally a thickness expander which creates compressions and rarefactions. This longitudinal (compressional) wave travels through a wedge (generally a plastic). The angle between transducer face and the examination face of the wedge is equal to the angle between the normal (perpendicular) to the examination surface and the incident beam. Fig. 1 shows the incident angle ϕi, and the refracted angle ϕr, of the ultrasonic beam.
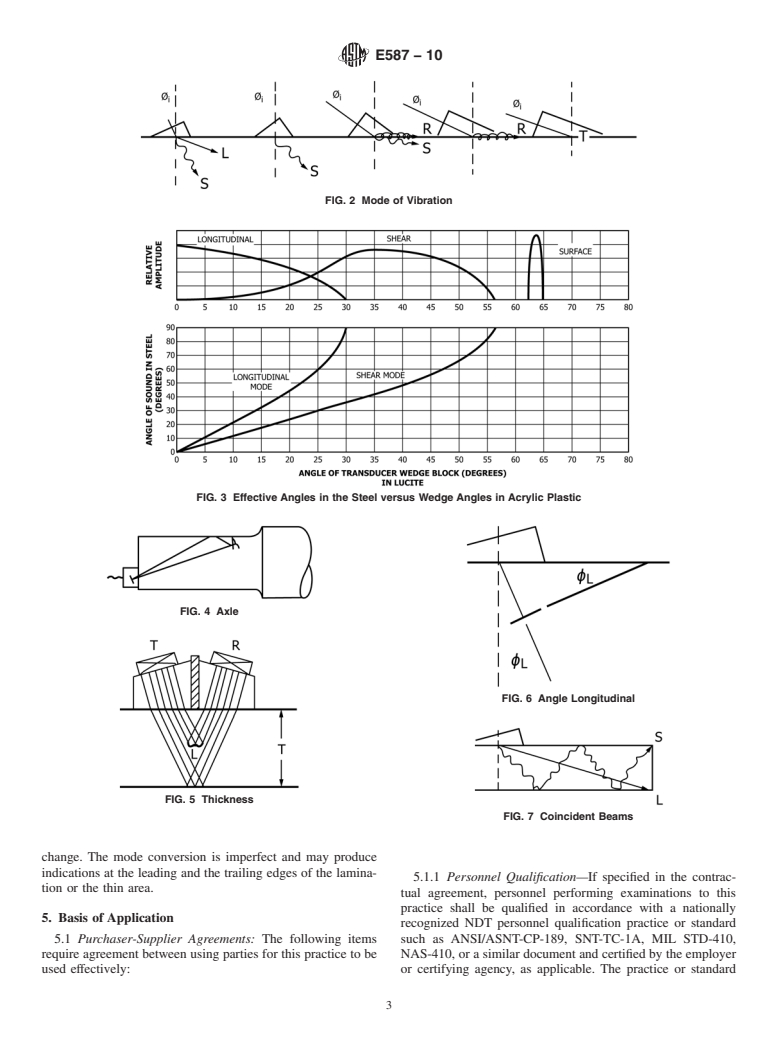
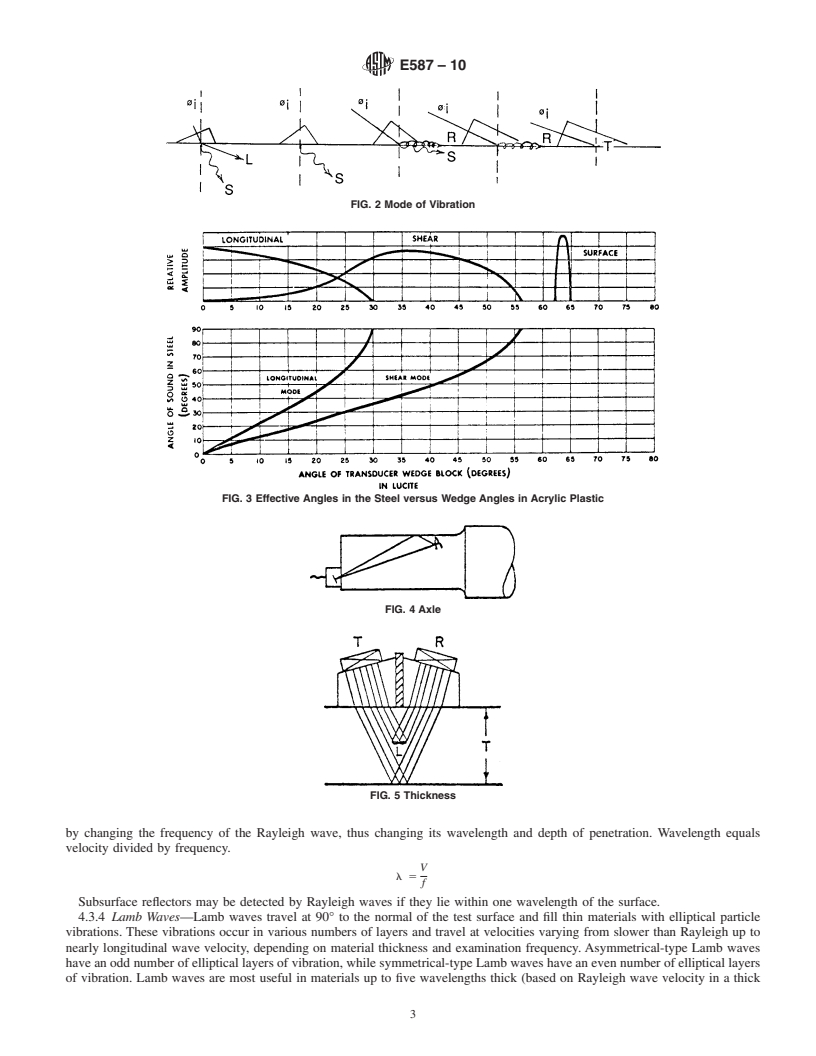
When the examination face of the angle-beam search unit is coupled to a material, ultrasonic waves may travel in the material. As shown in Fig. 2, the angle in the material (measured from the normal to the examination surface) and mode of vibration are dependent on the wedge angle, the ultrasonic velocity in the wedge, and the velocity of the wave in the examined material. When the material is thicker than a few wavelengths, the waves traveling in the material may be longitudinal and shear, shear alone, shear and Rayleigh, or Rayleigh alone. Total reflection may occur at the interface. (Refer to Fig. 3.) In thin materials (up to a few wavelengths thick), the waves from the angle-beam search unit traveling in the material may propagate in different Lamb wave modes.
All ultrasonic modes of vibration may be used for angle-beam examination of material. The material forms and the probable flaw locations and orientations determine selection of beam directions and modes of vibration. The use of angle beams and the selection of the proper wave mode presuppose a knowledge of the geometry of the object; the probable location, size, orientation, and reflectivity of the expected flaws; and the laws of physics governing the propagation of ultrasonic waves. Characteristics of the examination system used and the ultrasonic properties of the material being examined must be known or determine...
SCOPE
1.1 This practice covers ultrasonic examination of materials by the pulse-echo technique, using continuous coupling of angular incident ultrasonic vibrations.
1.2 This practice shall be applicable to development of an examination procedure agreed upon by the users of the practice.
1.3 The values stated in inch-pound units are regarded as standard. The values given in parentheses are mathematical conversions to SI units that are provided for information only and are not considered standard.
1.4 This standard does not purport to address all of the safety concerns, if any, associated with its use. It is the responsibility of the user of this standard to establish appropriate safety and health practices and determine the applicability of regulatory limitations prior to use.
General Information
Relations
Buy Standard
Standards Content (Sample)
NOTICE: This standard has either been superseded and replaced by a new version or withdrawn.
Contact ASTM International (www.astm.org) for the latest information
Designation: E587 − 10
StandardPractice for
1
Ultrasonic Angle-Beam Contact Testing
This standard is issued under the fixed designation E587; the number immediately following the designation indicates the year of
original adoption or, in the case of revision, the year of last revision. A number in parentheses indicates the year of last reapproval. A
superscript epsilon (´) indicates an editorial change since the last revision or reapproval.
4
1. Scope 2.3 Military Standards:
MIL-STD-410 Nondestructive Testing Personnel Qualifica-
1.1 This practice covers ultrasonic examination of materials
tion and Certification
by the pulse-echo technique, using continuous coupling of
5
2.4 Aerospace Industries Association Document:
angular incident ultrasonic vibrations.
NAS 410 Certification and Qualification of Nondestructive
1.2 This practice shall be applicable to development of an
Testing Personnel
examination procedure agreed upon by the users of the
practice.
3. Terminology
1.3 The values stated in inch-pound units are regarded as
3.1 Definitions—For definitions of terms used in this
standard. The values given in parentheses are mathematical
practice, see Terminology E1316.
conversions to SI units that are provided for information only
and are not considered standard.
4. Significance and Use
1.4 This standard does not purport to address all of the
4.1 An electrical pulse is applied to a piezoelectric trans-
safety concerns, if any, associated with its use. It is the
ducer which converts electrical to mechanical energy. In the
responsibility of the user of this standard to establish appro-
angle-beam search unit, the piezoelectric element is generally
priate safety and health practices and determine the applica-
a thickness expander which creates compressions and rarefac-
bility of regulatory limitations prior to use.
tions.Thislongitudinal(compressional)wavetravelsthrougha
wedge (generally a plastic).The angle between transducer face
2. Referenced Documents
and the examination face of the wedge is equal to the angle
2
2.1 ASTM Standards:
between the normal (perpendicular) to the examination surface
E114 Practice for Ultrasonic Pulse-Echo Straight-Beam
and the incident beam. Fig. 1 shows the incident angle φ, and
i
Contact Testing
the refracted angle φ , of the ultrasonic beam.
r
E317 Practice for Evaluating Performance Characteristics of
4.2 When the examination face of the angle-beam search
Ultrasonic Pulse-Echo Testing Instruments and Systems
unit is coupled to a material, ultrasonic waves may travel in the
without the Use of Electronic Measurement Instruments
material. As shown in Fig. 2, the angle in the material
E543 Specification for Agencies Performing Nondestructive
(measured from the normal to the examination surface) and
Testing
mode of vibration are dependent on the wedge angle, the
E1316 Terminology for Nondestructive Examinations
3 ultrasonic velocity in the wedge, and the velocity of the wave
2.2 ASNT Documents:
in the examined material. When the material is thicker than a
SNT-TC-1A Recommended Practice for Nondestructive
few wavelengths, the waves traveling in the material may be
Testing Personnel Qualification and Certification
longitudinal and shear, shear alone, shear and Rayleigh, or
ANSI/ASNT CP-189 Standard for Qualification and Certifi-
Rayleigh alone. Total reflection may occur at the interface.
cation of Nondestructive Testing Personnel
(Refer to Fig. 3.) In thin materials (up to a few wavelengths
thick), the waves from the angle-beam search unit traveling in
1
This practice is under the jurisdiction of ASTM Committee E07 on Nonde-
the material may propagate in different Lamb wave modes.
structive Testing and is the direct responsibility of Subcommittee E07.06 on
Ultrasonic Method.
4.3 All ultrasonic modes of vibration may be used for
CurrenteditionapprovedJune1,2010.PublishedJuly2010.Originallyapproved
angle-beam examination of material. The material forms and
in 1976. Last previous edition approved in 2005 as E587 - 00(2005). DOI:
10.1520/E0587-10.
2
For referenced ASTM standards, visit the ASTM website, www.astm.org, or
4
contact ASTM Customer Service at service@astm.org. For Annual Book of ASTM Available from Standardization Documents Order Desk, DODSSP, Bldg. 4,
Standards volume information, refer to the standard’s Document Summary page on Section D, 700 Robbins Ave., Philadelphia, PA 19111-5098, http://
the ASTM website. dodssp.daps.dla.mil.
3 5
AvailablefromAmericanSocietyforNondestructiveTesting(ASNT),P.O.Box Available fromAerospace IndustriesAssociation ofAmerica, Inc. (AIA), 1000
28518, 1711 Arlingate Ln., Columbus, OH 43228-0518, http://www.asnt.org. WilsonBlvd.,Suite1700,Arlington,VA22209-3928,http://www.aia-aerospace.org.
Copyright © ASTM International, 100 Barr Harbor Drive, PO Box C700, West Conshohocken, PA 19428-2959. United Sta
...
This document is not an ASTM standard and is intended only to provide the user of an ASTM standard an indication of what changes have been made to the previous version. Because
it may not be technically possible to adequately depict all changes accurately, ASTM recommends that users consult prior editions as appropriate. In all cases only the current version
of the standard as published by ASTM is to be considered the official document.
Designation:E587–00 (Reapproved 2005) Designation:E587–10
Standard Practice for
Ultrasonic Angle-Beam Examination by the Contact
1
MethodUltrasonic Angle-Beam Contact Testing
This standard is issued under the fixed designation E587; the number immediately following the designation indicates the year of
original adoption or, in the case of revision, the year of last revision. A number in parentheses indicates the year of last reapproval. A
superscript epsilon (´) indicates an editorial change since the last revision or reapproval.
1. Scope
1.1 This practice covers ultrasonic examination of materials by the pulse-echo technique, using continuous coupling of angular
incident ultrasonic vibrations.
1.2The values stated in inch-pound units are regarded as standard. The SI equivalents are in brackets and may be approximate.
1.3
1.2 This practice shall be applicable to development of an examination procedure agreed upon by the users of the practice.
1.3 The values stated in inch-pound units are regarded as standard. The values given in parentheses are mathematical
conversions to SI units that are provided for information only and are not considered standard.
1.4 This standard does not purport to address all of the safety concerns, if any, associated with its use. It is the responsibility
of the user of this standard to establish appropriate safety and health practices and determine the applicability of regulatory
limitations prior to use.
2. Referenced Documents
2
2.1 ASTM Standards:
E114 Practice for Ultrasonic Pulse-Echo Straight-Beam Contact Testing
E317 Practice for Evaluating Performance Characteristics of Ultrasonic Pulse-Echo Testing Instruments and Systems without
the Use of Electronic Measurement Instruments
E543 Specification for Agencies Performing Nondestructive Testing
E1316 Terminology for Nondestructive Examinations
3
2.2 ASNT Documents:
SNT-TC-1A Recommended Practice for Nondestructive Testing Personnel Qualification and Certification
ANSI/ASNT CP-189 Standard for Qualification and Certification of Nondestructive Testing Personnel
4
2.3 Military Standards:
MIL-STD-410 Nondestructive Testing Personnel Qualification and Certification
5
2.4 Aerospace Industries Association Document:
NAS 410 Certification and Qualification of Nondestructive Testing Personnel
3. Terminology
3.1 Definitions—For definitions of terms used in this practice, see Terminology E1316.
4. Significance and Use
4.1 Anelectricalpulseisappliedtoapiezoelectrictransducerwhichconvertselectricaltomechanicalenergy.Intheangle-beam
search unit, the piezoelectric element is generally a thickness expander which creates compressions and rarefactions. This
longitudinal (compressional) wave travels through a wedge (generally a plastic). The angle between transducer face and the
examinationfaceofthewedgeisequaltotheanglebetweenthenormal(perpendicular)totheexaminationsurfaceandtheincident
1
ThispracticeisunderthejurisdictionofASTMCommitteeE07onNondestructiveTestingandisthedirectresponsibilityofSubcommitteeE07.06onUltrasonicMethod.
Current edition approved JanuaryJune 1, 2005.2010. Published January 2005.July 2010. Originally approved in 1976. Last previous edition approved in 20002005 as
E587 - 00(2005). DOI: 10.1520/E0587-00R05.10.1520/E0587-10.
2
For referencedASTM standards, visit theASTM website, www.astm.org, or contactASTM Customer Service at service@astm.org. For Annual Book of ASTM Standards
volume information, refer to the standard’s Document Summary page on the ASTM website.
3
Available from TheAmerican Society for Nondestructive Testing (ASNT), P.O. Box 28518, 1711Arlingate Lane,Ln., Columbus, OH 43228-0518, http://www.asnt.org.
4
Available from Standardization Documents Order Desk, DODSSP, Bldg. 4, Section D, 700 Robbins Ave., Philadelphia, PA 19111-5094, Attn: NPODS.19111-5098,
http://dodssp.daps.dla.mil.
5
Available from Aerospace Industries Association of America, Inc., 1250 Eye St. NW, Washington D.C. 20005.
5
Available from Aerospace Industries Association of America, Inc. (AIA), 1000 Wilson Blvd., Suite 1700, Arlington, VA 22209-3928, http://www.aia-aerospace.org.
Copyright © ASTM International, 100 Barr Harbor Drive, PO Box C700, West Conshohocken, PA 19428-2959, United States.
1
---------------------- Page: 1 ----------------------
E587–10
beam. Fig. 1 shows the incident angle f, and the refracted angle f , of the ultrasonic beam.
i r
4.2 When the examination face of the angle-beam search unit is coupled to a material, ultrasonic waves may travel in the
material. As shown in Fig. 2, the angle in the mat
...


Questions, Comments and Discussion
Ask us and Technical Secretary will try to provide an answer. You can facilitate discussion about the standard in here.