ASTM F2162-01(2016)
(Specification)Standard Specification for Bearing, Roller, Needle: Drawn Outer Ring, Full Complement, Without Inner Ring, Open and Closed End, Standard Type
Standard Specification for Bearing, Roller, Needle: Drawn Outer Ring, Full Complement, Without Inner Ring, Open and Closed End, Standard Type
ABSTRACT
This specification covers the requirements for standard-type needle roller bearings with drawn outer rings, full complement, without inner rings, and with either open (Type B) or closed ends (Type M). Materials covered by this specification are needle rollers which shall be manufactured from steel, alloy, or carbon, and shall be of Grade E50100 or E52100. Rings, on the other hand, shall be manufactured from steel, alloy, or carbon, with carburizing grade 4620, 4720, 8620, 8720, or 1010-1020. Needle rollers and rings shall be hardened by heat treatment, and bearings shall be coated with rust preventive film.
SCOPE
1.1 This specification covers standard-type needle roller bearings having drawn outer rings, full complement, without inner rings, with either open or closed ends.
1.2 The use of recycled materials that meet the requirements of the applicable material specification without jeopardizing the intended use of the item is encouraged.
1.3 The inner rings specified in this specification are not intended for use in flight critical systems of aircraft.
1.4 The values stated in inch-pound units are to be regarded as standard. The values given in parentheses are mathematical conversions to SI units that are provided for information only and are not considered standard.
Note 1: This specification contains many of the requirements of MS17131, which was originally developed by the Department of Defense and is currently maintained by the Defense Supply Center Richmond.
General Information
- Status
- Published
- Publication Date
- 30-Apr-2016
- Technical Committee
- F34 - Rolling Element Bearings
- Drafting Committee
- F34.04 - Automotive/Industrial Bearing
Relations
- Effective Date
- 01-May-2016
- Effective Date
- 01-Jul-2018
- Effective Date
- 01-Jul-2017
- Effective Date
- 01-Dec-2012
- Effective Date
- 01-Nov-2011
- Effective Date
- 01-Feb-2010
- Effective Date
- 01-Feb-2010
- Effective Date
- 01-May-2009
- Effective Date
- 15-May-2008
- Effective Date
- 01-May-2008
- Effective Date
- 15-Mar-2008
- Effective Date
- 15-Mar-2008
- Effective Date
- 15-Jan-2008
- Effective Date
- 01-Jan-2008
- Effective Date
- 15-Dec-2007
Overview
ASTM F2162-01(2016) is the standard specification for needle roller bearings featuring drawn outer rings, full complement designs, without inner rings, and available in either open (Type B) or closed end (Type M) configurations. Developed by ASTM International, this standard sets forth comprehensive requirements regarding the materials, manufacture, performance, and marking of standard-type drawn cup needle roller bearings. The specification particularly emphasizes the use of specified steel grades, heat treatments, and dimensional tolerances to assure consistent, high-quality bearings suitable for automotive, industrial, and general machinery applications.
Key Topics
Bearing Types and Design
- Drawn outer ring needle roller bearings
- Full complement construction (maximum rollers, no cage)
- Options: Open end (Type B) and closed end (Type M)
- Supplied without inner rings
Material Requirements
- Needle rollers made from steel, alloy, or carbon (Grades E50100 or E52100)
- Outer rings made from carburizing grades such as 4620, 4720, 8620, 8720, or 1010-1020
- Both rollers and rings must be heat treated for proper hardness
Performance and Quality
- Dimensional accuracy and tolerances for bore, ring gage, width, and shaft diameter
- Basic dynamic and static load ratings defined
- Surface finish requirements for rollers and outer rings (ASME B46.1)
- Bearings coated with a rust preventive film; supplied without lubrication
Environmental Considerations
- Encouragement of recycled materials provided performance is not compromised
Marking and Certification
- Bearings must be marked with part number and manufacturer ID per MIL-STD-130
- Certification and test reporting available upon purchase request
Applications
The bearings specified by ASTM F2162 are widely used in:
- Automotive and Industrial Equipment: Including transmissions, gearboxes, pumps, and compressors, where compact, high-load-capacity bearings are required.
- General Machinery: Such as small motors, construction equipment, and agricultural machines.
- Aerospace (Non-Flight Critical Systems): Bearings meeting this standard are not intended for use in flight-critical aircraft systems but may be used in non-critical aerospace assemblies.
- Aftermarket Replacement and OEM Production: Ensures replacement parts and new machinery components meet recognized quality and compatibility requirements.
Key benefits for users include:
- Reliable performance and load capacity in compact spaces
- Compatibility with standard shaft sizes and housing bores
- Assurance of quality through standardized hardness, finish, and marking
Related Standards
Understanding ASTM F2162 involves awareness of several related industry standards:
- ASME B46.1 - Surface Texture, Surface Roughness, Waviness, and Lay
- SAE J-404 - Chemical Composition of SAE Alloy Steels
- MIL-STD-130 - Identification Marking of US Military Property
- ABMA STD 4 - Tolerance Definitions and Gauging Practices for Ball and Roller Bearings
- ISO 5593 - Rolling Bearings Vocabulary
- ISO 1132 - Rolling Bearings, Tolerances, Definitions
- ASTM E18 & E140 - Methods for Hardness Testing of Metallic Materials
- ASTM F2163 - Specification for Inner Bearing Rings for Needle Roller Bearings
Practical Value
By conforming to ASTM F2162, manufacturers, suppliers, and end-users benefit from:
- Consistent product quality and interchangeability across suppliers
- Reduced risk of part failure through strict adherence to material, heat treatment, and dimensional standards
- Ease of identification and traceability via mandated product marking
- Assurance of suitability for demanding industrial and automotive applications
This standard remains a vital reference for purchasing, specifying, and producing high-performance drawn cup needle roller bearings, supporting safe and reliable equipment operation across industries.
Buy Documents
ASTM F2162-01(2016) - Standard Specification for Bearing, Roller, Needle: Drawn Outer Ring, Full Complement, Without Inner Ring, Open and Closed End, Standard Type
Frequently Asked Questions
ASTM F2162-01(2016) is a technical specification published by ASTM International. Its full title is "Standard Specification for Bearing, Roller, Needle: Drawn Outer Ring, Full Complement, Without Inner Ring, Open and Closed End, Standard Type". This standard covers: ABSTRACT This specification covers the requirements for standard-type needle roller bearings with drawn outer rings, full complement, without inner rings, and with either open (Type B) or closed ends (Type M). Materials covered by this specification are needle rollers which shall be manufactured from steel, alloy, or carbon, and shall be of Grade E50100 or E52100. Rings, on the other hand, shall be manufactured from steel, alloy, or carbon, with carburizing grade 4620, 4720, 8620, 8720, or 1010-1020. Needle rollers and rings shall be hardened by heat treatment, and bearings shall be coated with rust preventive film. SCOPE 1.1 This specification covers standard-type needle roller bearings having drawn outer rings, full complement, without inner rings, with either open or closed ends. 1.2 The use of recycled materials that meet the requirements of the applicable material specification without jeopardizing the intended use of the item is encouraged. 1.3 The inner rings specified in this specification are not intended for use in flight critical systems of aircraft. 1.4 The values stated in inch-pound units are to be regarded as standard. The values given in parentheses are mathematical conversions to SI units that are provided for information only and are not considered standard. Note 1: This specification contains many of the requirements of MS17131, which was originally developed by the Department of Defense and is currently maintained by the Defense Supply Center Richmond.
ABSTRACT This specification covers the requirements for standard-type needle roller bearings with drawn outer rings, full complement, without inner rings, and with either open (Type B) or closed ends (Type M). Materials covered by this specification are needle rollers which shall be manufactured from steel, alloy, or carbon, and shall be of Grade E50100 or E52100. Rings, on the other hand, shall be manufactured from steel, alloy, or carbon, with carburizing grade 4620, 4720, 8620, 8720, or 1010-1020. Needle rollers and rings shall be hardened by heat treatment, and bearings shall be coated with rust preventive film. SCOPE 1.1 This specification covers standard-type needle roller bearings having drawn outer rings, full complement, without inner rings, with either open or closed ends. 1.2 The use of recycled materials that meet the requirements of the applicable material specification without jeopardizing the intended use of the item is encouraged. 1.3 The inner rings specified in this specification are not intended for use in flight critical systems of aircraft. 1.4 The values stated in inch-pound units are to be regarded as standard. The values given in parentheses are mathematical conversions to SI units that are provided for information only and are not considered standard. Note 1: This specification contains many of the requirements of MS17131, which was originally developed by the Department of Defense and is currently maintained by the Defense Supply Center Richmond.
ASTM F2162-01(2016) is classified under the following ICS (International Classification for Standards) categories: 21.100.20 - Rolling bearings. The ICS classification helps identify the subject area and facilitates finding related standards.
ASTM F2162-01(2016) has the following relationships with other standards: It is inter standard links to ASTM F2162-01(2008), ASTM E18-18, ASTM E18-17, ASTM E18-12, ASTM E18-11, ASTM E384-10, ASTM E384-10e1, ASTM E384-09, ASTM E18-08a, ASTM F2163-01(2008), ASTM E384-08a, ASTM E384-08ae1, ASTM E18-08, ASTM E384-08, ASTM E384-07a. Understanding these relationships helps ensure you are using the most current and applicable version of the standard.
ASTM F2162-01(2016) is available in PDF format for immediate download after purchase. The document can be added to your cart and obtained through the secure checkout process. Digital delivery ensures instant access to the complete standard document.
Standards Content (Sample)
This international standard was developed in accordance with internationally recognized principles on standardization established in the Decision on Principles for the
Development of International Standards, Guides and Recommendations issued by the World Trade Organization Technical Barriers to Trade (TBT) Committee.
Designation:F2162 −01 (Reapproved 2016)
Standard Specification for
Bearing, Roller, Needle: Drawn Outer Ring, Full
Complement, Without Inner Ring, Open and Closed End,
Standard Type
This standard is issued under the fixed designation F2162; the number immediately following the designation indicates the year of
original adoption or, in the case of revision, the year of last revision. A number in parentheses indicates the year of last reapproval. A
superscript epsilon (´) indicates an editorial change since the last revision or reapproval.
This standard has been approved for use by agencies of the U.S. Department of Defense.
1. Scope 2.2 ASME Standard:
ASME B 46.1 Surface Texture Surface Roughness,
1.1 This specification covers standard-type needle roller
Waviness, and Lay
bearings having drawn outer rings, full complement, without
2.3 SAE Standard:
inner rings, with either open or closed ends.
SAE J-404 Chemical Composition of SAE Alloy Steels
1.2 Theuseofrecycledmaterialsthatmeettherequirements
2.4 Military Standard:
of the applicable material specification without jeopardizing
MIL-STD-130 Identification Marking of US Military Prop-
the intended use of the item is encouraged.
erty
1.3 The inner rings specified in this specification are not
2.5 American Bearing Manufacturer’s Association (ABMA)
intended for use in flight critical systems of aircraft.
Standard:
1.4 The values stated in inch-pound units are to be regarded
STD 4 Tolerance Definitions and Gauging Practices For Ball
as standard. The values given in parentheses are mathematical
and Roller Bearings
conversions to SI units that are provided for information only
2.6 ISO Standards:
and are not considered standard.
ISO 5593 Rolling Bearings—Vocabulary
ISO 1132 Rolling Bearings—Tolerances—Definitions
NOTE 1—This specification contains many of the requirements of
MS17131, which was originally developed by the Department of Defense
and is currently maintained by the Defense Supply Center Richmond.
3. Terminology
3.1 Definitions—For definitions of terms used in this
2. Referenced Documents
specification, refer toABMASTD 4 Tolerance Definitions and
2.1 ASTM Standards:
Gauging Practices for Ball and Roller Bearings, ISO 1132
E18 Test Methods for Rockwell Hardness of Metallic Ma-
Roller Bearings—Tolerances—Definitions, and to ISO 5593
terials
Rolling Bearings—Vocabulary
E140 Hardness Conversion Tables for Metals Relationship
3.2 Definitions of Terms Specific to This Standard:
Among Brinell Hardness, Vickers Hardness, Rockwell
3.2.1 average life (L ), n—for a radial roller bearing, the
Hardness, Superficial Hardness, Knoop Hardness, Sclero- 50
number of revolutions that 50 % of a group of bearings will
scope Hardness, and Leeb Hardness
complete or exceed before the first evidence of fatigue devel-
E384 Test Method for Microindentation Hardness of Mate-
ops.
rials
3.2.1.1 Discussion—Theaveragelifemaybeasmuchasfive
F2163 Specification for Ring, Bearing, Inner: for Needle
times the rating life.
Roller Bearing With Drawn Outer Ring
1 3
ThisspecificationisunderthejurisdictionofASTMCommitteeF34onRolling Available from Global Engineering Documents, 15 Inverness Way, East
Element Bearings and is the direct responsibility of Subcommittee F34.04 on Englewood, CO 80112-5704, http://www.global.ihs.com.
Automotive/Industrial Bearing. Available from Society of Automotive Engineers (SAE), 400 Commonwealth
Current edition approved May 1, 2016. Published May 2016. Originally Dr., Warrendale, PA 15096-0001, http://www.sae.org.
approved in 2001. Last previous edition approved in 2008 as F2162 – 01(2008). Available from USAInformation Systems, 1092 Laskin Rd., Ste. 208, Virginia
DOI: 10.1520/F2162-01R16. Beach, VA 23451.
2 6
For referenced ASTM standards, visit the ASTM website, www.astm.org, or Available from the American Bearing Manufacturer’s Association, 1200 19th
contact ASTM Customer Service at service@astm.org. For Annual Book of ASTM St. NW, Ste. 300, Washington, DC 20036–2401.
Standards volume information, refer to the standard’s Document Summary page on Available fromAmerican National Standards Institute (ANSI), 25 W. 43rd St.,
the ASTM website. 4th Floor, New York, NY 10036, http://www.ansi.org.
Copyright © ASTM International, 100 Barr Harbor Drive, PO Box C700, West Conshohocken, PA 19428-2959. United States
F2162−01 (2016)
3.2.2 basic dynamic load rating (C ) , n—for a radial roller 5.1.4 Dimensions of roller bearings, including:
r
bearing, that calculated, constant radial load that a group of 5.1.4.1 Bore diameter, in;
apparently identical bearings with stationary outer rings can 5.1.4.2 Ring gage diameter, in;
theoretically endure for a rating life of one million revolutions 5.1.4.3 Width, in; and
of the inner ring. 5.1.4.4 Shaft diameter, in;
3.2.2.1 Discussion—Since applied loading as great as the 5.1.5 Load rating, including basic static load rating, lb and
basic dynamic load rating tends to cause local plastic defor- basic dynamic load rating, lb;
mation of the rolling surfaces, it is not anticipated that such 5.1.6 Approximate limiting speed, rpm; and
heavy loading would normally be applied. 5.1.7 Maximum end thickness.
3.2.3 basic static load rating (C ) , n—for a radial roller
or
6. Materials and Manufacture
bearing, that uniformly distributed static radial load which
6.1 Needle Rollers—Needlerollersshallbemanufacturedof
produces a maximum contact stress of 580 000 psi (4000 Mpa)
steel, alloy or carbon, of grades E50100 or E52100 in accor-
at the center of the contact of the most heavily loaded rolling
dance with SAEAHS STD-66, or 1090 or 1095 in accordance
element.
with SAE J-404.
3.2.3.1 Discussion—For this contact stress, total permanent
deformation of rolling element and raceway occurs which is
6.2 Rings—Rings shall be manufactured of steel, alloy, or
approximately 0.0001 or the roller diameter.
carbon, carburizing grade 4620, 4720, 8620, 8720, or 1010-
3.2.4 rating life (L ), n—for a radial roller bearing, the 1020 in accordance with SAE AHS STD-66.
number of revolutions that 90 % of a group of bearings will
7. Other Requirements
complete or exceed before the first evidence of fatigue devel-
ops.
7.1 Heat Treatment:
7.1.1 Needle Rollers—Needle rollers shall be through-
4. Classification
hardened to Rockwell HRC58 or equivalent, in accordance
with Test Methods E18.
4.1 This specification covers the following types of roller
bearings: 7.1.2 Rings—Rings shall be case hardened to surface hard-
ness of Rockwell HRC58-65 or equivalent, in accordance with
4.1.1 Type B—Open end roller bearings, and
4.1.2 Type M—Closed end roller bearings. Test Methods E18 with a 0.003 in. minimum case depth.
7.1.2.1 This case depth will not support Rockwell HR15N.
5. Ordering Information
Use of a standard file test in accordance with SAE J-864 or
microsection and microhardness test in accordance with Test
5.1 When ordering parts in accordance with this
Method E18 is required to determine the surface hardness.
specification, specify the following:
7.1.3 Shafts—Bearings are intended to be used with shafts
5.1.1 ASTM designation number, including year of issue,
hardened to Rockwell HRC58-65 in accordance with Test
5.1.2 Type, whether Type B or Type M roller bearings (see
Methods E18.
Section 4) are to be furnished,
7.1.3.1 When an open end bearing is used with an unhard-
5.1.3 Dash number (see Table 1),
ened shaft, the bearing shall be used in conjunction with an
inner bearing ring (Specification F2163).
7.2 Protective Coating:
7.2.1 Needle rollers and rings shall be furnished without
plating.
7.2.2 Manufacturer shall coat bearings with rust preventive
film.
7.3 Lubrication—Bearings shall be furnished without lubri-
cation.
7.4 Rollers shall be retained by the outer ring.
7.5 Bearings shall not be furnished with roller separators.
7.6 Oil holes shall be furnished in accordance with the
manufacturer’s standard practice.
8. Dimensions, Mass, and Permissible Variations
8.1 Products manufactured in accordance with this specifi-
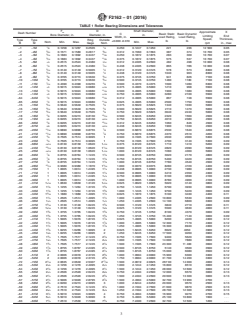
cation shall meet the requirements shown in Table 1.
8.2 Plug Gages—The “go” plug gage is the same size as the
minimum diameter under the needle rollers column in Table 1,
and the “no go” plug gage size is 0.0001 in. larger than the
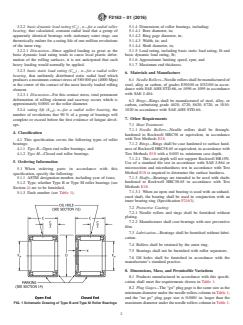
FIG. 1Schematic Drawing of Type B and Type M Roller Bearings maximum diameter under the needle rollers column in Table 1.
F2162−01 (2016)
TABLE 1 Roller Bearing Dimensions and Tolerances
F D Shaft Diameter,
w Approximate X
Dash Number
C Basic Static Basic Dynamic
Bore Diameter, in. Diameter, in. in.
Limiting End
Width, in. Load Rating, Load Rating,
Speed, Thickness,
Type Type Ring Outside
+0.000 -0.010 lb lb
Nom. Min. Max. Min. Max.
rpm in., max
B M Gage Nom.
1 1
–1 –1M ⁄8 0.1258 0.1267 0.2505 ⁄4 0.250 0.1247 0.1250 221 236 12 500 0.05
5 9
–2 –2M ⁄32 0.1571 0.1580 0.2817 ⁄32 0.312 0.1560 0.1563 387 374 10 700 0.05
3 11
–3 –3M ⁄16 0.1883 0.1892 0.3437 ⁄32 0.250 0.1872 0.1875 283 309 10 700 0.07
3 11
–4 –4M ⁄16 0.1883 0.1892 0.3437 ⁄32 0.375 0.1872 0.1875 575 537 10 700 0.07
1 7
–5 –5M ⁄4 0.2515 0.2524 0.4380 ⁄16 0.312 0.2495 0.2500 482 498 10 000 0.08
1 7
–6 –6M ⁄4 0.2515 0.2524 0.4380 ⁄16 0.438 0.2495 0.2500 865 786 10 000 0.08
5 1
–7 –7M ⁄16 0.3140 0.3149 0.5005 ⁄2 0.312 0.3120 0.3125 578 573 8300 0.08
5 1
–8 –8M ⁄16 0.3140 0.3149 0.5005 ⁄2 0.438 0.3120 0.3125 1040 903 8300 0.08
3 9
–9 –9M ⁄8 0.3765 0.3774 0.5630 ⁄16 0.375 0.3745 0.3750 941 826 7100 0.08
3 9
–10 –10M ⁄8 0.3765 0.3774 0.5630 ⁄16 0.500 0.3745 0.3750 1480 1180 7100 0.08
7 5
–11 –11M ⁄16 0.4390 0.4399 0.6255 ⁄8 0.500 0.4370 0.4375 1690 1280 6300 0.08
1 11
–12 –12M ⁄2 0.5015 0.5024 0.6880 ⁄16 0.375 0.4995 0.5000 1210 968 5500 0.08
1 11
–13 –13M ⁄2 0.5015 0.5024 0.6880 ⁄16 0.500 0.4995 0.5000 1900 1380 5500 0.08
1 11
–14 –14M ⁄2 0.5015 0.5024 0.6880 ⁄16 0.750 0.4995 0.5000 3280 2100 5500 0.08
1 11
–64 –64M
...


Questions, Comments and Discussion
Ask us and Technical Secretary will try to provide an answer. You can facilitate discussion about the standard in here.
Loading comments...