ASTM F2469-20
(Test Method)Standard Test Method for Measuring Optical Angular Deviation of Transparent Parts Using the Double-Exposure Method
Standard Test Method for Measuring Optical Angular Deviation of Transparent Parts Using the Double-Exposure Method
SIGNIFICANCE AND USE
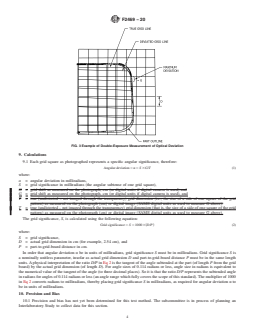
5.1 The optical angular deviation of flat transparent parts, such as aircraft windshields, canopies, cabin windows, and visors, can be measured using these methods. Angular deviation in a windscreen or visor can cause objects to appear at a location different from where they actually are. Variations in angular deviation can be used to characterize distortion and magnification in transparent parts. Also, angular deviation measurements made from the typical right and left eye positions for a windscreen or other transparent medium can be used to determine binocular disparity differences (see Test Method F1181).
SCOPE
1.1 This test method covers the measurement of the optical angular deviation of a light ray imposed by flat transparent parts such as a commercial or military aircraft windshield, canopy, or cabin window.
1.2 The values stated in SI units are to be regarded as standard. No other units of measurement are included in this standard.
1.2.1 Exceptions—The values given in parentheses are for information only. Also, print size is provided in inch-pound measurements.
1.3 This standard does not purport to address all of the safety concerns, if any, associated with its use. It is the responsibility of the user of this standard to establish appropriate safety, health, and environmental practices and determine the applicability of regulatory limitations prior to use.
1.4 This international standard was developed in accordance with internationally recognized principles on standardization established in the Decision on Principles for the Development of International Standards, Guides and Recommendations issued by the World Trade Organization Technical Barriers to Trade (TBT) Committee.
General Information
- Status
- Published
- Publication Date
- 30-Apr-2020
- Technical Committee
- F07 - Aerospace and Aircraft
- Drafting Committee
- F07.08 - Transparent Enclosures and Materials
Relations
- Effective Date
- 01-May-2020
- Effective Date
- 01-Nov-2019
- Effective Date
- 01-Nov-2019
- Effective Date
- 01-Dec-2014
- Refers
ASTM F1181-09(2014) - Standard Test Method for Measuring Binocular Disparity in Transparent Parts - Effective Date
- 01-Dec-2014
- Effective Date
- 15-May-2009
- Effective Date
- 15-May-2009
- Effective Date
- 01-Apr-2008
- Refers
ASTM F1181-96(2003) - Standard Test Method for Measuring Binocular Disparity in Transparent Parts - Effective Date
- 01-Oct-2003
- Effective Date
- 01-Oct-2003
- Effective Date
- 10-Nov-1996
- Refers
ASTM F801-96 - Standard Test Method for Measuring Optical Angular Deviation of Transparent Parts - Effective Date
- 10-Nov-1996
- Effective Date
- 01-Jan-1996
- Referred By
ASTM F790-23 - Standard Guide for Testing Materials for Aerospace Plastic Transparent Enclosures - Effective Date
- 01-May-2020
Overview
ASTM F2469-20 is an international standard developed by ASTM International, providing a test method for measuring the optical angular deviation of flat transparent parts such as aircraft windshields, canopies, cabin windows, and visors. Using the double-exposure method, this standard offers a systematic approach to quantify how transparent flat parts cause angular displacement of transmitted light, which can impact the perceived location of objects through the part. Understanding these deviations is critical to minimize visual distortion and ensure safety in aerospace and similar applications.
Key Topics
- Optical Angular Deviation: Measures the angular displacement of light rays as they pass through non-parallel surfaces of a transparent component, critical for assessing visual distortion and magnification.
- Double-Exposure Method: Involves photographing a grid board through the transparent part and then without it, allowing comparison to determine the degree of angular deviation.
- Test Equipment: Specifies requirements for grid boards (various types), low-reflectance test rooms, and camera setup, ensuring controlled and repeatable testing conditions.
- Calculation of Deviation: The standard details the measurement and calculation process for determining angular deviation in milliradians, using the observed grid shift and physical grid parameters.
- Applicable Units: The method is defined using SI units, with alternate measurements provided in inch-pound units for specific parameters such as print size.
- Safety and Compliance: Users must ensure adherence to relevant safety, health, and environmental requirements, as the standard does not specifically address these concerns.
Applications
ASTM F2469-20 is widely used in industries where optical clarity and minimal distortion of transparent parts are essential, particularly in:
- Aerospace: Qualification and routine testing of aircraft windshields, canopies, and cabin windows for military and commercial aviation to maintain pilot visibility and passenger safety.
- Automotive: Assessment of visors and transparent enclosures to ensure driver visibility and comfort.
- Other Transparent Components: Any field where transparent flat materials are used as visual barriers and where the distortion of viewed objects must be minimized.
This standard helps manufacturers, suppliers, and quality assurance professionals:
- Identify and quantify distortion and magnification in transparent parts.
- Ensure products meet required optical performance criteria.
- Evaluate binocular disparity by comparing right and left eye measurements, which is vital for human factor studies.
Related Standards
ASTM F2469-20 references and complements several other standards in the domain of transparent part evaluation:
- ASTM F733: Practice for Optical Distortion and Deviation of Transparent Parts Using the Double-Exposure Method.
- ASTM F801: Test Method for Measuring Optical Angular Deviation of Transparent Parts.
- ASTM F1181: Test Method for Measuring Binocular Disparity in Transparent Parts.
For accurate evaluation and testing, it is recommended to use ASTM F2469-20 alongside these related references, ensuring comprehensive assessment of optical properties in safety-critical transparent enclosures.
Keywords: ASTM F2469-20, optical angular deviation, double-exposure method, grid board, transparent parts, aircraft windshield, canopy, visor, optical distortion, transparency testing.
Buy Documents
ASTM F2469-20 - Standard Test Method for Measuring Optical Angular Deviation of Transparent Parts Using the Double-Exposure Method
REDLINE ASTM F2469-20 - Standard Test Method for Measuring Optical Angular Deviation of Transparent Parts Using the Double-Exposure Method
Get Certified
Connect with accredited certification bodies for this standard

BSMI (Bureau of Standards, Metrology and Inspection)
Taiwan's standards and inspection authority.
Sponsored listings
Frequently Asked Questions
ASTM F2469-20 is a standard published by ASTM International. Its full title is "Standard Test Method for Measuring Optical Angular Deviation of Transparent Parts Using the Double-Exposure Method". This standard covers: SIGNIFICANCE AND USE 5.1 The optical angular deviation of flat transparent parts, such as aircraft windshields, canopies, cabin windows, and visors, can be measured using these methods. Angular deviation in a windscreen or visor can cause objects to appear at a location different from where they actually are. Variations in angular deviation can be used to characterize distortion and magnification in transparent parts. Also, angular deviation measurements made from the typical right and left eye positions for a windscreen or other transparent medium can be used to determine binocular disparity differences (see Test Method F1181). SCOPE 1.1 This test method covers the measurement of the optical angular deviation of a light ray imposed by flat transparent parts such as a commercial or military aircraft windshield, canopy, or cabin window. 1.2 The values stated in SI units are to be regarded as standard. No other units of measurement are included in this standard. 1.2.1 Exceptions—The values given in parentheses are for information only. Also, print size is provided in inch-pound measurements. 1.3 This standard does not purport to address all of the safety concerns, if any, associated with its use. It is the responsibility of the user of this standard to establish appropriate safety, health, and environmental practices and determine the applicability of regulatory limitations prior to use. 1.4 This international standard was developed in accordance with internationally recognized principles on standardization established in the Decision on Principles for the Development of International Standards, Guides and Recommendations issued by the World Trade Organization Technical Barriers to Trade (TBT) Committee.
SIGNIFICANCE AND USE 5.1 The optical angular deviation of flat transparent parts, such as aircraft windshields, canopies, cabin windows, and visors, can be measured using these methods. Angular deviation in a windscreen or visor can cause objects to appear at a location different from where they actually are. Variations in angular deviation can be used to characterize distortion and magnification in transparent parts. Also, angular deviation measurements made from the typical right and left eye positions for a windscreen or other transparent medium can be used to determine binocular disparity differences (see Test Method F1181). SCOPE 1.1 This test method covers the measurement of the optical angular deviation of a light ray imposed by flat transparent parts such as a commercial or military aircraft windshield, canopy, or cabin window. 1.2 The values stated in SI units are to be regarded as standard. No other units of measurement are included in this standard. 1.2.1 Exceptions—The values given in parentheses are for information only. Also, print size is provided in inch-pound measurements. 1.3 This standard does not purport to address all of the safety concerns, if any, associated with its use. It is the responsibility of the user of this standard to establish appropriate safety, health, and environmental practices and determine the applicability of regulatory limitations prior to use. 1.4 This international standard was developed in accordance with internationally recognized principles on standardization established in the Decision on Principles for the Development of International Standards, Guides and Recommendations issued by the World Trade Organization Technical Barriers to Trade (TBT) Committee.
ASTM F2469-20 is classified under the following ICS (International Classification for Standards) categories: 17.180.20 - Colours and measurement of light. The ICS classification helps identify the subject area and facilitates finding related standards.
ASTM F2469-20 has the following relationships with other standards: It is inter standard links to ASTM F2469-15, ASTM F733-19, ASTM F1181-19, ASTM F733-09(2014), ASTM F1181-09(2014), ASTM F1181-09, ASTM F733-09, ASTM F801-96(2008), ASTM F1181-96(2003), ASTM F733-90(2003), ASTM F801-96(2002), ASTM F801-96, ASTM F1181-96, ASTM F790-23. Understanding these relationships helps ensure you are using the most current and applicable version of the standard.
ASTM F2469-20 is available in PDF format for immediate download after purchase. The document can be added to your cart and obtained through the secure checkout process. Digital delivery ensures instant access to the complete standard document.
Standards Content (Sample)
This international standard was developed in accordance with internationally recognized principles on standardization established in the Decision on Principles for the
Development of International Standards, Guides and Recommendations issued by the World Trade Organization Technical Barriers to Trade (TBT) Committee.
Designation: F2469 − 20
Standard Test Method for
Measuring Optical Angular Deviation of Transparent Parts
Using the Double-Exposure Method
This standard is issued under the fixed designation F2469; the number immediately following the designation indicates the year of
original adoption or, in the case of revision, the year of last revision. A number in parentheses indicates the year of last reapproval. A
superscript epsilon (´) indicates an editorial change since the last revision or reapproval.
1. Scope 3. Terminology
1.1 This test method covers the measurement of the optical 3.1 Definitions:
angular deviation of a light ray imposed by flat transparent
3.1.1 angular deviation, n—the angular displacement of a
parts such as a commercial or military aircraft windshield,
light ray from its original path caused by non-parallelism of
canopy, or cabin window.
opposite surfaces as it passes through a transparent material,
which is expressed in units of angle (degree, minutes of arc,
1.2 The values stated in SI units are to be regarded as
milliradians) and is a function of the angle of incidence at each
standard. No other units of measurement are included in this
surface of the material and the index of refraction of the
standard.
material.
1.2.1 Exceptions—The values given in parentheses are for
information only. Also, print size is provided in inch-pound
3.1.2 grid board, n—an optical evaluation tool used to
measurements.
detect the presence of distortion in transparent parts.
1.3 This standard does not purport to address all of the
3.1.2.1 Discussion—It is usually, but not always, a vertical
safety concerns, if any, associated with its use. It is the
rectangular backboard with horizontal and vertical intersecting
responsibility of the user of this standard to establish appro-
lines with maximum contrast between the white lines and the
priate safety, health, and environmental practices and deter-
black background.
mine the applicability of regulatory limitations prior to use.
1.4 This international standard was developed in accor-
4. Summary of Test Method
dance with internationally recognized principles on standard-
4.1 The flat transparent part is mounted at a specified
ization established in the Decision on Principles for the
Development of International Standards, Guides and Recom- distance from a grid board test pattern with its surface parallel
with the plane of the grid board test pattern.Acamera is placed
mendations issued by the World Trade Organization Technical
Barriers to Trade (TBT) Committee. so as to record a double exposure photograph of the grid
pattern as viewed through the transparency from a specified
viewing distance from the grid board test pattern. The image is
2. Referenced Documents
2 then measured to assess the level of optical deviation present.
2.1 ASTM Standards:
This method basically measures the amount of angular devia-
F733 Practice for Optical Distortion and Deviation of Trans-
tion present in a flat transparent part when viewing through it
parent Parts Using the Double-Exposure Method
perpendicular to its surface. The part to be measured must be
F801 Test Method for Measuring OpticalAngular Deviation
essentially flat and mounted such that its surface is perpendicu-
of Transparent Parts
lar to the camera axis. This is an alternate method to Test
F1181 Test Method for Measuring Binocular Disparity in
Method F801 and is essentially the same as the portion of
Transparent Parts
Practice F733 that deals with optical deviation.
5. Significance and Use
This test method is under the jurisdiction of ASTM Committee F07 on
Aerospace and Aircraft and is the direct responsibility of Subcommittee F07.08 on
5.1 The optical angular deviation of flat transparent parts,
Transparent Enclosures and Materials.
such as aircraft windshields, canopies, cabin windows, and
Current edition approved May 1, 2020. Published May 2020. Originally
visors, can be measured using these methods. Angular devia-
approved in 2005. Last previous edition approved in 2015 as F2469 – 15. DOI:
10.1520/F2469-20.
tion in a windscreen or visor can cause objects to appear at a
For referenced ASTM standards, visit the ASTM website, www.astm.org, or
location different from where they actually are. Variations in
contact ASTM Customer Service at service@astm.org. For Annual Book of ASTM
angular deviation can be used to characterize distortion and
Standards volume information, refer to the standard’s Document Summary page on
the ASTM website. magnification in transparent parts. Also, angular deviation
Copyright © ASTM International, 100 Barr Harbor Drive, PO Box C700, West Conshohocken, PA 19428-2959. United States
F2469 − 20
measurements made from the typical right and left eye posi- 6.2.2 Type 2—The grid board is a transparent sheet having
tions for a windscreen or other transparent medium can be used anopaque,flatblackoutersurfaceexceptforthegridlines.The
to determine binocular disparity differences (see Test Method grid lines remain transparent, and when backlit with fluores-
F1181). cent or incandescent lights, provide a bright grid pattern
against a black background with excellent contrast character-
6. Apparatus
istics.
6.2.3 Type 3—The grid board is a rigid sheet of material
6.1 Test Room—The test room must be large enough to
properly locate the required testing equipment. which has a grid pattern printed on the front surface. Details of
the grid lines, pattern, and lighting shall be as specified by the
6.1.1 The walls, ceiling, and floor shall have low reflec-
tance. A flat black paint or coating is preferred. procuring activity.
6.2.4 Type 4—The grid board shall have a width and height
6.2 Grid Board—The grid board provides a defined pattern
large enough so that the area of the part to be imaged can be
against which the transparent part is examined (see Fig. 1).
superimposed within the perimeter of the grid board. Details of
Grid boards are of the following types:
the grid square size shall be as specified by the procuring
6.2.1 Type 1—The grid board is composed of white strings
agency. The recommended grid line spacing is not less than
held taut, each spaced at a specific interval, with the strings
1.27 cm ( ⁄2 in.), or more than 2.54 cm (1 in.).
stretched vertically and horizontally. The grid board frame and
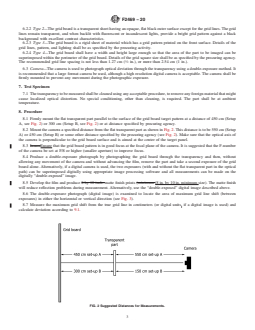
6.3 Camera—The camera is used to photograph optical
background shall have a flat black finish to reduce light
deviation through the transpare
...
This document is not an ASTM standard and is intended only to provide the user of an ASTM standard an indication of what changes have been made to the previous version. Because
it may not be technically possible to adequately depict all changes accurately, ASTM recommends that users consult prior editions as appropriate. In all cases only the current version
of the standard as published by ASTM is to be considered the official document.
Designation: F2469 − 15 F2469 − 20
Standard Test Method for
Measuring Optical Angular Deviation of Transparent Parts
Using the Double-Exposure Method
This standard is issued under the fixed designation F2469; the number immediately following the designation indicates the year of
original adoption or, in the case of revision, the year of last revision. A number in parentheses indicates the year of last reapproval. A
superscript epsilon (´) indicates an editorial change since the last revision or reapproval.
1. Scope
1.1 This test method covers the measurement of the optical angular deviation of a light ray imposed by flat transparent parts
such as a commercial or military aircraft windshield, canopy, or cabin window.
1.2 The values stated in SI units are to be regarded as standard. No other units of measurement are included in this standard.
1.2.1 Exceptions—The values given in parentheses are for information only. Also, print size is provided in inch-pound
measurements.
1.3 This standard does not purport to address all of the safety concerns, if any, associated with its use. It is the responsibility
of the user of this standard to establish appropriate safety safety, health, and healthenvironmental practices and determine the
applicability of regulatory limitations prior to use.
1.4 This international standard was developed in accordance with internationally recognized principles on standardization
established in the Decision on Principles for the Development of International Standards, Guides and Recommendations issued
by the World Trade Organization Technical Barriers to Trade (TBT) Committee.
2. Referenced Documents
2.1 ASTM Standards:
F733 Practice for Optical Distortion and Deviation of Transparent Parts Using the Double-Exposure Method
F801 Test Method for Measuring Optical Angular Deviation of Transparent Parts
F1181 Test Method for Measuring Binocular Disparity in Transparent Parts
F733 Practice for Optical Distortion and Deviation of Transparent Parts Using the Double-Exposure Method
3. Terminology
3.1 Definitions:
3.1.1 angular deviation—deviation, n—the angular displacement of a light ray from its original path caused by non-parallelism
of opposite surfaces as it passes through a transparent material, which is expressed in units of angle (degree, minutes of arc,
milliradians) and is a function of the angle of incidence at each surface of the material and the index of refraction of the material.
3.1.2 grid board—board, n—an optical evaluation tool used to detect the presence of distortion in transparent parts. It is usually,
but not always, a vertical rectangular backboard with horizontal and vertical intersecting lines with maximum contrast between the
white lines and the black background.
3.1.2.1 Discussion—
It is usually, but not always, a vertical rectangular backboard with horizontal and vertical intersecting lines with maximum contrast
between the white lines and the black background.
This test method is under the jurisdiction of ASTM Committee F07 on Aerospace and Aircraft and is the direct responsibility of Subcommittee F07.08 on Transparent
Enclosures and Materials.
Current edition approved Nov. 1, 2015May 1, 2020. Published November 2015May 2020. Originally approved in 2005. Last previous edition approved in 20102015 as
F2469 – 10.F2469 – 15. DOI: 10.1520/F2469-15.10.1520/F2469-20.
For referenced ASTM standards, visit the ASTM website, www.astm.org, or contact ASTM Customer Service at service@astm.org. For Annual Book of ASTM Standards
volume information, refer to the standard’s Document Summary page on the ASTM website.
Copyright © ASTM International, 100 Barr Harbor Drive, PO Box C700, West Conshohocken, PA 19428-2959. United States
F2469 − 20
4. Summary of Test Method
4.1 The flat transparent part is mounted at a specified distance from a grid board test pattern with its surface parallel with the
plane of the grid board test pattern. A camera is placed so as to record a double exposure photograph of the grid pattern as viewed
through the transparency from a specified viewing distance from the grid board test pattern. The image is then measured to assess
the level of optical deviation present. This method basically measures the amount of angular deviation present in a flat transparent
part when viewing through it perpendicular to its surface. The part to be measured must be essentially flat and mounted such that
its surface is perpendicular to the camera axis. This is an alternate method to Test Method F801 and is essentially the same as the
portion of Practice F733 that deals with optical deviation.
5. Significance and Use
5.1 The optical angular deviation of flat transparent parts, such as aircraft windshields, canopies, cabin windows, and visors,
can be measured using these methods. Angular deviation in a windscreen or visor can cause objects to appear at a location different
from where they actually are. Variations in angular deviation can be used to characterize distortion and magnification in transparent
parts. Also, angular deviation measurements made from the typical right and left eye positions for a windscreen or other transparent
medium can be used to determine binocular disparity differences (see Test Method F1181).
6. Apparatus
6.1 Test Room—The test room must be large enough to properly locate the required testing equipment.
6.1.1 The walls, ceiling, and floor shall have low reflectance. A flat black paint or coating is preferred.
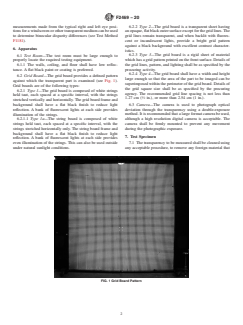
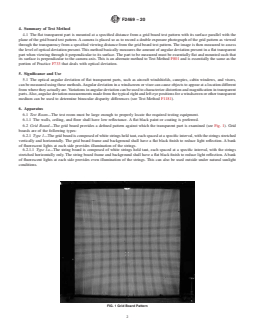
6.2 Grid Board—The grid board provides a defined pattern against which the transparent part is examined (see Fig. 1). Grid
boards are of the following types:
6.2.1 Type 1—The grid board is composed of white strings held taut, each spaced at a specific interval, with the strings stretched
vertically and horizontally. The grid board frame and background shall have a flat black finish to reduce light reflection. A bank
of fluorescent lights at each side provides illumination of the strings.
6.2.1.1 Type 1a—The string board is composed of white strings held taut, each spaced at a specific interval, with the strings
stretched horizontally only. The string board frame and background shall have a flat black finish to reduce light reflection. A bank
of fluorescent lights at each side provides even illumination of the strings. This can also be used outside under natural sunlight
conditions.
FIG. 1 Grid Board Pattern
F2469 − 20
6.2.2 Type 2—The grid board is a transparent sheet having an opaque, flat black outer surface except for the grid lines. The grid
lines remain transparent, and when backlit with fluorescent or incandescent lights, provide a bright grid pattern against a black
background with excellent contrast characteristics.
6.2.3 Type 3—The grid board is a rigid s
...

Questions, Comments and Discussion
Ask us and Technical Secretary will try to provide an answer. You can facilitate discussion about the standard in here.
Loading comments...