ASTM F1761-00
(Test Method)Standard Test Method for Pass Through Flux of Circular Magnetic Sputtering Targets
Standard Test Method for Pass Through Flux of Circular Magnetic Sputtering Targets
SCOPE
1.1 This specification covers measuring the DC magnetic field transmitted through a ferromagnetic sputtering target ("pass through flux" or "PTF").
1.2 Planar disk-shaped targets in the diameter range 5 to 8 in. inclusive (125 to 205 mm inclusive) and of thickness 0.1 to 0.5 in. inclusive (2.5 to 13 mm) may be characterized by this procedure.
1.3 This test method is also applicable to targets having an open center, for example, to targets 5-in. outside diameter by 2.5-in. inside diameter bu 0.25-in. thick (127-mm outside diameter by 63.5-mm inside diameter by 6.35-mm thick).
1.4 Targets of various diameters and thicknesses are accommodated by suitable fixturing to align the pieve under test with the source magnet mounted in the test fixture. Tooling, covering several popular target designs is specified in this procedure. Additional target configurations may be tested by providing special tooling. When special fixturing is used all parties concerned with the testing must agree to the test setup.
1.5 The values stated in inch-pound units are to be regarded as the standard. The values given in parentheses are for information only.
1.6 This standard does not purport to address all of the safety concerns, if any, associated with its use. It is the responsibility of the user of this standard to establish appropriate safety and health practices and determine the applicability of regulatory limitations prior to use.
General Information
Relations
Standards Content (Sample)
NOTICE: This standard has either been superseded and replaced by a new version or withdrawn.
Contact ASTM International (www.astm.org) for the latest information
Designation: F 1761 – 00
Standard Test Method for
Pass Through Flux of Circular Magnetic Sputtering Targets
This standard is issued under the fixed designation F 1761; the number immediately following the designation indicates the year of
original adoption or, in the case of revision, the year of last revision. A number in parentheses indicates the year of last reapproval. A
superscript epsilon (e) indicates an editorial change since the last revision or reapproval.
1. Scope 2.1.1.1 Discussion—PTF is also frequently called 88leakage
flux.”
1.1 This specification covers measuring the dc magnetic
2.1.2 reference field, n—For purposes of this standard the
field transmitted through a ferromagnetic sputtering target
“reference field” is the dc magnetic field measured with the
(“pass through flux” or “PTF”). In this test method the source
Hall probe Gaussmeter when no sputtering target is in position
magnetic field is in the test target’s circumferential direction.
on the test stand. The strength of the reference field depends
1.2 Planar disk-shaped targets in the diameter range 5 to 8
upon the height and position of the Hall probe relative to the
in. inclusive (125 to 205 mm inclusive) and of thickness 0.1 to
source magnet.
0.5 in. inclusive (2.5 to 13 mm) may be characterized by this
2.1.3 source field, n—For purposes of this standard the
procedure.
“source field” is the dc magnetic field measured with the Hall
1.3 This test method is also applicable to targets having an
probe at the top surface of the target support table.
open center, for example, to targets 5-in. outside diameter by
2.5-in. inside diameter by 0.25-in. thick (127-mm outside
3. Summary of Test Method
diameter by 63.5-mm inside diameter by 6.35-mm thick).
3.1 The sputtering target under test is mounted on a test
1.4 Targets of various diameters and thicknesses are accom-
fixture in which a permanent horseshoe-shaped magnet is held
modated by suitable fixturing to align the piece under test with
in proximity to one of the flat planar faces of the target.AHall
the source magnet mounted in the test fixture. Tooling, cover-
probe Gaussmeter is used to measure the dc magnetic field
ingseveralpopulartargetdesignsisspecifiedinthisprocedure.
penetrating the target and entering the air space from target’s
Additional target configurations may be tested by providing
opposite face.
special tooling. When special fixturing is used all parties
concerned with the testing must agree to the test setup.
4. Significance and Use
1.5 The values stated in inch-pound units are to be regarded
4.1 It is standard practice to use magnetron cathode sputter
as the standard. The values given in parentheses are for
deposition sources in manufacturing thin film magnetic data
information only.
storage media. But a ferromagnetic sputtering target tends to
1.6 This standard does not purport to address all of the
shunt a sputtering cathode’s magnetic field, thus reducing the
safety concerns, if any, associated with its use. It is the
efficiency of the sputtering process.
responsibility of the user of this standard to establish appro-
4.2 Makers of sputtering targets have developed various
priate safety and health practices and determine the applica-
means of controlling alloy microstructure to minimize the
bility of regulatory limitations prior to use.
undesirable cathode shunting effect. Because of their differing
2. Terminology manufacturing methods, however, the targets of one supplier
mayhavemagneticpropertiessignificantlybetterorworsethan
2.1 Definitions:
those of another, even when the alloy compositions are the
2.1.1 pass through flux (PTF), (n)—For purposes of this
same.
standard the 88pass through flux” is the dc magnetic field
4.3 This test method permits comparing the magnetic shunt-
transmittedthroughaferromagneticsputteringtarget,fromone
ing power of magnetic targets under a standard test condition.
face to the opposite face.
The results are useful to sputtering target suppliers and buyers
in predicting target performance, in specifying target quality,
andinqualifyingincomingtargetshipments.Thistestmayalso
This test method is under the jurisdiction of ASTM Committee F01 on
be useful in quantifying target improvement efforts.
Electronics and is the direct responsibility of Subcommittee F01.17 on Sputtered
4.4 Manufacturing process steps that lower a target materi-
Thin Films.
al’s magnetic permeability tend to increase the PTF, and vice
Current edition approved June 10, 2000. Published August 2000. Originally
published as F 1761 – 96. Last previous edition F 1761 – 96. versa. It would in principle be possible to predict the PTF by
Copyright © ASTM International, 100 Barr Harbor Drive, PO Box C700, West Conshohocken, PA 19428-2959, United States.
F 1761 – 00
accumulating sufficient permeability data, and knowing the shims under the magnet, and retightening the clamp screws.
target thickness and the field intensity of the magnetic assem- Recheck magnet location, in accordance with 7.1, if shims are
bly used for magnetron sputtering. adjusted.
7.3 Activate, zero, and calibrate the measuring Gaussmeter
5. Interferences (6.2) using the manufacturer’s instructions.
7.4 Mount the Gaussmeter probe in the fixture’s Hall probe
5.1 The magnetic test fixture must be located in an area free
support tube. The bottom tip of the probe should extend 0.050
of extraneous ferromagnetic materials and strong magnetic
6 0.025 in. (1.25 6 0.64 mm) beyond the support tube.
fields that would interfere with the source magnet—test speci-
Mounted properly, the probe tip will be clearly visible, sticking
men dc magnetic-field configuration.
out of its support. Gently tighten the nylon clamping screws to
5.2 The “magnetic conditioning” effect is strong in some
secure and center the Hall probe blade in position in the probe
sputtering target alloys. It is important to verify that the target
support tube. Excessive tightening may result in damage to the
under test is magnetically stabilized before finalizing a data set
probe that can affect test results.
(see 9.2).
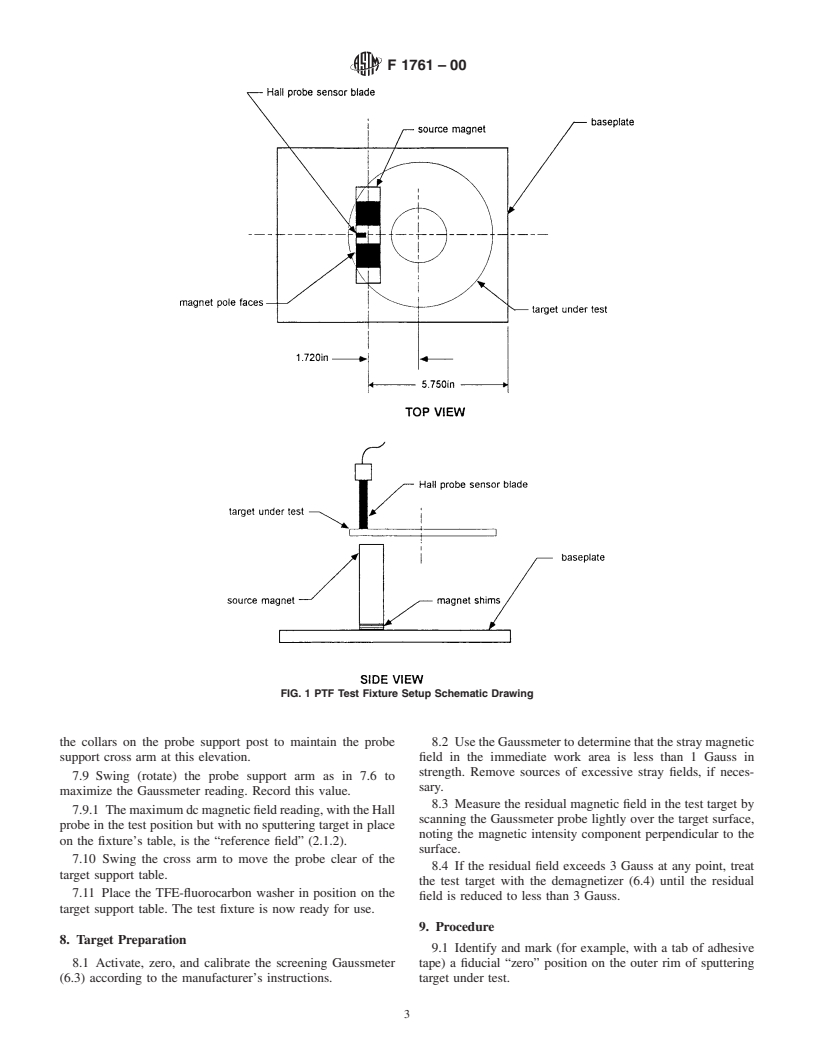
7.5 By visual sighting, align the Hall probe as indicated in
Fig.1,butwiththeprobetipclosetobutnottouchingthetarget
6. Apparatus
support table. The Hall probe should be roughly centered
6.1 This method requires the use of a special test fixture. Its
between the magnet poles, and the flats of the probe blade
construction is specified in Appendix X1.
should be parallel to the fixture’s long dimension. Note that the
6.2 Gaussmeter, is required, equipped with a portable
outer vertical edge of the probe blade is aligned with the side
transverse-field Hall probe blade nominally 0.040-in. thick by
of the magnet, illustrated in Fig. 1. Loosen the post attachment
0.170-in. wide by 2.5-in. long (1.0-mm by 4.3-mm by 64 mm).
screw at the baseplate and adjust the Hall probe post position,
The Gaussmeter must be capable of measuring dc magnetic
if necessary, to achieve the correct location.
fields in the range 10 Gauss to 3500 Gauss, inclusive, to an
7.5.1 To make the adjustments indicated in this and subse-
accuracy of 62 %. This unit is designated the “measuring
quent paragraphs, it may be necessary to loosen and retighten
Gaussmeter,” and is used for making the magnetic field
the collars on the Hall probe support post and the appropriate
measurements specified in this test method.
nylon clamping screws, which secure other parts of the
6.2.1 It is important that the semiconductor Hall probe
apparatus.
sensing element be mounted at the extreme tip end of the
7.6 Lower the support arm until the Hall probe blade tip is
probe. The distance from the probe tip to the center of the
in bare (light) contact with the target support table. Note the
sensing element must not exceed 0.030 in. (0.75 mm).
Gaussmeter reading. Swing (rotate) the cross arm to center the
6.3 It is convenient to have a second Gaussmeter available,
probe blade between the magnetic poles, and slightly rotate the
alsoequippedwithaportabletransverse-fieldHallprobeblade.
probe support tube, as necessary, to maximize the Gaussmeter
This unit must be capable of measuring dc magnetic fields in
readings.TheproperpositionisachievedwhentheGaussmeter
the range 1 Gauss to 50 Gauss, inclusive, to an accuracy of
reading indicates a clear maximum in the magnetic field
620 %. This unit is referred to in 8.1 as the “screening
strength.
Gaussmeter.” It is used to monitor residual magnetic fields in
NOTE 2—If a clear maximum cannot be identified, the Hall probe blade
test specimen sputtering targets.
is not adequately centered in the probe support tube (see 7.4), or the blade
NOTE 1—If a “screening Gaussmeter” is not available, the targets under
is not in correct transverse alignment (7.6), Repeat 7.4 or 7.6 as required,
testmustbedegaussedandverified(8.3)usingthemeasuringGaussmeter,
to provide a discernible maximum point in 7.6.
before starting Section 7.
7.6.1 The maximum Gaussmeter reading at the target sup-
6.4 Demagnetizer , is needed that is capable of removing
port table (7.6) is the “source field” (2.1.3).
the remnant magnetization in sputtering targets to be tested.
NOTE 3—Measuring and recording (preferably using an SPC control
chart) the source field provides important information about the stability
7. Preparation of Apparatus
of the measuring system. A significant deviation in source field strength
7.1 Verify that the source magnet is securely clamped with
may indicate a problem with the Hall probe, or a change in the operating
its vertical center plane located 5.750 6 0.015 in. (146.1 6 0.4
environment that may influence the test results.
mm) from the end of the baseplate. This is illustrated in Fig. 1.
7.7 The source field (7.6.1) must be in the range 825 6 50
7.2 Verify that the pole faces of the source magnet are in
Gauss.
light contact with the bottom of the target support table.
7.7.1 If the dc magnetic field is not in the required range
Adjustment of the magnet’s vertical position can be made by
(7.7) the Hall probe should be inspected and replaced if any
loosening the magnet clamp screws, inserting nonmagnetic
evidence of damage is observed. If there are no indications of
probe damage the measurement of the source field (7.2-7.6)
should be repeated, as needed, until the requirement of 7.7 is
satisfied.
The sole source of supply of the demagnetizer, 60-Hz hand held coil known to
thecommitteeatthistimeisRealisticHighPowerVideo/AudioTapeEraser,catalog
7.8 Lift the probe support cross arm to a position in which
number44-233AfromRadioShack.Ifyouareawareofalternativesuppliers,
...


Questions, Comments and Discussion
Ask us and Technical Secretary will try to provide an answer. You can facilitate discussion about the standard in here.